The attractiveness of ceramic tiles as a modern wall finishing material is difficult to dispute. Among the countless options, you can choose the optimal one that fits perfectly into the design concept of your room (what can you use to decorate the walls in the bathroom except tiles). At the same time, the issue of wall decoration will be closed for many years to come, even decades - the service life of the tiles is one of the obvious advantages of its use. However, this is only true if the installation is done correctly. The question arises: should we start a tedious search for a master whose hands grow from the right place, or should we try to delve into the process ourselves and master these simple manipulations? The correct technology for laying tiles on a wall is not as scary and complicated as it seems at first. Yes, it's quite tedious. And yes, when laying it you will have to be extremely careful and attentive to any little details. But the reward for your efforts will be beautifully laid tiles, a harmonious interior and a feeling of deep satisfaction from the final result.
- What you will need. List of required materials and tools;
- Surface preparation;
- Inspection of tiles;
- How and with what to cut tiles;
- Laying process;
- Rubbing seams;
- What you should get;
- Conclusion.
What you will need. List of required materials and tools
The key to successful installation is not only the meticulous alignment of the tile fragments relative to each other. Of course, a lot also depends on the quality of preparation of the wall base. Therefore, we have also included in the recommended list of all necessary tools and materials those items that will help you achieve the ideal surface.
Tools
- chisel;
- sponge;
- brush;
- chisel;
- level;
- construction mixer with whisk;
- glue container;
- Master OK;
- tile cutter;
- spatula (notched);
- hammer (rubber);
- ceramic tile;
- crosses.
Materials
- primer;
- plaster or putty;
- tile adhesive;
- fugue.
Tools to get started
Before laying tiles on the floor, make sure you have everything you need:
- building level,
- pencil and tape measure,
- roller and brush,
- 10cm spatula and rubber spatula for rubbing joints,
- comb,
- mixer and glue bucket.
From the material we will need:
- the tile itself,
- tile adhesive,
- dividing crosses,
- primer,
- grout (fugue)
Surface preparation
Any surface preparation for the subsequent application of ceramic tiles traditionally includes 3 main stages:
- removal of old finishes;
- leveling walls;
- padding.
No matter how tedious it may be at times to get rid of old material, doing so is your sacred duty. If you are dealing with wallpaper, carefully scrape off all the fragments, trying to end up with a perfectly clean wall. Try not to damage the concrete base - the pieces scraped out of it will need to be compensated for later with plaster, otherwise it will not be possible to achieve a flat surface. After the last fragment of the old finish is safely in the waste bin, pay attention to the wall surface itself:
- are there any cracks, fungus or mold;
- what defects are present;
- Are there any irregularities?
If any of the above comes into your field of vision, you will have to deal with it (read about how to get rid of fungus on the walls in an apartment).
With cracks
- make their diameter larger by driving a chisel with a hammer;
- treat them with a deep penetration primer;
- seal with plaster;
- re-prime.
With fungus and mold
- treatment with a special chemical agent or one of the well-known “folk” ones (hydrogen peroxide, vinegar, borax, etc.);
- thoroughly dry the wall;
- primer treatment with antiseptic components.
With unevenness
- if irregularities of more than 1 centimeter
,
plaster
the entire wall surface, and on top - reinforcement with a metal mesh to improve the adhesion of the tiles to the wall; - if irregularities of less than 1 centimeter
,
priming is required
, and tile adhesive, due to the difference in layers, will help correct minor defects.
After successfully overcoming all the problems with the base, all that remains is to mix the glue. It is best to use a construction mixer with a whisk attachment for this. Then you will be able to prepare a mixture of ideal consistency.
Alignment of walls
Tiles can only be laid on flat walls, otherwise problems may arise. The tile may fall off; on elements with decor, the differences will be especially noticeable.
How to detect irregularities
The wall may visually look smooth, because of this, the alignment is not done and they immediately begin laying the tiles. In fact, this effect is deceptive; even small deviations (more than 5 mm) after cladding will be noticeable.
To identify deviations in the walls, you should pay attention to a number of points.
- The angles should be right or close to 90 degrees; deviations will complicate the laying of tiles on the floor, and the number of tile trims will increase.
- Checking with a plumb line allows you to hit the vertical. If the wall has deviations towards the bottom along this axis, then the load on the rope will hang at a distance from the surface.
- Applying a long bubble level is one of the fastest ways to check. If the entire sole of the tool does not rest on the base, it means that the wall has deviations.
Defects
Sometimes the wall has a flat plane without deviations, but there are local damages on it. Before installation, all these flaws must be eliminated. Defects are often related to the quality of the substrate.
- The brickwork needs to be plastered before gluing the tiles. Particular attention should be paid to the seams: mortar leaks, breaks and blots must be eliminated.
- Concrete is characterized by sagging and should be knocked down before leveling.
- If the wall is already lined with old tiles , then in most cases it is recommended to remove it, but laying it on it is allowed.
- In old plaster you need to cover up the cracks and tap it to reveal voids.
You can read about sealing cracks in walls in a separate article.
Is it worth removing the old coating?
Dismantling plaster or tiles takes a lot of time, and you also have to solve the problem of removing construction waste. Often, owners decide to lay tiles over the old finish, but there is a danger that both layers will fall off.
To solve this issue, you should be guided by a simple construction rule: in multilayer structures, adhesion should decrease closer to the outer material. If the outer layer has high tear strength, then it is likely that it will fall along with the base.
In some cases, materials with high adhesion (cement-sand mortar) lose adhesion to the wall due to a violation of the technology. In this case, an air gap is formed between different materials. When tapping, the sound of surfaces with cavities is different; in this case, builders say that the plaster “boils” - the adhesion of the material has decreased. If you glue a tile to such a surface, the glue will tear off the base.
If the wall is painted with oil paint, then the strength of its adhesion to the tiles should be strengthened. Usually, in this case, the entire base is not dismantled, but notches are made on it with an ax or other durable steel tool.
How to level the walls?
In some cases, they try to smooth out wall unevenness by increasing the layer of tile adhesive. This is acceptable if we are talking about small differences (2 - 4 mm). The disadvantage is that tile adhesive is more expensive than plaster, and thickening the layer leads to poor adhesion. Let's look at the main alignment methods.
The plaster is suitable for brick, gas block and concrete walls. If the differences in the walls are more than 50 mm, then leveling with plaster is considered inappropriate from an economic point of view.
Read more about leveling walls with plaster in the article
Leveling with plasterboard involves constructing a frame. In this case, each wall takes 5-7 mm from the space of the room. In the bathroom you can only use moisture-resistant plasterboard; you can also use gypsum plasterboard or aqualist cladding.
When can I start laying tiles?
After completing the plastering work, you need to wait until the solution gains strength. This usually takes from one to three weeks. It all depends on the temperature and humidity level in the room. The most optimal temperature is 20 degrees; lowering it slows down the hardening.
It is not recommended to force the process using a heat gun or directed light. Uneven drying leads to cracks.
Read about mistakes when plastering walls.
Tile inspection
Of course, if laying tiles on a wall is new to you, there are some things you may want to skip. One of the most common mistakes made by beginners is ignoring the inspection of the tiles. Therefore, carefully read the recommendations below and learn better from the mistakes of others, saving time, money and your nerves:
- make sure that the front part has a flat surface
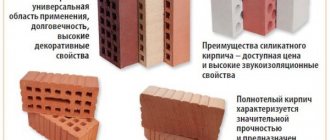
- according to state standards, a deviation to the side of no more than 3 mm is allowed, but it will be very difficult for a person who has not previously dealt with tiles to cope with such a discrepancy; - check whether the corners are even
- if the tiles are as close to the perfect 90 degrees as the Moon, then it is best to look for alternative options - even experienced tilers do not accept such discrepancies, since the end result is very blurry, with clearly visible defects; - determine whether the tile fragments have the same thickness, height and length
- most often, in order for all these parameters to match, you just need to purchase tiles from one batch; information about it can be found on the box or inquired at the store where you purchase the material.
Where to start laying tiles
How to lay tiles on the floor correctly? Based on the selected type of layout, the floor is marked. Starting to lay the floor away from the wall is very risky. It is best to do this from the most visible area. Therefore, the reference lines are most often placed closer to the center of the room. The first support line is drawn along the room. In order to do this, you need to measure the distance between the walls and mark the connecting points. After which the points are connected with a coated cord. Then a second line is drawn perpendicular to the first, and also approximately in the middle of the room.
Don’t be too lazy to make a test laying of these two rows without using mortar. This way you can evaluate the future picture by eye and finally decide on the type of tile installation.
How and with what to cut tiles
No matter how hard you try, you still can’t do without trimming elements. The number of manipulations associated with trimming can be minimized by selecting ceramic tiles of a certain size for the room in which tiling is planned. For example, if your wall is exactly 3 meters long, then a tile with a length of 50 centimeters will fit perfectly. Of course, it is not always possible to find tiles on sale that meet all the parameters; in this case, you can always use tools for cutting tiles. Perhaps the best of them is a manual tile cutter
.
As for other ways to cut the desired fragment, neither a grinder nor a glass cutter with wire cutters will give you the required evenness. There is still an electric option for a manual glass cutter, but its cost often exceeds the cost of your repair. Do you need this?
Differences from laying tiles in a toilet, bathroom, hallway, kitchen
If it is not necessary to apply a waterproofing layer in the hallway and kitchen, then in the bathroom and toilet you cannot do without it. The waterproofing layer will protect you from accidental flooding of your neighbors living below.
Waterproofing can be carried out in several ways:
- Pasting. Roofing felt or polyethylene film is glued to the base.
- Coating. The previously prepared floor surface is coated with a special liquid composition.
- Coloring. The floor is covered with special paint, and the walls of the room can also be treated.
Only after the waterproofing layer has completely dried do they proceed to further manipulations.
Laying process
The installation technology itself, if you look at it this way, is extremely simple. However, for the first time, some points may seem ambiguous, and slight excitement and responsibility for the result may prevent you from completing the task adequately.
in this case it is necessary. It should reflect the complete layout of the tiles, taking into account the trimming of all elements. All that remains to be done is to carefully transfer the plan onto the wall. Many specialty tile stores will complete these projects on site based on the size of your space. At the same time, designers take into account the wishes of clients regarding the placement of decorative elements.
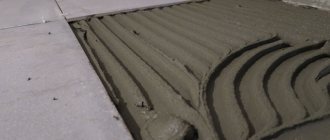
- apply the prepared mixture to the wall, about 2 rows from the bottom;
- level the layer with a notched trowel;
- take the tile and lean it against the wall, pressing lightly;
- lay one row - and immediately check with a level whether the tiles lie evenly, whether they stick out or are too recessed in some areas;
- please note: it is not the last row from the floor that needs to be laid, but the second - the last, the lowest one, will be laid at the end of the work;
- in order to maintain even seams between the tiles, use crosses of a given width, but do not forget to remove them after gluing;
- if the tile sticks out, tap it with a rubber hammer so that it goes deeper into the adhesive layer;
- If the tile is too recessed, then it is best to remove the fragment and re-glue it.
Place the trimmed fragments on the wall at the last moment - this way you can avoid mistakes in trimming
, which we talked about a little higher. Finally, the tiles should be laid on the last row from the floor. This sequence is due to the fact that this way you hide the trimming, achieving a better visual effect.
If the room is large, then laying tiles on the wall will take quite a long time, up to several days.
Video that will help.
Preparatory work
The surface for cladding should be as smooth as possible. For these purposes, the floor is equipped with a screed or a self-leveling floor is made. The first option requires more practice, but is suitable for leveling floors with significant slopes. Self-leveling flooring will be a little more expensive, but it does not require any special skill or skill.
A thorough inspection is carried out on the concrete base where the tiles are going to be laid. To avoid unstable areas, every centimeter of the floor is tapped. The level checks horizontalness. If the differences do not exceed 3 cm, the coating is quite suitable. If the conditions are not met, then pouring the screed cannot be avoided. The surface must not contain paint, parts of old coating or traces of petroleum products. Detected areas of crushed concrete or deep oiling are removed down to the “healthy surface”.
Wide cracks are cut to a width of up to 15 cm. All tubercles and protrusions must be removed, since the evenness of the tile laying depends on this. The surface is dust-free, and the areas to be filled with the repair compound are primed.
You can consider the option of a classic cement-sand mixture in proportions 1:3. This mixture will take quite a long time to dry. Cement-based tile adhesive can be used as a repair composition, but such a solution will only be reasonable for small defects; otherwise, a lot of it will be needed.
All cracks and potholes are sealed with mortar and leveled with the general surface. The point of leveling is not so much to accurately smooth the mortar, but to fill cracks and crevices as much as possible.
After the repair composition has hardened, the surface is primed in two layers, with each layer required to dry. This is done to ensure excellent adhesion and surface hardening.
But there are situations when, when repairing a small section of the screed, further delamination is observed, the so-called “avalanche-like process” occurs. In this case, remove all the old screed up to the floor slab and pour in a new one, about 300 mm thick. After hardening, the screed is primed.
Rubbing seams
Once the tiles are laid, it's time to do the post-operations. So, after the tiles have dried well, the seams should be treated with a fugue. It is also called grout
. This procedure is very dirty and causes discomfort, but is required:
- protects seams from moisture;
- highlights the beauty of ceramic tiles.
Nowadays, there are enough grouts in a variety of shades and various decorative effects - you can match them to the tone of your tiles and significantly enhance the impression of installation. At the same time, it would be useful to know some secrets of successful jointing:
- do not rush to dilute the entire package of grout at once - the mixture hardens much faster than you can successfully handle the seams, and it is unlikely that you will be able to use already hardened lumps;
- In order to carry out the jointing process correctly, use a spatula - use it to apply the jointer into the seams, and the jointing should be done with a piece of cable.
We also recommend that you read the article for instructions on drilling tiles on a wall.
Important Note:
for wet rooms, use grout
with a water-repellent effect
.
Not every fugue can boast of the corresponding components in its composition, so pay attention to the specifications indicated on the packaging. Ceresit
brand have proven themselves to be excellent in various conditions . Take a look at the color palette this class=”aligncenter” width=”559″ height=”800″|fcw3qayjh5a| src=»https://stenaprofi.ru/uploads/posts/2018-01/medium/1516016170_1443607206-1418230607-13854516712-100008474.jpg» class=»aligncenter» width=»800″ height=»800″|fcw3qay jh5a| src=»https://stenaprofi.ru/uploads/posts/2018-01/medium/1516016172_c3d83d9b370c354c74572e353838fb406.jpg» class=»aligncenter» width=»800″ height=»800″|fcw3qayjh5a| src=»https://stenaprofi.ru/uploads/posts/2018-01/medium/1516016253_771146-851007.jpg» class=»aligncenter» width=»800″ height=»600″[/img]
Can tiles be laid on a wooden base?
The tree does not tolerate unstable temperatures, constantly changing its size. It is not difficult to imagine what will happen to the ceramic tiles: the ceramics will begin to crack and move away from the base. However, there are times when it is vital to install tiles on a wood floor. In such cases, you have to make exceptions and painstakingly prepare the foundation, shelling out a lot of money for materials. You can create a strong and level base that will be suitable for ceramics by choosing a wet or dry leveling method.