Formwork - types of concrete boundaries
There are several types of formwork used in construction as a strong and reliable foundation for concrete (or reinforced concrete) structures:
- Horizontal formworks are used for the construction of floor slabs, have considerable thickness and are necessarily reinforced with steel rods;
- Vertical formworks are used in the construction of thin but strong walls of non-standard configuration;
- Inclined and architectural formworks serve as a means of design expression when creating unique concrete structures.
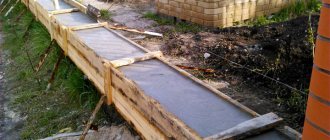
Fence formwork is characterized by the greatest ease of manufacture and smallest dimensions among all other “concrete boundaries” . If you have minimal carpentry skills, it’s easy to do it yourself, which is especially important when building a fence.
The fact is that a typical fence is a rather long structure and at the same time of the same type. There is no need to spend a lot of effort to arrange the entire formwork line at once - you can and should prepare the pouring in separate sections. When it is possible to remove the formwork without compromising the strength of fresh concrete, the removed boards are reassembled at another location. This way you can significantly save on raw materials when making homemade formwork. And installation of ready-made structures in a new location is easier and faster.
Expert advice
To make building a fence easier, it is recommended to follow a few tips that can make the process a little easier:
- You need to make sure that there are no protruding nails inside the foundation formwork. Otherwise, problems may arise with dismantling the shields;
- It is not recommended to carry out work on pouring the foundation in hot weather, as a lot of moisture will evaporate from the concrete;
- If it is not possible to postpone the work to another day, then you need to sprinkle the surface with wood shavings, which will prevent the evaporation of moisture;
- All stages of work must be performed sequentially, without haste.
Following these recommendations will help make a foundation for the fence with high strength. If, before performing the installation, you carefully study the theory and use the recommendations of experts, in the end, you can build the formwork yourself, and the foundation can last for more than one year.
DIY fence formwork: choosing material
Typically, the material for making “fence” formwork is boards. Chipboard and fiberboard boards are not suitable for this purpose, due to their swelling under the influence of moisture. Particle boards can be used in small formwork structures, but only once, after dismantling they will have to be thrown away. Of course, very high-quality and even formwork is obtained from special steel plates, but they are not produced for fences; metal formworks are used when pouring floor slabs, bridges, overpasses and other critical structures during capital construction.
Any formwork for concrete pouring must meet the following requirements:
- Precise and tight fit of boards to each other;
- Margin of safety - the weight of even a small concrete structure is very large, the boards must withstand the mass of concrete without deflection or deformation;
- Possibility of easy dismantling without serious damage to the integrity of the boards.
If, after each “move” to a new installation site, the formwork requires lengthy restoration, it means that it was assembled incorrectly or dismantled irresponsibly. A high-quality formwork structure can easily withstand dozens of movements along the line of the future fence.
The formwork is assembled from strong and dry boards with a thickness of 20 mm, without cracks, large knots, rottenness and other obvious defects. Standard shields with approximate dimensions of 100-200 cm in length to 50-60 cm in height are knocked together from boards. Each shield has several rear mounting strips. The nails are driven into the front (concrete) part of the formwork and bent on the opposite side onto the fastening strips.
The specialists of the site REMOSKOP.RU have prepared a special calculator for you : Formwork calculator . You can easily calculate the formwork.
In addition, you will need external reinforcement bars with a cross-section of 50x50 mm and a length of at least a meter. To join narrow gaps between panels, it is permissible to use sheets of durable multi-layer plywood. The same plywood will be required for the visible (top) part of the fill.
Advantages and disadvantages
What speaks in favor of reinforced concrete supports is that they:
- Durable. In terms of service life they are not inferior to metal or brick.
- Resistant to temperature changes, moisture, ultraviolet radiation, and corrosion.
- Durable. Such pillars can withstand heavy loads.
- During operation they do not require special care.
- Easy to install. This allows people with no experience to take on construction.
- They can be decorated with decorative elements made of stone, tiles and have many painting options.
- It is convenient to hide wiring in prefabricated concrete pillars and attach lights on top for better illumination of the area.
Disadvantages:
- If you make it yourself, you will need to prepare reliable formwork or molds for pouring.
- Monolithic supports weigh a lot, which forces them to build a massive foundation.
- Homemade pillars harden for about a month, which extends the construction time.
- If the elements are poured not at the installation site, then special equipment will have to be used to move them.
Despite the disadvantages, concrete supports are often installed for fences of varying complexity, and the result is reliable and beautiful structures.
How to make formwork for a fence - step-by-step diagram
Step 1: Marking
The importance of this stage of “fence construction” is often underestimated.
The future fence is drawn on the ground with a slight movement of a tarpaulin boot, after which the digging of a trench, knocking together of formwork and mixing of concrete mixture begins - the desire to advance towards the construction goal runs ahead of sanity. First you need to completely mark the entire perimeter of the future fence. Surely, its length will be tens (or even hundreds) of meters. There may be stumps and other heavy “surprises”, ditches and other utilities. It is better to go around the obstacle than to heroically uproot stumps and drill tunnels for drainage in the path of the future fence. It is likely that there will be a significant difference in height along the fence line. If at the starting point the deepening of the formwork into the ground is 15 cm, then on the other side of the site it is quite possible to reach a pouring depth of half a meter. Or vice versa - all this should be taken into account at the marking stage, before installing the first limiting panel of our formwork.
Step 2: Digger
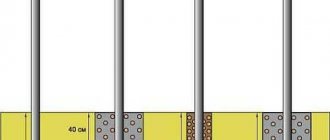
The ditch for the fence is dug with a significant margin of width. For example, if the thickness of the fill is determined to be 30 cm, then the width of the ditch should be 50-60 cm. This is due to the need to fasten the panels with side bars, which are dug into the ground 30-40 cm deeper than the formwork panels. Like marking, soil excavation is carried out along the entire line of the future fence. The total depth of excavation work should be 10-15 cm greater than the buried part of the formwork. As we remember, concrete cannot be poured directly onto the soil layer; a gravel-sand cushion under the concrete layer will be required.
Step 3: Installing Vertical Bars
Inside the ditch, along its edges, a double row of holes is dug for bars with a cross-section of 50x50 mm. It is permissible to loosen the soil a little with a shovel and drive in the bars with proper strength and strictly vertically. The distance between improvised piles should be 100 cm when pouring 30 cm wide, 120-130 cm when the foundation is 20 cm thick, etc. The upper part of the bars should protrude significantly above the dug ditch. For example, if the visible part of the fill is 20 cm, then the bars should rise above it by 20-25 cm. This will be required for further fastening of the formwork, for its rigidity and strength.
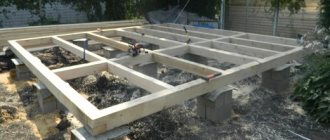
Step 4: Installation of panels and plywood
A double line of wooden panels is assembled along the exposed vertical bars.
It is very important that they are positioned strictly vertically and at the same distance from each other. It may be necessary to adjust the position of the supporting bars for the required accuracy of the position of the shields. When all the existing shields are mounted vertically in the ditch, gravel with a layer of 5-7 cm and sand of a similar thickness are poured onto its bottom. This creates the necessary “cushion” for concrete pouring and further strengthens the formwork panels. The vertical bars are securely fastened together using horizontal strips. Be sure to use long self-tapping screws, not forgetting to control the accuracy of the formwork panels when fastening. Once the opposing formwork panels are connected into a single structure, they can be reinforced with earth or gravel on the outside of the ditch.
Step 5: Installing Plywood
All that remains is to install the cut plywood sheets between the boards and the poured sand. The width of the plywood corresponds to the depth of the pour; it is enough to push it tightly into the gap between the sand and the boards. Under the weight of the concrete, the plywood sheet will press against the wood and give the entire pour the necessary smoothness. Install the necessary reinforcement elements between the formwork boards - to strengthen the concrete or fasten the fence structure. Now you can start pouring concrete into the finished tape “container”.
Step 6: Linear Continuation
Dismantling the formwork after the concrete mixture has hardened is performed in the reverse order. First, the horizontal planks between the bars are removed, then the vertical piles are pulled out, and then the formwork panels are moved to the edge of the ditch. Lastly, the plywood inserts are removed. All parts of our formwork constructor are transferred to a new place - and the work is repeated, starting from step No. 3.
- Author: Mikhail Malofeev
Rate this article:
- 5
- 4
- 3
- 2
- 1
(1 vote, average: 4 out of 5)
Share with your friends!
Types
The following shapes are available for sale:
- triangular;
- square;
- multifaceted;
- round.
Photo: support with a groove 2900x140x140 made of reinforced concrete.
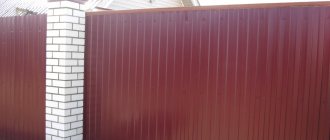
They also differ in the way they are attached to the fence sections:
- With longitudinal grooves. Used for monolithic structures.
- With metal loops. Universal fastener. Suitable for both forged spans and those made of corrugated sheets, siding or polycarbonate.
- With mortgages made of wooden blocks. Used for sections made of picket fence, unedged or edged boards.
According to the manufacturing method and structure, they are also divided into several types. Let's look at each of them in more detail.
Whole
A solid reinforced concrete column is poured independently or purchased ready-made and installed with special equipment.
To make a solid support with your own hands, you will need to build a foundation, create vertical formwork, insert a reinforced frame inside and fill it with concrete mortar.
An alternative is to prepare the forms for pouring and fill them horizontally, but this will complicate the delivery and installation of supports to the construction site.
Photo: fencing the territory of a medical institution
Among the advantages of solid pillars:
- strength;
- long service life;
- ability to withstand high loads;
- lower price than stacked supports.
Of the minuses:
- labor intensity of the process;
- long hardening period (up to a month);
- heavy weight of elements.
Photo: the foundation and fence posts are made of monolithic concrete
When making solid pillars, it is important to follow the process technology, choose the appropriate brand of cement, and prepare a solution of the correct consistency.
Any violation will lead to the formation of cracks, deformation of the support and a damaged appearance of the fence.
Made
It is built from ready-made hollow concrete blocks. The supports are formed directly at the construction site of the fence.
A metal profile pipe or a bundle of reinforcement rods is mounted into the foundation, onto which blocks are strung to the required height level. The internal cavity is filled with concrete mortar.
Advantages of prefabricated pillars:
- light in weight;
- assemble quickly;
- The installation process is simple;
- no need to involve special equipment or assistants.
Of the minuses:
- inferior in strength to solid ones;
- If the masonry is not vertical, the post will collapse over time.
There are decorative elements on sale that do not require additional finishing. Their surface imitates marble, wood, stone.
Recommendations for the selection and stages of construction of supports made of concrete blocks.
With concrete poured at the installation site
When creating pillars of a rectangular or square shape, you should prepare in advance a formwork made from wooden boards and durable plywood.
In order for the frozen product to better detach from the walls, the inside is coated with machine oil.
Photo: installation of formwork from boards for pouring pillars
To obtain round racks, it is possible to use a profile pipe of a suitable diameter.
Regardless of the shape, a frame made of reinforcement is placed inside future fence posts, which will strengthen the reinforced concrete products, giving additional strength.
Dismantling a wooden structure
After the concrete has completely hardened, dismantling the formwork is done in the reverse order. First, the horizontal cross bars are dismantled. Then the bars are pulled out and the formwork panels are pushed towards the edges of the ditch. After this, the plywood inserts are removed and everything is moved to a new location. The process of dismantling the mold can last several days.
Making formwork for a fence of the correct shape is necessary in order to get a strong fence, the foundation of which will last for a long time and will reliably protect your yard.
The basis of a reliable enclosing structure is the foundation. A special frame will help extend its service life, increase its strength and service life. How to make formwork for a fence so that the fence lasts for several decades? Making a frame for a fence with your own hands is quite simple. Theoretical knowledge, desire and availability of free time will help you build a real masterpiece of the barrier element.
Excavation part of the work
Trench for laying tape
Most often, the fence has a considerable length. The formwork for the fence is made in separate parts, but the ditch for the fence is dug the entire length at once. This can be done with a rented mini-tractor. To install a fence consisting of individual posts, separate holes 1 meter deep are dug.
If stumps and other obstacles are encountered, the ditch bypasses them. It is necessary to take into account the difference in elevation on the site and make adjustments to the depth of the ditch.
The depth of the trench is measured from the lowest point of the area where the fence is installed. If the area of the site is uneven, you need to make a fence with steps.
The most appropriate foundation width is 30 centimeters; the ditch should be made twice as wide. The depth of the foundation is half a meter, the ditch should be 20-30 centimeters deeper.
If you dig holes for pillars with your own hands, their depth should be at least a meter. The dug holes for the pillars are filled with sand to a depth of 15 centimeters, the sand is compacted strongly, wetting the sand with water for density.
If the terrain of the area is uneven, when the fence is built like a ladder, the bottom of the trench should also be stepped. You need to do the filling yourself from the bottom up and do not forget to cover the ends of the next step with a cross board.
We recommend watching a video of the process of digging a trench and preparing it for pouring.
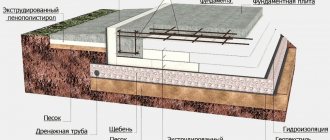
Pouring the base
The construction of a formative foundation begins with digging a hole. If the product involves brickwork, the parameters of the ditch must correspond to the dimensions of the fence. For other structures, you can limit yourself to bases for fixing concrete pillars, the depth of which reaches one meter. Using sand, we fill the pits, periodically compacting the layers, until we get a solid, dense ceiling.
Materials required for the base
For kneading you will need:
- capacity;
- drill;
- water;
- cement;
- sand;
- crushed stone;
- plasticizer no more than 1% of the total volume.
We combine the above building materials and mix using a special drill attachment until smooth.
How to properly prepare a concrete composition?
Having compiled a list of the above materials, select from it fine sand, crushed stone with medium fractions, water and M300 cement. Concrete is prepared in a ratio of 1 part cement to 3 parts sand and 4 parts crushed stone. Water is added until it becomes sour cream. The plasticizer must be added according to the manufacturer's requirements. Builders advise replacing synthetic compounds with liquid soap - this way the mixture will spread evenly over the formwork and prevent its shrinkage.
Preparation of the reinforcing frame
Formwork for the fence in accordance with the diagram is a guarantee of the reliability of the foundation and the quality of work. Formation is necessary to strengthen the strength of the foundation, especially if groundwater is close to the soil or on loams. It is performed in several technological steps:
- We take reinforcement bars with a cross-sectional diameter of 10 mm and fix them 5 cm above the level of the bottom of the pit.
- We mount a support under each pin.
- We make a retreat from the trench by 10 cm, and begin to fix the reinforcing sticks, alternating horizontal pins with vertical ones every 40 cm.
- Using a welding machine, we connect lines in different directions to obtain a single, reliable frame.
When the work of installing the reinforcement is completed, we begin preparing the cement mortar.
Subtleties of working with concrete mortar
It is not recommended to fill the fence base with cement mortar in one go. The mold must be filled gradually, making holes with an iron rod in each layer. This will help prevent the appearance of swelling and surface relief. We cover the concreted surface with a film to protect it from the effects of natural phenomena and other debris. Spray the surface with water every three days. After a two-week period, we dismantle the fence formwork in the following order:
- remove the clamps between the beams;
- We begin to disassemble the load-bearing elements towards the edge of the trench;
- Lastly, we dismantle the form-building chipboard sheets.
It will take a month for the cement to completely harden, but in hot conditions it is recommended to remove the frame after 15 days. The foundation requires periodic moistening with water.