What tools and materials are needed?
The concrete mixer can be electric or mechanical. The second option definitely loses: mechanical mixing requires a lot of effort and time, but the result is insignificant. It is extremely difficult to manually rotate a two-hundred-liter container. Why exactly 200 liters? This is the optimal displacement for the average construction cycle implemented in the private sector. Therefore, home craftsmen have found a way to make an electric concrete mixer without spending extra money. You will need an old washing machine. Preferably vertical. A container for the activator is required. Required tools and materials:
- grinder or hacksaw;
- welding machine - you can do without it if the frame is assembled with bolts;
- electric drill;
- screwdrivers and keys;
- metal corner or finished frame;
- parts for shaft and blades;
- electric motor - if the device is made with a manual drive, it is not needed;
- Wheels are optional, but with their help the device can be transported around the site.
All you need
To reduce assembly time, you can use a grinder and a welding machine. Tools and materials you will need:
- washing machine with vertical or horizontal loading, tank for activator;
- a hacksaw for metal (used if you don’t have a grinder);
- welding device with electrodes;
- drill;
- soldering iron;
- U-shaped profile or metal corners measuring 4.5x4.5 cm;
- metal strip;
- wheels.
Assembling a concrete mixer with your own hands
To make a concrete mixer from a washing machine, it is important that its activator is located at the bottom. Your task is to install a shaft of the appropriate size instead of the activator. A homemade concrete mixer with an engine is assembled in several stages, let’s look at them.
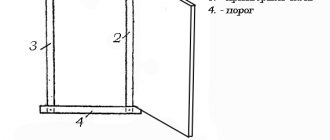
How to make a base?
We will make the frame for the concrete mixer from metal - it must be strong and stable. Before you start work, you can make basic drawings based on ready-made designs of homemade mixers. There should be no wobble when rotating the container. It is important to securely attach the device to the massive frame. The more reliable the base, the longer the homemade concrete mixer will last. The frame frame must withstand heavy loads, so the requirements for it are increased. It’s good if you have a ready-made frame; if not, you’ll need a metal corner 45x45 mm. You can connect metal elements either by welding or with hardware.
The recommended tilt angle for the concrete mixing container is 35–40 degrees. This is the optimal solution for efficient operation of the device.
Engine Installation
To drive a cylindrical container, any motor is suitable - diesel or electric. You can take an electric motor from a pump or ventilation. It is important to choose the right power. You need to proceed from the ratio - for every 50 liters 1000 W. If the axis of the model is horizontal, the power decreases - 1000 W is enough for 75 hp.
If the volume of the barrel is up to 200 liters, you can do without a motor and use a manual drive. But we have already talked about the disadvantages of such a solution. After all, our goal is to create an effective electric concrete mixer. If we are making a concrete mixer from a washing machine, then we can make do with its motor; if it is broken, we will have to look for a suitable one.
Assembling the device
Making the base
It is better to make the base of the concrete mixer metal.
An important part of concrete mixers is their base. They must be reliable and not allow the container to wobble while preparing the solution. Therefore, the concrete mixer must be firmly secured to a stable frame. In addition, the reliability of the base affects the service life of the device - the more reliable it is, the longer the homemade concrete mixer will last.
The base is a beam (with a cross-section of 15x15 cm), it is fastened with tenons: cut out a tenon on one beam, make an eye in the other (their sizes must match). Additional elements can be fastened with self-tapping screws. The most reliable base is considered to be metal; it will also be easier to attach wheels to it. True, you will have to tinker with metal longer, but believe me, the result is worth it. In this case, welding can be safely replaced with bolted fastenings.
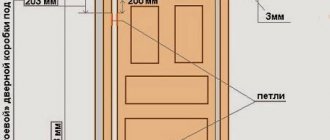
Cut the required number of blanks from the workpiece (channel/angle), the size will depend on how large the container you plan to use. The inclined angle between the container and the base is 30 degrees - this is an important condition. You can adhere to standard base dimensions:
- 55 cm – you will need two pieces;
- 70, 78, 80, 81, 85 cm - one piece each.
Assembly begins with the frame - its internal part. Weld two 55 cm pieces onto the 70 cm cuts. Assemble 2 more parts according to the size of the engine (it will also be attached to the base).
Cut the shelves for the gearbox from the corner and weld them to the legs of the base (expect that the gearbox and capacitive shafts will be in the same plane). Also remember that the electric motor must be held firmly, so take care of the holes for the bolt connections. The gear and motor pulleys must also be located in the same plane. Watch this carefully! Otherwise, you will overload the motor (it is carried over from washing machines).
Take care of turning the unit on/off; to do this, install a packet switch. It can be connected via a capacitor. How to do this - read in the instructions that come with the fasteners.
Outside, the base is designed according to a similar pattern. Here you should definitely take care of the handle (it will help to throw the finished solution into the bucket). It can be made from a pipe or channel. An alternative would be a rotary device (use a pair of gears and attach a wheel or rotary knob to one of them). Also, do not forget about the limiter (this will allow you to easily fix the wheel in the mixing mode or taking the finished mixture).
Wheels are attached to the bottom of the base. To do this, use a metal rod or rod made of reinforcement (at least 45 mm in diameter). At this stage, take care of your safety in advance: process the edges of the rod so that there are no sharp edges left on them.
Return to contents
Rotating device
The turning device of the concrete mixer consists of: 1 – front struts;
2 – front corner; 3 – front bearing ring; 4 – rear ring-bearing; 5 – rear strut; 6 – wheel axle; 7 – heel; 8 – handle drove. With its help, as already noted, you can easily throw away the finished solution. For assembly, stock up on:
- two pipes 6 cm in diameter;
- two stops;
- housings of two bearings;
- handles;
- plugs.
When the device is fixed in the bearings, handles, plugs, and stops are welded. This will allow the device to lock at the right moment and not move on the ring bearing. For reliable fixation, a hole is drilled vertically in the front ring. Fastening occurs with a special pin (diameter – 8 mm).
There is another option for arranging a rotating device. Weld a hexagonal steering wheel from the corners and attach it to the concrete mixer. There is one “but” here - you will have to apply force when tipping over.
Return to contents
We fasten the container
The blades are placed symmetrically.
For such a container, use the tank that was equipped with the washing unit. It is better that the loading is vertical and the type of rotation is activator. Remove the tank from the washing equipment and place a plug on the drain hole. Remove the activator (it will not be useful), set the shaft to size, and first weld the blades onto it.
Attention! The blades must be welded symmetrically; this can be achieved by attaching them to a metal strip.
Secure the resulting device in a container. If the blades move for some reason, lateral runout will begin, which is destructive to the tank. The top of the container is ringed - this ensures rigid attachment to the base.
Return to contents
Motor with gearbox
The question often arises: which engine is better to choose? The answer, according to experts, is obvious: the best option would be an old-style washing machine motor. Such a motor will last a long time, overheating is excluded. The optimal rotation speed (about 30 rpm) is ensured by the gearbox. Many schemes for its manufacture are proposed. But the optimal solution may be a device made from a pulley and a V-belt. You will also find them in old washing machines. No gearbox will function fully without an intermediate roller.
The motor is mounted on the steel strips of the rotating device. On the back side of the motor, the intermediate roller housing is attached in 4 places.
Important. Try to place the engine and gearbox in a special protective box; it will protect the mechanisms on the mixing machine and will not allow concrete to get into them.
Return to contents
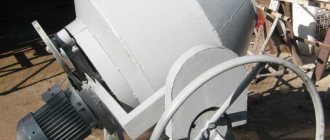
We assemble the device from an old washing machine
To implement the idea, a large Soviet washing machine is better suited than others. It has a cylindrical shape and is ideal for a second life as a concrete mixer. The completely smooth surface and absence of corners will allow you to easily unload the concrete mixture. If you don’t have an old machine, you can get by with a drum from modern analogues. It is advisable to take drums from front-facing models; at worst, vertical ones will do.
- Frame assembly. If there is no metal, you can assemble it from a wooden beam. True, the cross-section must be at least 10x10 cm. To assemble a wooden frame, you only need self-tapping screws and corners. And no welding is needed - that's also a plus.
- Installing the frame on the wheels. By placing the device on wheels, you will increase its mobility.
- We decide on the engine. There are three options:
– an old washing machine has a working electric motor - the simplest situation;
– the engine is not working, so we are looking for a suitable replacement, not forgetting about the correct calculation of power;
– there is no engine, we use manual drive.
- We install a shaft with metal blades - they will disturb the concrete. We put it in the place where the engine was previously attached. What is the shaft made of? This may be a metal pulley with welded metal parts.
- We secure metal brackets with nuts on the inside of the tank.
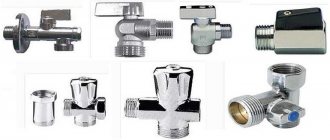
- Make sure the container drain is tight, otherwise the mixture will leak out during mixing.
- All that remains is to place the cylindrical container on the frame and connect the engine. You can launch and perform tests.
Important! A concrete mixer from a washing machine is more suitable for creating mixtures without large fractions - for example, for plastering work and self-leveling floors.
A homemade device will have much lower performance than its industrial counterparts, but it will be quite enough for home use. If the farm is undergoing large-scale construction work that requires large volumes of mortar, you will have to make the device more powerful or buy an industrial model. For a powerful concrete mixer, you cannot do without a metal frame and welding: it will be needed to create a container of a special design.
Source
How to make a concrete mixer from a washing machine
Are you planning a construction project? Then you will need a concrete mixer to mix the cement mortar. But where can I get it? It’s expensive to buy, especially since you may only need it once.
The solution may be a homemade concrete mixer from a washing machine. If you have an old washing machine with a working engine, then you can make your own equipment for household needs.
Assembly options
It is not always possible to find a suitable motor or gearbox for making a driven concrete mixer from a washing machine. It may not be required due to small production volumes or lack of electricity at the construction site. It is for such situations that you can use a small concrete mixer to prepare a mixture that one or two people can spin. If you have a good engine from a washing machine, you can make a concrete mixer for mortar with a drum arrangement:
- vertical;
- horizontally.
The vertical version of the concrete mixer for mortar implies a stable, fixed position of the drum. In such a concrete mixer, only the blades that are located inside rotate to prepare the solution. This type of solution preparation is called forced. The horizontal method of positioning the concrete mixer drum has its advantages. It rotates and has an inclined design, so the solution is unloaded in a few touches. Also, depending on the choice of inclination angle when preparing the solution, you can increase or decrease the total volume.
Manual concrete mixer from a washing machine
When rotating the concrete mixer drum when preparing the mixture, an important task is to achieve stability. Dissonance can be introduced by the components of the solution themselves, which constantly shift the center of gravity when thrown. That is why it is necessary to take care of a high-quality base or frame for a concrete mixer from a washing machine. The most stable geometric figure is the triangle. It is he who can withstand significant loads and maintain its position unchanged. Several triangles will be placed in the base of the concrete mixer for the mortar.
The advantage of a concrete mixer for mortar, which is assembled independently from a washing machine, is the individual selection of height. You can create a concrete mixer design that will best suit your height without having to work too hard. Therefore, it is worth taking a tape measure and roughly estimating at what height the lowest point of the washing machine barrel should be. For an average person with a height of 180 cm, this figure will be in the range from 50 to 80 cm. This is exactly what the sides of the triangle should be. Four identical pieces are cut. For stability, the base of the triangle should be 60 cm. You will need 2 such segments. Two triangles are assembled from a prepared corner or pipe using a welding machine.
Now they need to be secured together to form a monolithic structure. The distance between them will depend on the diameter of the washing machine drum. If it is 60 cm, then a gap of 5 cm will need to be made on each side. That is, the triangles must be placed at a distance of 70 cm from each other. Two 70 cm sections are welded in pairs to the lower corners. Two small jumpers are made in each triangle 10 cm below the upper corner. Two pipes are welded to them. An axis is installed in them, which will serve to tip the washing machine tank. Additionally, a rectangle with sides 68x60 cm is made. It is fixed to the axis.
In the free position, the rectangle is tilted. Two wheels from a wheelbarrow for transporting boxes are welded to its upper part. They will hold the washing machine barrel in front. At its lower part there is another triangle. It will act as a support, and at its upper point the axis for the concrete mixer tank will be fixed, on which it will rotate. To do this, a pipe is welded to the top, and two bearings are inserted into it. The bearings hold the axle, which is connected to the tank.
The connection unit for the washing machine tank is implemented in this way. A piece of reinforcement that is inserted into the bearings is welded to a circle of sheet material. It turns out to be a shaped metal umbrella. In the round part, holes for bolts are drilled around the perimeter every 15 mm. Through these holes it is attached to the washing machine tank. To prevent water from leaking out through the cracks, you will need to make rubber gaskets. After everything is assembled, a handle is welded to the axle on the other side of the bearings. Also, clamps are welded onto it, which will prevent the axis from moving. An example of such a design can be seen in the photo.
Wheels are attached to the two corners at the bottom, which will make it easier to transport the concrete mixer for mortar around the work site. Additionally, it is worth installing a latch that will hold the washing machine tank in a vertical position. Blades are fixed inside the concrete mixer barrel, which will facilitate high-quality mixing of the solution. You will have to strain your hands a little when rotating the handle and drum of the concrete mixer, but if everything is well balanced, then there will be no special problems, and the result will please you.
Horizontal concrete mixer
A horizontal concrete mixer has much in common with the manual version. The frame for it is made in the same way. The only difference between such a concrete mixer for mortar will be the presence of an electrical unit with a motor. To implement it, you can use several possible methods. One is to use a bendex gear, a flywheel and two pulleys of different sizes. The latter can be used from those that were in the washing machine.
Instead of the metal umbrella that was used for the previous version of the concrete mixer, it is necessary to attach a metal rod to the large gear from the flywheel. A small bendex gear is attached to a metal rod. At a short distance from the flywheel, a pipe into which the bearings are inserted is welded onto the bar on which the barrel from the washing machine is attached. A rod with a small gear is inserted into the bearing. On the other hand, it should protrude enough so that a large-diameter pulley from a washing machine can be mounted on it. The motor from the washing machine is fixed in such a position that the belt, which will be located on the small pulley and the large pulley, moves without distortion.
The belt is installed in its place. The electrical part of the concrete mixer for the solution is connected. To start the concrete mixer, you can use the starter switch or use the timer that was in the washing machine, if it is in working order. With this assembly method, you will get approximately 100 drum revolutions per minute, which is quite enough. The upper part of the drum from the washing machine can be slightly narrowed so that the solution does not spill out of it during rotation. To do this, you can weld a small neck or make triangular slits, bend the resulting petals and weld the seams.
Note! Instead of gears, the unit for transmitting motion from the engine in a concrete mixer for mortar can only be assembled on pulleys. If you select them in different sizes, then it will be possible to regulate the speed by moving the belt, as is done in a lathe. In this case, instead of gears, two pulleys are fixed. A large pulley is attached to the tank from the washing machine, and a small pulley is attached in place of the bendex. Additionally, another belt is installed and the structure is ready for use. This option is safer, because the gears cannot bite.
Vertical concrete mixer
The vertical concrete mixer for mortar is a rather interesting design. It will come in handy when necessary to mix liquid solutions and mixtures that are more often used for putty and plaster. Making such a concrete mixer is simpler in some ways, but there are also some nuances. The frame of the concrete mixer is made rectangular. In such a concrete mixer there is no need for an inclined structure, since the solution will be removed from below. Next to the hole for the activator, another semicircular one is made, which will be closed with a flap. You can see what it looks like in the photo below.
A handle is attached to the outside of the concrete mixer drum, which will allow you to move the shutter. The solution will easily be poured into some container, for example, a bucket. There is no longer any need to make the top hole of the concrete mixer, since nothing will spill out. Making a frame for a concrete mixer is very simple. It is necessary to make a rectangle from a metal pipe, corner or square using a welding machine. Its width should be such that the drum can stand on it without any problems and not fall through. Additionally, two crossbars are made from the same material under the drum. Legs are welded to each corner of the rectangle for stability. To make the design more reliable, the sides of the rectangle with a smaller size can be moved out further so that the legs stand wider.
The hole in the tank from the washing machine, which was used to install the activator, is welded shut. There remains a small hole for the long shaft. The latter can be made from durable reinforcement with a diameter or from a pipe. A bearing is installed below the hole in the concrete mixer tank and secured to its walls. A shaft is inserted into the bearing. To prevent solution from the tank from getting into the space between the balls, they are tightly closed with rubber pads. The shaft is mounted in its place. A large gear from the flywheel or a pulley with a large diameter is welded to it from below.
The concrete mixer motor is installed in the same way as in the previous version, but with the pulley down. If the motor power is sufficient, then there is no need for intermediate units and you can connect the pulley on the tank and the engine with a belt. If gears are used, you will need to use an intermediate unit, which will ensure the transmission of rotation from the pulley to the gear from the bendex. Inside the tank, blades are mounted on the shaft following the example shown in the photo.
Advantages of a homemade concrete mixer from a washing machine
Some people believe that there is nothing better than branded equipment. However, a homemade concrete mixer also has its advantages:
- In addition to the fact that you use old spare parts that are uselessly lying in the garage, you will save money on the purchase of new equipment.
- Having your own concrete mixer, especially in the private sector, is always useful. If you need to update the path or patch up the foundation, you won’t have to look for equipment again.
- You can make a concrete mixer according to your own drawing. This will make it easier to repair it if it breaks and calculate the dimensions for transportation in transport.
- The quality of mixing in a concrete mixer cannot be compared with manual mixing, especially when the volume of work is large.
Advantages of the device
Although you may have to spend a little time and effort to make your own concrete mixer, believe me, it's worth it! First of all, this will help save a significant amount on the purchase, not only of factory tools, but also of ready-made concrete (and, as you know, it costs not a penny). Other “advantages” include the following:
- You will always have your own concrete mixer at hand. At any time, you can easily correct existing construction errors, strengthen the finished building, and so on.
- There is no need to mix concrete by hand - it is difficult and troublesome. In addition, it will not be possible to knead a sufficient amount of building material by hand, but you can prepare it in concrete mixers as much as you need.
- In a concrete mixer, the mixture will retain its quality, while in open containers the concrete can harden quickly.
Return to contents