- Sandwich panels for slopes: type of window opening finishing
- What are window slopes: the purpose of the structural element
- What requirements must the slope material meet?
- Sandwich panels: a modern universal material
- Dimensions and design options of sandwich panels for windows
- Sandwich panels for slopes: advantages and disadvantages of the material
- Comparison of sandwich panels and double-glazed windows: which is better
- How to install slopes from sandwich panels
- Further installation of slopes from sandwich panels into the window
- Sequence of installation of PVC sandwich panels on liquid nails
- Do-it-yourself installation of sandwich panels on polyurethane foam
- How to choose slopes: the best finishing option
- Features of plasterboard slopes for window openings
- Sequence of installation of plasterboard slopes
- Features of slopes for gypsum fiber windows
- Plastic panels for window slopes: material features
- Video: how to make window slopes from sandwich panels
Sandwich panels for slopes: type of window opening finishing
In one of the articles on the site, we talked about how to finish external slopes on windows. In this article we will talk about slopes made of sandwich panels .
Exterior window decoration: photo examples and step-by-step instructions (read more)
Installation of a metal-plastic system is not the final stage of the window replacement process. To prevent freezing and condensation, the walls of the window opening are finished. Today, sandwich panels for slopes have proven themselves to be the best, characterized by excellent technical and performance qualities and ease of installation. You can learn more about this building material from the article.
Slopes on windows protect against condensation and resist freezing.
Positive traits
Surely many people will ask why the installation of slopes made of sandwich panels is so popular. Why is it not used, for example, plasterboard or PVC? The fact is that sandwich panels have long been able to prove the presence of a complex of valuable properties that make this material simply irreplaceable in many construction processes.
Scheme
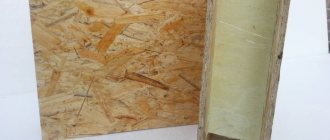
A standard sip sheet includes three components, including a solid sheet of PVC of a certain density located on the outside of the material, and a polystyrene sheet located on the inside of the panel, as shown in the photo.
The main distinguishing point between the sheets can only be the material that is used in the manufacture of the cladding side. The finishing inside the material is made in such a way that it fits perfectly into any interior design of the room.
The popular name for slopes made from such panels is the name “warm slopes”. These independent elements, distinguished by their individual composition, are distinguished by their affordability, as well as originality.
What are window slopes: the purpose of the structural element
The first step is to understand what slopes are and what their main purpose is. This structural element of a window opening is the inner wall of a niche surrounding the window frame on both sides. Installing a window profile is not the final stage. For a presentable appearance of the window system, it is necessary to install good fittings for PVC windows. It includes not only handles, mechanisms and hinges. The range of elements also includes window slopes, which are used to design the profile.
Slopes made of sandwich panels provide additional protection of the room from atmospheric influences.
Note! It is imperative to finish the slopes to eliminate the occurrence of many negative factors that will negatively affect the appearance, service life of the window system and the microclimate of the room.
Finishing the niche will prevent the accumulation of condensation and freezing of the window frame. It can protect the seams between the frame and the window opening from destruction, so it is important to carry out both internal and external cladding of slopes. Protecting niches can improve the thermal insulation properties of a room, preventing cold outdoor masses from penetrating inside and thermal energy from escaping outside.
Note! Window slopes are also a decorative design of a window system.
To finish the slopes, you can perform plastering, covering the surface with plasterboard, plastic panels. The most popular and least labor-intensive method today is the use of sandwich panels for slopes. This material not only gives the window a finished appearance, but also, thanks to the presence of internal insulation, provides a warm temperature regime in the room.
In addition, window slopes perform a decorative function.
When covering slopes with plasterboard, a large consumption of material will be required, which is associated with its fragility. Plastering the side elements is a labor-intensive and time-consuming process that requires certain skills to ultimately achieve a smooth surface. In addition, such work is associated with significant pollution of the surrounding space.
On a note! The combination of windows and slopes made of the same material looks most harmonious.
Why are slopes needed?
Many people believe that slopes are optional, so they put off finishing them until the very last moment. In fact, this is a very important procedure that ensures not only the safety of open areas of the walls, but also the installed window frame.
Installation of slopes made of sandwich panels is important for the following reasons:
- Protection of assembly seams from destruction. Therefore, finishing of plastic windows should be carried out outside and inside the room.
- Prevents moisture penetration. That is, the object itself, and mostly the walls, are protected from the penetration of moisture, which leads to the appearance of mold.
- Improved thermal insulation. Slopes on windows are the most vulnerable place; cold air from the street can enter the room through it, and warm air can also escape from the room.
Summarizing the above, we can conclude that slopes are an irreplaceable part of the room that needs high-quality finishing.
Slopes made of sandwich panels can improve the thermal insulation of windows and prevent the appearance of moisture
What requirements must the slope material meet?
Regardless of the technology for protective and decorative finishing of a window opening, finished slopes must meet certain requirements. The design must withstand various mechanical impacts without loss of operational and aesthetic characteristics. It is necessary that the slopes are moisture resistant. This especially applies to outdoor structures. The material must be characterized by wear resistance, immunity to ultraviolet rays and high humidity, and temperature changes.
Note! To waterproof the frame, a PVC window ebb is attached to its outer side.
Slopes must be moisture-resistant, wear-resistant, and have low thermal conductivity.
The protective structure of the window should not deform over time. It must be distinguished by a long period of operation without loss of original properties. Due to the fact that the slope panel closes the installation gap, this is the main source of heat loss. It is necessary that the material has low thermal conductivity, which will provide a good level of heat and sound insulation in the room.
The chosen finish for the slopes should be aesthetically appealing. High-quality cladding is characterized by a neat appearance. It is necessary that the finish is in harmony with the window profile and fits into the interior design of the room. Maco window fittings have proven themselves to be the best in this regard.
Sandwich panels: a modern universal material
Plastic sandwich panels are sheets of extruded polystyrene foam. The thickness of the products is 9 mm. The canvases can be finished on both sides with polyvinyl chloride film 1-1.5 mm thick. The internal structure of sandwich panels is represented by the following elements: a J- and C-shaped profile for fixing the internal edge of the slope, a guiding wooden beam, insulating material and an upper decorative panel.
Polyurethane foam, free-foam plastic, and extruded polystyrene are used as insulation in sandwich panels, which fills all cavities. The latter option is characterized by the best thermal resistance indicators. The insulation blocks the flow of cold air masses from the street into the room.
Sandwich panels are a universal product, widely used in repair and construction work.
The top decorative panel can be made of laminated plastic, rigid or foamed PVC sheet. The first type of coating is made by impregnating multilayer material with resins in the form of pressed decorative or kraft paper.
Rigid PVC sheet is represented by a white sheet covering, the thickness of which is in the range of 0.8-2 mm. The special coating can be glossy or matte. The density of such a panel reaches 1.4 g/m³. The internal structure of a foamed PVC sheet has a porous composition, so this coating is less dense and has good thermal insulation.
The outer layer can be painted in any color, which makes it possible to choose a shade that matches the window and the design of the room. The most popular is the white PVC sandwich panel for slopes. You can often find a yellow tint to the panels. Products made in a natural style, imitating wood, fit harmoniously into the interior.
Dimensions and design options of sandwich panels for windows
Sandwich panels are available in two variations: ready-made, where the material does not require assembly and is intended to be fixed using an adhesive, and disassembled, when it requires preliminary fixation of the component elements using self-tapping screws.
Sandwich panels are available for sale in finished form or disassembled.
Plastic window sandwich panels can be manufactured in single-sided and double-sided form. In the first case, one side of the product is rough, the other is the front side, which is thicker. For a double-sided product, both sides are front.
Note! Sandwich panels can be used for both plastic and wooden windows.
The dimensions of sandwich panels for slopes are determined by the equipment on which the material is produced. Despite this, standardized parameters exist. The products have a maximum length of 12-16 m. A larger value can lead to damage to the structure of the element under its own weight during the installation process. In addition, long products are difficult to transport. The width of the sandwich panels reaches 100, 115, 199 and 120 cm. The thickness is in the range of 5-35 cm. The most popular are white sandwich panels for slopes 3000x1500x10 mm.
Products are often made to individual sizes. Some versions of sandwich panels can be used to finish the slopes of not only windows, but also doors. In this case, their length is 3 m, width - 115, 130 and 150 cm. The thickness of the products is 10, 24, 32 and 40 mm. Sandwich panels 3000x1500x10 mm used for slopes are in great demand, the cost of which starts from 900 rubles/piece.
Sandwich panels of different thicknesses, lengths and widths are available for sale.
Step-by-step installation guide
Preparatory work
To install slopes from sandwich panels, you need to equip yourself with the necessary set of tools and materials. The following will be useful for work:
- Sandwich panel.
- P-profile, which is the starting profile.
- F-profile is the so-called device cover.
- Plastic in liquid form (preferably).
- Construction tape.
- A sharpened knife.
- Self-tapping screws measuring 2.5 * 7 mm.
- Several screwdrivers with different tips; the drill can be replaced with a screwdriver.
Armed with a tape measure, take measurements of the length and width of the slopes; this is the main guideline that determines the final dimensions of the sandwich panels for the slopes. Taking these values into account, cut out several strips with a knife: one will be located at the top of the window, and the remaining two will be on the sides.
Now let's talk about how to correctly cut the elements of a sandwich device:
- The width of the elements is 10 mm larger than the initial dimensions of the window, this will ensure closer contact with the frame.
- A hole should be cut around the window frame directly in the hardened foam, the depth of which is 100 mm and the width is 1 mm.
- On the edge where the sandwich panel will be located, measure 10 mm and draw a line. Cut the material strictly along the line, but only cover the upper and insulating levels. How to cut a sandwich panel for slopes? You don't need a special tool for this; you can use an ordinary kitchen knife.
- Cut from the end, remove excess layers.
If you plan to finish slopes with sandwich panels in one place, you can try to save money and buy ready-made, cut strips without purchasing a whole panel.
Main part of the work
After preparing the necessary tools and materials, we move on to the main part of the slope installation process. First we install the frame:
- We carefully process the window frame - get rid of excess polyurethane foam, go over the structure with a cloth to clean it of dust and debris.
- We distribute vapor barrier material over the entire area of the slopes. If you want to further insulate the openings, use foam strips.
- Using a brush, aerosol or directly from the tube (depending on the packaging), apply an antiseptic agent to the coating, which in the future will protect the window from mold, fungal growth and other harmful substances.
- Focusing on the inside of the device, following the perimeter, install the sheathing made of wood. The dimensions of the slatted material are 20*40 mm. The lath is secured with dowel nails. Maintain a distance of 40 mm. In the areas of the seams where the side and top battens of the sheathing meet, leave a gap of 10 mm or more - this will be needed for installing PVC elements on the slopes at the top. If the frame cannot be fixed, the sandwich panel cladding is fixed with foam.
The outer strips are overlapped.
Installation of the panels is always done from the top of the window frame, moving to the bottom. Place the protruding element into the formed groove so that the part fits snugly against the window. Fill the free space with a material that will maintain temperature and insulate the window structure from drafts; for this it is better to use isover.
The outer side is secured using self-tapping screws; check the correct position of the top trim using a building level. The finishing of the side slopes is a special edge finishing.
Sandwich panels for slopes: advantages and disadvantages of the material
Sandwich panels for slopes have many advantages. This finish helps create good thermal and noise insulation. The sound absorption rate is 21 dB. The material has a high level of vapor permeability. This coating will not get wet from moisture, will not deform or crack. Sandwich panels exhibit increased resistance to mechanical damage, the negative effects of sunlight, and resistance to the formation of fungus and mold.
Note! To reliably connect the material to the slope, polyurethane foam is used, which at the same time serves as an additional insulation.
The design is characterized by its low weight, which is only 4 kg with a product thickness of 24 mm, so it does not have a significant impact on the elements of the window opening and does not require the use of reinforced fasteners.
Slopes finished with sandwich panels do not require constant maintenance. Any dirt can be easily removed with a sponge and soap solution, which will not damage the structure of the structure. The material is absolutely harmless to human health. During operation, no harmful components are released into the atmosphere.
Panels for window slopes have many advantages.
Slopes made from sandwich panels do not require additional decoration, since they have a pleasant texture that is similar to the surface of a plastic window. The demand for the material is also associated with the reasonable price of sandwich panels for window slopes, which can be purchased at any hardware store.
However, such multilayer panels for finishing slopes have their drawbacks. The material is susceptible to high temperatures, which can lead to deformation changes and yellowing of the surface of the product. Finishing with sandwich panels is not performed if there is a small gap between the wall and the hinge. This will lead to the structure not fitting tightly to the niche. Incorrect installation may cause cracks and gaps to form.
Advantages and disadvantages of the product
Currently, sandwich panels for windows are produced that have excellent properties. The following can be distinguished:
- The presence of a layer of foam is an excellent opportunity to retain heat in the room. This material does not transmit cold from the walls, which creates a special microclimate in the room, and the windows are not covered with condensation.
- The sandwich panel has an energy-saving effect - it reflects heat, limiting its loss as much as possible.
- Large selection of colors and textures. Naturally, the most popular shade is white, but if you wish, you can choose any color scheme.
- Window slopes made of sandwich panels can have different sizes. The material is selected directly based on the size of the treated areas.
- There are ready-made options that simplify the installation process.
Plastic sandwich panels come in a wide variety of colors.
Of course, there are some disadvantages. These should be taken into account:
- The material must be cut very carefully, because it can be very easily damaged, which will lead to damage to the entire part.
- Surfaces need to be prepared for work. Although this procedure will not cause any special problems.
- This option is not suitable if the distance between the wall and the hinge installed on the frame is small. That is, the material hides some space that is necessary for its installation.
You must work with the material very carefully, otherwise it can be damaged.
Comparison of sandwich panels and double-glazed windows: which is better
The design of a balcony or loggia is often accompanied by the joint installation of metal-plastic glazing and plastic sandwich panels. The latter are often used for covering blind sections, which can be located at the bottom of the balcony door frame that reaches the floor, or for finishing side sections. This is done to limit light transmission in specific areas. In addition, due to their good strength properties, sandwich panels are considered the best option in comparison with double-glazed windows in terms of safety.
Installing sandwich panels instead of double-glazed windows allows you to make the side sections of a balcony or loggia blank, which is necessary for installing cabinets or other items that should not be visible from the outside. This design can subsequently be used as a ventilation outlet, since a number of holes can be made in it.
Sandwich panels, unlike double-glazed windows, are resistant to moisture, ultraviolet radiation and mechanical stress.
However, using panels instead of double-glazed windows has other advantages. The material is resistant to various negative influences. It is impervious to ultraviolet radiation, moisture, chemicals, and tolerates mechanical and shock loads. The panels are strong, reliable and durable. They do not require special care, which cannot be said about traditional glazing. You can also choose different colors of the material, which is clearly shown in the photo of sandwich panels.
Note! The Salamander window profile is very popular today, and it is possible to order sandwich panels with a protective film, which not only improves the decorative qualities of the material, but also increases its strength characteristics.
Since the plastic sandwich panel is represented by a multilayer material, inside of which there is a layer of insulation, such cladding is characterized by good heat-insulating and sound-absorbing properties.
How to install slopes from sandwich panels
The process of finishing window slopes with sandwich panels consists of several stages. To carry out the work you will need the following tools and materials: PVC profile, edging and starting profiles, liquid nails, sealant, primer for concrete, plaster, antifungal agent, building level, tape measure, assembly knife, screwdriver, self-tapping screws, brush, spatula, sandpaper .
Installation of panel slopes can be done in three ways.
Installation of slopes from sandwich panels is carried out in three ways: liquid nails, polyurethane foam or a frame made of wooden blocks can be used. The panels, in turn, are two- and three-layer. The last option is covered with PVC on both sides. Such panels are installed exclusively on a wooden frame, since they are characterized by increased rigidity. There is no point in attaching them to the wall using liquid nails, since the PVC back side has a low adhesion rate.
Installation of sandwich panels in a window on wooden slats consists of the following algorithm of actions. First, slope measurements are taken. The obtained data is transferred to the panels, after which blanks are made using a sharp knife. Panels can also be cut using a circular saw with a small pitch of teeth, which will eliminate the possibility of delamination or cracking of the product.
Note! The sandwich panel can be cut at a temperature not lower than 5 ºC; lower values lead to brittleness of the material.
Let's start installation
Finishing window slopes with sandwich panels
It will be quite easy to make slopes with sandwich panels if you follow the rules and sequence of actions. Even if you don’t have experience finishing slopes with your own hands, you don’t need to be afraid of this work. Before starting installation, you need to prepare tools and materials, you will need:
- Sandwich panel – you choose what material to buy from yourself
- Start profile
- F profile
- Liquid plastic – used as desired
- Tape measure and knife
- A screwdriver with self-tapping screws, a screwdriver and a drill - probably every home has the latter.
Slopes made of sandwich panels in a panel house
I have already said that installation should be done at least 24 hours after installing new windows. Using a tape measure, you need to take measurements and cut out panels for the side and top slopes. Use a knife to remove unnecessary pieces of polyurethane foam and begin installing the starting U profile using self-tapping screws for fastening. They need to be screwed in with a gap of 10-15 cm. Do not forget that the top profile is attached first, and only then the side ones should fit tightly with the top one. Next, we proceed to install the slopes using a sandwich panel; it is inserted into the grooves of the profile. Using the same scheme, we start from the upper slope.
Finishing of plastic slopes
Then there are two options:
- The first is to insert pieces of the starting profile into the vertical bar from above and below, and then the side panels fit into these grooves.
- The second is to simply attach the panel end-to-end with the window sill and the upper slope, after which the gaps are closed using liquid plastic.
When this stage is completed, all that remains is to give the slopes a finished look. To do this, use the f profile; it needs to be secured to the edges of the sandwich fabric. For additional thermal insulation, the voids between the sandwich sheet and the wall are filled with polyurethane foam - this process does not bring any inconvenience, since it is very easy to dismantle the profile. After filling the voids, the bar is returned to its place.
Plastic slopes made of sandwich panels for a balcony block
One more tip! It is better to trim the f profile after installation - to do this, it is attached with an overlap and then a cutting line is outlined using a pencil. In this way, maximum joining of the planks can be achieved.
We also recommend reading:
Convenient finishing of slopes with a PVC profile Beautiful and convenient do-it-yourself slopes made of PVC panels, wood or simply plastered Practical and easy installation of plastic slopes on windows Features of using plastic corners on slopes Arrangement and installation of metal slopes for windows
Further installation of slopes from sandwich panels into the window
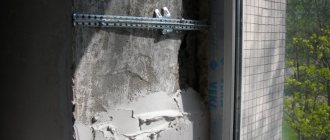
On the outside of the window frame along the edge, mounting strips should be secured to form a complete contour. The correct installation is controlled by the building level. Wooden elements must be made from dry wood. Otherwise, if they contain excess moisture, the slats will dry out, which will lead to deformation of the structure. Before fastening, they must be treated with special moisture-repellent compounds.
The gap between the frame and the panel can be filled with mineral wool or polyurethane foam.
The next step is to attach the starting profile to the plastic frame. The gap that has formed must be filled with polyurethane foam or mineral wool. Sandwich panels used for finishing slopes are inserted into the grooves of the profile. They are not glued using liquid nails or foam, but are nailed with a construction stapler. Staples can penetrate the outer side of products, so with this installation option, only three-layer products are used.
On a note! It is necessary to purchase a starting profile from the same manufacturer that produced the sandwich panels.
If the starting element is not used, the slopes are finished with sandwich panels by attaching the material with an adhesive composition. In this case, the inner corner is treated with sealant in order to hide possible defects.
Sequence of installation of PVC sandwich panels on liquid nails
Let's consider the technology of installing slopes from sandwich panels using liquid nails. The first step is to thoroughly clean the slopes, removing old coating, dirt, and remnants of polyurethane foam. The base must be perfectly flat, so all defects should be eliminated using a plaster mixture. This material is used to seal all cracks and crevices and level the surface. The process is controlled by the construction level.
First of all, it is necessary to install the side slopes.
After the plastered surface has completely set, it should be treated with a primer intended for porous coatings. The procedure is carried out to ensure further reliable adhesion of the panels to the base. After drying, the surface is treated with a special antifungal compound. The dried base is ready for finishing with sandwich panels.
Before installing sandwich panels, measurements of each slope are taken to prepare products of appropriate dimensions. The sheathing is cut using a cutting object in the form of a mounting knife. The panel should be laid on the floor, then marked using a tape measure and pencil. Use a sharp knife blade to follow the marks several times. After trimming, the edges of the finished workpiece are processed with sandpaper to remove burrs.
The first step is to install the side slopes from sandwich panels with your own hands. The starting profile is attached to the wall near the window using self-tapping screws at 15 cm intervals. A strip of liquid nails is applied to the prepared panel in a zigzag design in the center and in straight stripes along the perimeter of the product. The workpiece is inserted with one edge into the starting profile and pressed firmly against the slope. The second side and top panels are installed in a similar manner. Components must be installed with minimal gaps between them.
Note! If the starting profile is not used when finishing slopes made of PVC panels, the sandwich element is mounted close to the window. It is inserted 1 cm deep, fixing it with polyurethane foam.
To complete this, you can putty the panel slopes.
To make the window opening look more aesthetically pleasing, it can be trimmed with an edging profile along its entire perimeter. To achieve a neat appearance, the joints in the corners must be cut at an angle of 45°. To mask butt joints, you can use liquid plastic or white sealant.
Preparatory stage
Sandwich panels are practical materials that are as simple as possible to install. Due to the inner layer, which is a sheet of compacted foam plastic, thermal insulation of building structures is ensured and heat leakage from the room is prevented. The outer layer, made of smooth polyvinyl chloride, looks neat and aesthetically pleasing and is resistant to aggressive environments and moisture. This material is durable and not damaged by pests and fungi.
The panels can be either two-layer or three-layer; in the second case, there is a PVC coating on both sides. Such panels are suitable for installation on wooden sheathing due to their increased rigidity; attaching them to foam or liquid nails is irrational - PVC surfaces have low adhesion.
Slopes of this type are mounted in three ways:
- for liquid nails (the wall surface must be flat);
- on polyurethane foam (small unevenness of the base is allowed);
- on a frame made of slats (if the base is difficult to level using plaster).
We will consider in detail the first option for installing slopes, i.e. on the starting profile and liquid nails, which “eats” a minimum of space. I forgot to add that the thickness of the two-layer panel is about 10 mm.
At the preliminary stage, you should thoroughly clean the slopes, removing everything that can peel off from the base and all protruding bumps. Be sure to remove any excess foam around the perimeter of the window unit that remains after installation.
Then a plaster solution is prepared for rough work. It is used to seal cracks and depressions - the surface of the slopes must be smooth, this can be checked using a level. Please note that if the surface of your slopes is smooth, then you do not need to plaster it and you can safely skip this step.
Wait until the plaster layer has completely dried and treat the slopes with a primer for porous bases so that the adhesive composition securely fixes the sandwich panel. After the primer has dried, treat it with an antifungal compound; after waiting for it to dry completely, you can begin lining the slopes.
Paste a VALID AdSense code in Ads Elite Plugin options before activating it.
Do-it-yourself installation of sandwich panels on polyurethane foam
Slopes made of sandwich panels for plastic windows can be mounted using polyurethane foam. For this, a multilayer type of material with two stiffeners is selected. At the first stage, measurements are taken. The final type of finishing of the window opening depends on the accuracy of this process. Based on the results obtained, the products are marked, according to which the panels are trimmed with a sharp object.
A starting profile is mounted to the joining area between the wall and the window frame using self-tapping screws in increments of 10-15 cm. Finishing the slopes with sandwich panels begins from the top strip. It is inserted into the groove of the starting profile. The resulting gap between the wall and the PVC element is filled with polyurethane foam. The material should be applied very carefully, since during the drying process the foam can double in size.
On a note! It is better to choose a professional type of polyurethane foam, applied to the surface in a small layer.
Panels with two stiffeners are suitable for mounting on polyurethane foam.
A plastic sandwich panel is being installed, which is done using masking tape. Next, the side slopes are sheathed in the same way. After the mounting foam has completely dried, the excess material is cut off, and the structure is ready for further use.
Advantages of finishing with sandwich panels over other types
Finishing slopes with sandwich panels is an excellent solution that has many more advantages than using other types of finishing materials.
- Window finishing with gypsum plasterboards. This option is considered quite labor-intensive. It is convenient to work with sheets of plasterboard when you plan to cover walls or construct a frame. Otherwise, you have to purchase much more material than is needed for the window slopes.
- Using plaster. This method is loved by many due to the fact that it does not require any special financial costs. But it must be taken into account that finishing areas using solutions is a very labor-intensive process. If you don’t have certain skills, it’s almost impossible to create a smooth surface. Also, we must not forget that the work is accompanied by dust and dirt.
- MDF products. Of course, they perfectly imitate natural materials, for example, cut wood, but using them for cladding plastic windows is not quite the right decision. After all, you need to take into account that the products must be combined with each other.
Indeed, sandwich panels for installing window slopes are an option that deserves special discussion. Although many have not yet appreciated the advantages that this material provides.
How to choose slopes: the best finishing option
There are several options for finishing slopes. Materials such as plaster, plasterboard, gypsum fiber, plastic panels and sandwich panels can be used for this. The price for window slopes of the latter type of material is the highest compared to other options.
The traditional way to finish slopes is to plaster the side and top niches of the window frame. The technology consists of leveling the surface by applying several layers of plaster, followed by priming and painting the surface. This method is characterized by a number of distinctive advantages. First of all, it is distinguished by its versatility. You can plaster the slope in a room with any humidity and temperature conditions. The mixture itself is an inexpensive material.
Plaster slopes are characterized by resistance to mechanical stress, ultraviolet radiation and moisture. This finish does not contain seams or joints. The surface is perfectly flat and smooth. In the event of a decrease in aesthetics, such slopes can easily be updated or repaired.
For slopes, plasterboard, plastic and sandwich panels, as well as gypsum fiber are used.
Despite its many advantages, this method of finishing slopes has its drawbacks. Plastering side niches is a long and labor-intensive process that requires breaks in work to dry each new layer. In addition, to get a good result you need to have the appropriate skills. Plaster slopes are characterized by low thermal insulation properties. They are prone to freezing and condensation.
Note! To perform plastering work, you will need to trim the mounting foam inward by 1-2 cm, which will weaken the thermal insulation seam.
The plaster and plastic frame do not interact well enough with each other, which will soon lead to the formation of cracks. They can be filled using sealant. However, there is no universal composition that equally exhibits good adhesion to plaster and PVC window block.
Features of plasterboard slopes for window openings
Many people prefer plasterboard slopes. The method is based on gluing or screwing sheets of material of the required size to the side niches, followed by priming, puttying and painting. This option attracts with its simple and quick installation, which even a novice master can handle. The material is also characterized by an acceptable cost.
Installation of plasterboard slopes is a quick and easy finishing option.
Using strips of plasterboard, you can create perfectly smooth sides of the window. The space between the drywall and the wall is filled with mounting foam, which serves as a seal for the window. This surface is suitable for numerous paintings.
However, this method is not without drawbacks. The material is susceptible to moisture, so it can be used exclusively for finishing internal slopes. Condensation forms on the surface, which will soon lead to swelling and destruction of the structure. Such defects can be eliminated by completely redoing the slopes.
Drywall, like plaster slopes, is not able to interact firmly with the plastic frame. This contributes to the formation of cracks at the joints. The material is quite fragile, which does not exclude the possibility of it being pressed through and bending during installation.
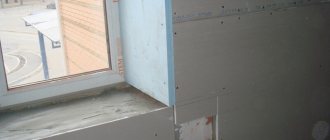
After installing drywall, you will need to prime, putty and paint the surface to give it a finished appearance, which is not required when using sandwich panels for window slopes. It will take a few more days to complete all the work.
Installation of such slopes is carried out in two ways: frameless and frame.
On a note! To avoid finishing, you can use laminated drywall, which is mounted using special corners covering the ends of the sheet.
Sequence of installation of plasterboard slopes
Installation of plasterboard slopes can be carried out in two ways: framed and frameless. With the frame installation method, at the initial stage you should screw the starting profile using self-tapping screws, as in the case of using sandwich panels for window slopes. It is fixed on the line of joining of the plasterboard sheet and the window frame in the groove. The original frame is ready, after which you can begin installation.
A feature of plasterboard slopes is that the strips of material do not fit tightly to the window frame. A gap is formed, which negatively affects the thermal insulation properties of the opening. This space should be filled with mounting foam or mineral wool.
Note! Filling the gap with polyurethane foam is done very carefully, since the material increases in volume, which can lead to damage to the drywall.
Fastening drywall can be done using liquid nails.
At the junction of plasterboard panels, perforated corners are installed. The finished surface is primed and puttied. After the composition has completely dried, the coating is rubbed with sandpaper to obtain a smooth base, which can be painted in any color with water-based paint.
The frameless method involves installing plasterboard panels to the window opening using liquid nails or other suitable composition. The surface is first thoroughly cleaned and primed. Each slope element with applied glue is pressed tightly against the niche. To fix the elements, you can either use a wooden beam, which will give the structure evenness, or install spacers to the window sill. After complete drying, the slopes are puttied and then painted.
Installation
- Before starting work, you should start the preparatory stage and purchase all the necessary building materials and consumable parts;
- It is also necessary to measure in detail the dimensions of the window opening, which will allow you to determine the length of the starting profile and choose the right PVC sandwich panel for the slopes;
- Then you need to remove the protective tape from the window and cut off the starting profile according to the measurements, which is then attached to the frame using self-tapping screws measuring 8.5 mm. Fastening starts from the edge and occurs every 150 millimeters, as shown in the video;
- All remaining sheets are marked and cut, for which a jigsaw is suitable, which will ensure instant sawing and clean cutting. Additional insulation will be provided by foaming with special foam;
- The next step should be to remove the protective film from the panels and position the vertical panel. The butt seams connecting the window sill and the material are covered with a starting profile, followed by foaming. The finishing strip will be located on the left side of the window opening;
- With the same sequence, the window slopes are finished with sandwich panels and on the right side of the opening;
- Then the process of all the necessary measurements, as well as the angles of rotation of the protrusion on both sides, is carried out in a new way, the panel is installed from above and the joint is closed with a starting profile. It is necessary to fasten the top panel to the sides, and then make a finishing profile for the top;
- All joints are sealed with snow-white installation glue, removing its excess, as shown in the photo, and the empty space under the window sill is sealed with snow-white gypsum plaster.
Let's sum it up
By using sandwich panels correctly for window slopes, you will get great-looking projections that protect from low temperatures and do not collect condensation. By carrying out all the work yourself, you will save money and complete all installation processes quickly and accurately. The entire process, taking into account compliance with all the rules of the technological process, will take you from 1.5 to 3 hours. Moreover, even a beginner in the construction business can cope with this work.
Features of slopes for gypsum fiber windows
Gypsum fiber is often used to finish slopes. The technology for installing the material is similar to the principle of finishing niches with plasterboard. However, gypsum fiber has distinctive advantages over its analogue. The material has good strength and rigidity. There is a variety of products that are characterized by excellent moisture-proof properties. This feature makes it possible to use the material for finishing the external slopes of windows.
Slopes made of gypsum fiber are characterized by ease of installation and high speed of work. The material has excellent technical and performance qualities. It withstands mechanical stress and adverse environmental factors. Due to the presence of fibers in the structure of the material, it is an additional insulation for the window, which increases its thermal insulation properties, which makes it similar to PVC sandwich panels for slopes.
Drywall is characterized by high strength and rigidity.
Due to the good strength and rigidity of the material, it is possible to obtain an ideal design geometry that will have a long period of operation. Such slopes are characterized by maintainability. The damaged area can be puttied and tinted.
The disadvantages of the material include its higher cost compared to conventional drywall. However, it is lower than the price of sandwich panels for slopes. Cutting such material is also much more difficult. The surface needs finishing, which is carried out by priming, puttying and painting.
On a note! When painting gypsum fiber slopes with high-quality latex paint, it is possible to obtain a durable, moisture-resistant surface that can be washed.
Features of the material
It is important to purchase high-quality material, as otherwise, when exposed to direct sunlight, the panels may lose their shape and turn yellow..
When working with this material, care should be taken when performing mechanical impacts on it, for example, cutting. The material is quite fragile and the sheet can be damaged if the effort is not calculated.
Working with sandwich panels should be carried out with care to avoid damage to the material
If there is not enough space between the window hinge and the wall, it will not be possible to install this material. It is important to consider that the window opening when using this material will decrease on both sides by the thickness of the panels.
Transporting products can be difficult since the sheets are large. However, in some stores they are cut into smaller pieces.
Plastic panels for window slopes: material features
You can create reliable and aesthetic slopes using plastic panels. They are characterized by a sufficient level of rigidity, wear resistance, and moisture resistance. As a result of using the material, it will be possible to create a flat, smooth surface that does not require finishing.
Plastic panels for slopes do not require additional finishing.
Note! For slopes, you should choose panels made of virgin plastic that are resistant to ultraviolet radiation, which will not lead to yellowing over time.
The panels are installed using liquid nails, which ensures reliable, strong and durable fixation. Installation of the material is easy and quick, with a minimum amount of dust and dirt during the work process. Due to the fact that the slope and the window frame are made of the same material, it is possible to ensure that there are no gaps in the places where the elements come into contact.
Note! For additional tightness, eliminating the negative effects of temperature changes, the butt joint is treated with a sealant.
Plastic panels are attached using liquid nails, and the joints are treated with sealant.
PVC panels for slopes are completely moisture-resistant, so they can also be used for exterior decoration. The presence of an edge profile allows you to give the window a more aesthetic appearance. The element is applied to the joint between the wall trim and the window opening. The cost of the material is an order of magnitude lower than the price of sandwich panels for slopes of plastic windows.
The disadvantages include the insufficient strength of the material, which is why it is prone to mechanical damage. If a defect occurs, the strip is completely replaced. Additional elements are often of low quality, as a result of which they turn yellow, standing out unattractively against the snow-white background of the slopes. In addition, unlike sandwich panels for slopes, plastic elements do not contain insulation, which reduces the thermal insulation properties of the window.
Sandwich panels are very popular today when finishing window slopes. This is due to strength, reliability, moisture resistance and good thermal insulation qualities. The material is installed easily and simply. We are also pleased with the affordable price per m2 of sandwich panels for slopes, which averages 150-200 rubles.
Characteristic
Sandwich panels for window slopes got their name due to the insulation located between the facing panels in such a way that a sandwich-like structure is obtained. This thermal insulation material, which is often chosen as mineral wool or expanded polystyrene foam, is non-flammable, and the panels themselves can boast of the same property. Sandwich panels for windows are environmentally friendly and therefore can be installed without additional protective equipment, as shown in the photo.
It is best to choose panels 1 cm thick for such work. They can be used for both plastic and wooden windows, while the width can vary from 5 to 150 cm. By choosing sandwich panels, you will ensure excellent sound insulation and high thermal insulation. An important factor when choosing is the strength of the material, as well as the long-term use of the material. If the window sill is installed in compliance with all technological standards, then mold and mildew will never appear on the slopes, even in conditions of high humidity. It is best if the installation of slopes from sandwich panels and the window sill is carried out simultaneously. Moreover, it is best to do this the next day after installing the windows themselves, to allow the mounting foam to dry thoroughly.
If your rooms are cool in the winter and even heating appliances cannot help, then finishing the slopes with sandwich panels is exactly what you need. Thanks to a consumable material with excellent thermal insulation, which can be polyurethane foam, your home will always be warm and cozy, and you will forever be able to forget about drafts.
There are certain ways to attach panels to walls. This takes into account the depth of the window, the dimensions and cross-section of the window openings. The fasteners themselves are made using dowels, and subsequently all the ends can be covered with decorative corners.
To process the joints between the panels and the window sill and window, a PVC-based sealant or glue, which is called “liquid plastic,” is used. Unlike silicone sealant, “liquid plastic” does not turn yellow over time and is less dirty.
Recently, few people have resorted to plastering the internal projections of the window opening. Mixing the solution, stained flooring and hands, as well as dust and dirt settled on the slopes, which are quite difficult to get rid of, are a thing of the past. And installing drywall will require a lot of skill and patience from you. Whether it’s finishing the window slopes with sandwich panels. Simplicity of installation and further maintenance, as well as the ability to clean with ordinary cleaning products available in any home, this is what you get when you choose such a unique material as sandwich panels.