Fastening plastic panels to the wall on a frame
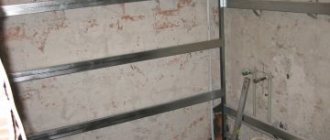
Before you start finishing the walls, you need to make a frame from timber or a metal profile.
Before starting work, you need to remove excess dirt and dust from the walls, and also treat the surface with a special antifungal agent. Then you need to draw the sheathing grid using a level. The distance between the slats should be no more than 40 cm. On the marking lines, you need to drill holes at a distance of 50 cm from each other. It is in them that the profile will be attached to the wall with suitable fasteners. First you need to screw on those profiles that will go along the perimeter of the room, and only then you need to fasten the transverse parts.
If the walls in the room are relatively flat, that is, the difference is not more than 5 cm, then you can use wooden blocks for the frame, but if the difference is larger, you need to use a metal profile. It is much easier to secure it at a distance from the wall using special fasteners. Once the sheathing is completely completed, you can begin finishing work.
It is worth starting work from the corner farthest to the entrance, because it is the one that is most visible and any trimming will be visible here. First you need to secure the starting strips at the top and bottom of the frame. The outer or inner mounting corner should be secured to the side. These elements will help secure the plastic and hide the unaesthetic appearance of the panel cuts. Now you can begin installing the material.
Cut the plastic to the required size, it is better to make it 5 cm less in height - when temperatures change, this will help the panel not to deform. Insert it first into the upper and lower grooves, and then into the side. The plastic must be secured to each sheathing post using screws or a stapler. Subsequent planks will be attached in the same way.
Installing the last strip is the most difficult step. To do this, it needs to be cut half a centimeter less than required by the rules. First insert it into the corner profile, and then snap it into the groove of the previous panel. This way you will not deform the guides and finish the wall installation neatly.
Do-it-yourself wall covering with plastic panels: video and benefits
Today, there are a very wide range of plastic panels for cladding on the market:
- multi-colored;
- with different designs and patterns;
- imitating natural materials.
At the same time, the main thing is to choose the option that fits perfectly into the interior of your room, which will be extremely difficult.
Plastic panels for wall cladding have a number of competitive advantages over other finishing materials:
- affordable price for every consumer;
- convenience and ease of installation;
- high level of resistance to moisture;
- reliability and durability;
- environmental friendliness;
- fire resistance;
- the ability to place panels in different directions relative to the finishing plane;
- good characteristics in terms of thermal insulation qualities of the material;
- It is possible to connect the panels in a seamless way.
In addition, the panels can be installed either with or without a frame. Although it is advisable to use an auxiliary working frame or lathing, which is very important when finishing ceilings and walls in the upper part of the premises.
We invite you to watch a training video on how to properly cover walls with plastic.
Necessary tools for installation work
In order to attach this type of finishing material, you do not need to have sophisticated tools. To begin and complete the work you will need the following construction tools:
- Hammer with impact attachment. Such a tool has a high degree of versatility and therefore it will not be superfluous in every home.
- If the hammer drill does not have a switch to turn on the spindle rotation, then you need a screwdriver. If it is possible to use a special tool for tightening screws or self-tapping screws, then you need to use it, since the hammer drill is heavy and is inconvenient to handle at height when carrying out work.
- Attaching PVC panels to the ceiling must occur exactly on a horizontal plane. It is to check this indicator that the building level is used.
- Molar cord for marking.
- Metal corner, as well as other measuring tools.
- After finding all the necessary tools and materials, you can move on to the next stage of work - preparing the foundation.
Stages of installation work
Workflow: step-by-step instructions
The first stage is preparation
After purchasing the material (PVC panels), you should stock up on the necessary tools:
- A jigsaw or hacksaw is a must-have tool. Without them, it is impossible to install the panels, since the products will have to be cut/shortened in some places. For greater effect, it is better to have both tools.
- Hammer or drill - the choice depends on what the ceiling is made of: reinforced concrete slabs can only be drilled with a hammer, a drill is suitable for wooden floors.
- A set of screwdrivers or a screwdriver - to make the work process go faster, use everything.
- Hammer and mallet - since the ceiling panels are a rather “delicate” material, a mallet will be more handy, although a hammer is necessary for working with the frame.
- Level - it is better to use a meter and half meter, this will make it easier to measure in hard-to-reach places. You will also need a tape measure and painter's cord.
- Stapler, countersunk screws or nails - for attaching PVC panels to the frame.
- Stepladder or scaffolding.
As soon as all the tools are available and the material has been delivered, surface treatment can begin, followed by the installation of ceiling panels.
Cleaning the ceiling is necessary only if it is covered with fungus and rust: otherwise this will soon lead to a violation of the integrity of the structure. It is better to treat the surface with special means, or completely hollow out the “painful” places.
The preparatory stage before installing a suspended ceiling includes marking the surface: a straight line is drawn along the perimeter of the room, which should be 5-10 cm below the ceiling (for wiring). To make it easier, a level is used to mark a line in the corners, after which a paint cord is pulled between the corners.
Second stage - installation
So we come to the answer to the question - how to repair the ceiling using plastic panels with your own hands?
The entire process follows sequential instructions, compliance with which allows you to reduce the installation time of a suspended ceiling several times.
Installation of a guide for PVC panels - it is mounted exactly along the line that was obtained using a rope. The ease of fastening lies in the existing technological holes located on the U-shaped profile.
U-shaped profile
Installation of suspensions - a suspension profile is attached to them. Since the maximum width of plastic panels is 25 centimeters, it is better to mount the profile for a suspended ceiling at this distance. To maintain the level, you need to check it from time to time by pulling the rope from one wall to another: if somewhere the fasteners are lower or higher, you need to eliminate this at this stage, otherwise the unevenness will be noticeable visually.
This completes the process of installing the profiles; now we move on to installing PVC panels; their direction is first selected: across or along the room. Afterwards, the plastic products are attached to the profiles using self-tapping screws (or using nails and a stapler if the frame is wooden).
Wooden frame
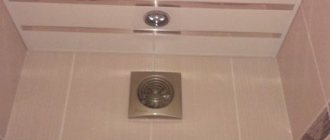
All wiring is prepared in advance and installed in those places where there will be lamps or a chandelier (see mounting ceiling lamps): holes are drilled with special crowns and the lighting fixtures are installed.
Cutout for lighting fixture
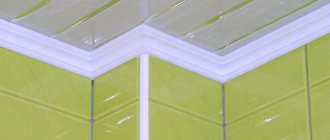
The installation of plastic panels on the ceiling ends only when a border is glued along the perimeter of the ceiling, which hides the joints of plastic and walls, irregularities and raw edges.
Fastening PVC panels to columns
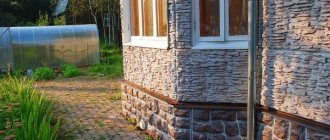
Sometimes there is a need to cover a column with PVC panels. This is a rather labor-intensive task if the column has a round shape. But such work can also be done independently. To cover the column, you will need to calculate the required amount of metal profile, since a wooden frame cannot be used. The whole point of column cladding is the correct installation of the frame.
The metal profile has a U-shape. You need to cut triangles along its edges on both sides. This can be done using a grinder or metal scissors. This way the profile can be bent into a perfect circle. Its fastening is carried out using special metal plates, which are initially attached along the entire circumference. Then the profile is mounted on these plates.
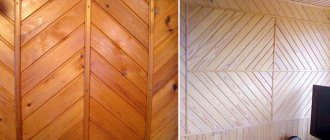
Fastening the lining in such cases is usually used diagonally, since the sheets of panels are rectangular in shape and can be easily attached to a round surface.
You can also watch a video on this topic:
Preparatory work
The beauty of suspended ceilings is that the base base does not need to be primed, puttied, or generally specially prepared. Only the old finish is removed, and it is recommended to treat the surface with an antifungal compound. But sometimes they don’t even do this; the old whitewash or paint is simply hidden under the new ceiling. It is worth considering how high the ceiling will be lowered. The minimum offset is equal to the thickness of the sheathing, but if spotlights are installed or ventilation is hidden under the ceiling, then they start from their maximum height. It is not recommended to lower the ceiling more than 40 cm.
Ceiling prepared for installation of a suspended structure
Other methods of fastening PVC panels
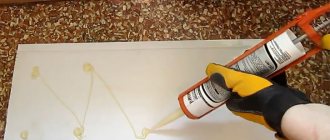
The technology for fastening PVC panels using lathing is not complicated, but often this method takes up significant usable space, this is especially true when the walls are very curved. If the walls are leveled using beacon plaster or drywall, then this method of improvement cannot be called optimal. In this case, PVC panels are fixed to the wall using glue. It could even be silicone or polyurethane foam, which are applied to the surface in zigzags.
Installation of PVC panels directly on the wall. No guides!
Unfortunately, there is another problem. It consists in the fact that you will have to attach the profile to dowels.
According to many, this is a fairly quick installation of PVC panels, but not everything is as simple as it seems. A lot of time is spent on preparatory work, and without them it’s impossible. The disadvantage of this method is obvious: if you suddenly have to disassemble the panels, you won’t be able to do anything without damaging them. In addition, the walls must be fairly even, and here comes a moment of contradiction: why cover the walls with PVC panels if they are even?
Selecting a profile and tools
The main types of profiles that are used to create a frame are the following:
- Starters. Such profiles are used to cover the ends of the tiles and are attached along the entire perimeter of the ceiling surface.
- H-profiles. Another variant of the name is connecting. They are used to increase the length of plastic plates.
- F-profiles. Like the starting ones, they are intended for closing the ends, but are only used in external corners or changing planes. Thus, one wall is paneled, but the corner wall on the other side is not.
- Ceiling plinths. A more refined version of the starting profile.
- Plastic corners - external and internal. They are used to close joints that form in all corners of the surface.
- Universal corners. This type can be used in any corner joints, but this does not guarantee a presentable appearance.
In order to determine a clear amount of materials needed, you should also create a drawing or diagram of the ceiling surface. A small copy of the ceiling is drawn on a regular piece of paper. Each profile should be attached at a distance of 60 cm to the other. Considering this fact, you can count the number of beams for the profile, as well as the number of plinths. In addition, such a diagram marks the mounting points for lighting systems.
Another significant point is the number of profiles for the entire perimeter, as well as the screws and dowels that serve to secure the profile structure. It is also necessary to take into account a certain number of spare parts, well, in case additional ones are required. An alternative option for profiles can be a wooden beam; it is attached using staples. This choice can facilitate the installation process and save a sufficient amount of money.
Ceilings made of PVC panels
A few words about PVC panels
The properties of ceilings made of PVC panels are largely determined by the finishing material itself. What are ceiling panels?
Panels for finishing ceilings from walls are made of plastic. The most commonly used material for this is polyvinyl chloride (PVC). The panels are produced in the form of a lining, i.e. there is a spike on one of the long edges of the PVC panel, and a groove on the other.
This design provides a fairly simple and reliable installation of panel ceilings according to the design principle: the panels are joined to one another, forming a continuous ceiling covering.
PVC panels
According to their characteristics, PVC panels are divided into:
- White ones are often the cheapest. They are made from unpainted PVC and are most often used for finishing walls and ceilings in bathrooms.
- Colored - made from polyvinyl chloride, dyed in the mass. The cost is somewhat more expensive than white ones, but still quite affordable.
- Textured – These panels have their own texture. Most often, the texture imitates wood, but there are also more exotic options.
To decorate ceilings in residential premises, it is recommended to use textured or colored panels, since a simple white ceiling looks quite “poor”
Advantages of PVC ceilings
From the point of view of a master who makes repairs on his own, installing such a ceiling has a number of significant advantages:
- Practical and sustainable. Ceilings made of PVC panels are much more resistant to external influences (for example, waterlogging) than most other finishing materials. It is for this reason that PVC ceilings are often installed in bathrooms - where there is a high probability of moisture getting on the ceiling.
- Durability is directly related to the resistance of PVC to external influences. A well-installed ceiling made of plastic panels does not require repair or replacement for a very long time, and its maintenance consists of periodic washing.
PVC ceiling imitating wood texture
- Low cost. As we noted above, installing a PVC ceiling is an excellent option if you want to “ennoble” a room at minimal cost.
- Easy to install. PVC suspended ceilings are quite easy to install - you can do them yourself with minimal skills in working with tools. Unlike these ceilings, the installation of suspended ceilings, for example, cannot be done with your own hands - you will have to turn to specialists.
Installation without frame
You can decorate the ceiling with plastic with your own hands without assembling metal or wooden sheathing. In such cases, tile adhesive and liquid nails are used. It is important to prepare the most even base here. Be sure to clean it of foreign particles and prime it.
To finish the ceiling with panels, the adhesive solution must be prepared in accordance with the attached instructions.
Using a spatula, apply a thin layer of glue to the back of the plastic and attach it to the corner with a spike. Subsequent finishing elements are glued according to a similar principle, tongue and groove. The last panel is trimmed if necessary. At the end of the plastic ceiling covering, a ceiling plinth is installed.
Plastic panels can be effectively used for both wall cladding and ceiling surfaces. The main thing is to make the calculations correctly, choose a high-quality coating and follow the recommendations regarding the installation of plastic.
Plastic finishing of walls and ceilings - photo:
Ceiling finishing with plastic panels (design) – photo:
Finishing the ceiling with plastic with your own hands - video:
Liked? Share on social media networks!
Many people prefer to choose plastic for finishing walls and ceilings because it is a practical and inexpensive material.
The most affordable and versatile finishing material today is plastic panels. Plastic finishing can be used in almost any room: be it a residential building or an office. No climatic conditions, such as dampness, humidity, drafts and even low temperatures, can cause significant harm to it. These products are available in almost any hardware store and are therefore one of the most popular finishing materials. When installing, it does not have any particular complexity of fasteners and allows you to choose different colors and shades. Both a specialist and an ordinary householder can assemble a plastic ceiling.
Lighting
For plastic ceiling panels, luminaires with a certain type of lamp are used:
- halogen;
- luminescent;
- LED;
- incandescent lamps.
To install them, a diagram is first drawn up. To ensure good lighting in the room, the lamps are installed at a distance of no more than 1 m from each other. You should calculate where the electrical wiring will go and how many lighting fixtures will be needed, as well as how long the cable will have to be used.
For plastic, it is necessary to choose a fireproof wire, which is attached in places where lighting fixtures will be located. Using clamps and clips, a wire loop 10-15 cm long is attached to the frame and pulled down through the panels. This stage of work is carried out during the installation of the ceiling covering.
The lamps are mounted in 220 V lamps, and they can also be built into devices with a step-down transformer within 12 V. For standard voltage, ordinary lamps are used. When the voltage is low, LED or halogen light sources are installed in the lamps.
The bathroom or kitchen should be lit by a separate automatic device. In the event of a short circuit, the emergency mechanism will operate and the electricity supply will stop. From the electrical panel after the machine, the current supply is supplied to the transformer, and from it to the lamps. For high-quality operation of light sources, the distance from the transformer to the lamp should not be more than 2 meters. Up to four lamps can be connected to one transformer.
When installing lamps on 220V lighting fixtures, the lamp housing must be insulated. During operation, the lamps become heated, and plastic concentrated on the ceiling may warp from their heat.
Varieties
- matte - look better with good lighting, since the surface partially absorbs light, so the rated power should be higher than that of glossy counterparts;
- glossy - suitable for low rooms, since the mirror surface creates the illusion of no ceiling boundary and makes it a little visually higher.
PVC ceiling panels come in different shapes:
- sheet - most often produced square with a side of 0.3 or 0.5 m, rectangular ones are less common;
- seamless - equipped with special grooves that allow you to create a monolithic surface without visible gaps or seams between individual slabs;
- slatted - in appearance they are very reminiscent of plastic or wooden lining, and are fastened in the same way and are produced in the form of long strips.
By color of decorative coating
- Solid colors with higher UV resistance.
- Laminated with an imitation of the texture of natural materials - over time, the sun's rays that fall on the surface of the boards contribute to the peeling of the laminated coating.
- Mirror - consist of a PVC base and a reflective film, which reflects up to 90% of the rays falling on the surface. You can find such coatings in public institutions, for example, swimming pools, shopping centers, restaurants.
- Varnished - consist of a plastic base and a thin varnish layer, which is very sensitive to mechanical damage.
- With printed design.
- With thermal printing.
By mounting method
- seamless;
- with a seam that is visible.
By size
- thickness – 1 cm;
- width – 0.1 m, 0.2 m, 0.25 m;
- length - 2.7 m, 3 m, 4 m, 6 m (slat), 0.3 and 0.5 m - on the side of the square (sheet).
Preparation stage
Before installation, you will need to prepare the following material and tools
- the slabs themselves, profiles for the frame - guides, ceiling;
- connecting elements for the frame, hangers, stringers;
- fasteners: dowels, metal screws, “liquid nails”;
- ceiling plinth or molding;
- acrylic sealant for sealing seams;
- deep penetration antiseptic primer;
- laser level or with an alcohol capsule, beating, nylon thread;
- square, tape measure, construction ruler no less than 1 m (metal);
- a hacksaw with a blade for metal or an angle grinder;
- impact drill, set of drills;
- metal scissors, wire cutters, pliers, hammer;
- construction knife with break-off blades;
- a screwdriver for self-tapping screws and dowels that will be used during installation.
Advice Additionally, you will need protective equipment and clothing, including a respirator and plastic goggles.
It will be necessary to prepare the ceiling surface. Under the starting profile, markings will be made along the perimeter of the room under the ceiling.
How to install the frame yourself?
- plastic profile of the "economy" category;
- wooden beam with a section of 2x4 or 3x3 cm;
- metal profile.
The choice of wooden beams is unacceptable for rooms with high humidity and temperature fluctuations
How to attach the sheathing?
PVC frame
- starting profile, which should be fixed on the walls of the room and act as a load-bearing structural element;
- ceiling for fastening between starting elements inside the ceiling area;
- H-shaped, with which the ends of different panels are joined;
- ceiling plinth made of plastic, which, after installing all the ceiling elements from PVC panels, closes the gaps between the wall and the ceiling;
- universal corner - for creating multi-level ceilings and masking structural joints.
Wooden sheathing
Advice: In rooms with high humidity, it is better to abandon such a frame, since wood does not tolerate high humidity and significant frequent changes in microclimate.
covering living room ceilings with plastic sheets. To fix the timber, dowels are used that are drilled into the surface of the walls
How to install a metal profile?
Often a metal profile is chosen when organizing a plastic ceiling; make a two-level ceiling with your own hands; Procedure for installing parts
- The guide profile is fixed according to the marking level on the walls of the room along the perimeter.
- Suspensions, stringers under intersecting ceiling profiles and spotlights are attached.
- A structure is assembled from ceiling profiles, which are fixed together with a “crab” element.
Important It is necessary to use only suitable structural elements when using a metal profile, which will ensure the reliability and strength of the connection of all parts. https://www.youtube.com/embed/ehIZxlyG7iA
How to cover a frame with PVC panels?
The panels are installed on the frame according to the following principle
- Measurements are taken between opposite walls along the direction of fastening the panels, and strips of the required length are cut from the material.
- The first panel is installed with the groove outward, fixed with screws and press washers to the frame with a clear location relative to the window, if the area of the room allows (width no more than 6 m).
- All subsequent planks are fixed in the lock-groove fastening until the last one according to a similar scheme.
- The last plank should be cut to the required length and reduced to approximately 1 cm so that it can be easily inserted into the structure. “Liquid nails” are used for fastening.
- The last stage is attaching the ceiling plinth around the perimeter of the room to the wall with “liquid nails”.
- All joints between the planks are sealed with acrylic sealant, which is inserted with a tube into the mounting gun. It is necessary to immediately wipe off excess composition so that it does not harden and spoil the decorative coating.
the planks should be cut 5 mm less on each side of the measurements taken for ceilings in bathrooms and kitchens
Main types of PVC plastic panels
PVC boards can have different characteristics. This universal material has the following parameters:
- Size – there are square and rectangular elongated slabs. So-called PVC slats up to 15 centimeters wide are also produced. There are also slabs whose width reaches 2 meters;
- Surface – can be glossy, half-glossy or completely matte;
- Framing type – suture and seamless. With a seamless type, the joints between the panels are practically invisible. Thanks to this, the surface becomes continuous. With the suture type, the joints, on the contrary, show through well. These types of framing are used depending on the design of the room;
- Also, PVC panels have a huge range of colors, textures and images. Therefore, every apartment owner will find something to suit their taste and preferences.
PVC panels have a huge range of colors, textures and images.
What you need
So, now we will consider the option of installing a suspended ceiling using PVC panels as a finishing material. To do this, you will need the required minimum of tools, PVC panels and the required mounting elements. More precisely, you will need the following tools:
- screwdriver or low-speed drill;
- tape measure, bubble level, water level;
- hammer;
- miter box, hacksaw, construction knife.
The material used is PVC panels. According to generally accepted standards, panels can be 25 and 50 cm wide. The main parameter when purchasing is the area of all elements in the package. When calculating the required quantity, you should calculate the area of the room in which the suspended ceiling will be installed, and increase the resulting quantity by 10-15%, taking into account the trimming of the material.
To secure the panels to the ceiling, use special fasteners and form a frame. The PVC panels themselves are quite fragile and soft, so for reliable fastening you will need a strong frame with frequent lathing.
Along the perimeter of the room, a U-shaped plastic profile is used, into which the edges of the panels will be inserted. As an alternative, you can choose a matching ceiling plinth for PVC panels, which is already equipped with a U-shaped groove. In high-quality design, such a plinth is a prefabricated structure in which the U-shaped groove is assembled in two parts to facilitate installation.
For the sheathing, you can use a wooden beam measuring 20x40 mm or a metal profile like for plasterboard. In the bathroom or kitchen, wooden beams are not suitable due to high humidity. However, thanks to the simpler installation of wooden beams and the fastening of the panels themselves to it, it can be used in the bedroom or living room. The second parameter for selection is the price of the material; in this matter, you only need to check the availability and price in your region. When using wood in any form in construction, it must be treated with antiseptic impregnations and fire retardants before installation. The latter is necessary to increase the fire-resistant properties of wood.
PVC panels of various standards
In addition, there are plastic or aluminum profiles specifically for PVC panels. If the cladding is carried out along the ceiling with small differences of up to 4-5 mm and with minimal lowering of the suspended ceiling, installation of PVC panels on the ceiling may be completely simple. The profiles are made with a special groove in the center for fastening to the base and for fastening the clips that will hold the sheathing panels.
For hardware, you will definitely need plastic dowels and nails-screws for them (another alternative would be anchors with a wedge for driving). They will attach frame elements and profiles along the perimeter to the walls and ceiling. The frame itself is assembled using screws with a drill tip for the metal profile and wood screws for the timber. PVC panels can be fastened either with screws with a press washer or with special metal clips. The approximate quantity of all hardware can be calculated after choosing the method of fixing the ceiling and after reading the installation instructions.
Criteria for choosing plastic panels
Covering the ceiling with plastic panels will have the desired result only if the finishing material is chosen correctly. To do this, it is recommended to adhere to the following tips:
- stiffeners must be free of visible damage and deformation
- the design on the façade should be distinct, with clear lines, without blurred areas
- the coating of all selected panels must have the same tone, for this the panels must be from the same batch
- there should be no dents or scratches on the plastic
- do not buy panels of different sizes
Preparatory stage
Cladding with PVC panels
Preliminary calculations
You need to start by calculating the amount of finishing material so that you don’t have to overpay or go to the store for an additional batch. The panels can be mounted both vertically and horizontally, depending on the wishes of the apartment owners. When mounting vertically, the number of panels is calculated as follows: measure the length of the perimeter of the room, subtract the width of the openings and divide by the width of one panel. To the resulting number add 2-3 lamellas in reserve.
For horizontal installation, measure the area of the room minus door and window openings and divide by the area of one panel. Here the margin should be at least 10%, since the consumption of material for trimming increases. Additionally, you need to calculate the number of slats for the sheathing and fasteners. First, the height of the walls is divided by the sheathing pitch, which is usually 0.5 m, and multiplied by the perimeter of the room. The resulting number indicates the length of the slats in linear meters. By measuring the height of the corners and multiplying it by their number, we obtain the total footage of the corner profiles; to this number you need to add the perimeter of window and door openings.
Methods for attaching lamellas
How to attach PVC lining to walls
There are three ways to attach panels to the wall - using glue, self-tapping screws and clamps. The first method is suitable for very even and smooth walls; glue is used special for PVC, universal “Moment-installation” or “liquid nails”.
Installation of panels with glue
The use of this method simplifies and reduces the cost of the installation process, since there is no need to attach the sheathing. Disadvantages: it is impossible to replace a damaged panel; during subsequent repairs it is difficult to remove the covering from the wall.
Methods for installing PVC panels on walls
Do-it-yourself installation of PVC panels
Fastening with self-tapping screws is a reliable and convenient option that does not require a perfectly flat surface. To screw in the screws, you definitely need a screwdriver, otherwise the installation process will take a long time. Disadvantages of this method: a wooden frame is better suited for self-tapping screws, so additional time is spent cutting the timber and treating it with an antiseptic.
How to attach plastic panels
The third option is the most optimal. The clamps are conveniently and quickly attached to the sheathing and securely fix the panels to the wall. The lathing is mounted from a metal profile, assembly of the covering is carried out effortlessly. A damaged lamella can be easily replaced with a new one; dismantling the finish also does not take much time.
Installation of PVC panels
Tools and necessary materials
During the work, everything should be at hand, so materials and tools for installation are prepared in advance. You will need:
- fine-toothed hacksaw;
- pencil and tape measure;
- level;
- square;
- plastic panels;
- slats or plastic profile;
- dowel-nails, screws or clamps;
- screwdriver;
- perforator;
- antiseptic composition;
- sealant;
- ceiling plinth.
Preparing the walls
Before covering the walls with panels, you need to clear the old coating, seal every single crack, smooth out noticeable defects and treat the surface with an antifungal agent. Thanks to this, dust will not accumulate under the plastic and mold will not develop, which negatively affects the microclimate in the room. If the installation will be carried out on a frame, it is not necessary to additionally level the surface.
Choosing a frame for PVC panels
In order to carry out all installation work efficiently, you should first familiarize yourself with the preparatory work. The installation of wall or ceiling panels depends 90% on a high-quality frame for them. It is intended for fastening panels, since such material is not used on the main surface. In some cases, it also performs the function of leveling the main surface.
The frame can be made from wooden slats or from a metal profile. This profile is used for drywall work. The difference between these materials lies primarily in the pricing policy. But it is also worth noting other nuances.
On the left is a wooden frame (sheathing), on the right is metal
A wooden frame is made faster and will cost a little less, but before installing it, additional costs and time will be required for fireproofing the wood. Also, if the rail was purchased raw, after its installation it may change shape. As a result, more dowels will be required to secure it.
The main advantage of a metal frame is its durability and ease of work. It does not require any additional work with it.
It is also worth noting that if the walls are uneven, the wooden slats will require more than the metal profile. A metal frame is simply necessary in places with high humidity, since under such conditions the tree can be affected by fungus and the entire frame can collapse in a short period.
To choose the right material for the frame, you will also need to take into account the location and type of wiring if the work is carried out indoors.
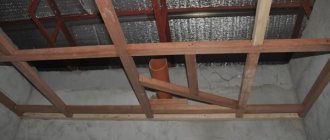
How to make a sheathing from bars
It is advisable to install wooden sheathing at a certain distance (3-5 cm) from the main ceiling.
Lathing made of bars on hangers
This will make the skin as smooth as possible, as well as avoid difficulties with laying communications and installing lighting fixtures. The manufacture of such a frame involves the use of brackets, which you can make yourself or purchase galvanized U-shaped hangers (used to construct a frame from a profile).
The most suitable cross-section of the batten for wooden sheathing on the ceiling is 20x40 mm; 15x40 mm is less commonly used. It is not advisable to use material thicker than 20 mm, since the mass of panels, even wall panels, is relatively small.
Planed dry lath 20x40mm 3 m long will cost 50 rubles.
An important factor is the moisture content of the wooden blocks. It will not be possible to accurately determine it without the use of special equipment; in such cases, they are guided by the weight of the product; in addition, moisture that is excessive for the frame will be noticeable to the touch.
In addition to humidity, you should pay attention to the color of the wood. There should be no bluish or brown stains on the rail - this indicates the presence of fungal formations and the initial stage of rotting, which can significantly reduce the service life of the structure
The construction of timber sheathing includes the following steps:
- Marking. Using a water level on the walls along the perimeter of the room, the location of the frame in height is marked. You can also use a regular bubble level for this procedure, but the accuracy will be less.
- Installation of beams (guides) around the perimeter of the ceiling. According to the markings made at the first stage, the rail is attached along all the walls (with the wide side parallel to the ceiling). During installation, it is advisable to double-check the accuracy of the level, and also use the rule to control the evenness of the fastening of the guides. The timber is fixed either to hangers or directly to the rough ceiling. The method of fastening depends on the material from which the base is made: if it is a concrete slab, you will have to drill it, hammer in the dowel and only then fasten the suspension with self-tapping screws; Self-tapping screws can be screwed into a wooden floor without prior preparation. The distance between the fastenings depends on the thickness of the timber used, but should not exceed 60 cm.
- Installation of transverse elements of the sheathing. The ends of the transverse bars are aligned flush with the front side of the guides. Fixation is performed in the manner described in the second paragraph. During the installation process, it is necessary to ensure that the front side of the entire rail is located in the same plane, for which it is convenient to use the rule. They apply it to a pre-fixed beam and see if there are any gaps. If there are irregularities, the position of the beam is adjusted by suspensions (if any were used) or spacers (wooden wedges, pieces of fiberboard, MDF or thick plastic). The distance between the centers of the transverse elements should be no more than 50 cm.
Ceiling diagram - bottom view
It should be remembered that the plastic panels are located perpendicular to the transverse rail. This must be taken into account during the initial design of the sheathing and calculation of the material, in particular the consumption of the PVC profile. It is more rational to sheathe the balcony ceiling (4x1.2 m) crosswise, since the length of the plastic panels is 2.4 m, 3 m or 6 m.
Material selection
Firstly, when purchasing PVC panels you need to visually evaluate the product. There should not be any dents or holes on it, there should not be a strong smell of plastic, the surface should be smooth, the pattern should not be damaged, there should be no kinks along the entire length of the panel. The stiffening ribs on the inside of the panel should not be visible.
Another important point is the tight fit of one panel to another when joining; the seam should be barely noticeable.
- Another important indicator is the density of the product. It can be determined simply by pressing firmly on the panel. If the material is of poor quality, it will simply crack.
- When choosing, it is worth comparing copies of several manufacturers. Pay attention to the number of internal ribs.
- The PVC panel is represented by a three-dimensional structure, consisting of a hard layer on top, and stiffening ribs located inside. Along the edge there is a certain tongue-and-groove configuration, thanks to which the panels are connected into a single sheet. The fastening system is similar to eurolining.
- Note: The strongest panel is considered to be the one with more ribs.
- It is better to choose panels that have the largest thickness of walls and stiffeners.
- A good panel will not leave a mark after several folds.
The nuances of attaching PVC plastic panels in different rooms
How are PVC panels attached to the wall in different rooms? After all, installation has its own nuances depending on the room.
Bathroom and toilet
There is high humidity in rooms such as the bathroom and toilet. Therefore, the slabs should only be attached to the sheathing.
In the bathroom, slabs should only be attached to the sheathing.
Kitchen
There is always a lot of fumes in the kitchen. Therefore, it is better to install this finishing material using a pre-prepared frame.
It is better to mount this finishing material using a pre-prepared frame.
Balcony
If the balcony is sufficiently insulated and the humidity in it is minimal, you can take a chance and install the products without lathing.
If the balcony is sufficiently insulated, you can take a chance and install the products without lathing.
Other possible rooms where they can be used
In other rooms, you can also install PVC slabs without using lathing. Of course, it is better to use liquid nails or special glue as fastening. Self-tapping screws can spoil the visual characteristics of the interior.
It is better to use liquid nails or special glue as fastening.
Pros and cons of PVC panels
When choosing a finishing material, you should know and take into account all the positive and negative qualities. PVC panels have the following positive qualities :
- Easy installation;
- Long service life;
- Availability;
- Large selection of colors;
- Does not require special care;
- This material is suitable for finishing any room;
Along with positive qualities, there are also a number of disadvantages that you should pay attention to when choosing it:
- Low impact resistance;
- This material is not resistant to ultraviolet radiation. That is, it is not advisable to install the lining in places that are constantly exposed to the sun;
It is worth noting that such shortcomings can be removed depending on the pricing policy. Therefore, when choosing PVC panels, great attention should be paid to these parameters.
Attaching panels to the ceiling
To attach PVC panels to the ceiling, you need to purchase them in the quantities calculated earlier, select a tool, prepare the surface and get to work.
Selecting a tool
To install PVC panels with your own hands you will need:
- drill or hammer drill;
- screwdriver or screwdriver;
- knife, hacksaw and metal scissors;
- miter box;
- clean cloth;
- glue or liquid nails;
- level and roulette.
Preparation for installation
Before attaching the plastic panels, the ceiling surface must be thoroughly cleaned of anything that could damage the planned finish by crumbling, breaking off, or catching fire. The ceiling must be coated with a primer, after which it dries, markings for the frame are drawn on it.
The resulting space between the ceilings is used to accommodate communications and, if necessary, insulation.
Using a level and a tape measure, a perimeter line is drawn on the walls, at the level of which the future PVC ceiling will be located. The height of this line depends on the unevenness of the ceiling (measurement should be taken from the lowest point of the ceiling), the size of the selected lamps, communications and wiring.
For separate wiring, you need to leave an empty space at least a couple of centimeters high. After placing several marks on the walls, they are extended into a continuous line. A chalk rope will help with this, but you can also mark the line with a pencil.
Next, a grid is drawn on the ceiling itself, indicating the location of the frame so that the profile is located at right angles to the direction of the panels, and the distance between its slats is 60 cm.
Installation of frame for panels
The metal profile is attached to parts similar to the letter “P”, installed in increments of 0.6-0.8 meters with anchor bolts. They are attached to the profiles with screws or self-tapping screws. Jumpers are not placed between the supporting planks of the frame, installing them only in those places where it is planned to mount the lamps.
After installing the frame, wires for lighting fixtures are laid, hidden in a corrugated pipe. For spotlights, you can leave a loop no more than 20 cm long.
Another option for installing the frame is to use plastic sheathing: the U-profile is fixed so that its lower side is at the level of the perimeter line outlined on the walls, joining the corners with a saw and a miter box. The plastic profile is mounted in increments of 30 cm.
An even cheaper option is to install a wooden frame on the ceiling with dowels or screws in increments of 0.6 meters.
Installation of PVC panels
Installation is carried out according to the instructions on how to attach PVC panels to the ceiling:
- the length of each plank must be reduced so as to obtain a value 10 cm less than the length of the ceiling - a gap is left between the end side and the wall;
- the first panel strip is inserted into the U-profile and fixed with screws to each support profile on the frame. To facilitate further finishing, you can cut off its outer latch;
- if the size of the panel needs to be adjusted, it is cut with a knife or hacksaw;
- the second strip is inserted into the gap of the first panel at an angle and secured with screws on its other side;
- When almost the entire ceiling is covered with panels, the last of them can be trimmed on the side where the groove is located.
Plastic panels can be easily cut using a utility knife by making a cut and then breaking the panel along it
Alternative - glue the panels
If the ceiling is smooth and has no significant defects, panels can be glued to it. To do this, use liquid nails to draw a medium-sized mesh on the surface and install the first panel. Next, a second one is inserted into its groove and advanced to the end of the ceiling.
Features of installing panels on walls
Source: krovati-i-divany.ru
It is much easier to install plastic strips on walls than on the ceiling. You just need to find out whether the drawing will be horizontal or vertical. Sometimes, when installing longitudinally, PVC strips may require much less than when installing them perpendicular to the floor. Preparatory work includes:
- cleaning walls from wallpaper, paint, dust;
- marking the premises;
- installation of a frame for attaching panels.
If you have wooden walls, then use self-tapping screws. Dowel-nails or regular dowels together with self-tapping screws are suitable for surfaces made of brick or concrete.
To attach plastic to the structure use:
- nails;
- clasps;
- staples;
- self-tapping screws
Installation of PVC panels begins with securing the final elements, as well as corners - internal or external. If you plan to close the wall to its entire height, then cover the beam near the ceiling with a plinth. Fastening with brackets or self-tapping screws is done from the side of the wide fastening strip.
Important!
Plastic is glued to smooth walls using liquid nails.