Wall insulation
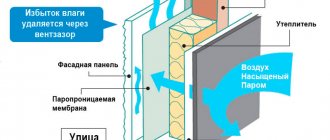
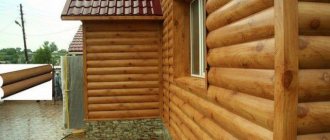
The best option would be to insulate from the outside. This will solve problems with dampness, freezing and blowing
This is especially important with a steel frame. The racks, sewn on the outside, will be protected from external influences, maintaining performance characteristics for a long time
When externally sewn, the structure cannot be frozen. Temperature changes do not affect the strength. Insulating a structure in this way means ridding it of dampness. From the inside, everything will be dried with warm air.
The insulation technology can be:
- Frame;
- Wet method;
- Well method.
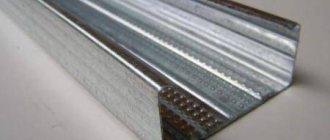
The first option is suitable for insulation under finishing with boards, corrugated sheets and other similar elements. A frame in the form of an aluminum profile or wooden slats is placed on the surface of the wall. The step is set taking into account future finishing.
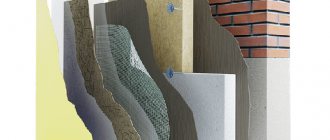
The wet method is so named because of the finishing plastering. Often, a shed is insulated with foam plastic by gluing slabs. After complete setting, the foam is fixed with plastic dowels.
A fiberglass mesh is installed over the insulation layer. It is necessary to hold the plaster on the surface. The canvas is fixed with glue or a stapler.
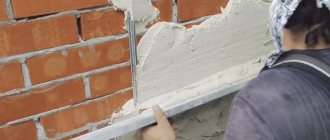
A plaster or cement-sand mortar is applied on top of the mesh. It can be in the form of an even layer or in the form of a “fur coat”.
The well method can be created using masonry or using boards. When laying, two half-brick walls are erected, fastened in height with mortgages. The space between them is filled with:
- slag;
- foam balls;
- expanded clay
Sawdust is poured into the space. The insulation is being compacted. Next, the next sewing and backfilling occurs. Insulating the shed from the inside is also not uncommon. Often shingles are used for such purposes. This is a mixture containing sawdust, water and clay. The material is applied to the frame of their thin slats.
You can make the insulation yourself or order a ready-made mixture. Many companies produce such compositions in dry form with various properties.
The advantage of insulation is that you don’t feel sorry for it. It is difficult for even ungulates to damage such lining. Even if this happens, you can always repair the defect. The cost of insulation is small, but the effect is quite good.
For a more lived-in shed, lining with reflective material is suitable. Its feature is to retain heat indoors. Therefore, when using it, it is necessary to install a heater inside.
The insulation can be attached either with glue or with wooden slats. The second option is more reliable. In addition, using this design you can later create a more attractive finish.
First, let's look at how to insulate a wooden shed.
Plank building
Even if the shed is built of boards, it can be well insulated.
- Even with good care, boards will crack, and even more so in a plank shed. We will have to fight this phenomenon. You can use available materials (tow or dry moss) to seal the cracks, but this can be done much faster with the help of polyurethane foam.
- Now you need to make a second wall from the inside at a distance of 30 cm from the main one. Simply make a frame onto which OSB sheets are screwed, and the space is filled with insulating material. Design features do not matter, the main thing is that the system is reliable. Instead of OSB, you can use an unedged board, nailing it with a herringbone pattern. In this case, the cracks will have to be sealed from the inside with foam.
- To prevent the insulation from absorbing moisture from the floor, roofing felt is laid on the ground, and only after that the insulation is laid.
Plank building
Plank shed
- Even with good care, boards will crack, and even more so in a plank shed. We will have to fight this phenomenon. You can use available materials (tow or dry moss) to seal the cracks, but this can be done much faster with the help of polyurethane foam.
- Now you need to make a second wall from the inside at a distance of 30 cm from the main one. Simply make a frame onto which OSB sheets are screwed, and the space is filled with heat-insulating material. Design features do not matter, the main thing is that the system is reliable. Instead of OSB, you can use an unedged board, nailing it with a herringbone pattern. In this case, the cracks will have to be sealed from the inside with foam.
- To prevent the insulation from absorbing moisture from the floor, roofing material is laid underneath it on the ground.
Internal additional work
In order to maintain a favorable microclimate in the insulated utility room, you will need to take care of air circulation. Animals produce a lot of moisture during their life, and humid air is a breeding ground for the development of mold and mildew. To organize air exchange, you will have to install one or two exhaust devices with a check valve into the wall at the top of the room, which prevents cold air from entering the room. Supply ventilation, as a rule, is provided by remaining leaks, a gap under the door and its periodic opening.
If possible, an insulated shed should be equipped with a vestibule with an internal door. It is convenient to store food and pet care items out of their reach. The vestibule allows you to save up to 30% of heat.
12.10.2018
Owners usually prefer to handle the construction of their households on their own. buildings And quite often the question arises of how to insulate a shed. Even before construction begins, you need to know for what purpose you need it: to store unnecessary rubbish, tools, or whether livestock will live in it. Determine the dimensions of the future building. Then mark the planned shed on the site and dig a trench for the foundation. It can be shallow, about half a meter. When pouring the foundation, you can use stones, pieces of old brick, mixing them with cement mortar. If the foundation suddenly settles, you just need to add a new one.
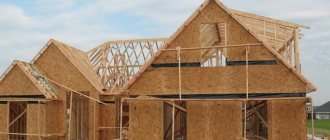
Construction of a shed: attention to the frame option
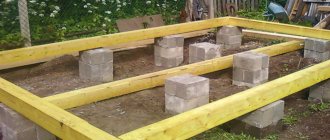
Instead of building a stable foundation for heavy brick or cinder block walls, it is better to make an analogue lightweight base for a frame shed.
In this design, small cross-section bars act as a frame - 22x28, 24x32, 26x36 mm. Unless the load-bearing joists for the floor can be thicker - 40x60, 60x80, etc.
Moreover, it is not necessary to be guided by the corresponding parameters, because There is always lumber of similar sizes on the market.
As a last resort, such a copy can be ordered from a carpentry shop. And if there is an analogue that is thinner or thicker, then you just need to increase or decrease the number of pillars and lamellas for the future design.
How to insulate a shed from the outside with your own hands, step-by-step diagram
Step 1: Create a frame for the walls
The back wall of the frame will be the existing wall surface, and we will put together the front wall from boards. Even those that are not quite even will come in handy. What about the cracks? There is one proven technique - the boards are nailed with an overlap! First, two boards are nailed to the bars, leaving space between them for the third. The middle one is inserted so that the upper part fits under the first board, and the lower part covers the second board on top. You will get a “Christmas tree” through which no wind will break through. The advantage of this design is that it is protected from drying out, because if we simply nailed the boards together, sooner or later large gaps would form between them.
Step 2: Fill the frame with insulation
The space between parallel walls can be insulated with your own hands in different ways. If funds allow, buy mineral wool or fill the voids with polyurethane foam. However, initially we agreed to save money, which means it’s time to remember the methods of insulation for the winter that our grandparents used. What could be simpler than sawdust! The material is almost free - at the nearest sawmill there is at least heaps of this stuff, you can bargain with the watchman for a bottle of something stronger.
It is advisable to take sawdust that is dry and small. To prevent rodents from infesting them, it is enough to mix the wood with fluff lime - 1 part of lime is enough for 25 parts of sawdust. When insulating with sawdust, the space between parallel walls should be at least 25 cm. The prepared material is covered in layers, constantly tamping. Over the next two weeks, the insulation will still shrink - do not forget to add more sawdust after some time.
Step 3: Insulate the ceiling
In the case of the ceiling, the same frame is created. But unlike walls, a layer of high-quality waterproofing is also laid on top of the thermal insulation. Simply covering with slate or tiles is not enough; between them there must be a layer of roofing felt or plastic film. The most important thing at all stages is to prevent moisture from penetrating into the sawdust. To prevent this from happening, many people pack sawdust in plastic bags and then carefully place it in the space between the walls.
Step 4: Insulate the floor
To insulate the floor with your own hands, it is important to make a mound of soil at least 10 cm high on top of the main level. Then clay is poured and compacted
The disadvantage of this method is the dirt that will always be inside the barn. If you want to make a clean and durable heated floor, it is recommended that instead of an embankment of soil, make an embankment of expanded clay and pour a cement-sand screed on top of it. Just do this in advance, in the warm season.
The first method is cladding with boards.
The outside of the barn can be covered with boards according to the principle of brickwork, closing the gap between two boards with a third. The walls are covered with slate in the same way as when covering the roof. In addition, the shed can be sheathed with boards from below. Sheets of slate are placed higher, and then timber is stuffed.
During the work process, insulation is poured between the walls, which needs to be compacted with something. Pine needles, fallen leaves, and sawdust can be used as insulation. These materials are mixed with lime in a combination of one to twenty-five. This avoids problems such as rodents between the walls. The ceiling also needs to be hemmed, and the same composition must be poured on top. Boards are placed above the rafters and covered with roofing felt in several layers, which must be nailed down with wooden slats at a distance of half a meter. The lower part of the barn can be lined with slate on both sides, which will protect the room from rodents and predatory animals.
The bottom of the barn is insulated by filling the floor with soil, 10 cm below the main floor, and then laying and compacting the clay mortar.
The door is made of boards knocked down diagonally, with a layer of roofing felt placed between them so as not to let out heat.
Types of modern sheds depending on their purpose
Before you order the construction of a shed, you need to decide what it is needed for. Depending on the purpose of use, utility units can be divided into the following categories:
Building for storing gardening equipment. Most often, it is designed as one small room with an area of 6–12 square meters. m.
Multifunctional barn, which includes storage for things, a gazebo, and a cellar.
Poultry house, pigsty, rabbitry.
Mini poultry house from the designer: such a chicken coop will not spoil the overall appearance of the site, but, most importantly, the laying hens will be comfortable here
A cellar barn consisting of 2 parts: one for household supplies, the second for things.
A utility unit for household items, for example, garden and home furniture, a collapsible swimming pool, etc.
The utility room is a gazebo, which can be glazed. In summer it is used as a living-dining room, in cold weather - as a closet.
Barn with terrace. Often such a project, with common sense, turns into a bathhouse with a guest room.
Summer kitchen-dining room with pantry. Here you can place or attach a barbecue.
The gazebo-dining room is a great place to relax with family or friends
To ensure that the building does not create disharmony and fits into the landscape, you should not neglect the design. It’s both pleasing to the eye and not embarrassing in front of guests, and most importantly, it’s comfortable. Most often, minimalist, country, and high-tech styles are chosen for utility units.
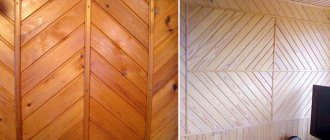
The second method is cladding with shingles.
How to insulate a shed if money is tight? The walls need to be covered with shingles, it needs to be nailed diagonally, starting work from the corner. Do the work in one direction, then in the other, until the shingles cross. It can be replaced with goat willow branches, then the clay can be applied thicker.
Start preparing the clay solution by adding sawdust to it. The clay needs to be soaked and diluted with water to the consistency of liquid sour cream. Sawdust should be added a little at a time, achieving the required thickness of the solution. For cooking, it is better to take larger dishes so as not to knead several times. The finished solution should stand for a while.
Apply the solution to the lower part of the wall in large quantities and level it with a spatula. Its layer should be at least 3-5 centimeters
Apply the solution evenly, paying special attention to the corners of the room. They can even be rounded and made even warmer
After finishing plastering, let the walls dry for several days. During this time, cracks form, which must be rubbed with a solution of clay and sand in a ratio of 1 to 2. The walls must be whitewashed with lime. Take granulated lime and dilute it in half a bucket of water. Within a minute, the reaction with water will begin, the solution will become very hot. When the reaction is over, fill the bucket with water to the top, add a spoonful of table salt.
Insulate the barn ceiling. At a level of 15 cm from the roof along the perimeter, secure the bars. The length of the boards should allow them to lie on the bars and fit snugly against the walls. Fill the boards with a solution of clay and sawdust, 10 cm thick, after opening the roof
Again, special attention should be paid to the corners
The process of insulating a shed in this way is quite labor-intensive, but it is the cheapest and very reliable. Now your animals will definitely not freeze!
05/26/2013 at 16:05
How to insulate a poultry shed so that the chickens lay eggs?
Construction and insulation are carried out outside the barn
Rural residents hardly need to be explained what pets are and how to care for them. But for yesterday’s “city dwellers” who decided to move closer to nature, everything is new! As a rule, chickens are the first on the list of pets, not counting dogs and cats. In spring and summer, caring for them is not at all difficult, the main thing is to provide high-quality food and a shelter where they can hide from the sun. But in winter, the question is different - you can’t invite a chicken “gang” led by a pugnacious rooster into your house for the whole winter, and in the tool shed the animals will simply freeze.
The issue should be resolved quickly and effectively. And, as everyone thought at that moment, preferably inexpensive. Even a leaky tool shed can be turned into a warm room for the winter with your own hands. The simplest option is to knock down a wooden frame from boards, hollow inside.
Heating is a radical way to make the barn warm
If winter has caught you suddenly, and the barns with animals turned out to be poorly insulated, a radical way to increase the temperature inside the premises is to provide heating for the winter. Heating can be electric or wood-burning. In the first case, heaters are used, in the second, a stove is built. Heaters are a temporary solution to the problem, but the stove should be installed even in insulated rooms.
The fact is that thermal insulation does not warm, but only prevents heat from leaving the barn. The stove will allow you to quickly and at no extra cost heat the air for a comfortable life for your pets. What to make the stove from is up to you. Just keep in mind that brick structures take a long time to heat up, but then take a long time to cool down. Metal stoves heat up almost instantly, but then cool down just as quickly.
Insulated doors will help conserve heat inside the barn. It is best if the door leaf consists of two independent halves. To let animals out into the yard or into an enclosure for walking, all you need to do is open the bottom door. Warm air accumulated from above will not be able to leave the room. And in the summer, the upper half will make it easier for you to clean the barn - through it you can throw fresh manure outside.
If you live in a private house, then you have some opportunities that residents of government apartments do not have. You can grow your own vegetables and fruits, have your own livestock and treat yourself to fresh, organic products. True, the cattle still need to be kept somewhere. And here they go to great lengths - they drive the poor cattle anywhere, even into premises that are completely unsuitable for that purpose.
In this article we will try to give recommendations on how to insulate a shed yourself.
A cheap way to insulate a shed
To insulate an outbuilding for poultry, pigs and other livestock, you do not have to be a professional builder.
All work can be easily done with your own hands.
Installation of wall structure
First you need to build a second wall around the entire perimeter of the building. To do this, two boards are nailed parallel to each other, and a third board is placed on top of the seam.
Laying insulation
Insulating material must be placed in the resulting space between the wall surfaces. These could be autumn leaves, pine needles or sawdust. To prevent small rodents from infesting the shed, the heat insulator must be mixed with slaked lime in a ratio of 25:1.
The insulation layer must be at least 20 cm. Moreover, it must be placed everywhere - on the walls, ceiling and floor. It is compacted well, and then allowed to stand for another 2-3 weeks. If necessary, material is added and the space is “sealed.”
Floor insulation
How can you insulate the floor in a barn? Even ordinary clay will do. To do this, first pour soil around the entire perimeter of the building 10-15 cm above the main one, and then lay compacted clay.
At the same time, it is very important to prevent moisture from penetrating into the sawdust, otherwise they will begin to rot quickly.
Thermal protection of doors
The door in an outbuilding can be insulated with ordinary boards and roofing felt. To do this, the boards are nailed diagonally, and a sheet of roofing material is inserted between them.
By insulating the barn with your own hands in this way, you can provide warmth all year round for chickens, pigs and any other living creatures.
Building a foundation for a barn with your own hands
Under the shed, you can make one of two types of foundation: strip or columnar. The first option is suitable for permanent frame structures with a concrete base. Light buildings are recommended to be placed on a columnar base.
Important! Strip foundations cannot be erected in areas with sedimentary soil or peat.
The step-by-step technology for laying a strip foundation for a barn with your own hands is as follows:
- making markings for the future building according to its dimensions;
- preparing a trench 40 cm deep and 30 cm wide;
- filling the depression with a layer of sand and crushed stone 15 cm high;
- strengthening the bottom and side walls with roofing felt;
For a columnar foundation it is necessary to dig holes measuring 80 cm
- installation of formwork around the perimeter of the trench;
- laying a reinforcing frame in the form of a box of 12 mm thick rods over the entire area of the recess;
- pouring concrete mortar.
Important! The foundation must protrude above the ground level to the height of the plinth.
After two to three weeks, you will be able to start building a barn at your dacha with your own hands.
Installation of a columnar base involves the following steps:
- making holes 80 cm deep under the foundation pillars at the corners of the structure and at the junction of partitions, which should be spaced at least 1.5 m;
- filling the bottom of the holes with a layer of crushed stone or gravel with sand 15 cm thick;
- installing pieces of metal or asbestos-cement pipe or roofing felt sleeves into the holes;
Strip foundation is suitable for frame buildings with a cement base
- filling the space between the stand and the ground with sand and gravel;
- filling the pipe cavity with reinforcement 10-12 mm thick, tied with 2 mm wire;
- pouring pipes with concrete.
Helpful advice! To improve the waterproofing of the base and extend its service life, the support pillars should be coated with special mastic.
The posts can be made of brick or concrete blocks. You can also use oak or larch logs with a thickness of at least 300 mm. Wooden products must be carefully treated with an antiseptic. The lower part of the logs, which is buried in the ground, is covered with bitumen mastic and wrapped in several layers of roofing felt. After installing the posts in the holes, the wooden supports are filled with concrete.
Options and materials for thermal insulation
How to insulate a shed with your own hands? First of all, you need to choose technology and material. The following materials have traditionally been used for thermal insulation of outbuildings:
- Chopped straw. This insulation has been used by people for thousands of years. It is highly environmentally friendly, but short-lived. Straw is flammable, susceptible to getting wet and rotting, and insects and rodents readily grow in it. In order to protect the material, it is impregnated with lime at the rate of 1 part lime to 25 parts straw. The resulting mixture is used to fill the space between two plank walls. Straw is also used to insulate the ceiling. The thermal insulation coefficient of straw is low.
- Sawdust. Sawdust, like straw, is also flammable and susceptible to biological hazards. They are mixed with lime in a ratio of 1:15. To strengthen the composition and increase its moisture resistance, add up to 10% cement. Sawdust is prone to caking; if the walls are insulated, they will have to be added annually.
- Expanded clay. These are light pellets with a diameter of 1-2 cm, sintered from ceramic raw materials. The material is not hygroscopic, durable, non-flammable, and has little caking. It is also not susceptible to biological threats. The only drawback is the low thermal insulation rates, forcing the use of thick layers of material. When filling expanded clay between walls, it is often mixed with cement mortar. It turns out to be a very durable material. This should be done in layers of 20 cm, giving the solution time to set each time. Otherwise, the lower part of the wall may burst open.
Expanded clay - material for insulating sheds
Nowadays, more modern materials are increasingly being used for insulating sheds. They are more expensive, but have several times higher performance. Among them are:
Foam glass. Small granules of foam glass. Does not burn, does not get wet, does not allow mold, microorganisms or rodents to develop. Mineral wool. The product is made from rocks (basalt wool) or from glass production waste. The material does not burn and is not subject to biohazards. It has high thermal insulation rates, so a 50 mm layer of mineral wool is equivalent to a 25 cm layer of sawdust. Mineral wool is mounted in a guide system. It is suitable for insulating both walls and ceilings. When the material gets wet, it loses its heat-insulating properties, so during installation special attention should be paid to waterproofing and steam removal. During installation, mineral wool emits dust that is harmful to health; you should work with it wearing protective gloves, thick clothing and shoes, and a respirator. Expanded polystyrene The common name for the material is polystyrene foam. It is produced in sheets measuring 100*100cm and can be easily mounted on vertical and horizontal surfaces. It has good thermal insulation and does not absorb moisture. One of the main disadvantages is fragility
When pressed hard, the sheets crumble, so you need to be careful when handling them. Another significant disadvantage: the material is flammable; when heated, it emits toxic gases and aerosols
This limits the use of foam plastic for insulation of residential premises. Extruded polystyrene foam. It is produced by extrusion and has a significantly smaller granule size than conventional foam. The material is durable, does not crumble, and does not require additional vapor or waterproofing. Ideal for thermal insulation of floors. Polyethylene foam. The common name is penofol. This flexible and elastic roll of material is covered on one side with a layer of foil, which reflects heat back into the protected room. Used as waterproofing and additional insulation, or as the main heat insulator. Easily mounted on wooden surfaces using a construction stapler. The material also releases harmful substances when heated. The widespread use of penofol is limited by its high price.
In addition, progressive sprayed materials such as polyurethane foam and ecowool are becoming more common. The high cost of equipment makes it unlikely that they will be purchased specifically for a shed. However, if they carry out thermal insulation of the main house, and the equipment has already been delivered to the site, then it is quite possible to use the remaining materials for outbuildings. Sprayed materials have no seams and create a perfectly smooth continuous layer of thermal insulation. They do not cake, do not crumble and are characterized by consistently high thermal insulation properties and durability.
Door installation, vinyl siding
The job was nearing completion and it was time to install the siding. The process itself is simple and not labor intensive. The main thing is to know and follow several rules when installing siding.
Tips for installing vinyl siding:
To trim siding, use an electric jigsaw with a small-tooth saw, or a simple hacksaw with a metal blade.
You can use metal scissors for cutting, but it all depends on the quality of the plastic. Often it cracks in the wrong direction.
Siding should be fastened by hanging, leaving a minimum gap between the hardware and the siding itself of 1-2 mm, and not nailed to full contact. Vinyl siding tends to expand and contract slightly as temperature changes.
When installing panels, be sure to ensure that there is an installation gap between the edges of the panels (top and side) and the elements of the shed (2-3 cm). Read the specific manufacturer's recommendations.
When installing the panels, do not press too hard down or up on them. Deformation of the panel leads to a change in the natural radius of the lock, which leads to a distortion of the geometry of a certain part of the coating.
Do not drive hardware through the siding panels - this may lead to the appearance of longitudinal or transverse cracks.
Initially, the barn did not have a small canopy in front of its entrance, and since there was still a whole sheet of corrugated board left, a small canopy was made. Although its only practical function is the ability to prevent water from getting into the inside of the barn when the doors are open in the rain.
Canopy of a barn at the dacha
The doors installed in the barn are also old material left over after renovations in a residential building. On the outside, like everything else, the doors were covered with the same vinyl siding. Firstly, the doors themselves are far from new, secondly, covered with siding they look quite attractive, and thirdly, siding is an excellent protection against the effects of sunlight and precipitation on the wood.
The barn doors are also lined with siding.
It cannot be said unequivocally that building a shed in a country house is easy or simple. After all, a lot is determined by the specific nuances of your choice. If you build a building for equipment 3 m by 6 m, and on a monolithic foundation, it will be a completely different story.
Finished barn. General form.
If you compare building a shed yourself or building a garden path from paving stones, the latter will undoubtedly be more difficult. However, now you know how to build a barn with your own hands in the simplest version with minimal cost. By the way, a barn for this building does not sound proud at all; a better name would be a utility block (hozblok).
How to insulate a barn - working from the inside
Shingling, although a budget option, will take you a lot of time. If you value time, then instead of budget options you can use more expensive ones, but also more effective in terms of speed of work. These include the option of insulation with mineral wool and polystyrene foam. There is no point in talking about the advantages of materials - we have already talked about this more than once in articles devoted to these heat insulators. Let us remind you of the disadvantages - mineral wool is easily saturated with moisture, as a result of which it loses its thermal insulation qualities and also cakes over time.
When insulating with mineral wool, nails are hammered onto the walls in a checkerboard pattern to create a reinforcing mesh. Rolls of mineral insulation are unwound and laid on the walls, while a reinforcing mesh is created using rope to hold the wool in the desired position. There is no need for mesh if you use rigid or semi-rigid slabs instead of soft rolls. But in this case, you will need to make a sheathing of boards with your own hands.
The distance between the boards should correspond to the width of the slabs, and even be a couple of millimeters smaller so that the slabs fit tightly into the space. How to insulate a shed with mineral wool for the winter? The secret is to prevent the material from getting wet due to condensation. Therefore, a layer of vapor barrier is placed on top of the insulation - glassine or more modern versions of membranes.
Insulating foam inside a shed is even easier. If the base is strong, you can glue the insulation boards with your own hands using any available glue, even regular PVA. Both polyurethane foam and liquid nails are suitable. For greater strength, you can fasten the slabs together with the adhesive base using special dowels. In any case, after this, be sure to protect the material from mechanical damage. Any sheet materials will do. In a chicken coop this could be flat slate, and in a small horned shed it could be sheets of plywood.
Arrangement of the roof of the barn
Many of those who are looking for answers to how to build a shed are looking not for theory, but for practice. Next, according to theory, as a rule, is the process of covering the walls of the barn, but sometimes you can and should do it differently.
The barn, as already mentioned, has an optimal pitched roof structure. What does this give? This design makes it possible to install a fairly high door in the front part and at the same time, does not make the entire barn excessively high.
When you cover relatively large areas with roofing material, when calculating the required material, you always take it with a small margin. From the roofing material that was purchased to cover the extension to the house, what remained was the roofing profiled sheet. In fact, the size of the shed was predetermined by the remnants of the corrugated sheet, since I did not want to buy additional material.
Frequent rains determined the further order of work. And although the construction of a barn consists of successive stages, then came the construction of the roof. The roofing sheet is laid with an overlap.
The corrugated sheet is fastened using special roofing screws with a rubber gasket (sealing washer) that prevents the penetration of water through the fastening hole.
Roofing screws with sealing washer
If desired (or if there are no roofing screws), you can choose painted screws to match the color of the roofing material. According to the rules, 8-10 pieces are used per 1 meter square. Again, according to the general rules, corrugated sheeting is attached to the elements of the roof sheathing in the places adjacent to them, and to connect two sheets together in the upper part of the sheet wave. The pitch angle of the roof, among other things, determines the distance between the hardware: the greater it is, the smaller the distance between the hardware.
But on small, very small areas of the roof, you can deviate a little from the rules - after all, during heavy rain, water flows down the lower parts of the roofing sheets, and over time, sealing gaskets on hardware tend to dry out in the sun and lose elasticity. And there is information that when installing self-tapping screws in the lower wave, the sealing rubber washers begin to collapse after 4-6 years.
Therefore, in this case, hardware screwed into the upper wave of the corrugated sheet is quite sufficient. Important nuances that cannot be ignored when attaching corrugated sheets are the correct position of the screw and the depth of screwing in the screw.
Make sure that the hardware fits into the sheathing at an angle of 90 degrees, and also that the sealing washer is pressed tightly against the corrugated sheet, but no more than necessary: do not overtighten either.
Fastening corrugated sheeting to the sheathing with a self-tapping screw
The most basic way to install roofing screws is to use a hammer. Using a self-tapping screw, using a hammer, you pierce the metal, and then use a screwdriver with a screw-in attachment to drive the self-tapping screw into the roof sheathing element. To avoid overtightening the screw, use a screwdriver only at low speeds. Although, to make a hole in the corrugated sheet, you can attach a metal drill of the required diameter in a screwdriver and make holes with it.
Shingling is an environmentally friendly way
Clay and straw are another budget option for do-it-yourself insulation, which, moreover, is absolutely safe from an environmental point of view. To this day, clay and straw are used to make adobe (lampach, roller, clay block) - clay bricks that combine both insulation and the basis for the walls of a barn. Straw mixed with clay acts as a reinforcing material, so the clay does not crack or crumble.
Under a layer of plaster, adobe can last for many decades. So if you intend to build a shed for the winter from scratch, consider this budget option. In the villages, clay bricks used to be made by all relatives - it would be a reason to get together. If the barn has already been built, the option with clay and straw is still relevant. Do-it-yourself insulation of the barn should be done from the inside - a mixture of materials is applied to pre-prepared shingles.
Shingles are wooden planks stuffed from the inside of a room. First, one layer of planks is packed diagonally, and then a second layer in the opposite direction. To prepare the solution, first soak the clay (the consistency of sour cream) and add straw in portions. The resulting solution should be thick enough so that it does not slide off the surface. Let the mixture sit for a while before starting to work.
The clay mixture is applied to the walls with your own hands from bottom to top. The layer thickness is at least 3 cm. Use a spatula to make leveling easier. At the corners, the thickness of the layer can be increased to 5 cm by rounding them. When drying, cracks may appear - this is not a problem. They should be covered with a solution of clay and sand (1:2). The final stage is whitewashing the walls with lime.
Finishing the walls of the barn with OSB
With my note, I will not open America to anyone or teach anything new.
Especially those who build their own houses. I want to show those who are far from construction and doubt their capabilities that they must first try to understand whether it will work or not. Background. I was let down by a man who started building a barn and quit halfway through the job. This is the second time that savings have backfired on me and henceforth I choose reputable companies for large-scale and complex work.
In general, I have no experience. Of all the repair work, I only had to paint it) I even learned how to hammer nails only this summer. And there is no one to ask. I had to come up with everything myself as I went along.
The situation is complicated by a large amount of material that is stored in the same shed and gets in the way. You have to free up access to the walls one by one, dragging everything from corner to corner. The two side walls have already been started. It's the turn of the central one.
Photo 1. Side wall with started cladding
Photo 2. Wall that needs to be covered with OSB
It already has insulation installed and a vapor barrier membrane is stretched. There are no difficulties here, I just laid the mineral wool more tightly so that there were no gaps, and used a stapler to fasten the membrane to the vertical beams of the walls.
I think (let me be corrected) that if you have extra funds for the material or the material itself, if it were a house, for example, it would be correct to lay slats horizontally on top of the membrane (across the beams) so that there is a gap and there is more support for the OSB sheets . But I have a shed and savings).
Therefore, we measure the distance from the corner to the beam that will be on the edge of the sheet if we use it to the maximum. For me it is the 3rd one from the left and 225 cm, taking into account the fact that we will attach the sheet “lying down”. It would probably be more beautiful to place them vertically, thanks to the eccentric who made the ceiling in the barn more than 2.5 m (not enough evil), but sawing the sheet along the long side... an unjustified hassle, to put it mildly.
We take a sheet, lean it against something and measure 225 cm. Here it’s a good time to remember the saying and measure 7 times before sawing it off. I measure along one side, put a mark, on the other, put a second mark, apply something even to the two marks and connect with a straight line, along which I will then saw.
The main thing here is to find this “something even” with a length of at least 125 cm (the width of the sheet), like a long ruler that was used to measure fabrics in the USSR. But for me this function is performed by a tape measure, and it bends. The first sheets turned out to have a beveled edge, so now I check the distance several times not only at the top and bottom, but also in the middle, and adjust the cutting line.
When I am convinced that there are no strong deviations, I start sawing. This is where the difficulty arose. If you just cut perpendicularly, after 5 centimeters the saw begins to get stuck in the sawed gap. After several attempts, I was able to avoid this by holding the saw at a sharper angle to the sheet. If you cut almost parallel, only the teeth move in the gap, and the saw does not get stuck. In addition, the cut will be smoother, since the saw moves along the drawn line.
Photo 3. If you hold the saw at an angle, it does not get stuck
Of course, if it is possible to place the sheet on a flat surface so that the cut end hangs down, it will be more convenient, but I don’t have such a place. I place the sheet in the doorway and saw vertically.
When the piece is sawn off, I place the sheet against the wall with the cut edge in the corner in case it is still not perfectly straight, and in the corner it is not so noticeable. I press the edge tightly against the corner so that there is no gap left, and begin to screw it in with self-tapping screws.
To make it easier, I start driving the screw in with a hammer like a nail. Although not firmly, the tip of the screw fits into the material, and it is easier to hold it straight and screw it in with a screwdriver than if you start right away.
Photo 4. The self-tapping screw, driven in first with a hammer, is held by the tip in the wood
Photo 5. Finished screwed sheathing sheet
A few more nuances from my experience:
- You can cope alone, but having even a child over 5 years old as an assistant is better than none at all. Anyone can apply a screwdriver or self-tapping screw as long as you hold the sheet in the desired position.
- For a reasonable consumption of material, it is better to first nail large pieces onto the surfaces where they are needed, and you can pick up the leftovers in the remaining bottlenecks.
In general, there is nothing difficult “for a person with intelligence,” as the secretary said in “Office Romance”)) The main thing is not to try to do everything at once in one day.
Although there are workers who will dig up 10 acres in a day or renovate an entire house, I am writing for those who are not used to physical labor and doubt their abilities. If you can spend the whole day on the site, you can start working in several approaches. And in a few days, depending on the amount of time and area, you will master it without overexerting yourself.
I still have to solve the problem of covering the ceiling. I’m still coming up with a system for dragging the sheets in, but if that doesn’t work, I’ll cut it into small fragments. The material is a pity, but the back is more expensive.