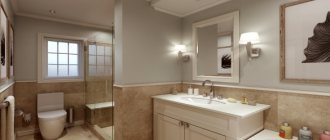
The bathroom and toilet are rooms in the process of arranging which, first of all, you need to think about organizing intensive air exchange. This is due to the specific nature of the operation of hygienic premises. Polluted and over-humidified air must be freely removed and replaced with a fresh portion.
We will tell you how ventilation should be arranged in the bathroom and toilet according to building codes and regulations. In the article we presented, the options for organizing ventilation that have been tested in practice are analyzed in detail. Do-it-yourselfers will find detailed installation manuals here.
Why is ventilation needed?
The opinion that the absence of a ventilation shaft in the bathroom and toilet will only lead to fogging of the mirrors is fundamentally wrong. The main problem is the appearance of fungus (most often it can be seen on the seams between tiles) and rust on the surface of equipment and furniture.
Often, it is due to an incorrectly designed ventilation system that corrosion affects the working parts of the washing machine, which is the cause of its breakdown. The list of problems that the lack of intensive air exchange leads to does not end with this. As a result, poor ventilation will have a detrimental effect on the health of residents.
Backlash closet and elimination of odors from it
Backlash closet installation diagram
Toilets of this design can often be seen in houses that do not have a sewer connection. A backlash closet is one of the rooms of the house, under which there is a cesspool for sewage. It’s not at all difficult to build an exhaust ventilation system for such a bathroom in a wooden house with your own hands.
The principle of operation of bathroom ventilation in a private house with a backlash closet is extremely simple. A vertical pipe, the so-called backlash channel, creates draft so that the air from the toilet is drawn out. Traditionally, the backlash closet was built close to the stove, and the exhaust duct was built into the chimney masonry. Thus, the problems of heating the toilet and its ventilation were simultaneously solved.
If you decide to build a backlash closet in your home, take into account the following:
Determine the height of the ventilation pipe according to the same rules as the stove pipe - the higher, the better. Install a TsAGI deflector on its head to increase the upward flow of air in the pipe due to the wind.
To ensure good draft during the period when the stove is not heated, you can install a low-power fan in the backlash channel and turn it on as needed. A stylish ventilation grille with a fan in the bathroom will also serve as an interior decoration.
Sanitary requirements and standards
There are special standards that must be followed when organizing forced air exchange in rooms with high humidity levels. At a minimum, it is necessary to ensure a fresh air flow of 6-7 m3/hour for each cubic meter of the bathroom and about 8-10 m3/hour for the toilet or combined bathroom.
Experts recommend organizing ventilation with a capacity that is 20% greater than the required volume in m3/hour
Types of ventilation
- - natural;
- - forced;
- - mixed.
The natural flow of air into the apartment occurs through open vents, sometimes doors, invisible cracks, gaps near door and window openings. The flow comes from the street, passes through the rooms, and then, already warm, having lost its freshness, comes out through the common ventilation shaft of the bathroom and kitchen. This is the principle of natural air exchange.
If natural circulation is insufficient, or even completely absent, additional devices and equipment should be installed that produce the influx or removal of air masses. This is forced ventilation. When it comes to houses, such equipment is most often a supply and exhaust ventilation device with a heat recuperator.
For apartments, a mixed type is more typical, when natural circulation is enhanced by simple devices. This optimal option for urban housing can be organized independently. Here it is possible to install supply window, wall valves, and bathroom exhaust fans. The main thing is that the influx of fresh air should be equal to the volume allocated outside the home.
The difference between natural ventilation and forced ventilation
There is natural and forced ventilation. In the first case, air exchange is ensured by the circulation of air masses through door and window openings. About a century ago, natural ventilation was considered the most effective method.
Today, it is unable to provide a sufficient level of air exchange, so it is used only for inflow. To fully ventilate the room, choose the forced option. After all, no one wants to open a window for a long time in winter and let out the heat.
Organizing forced ventilation involves installing an exhaust fan. Thanks to this, you can retain precious heat, remove excess moisture and fill the room with fresh and clean air in a matter of minutes.
The main reason why it is worth installing forced ventilation is precisely sized doorways and the tightness of modern double-glazed windows. Such perfectionism, while retaining heat, makes any natural air exchange impossible.
Installation of a bathroom ventilation system
Ventilation system design
The easiest way for you to do it yourself is to equip the natural ventilation of a bathroom in a wooden house with your own hands. To do this, make ventilation holes at the bottom and top of the walls of the room and equip them with grilles.
If natural ventilation is not enough, you will have to do forced ventilation in the bathroom of a wooden house. Air circulation in the system will be increased due to the action of the fan, and odors and fumes will be removed through a network of ventilation ducts.
You can install the fan in the attic, and it will be common to the entire system. When installing it, follow the safety precautions:
- use only specialized fans with a higher fire protection class;
- place the air duct with the fan not on a wooden attic flooring, but on metal supports;
- for use in a wooden house, purchase air ducts only from non-combustible materials;
- If possible, the fan ventilation grille in your bathroom should be equipped with a fire damper.
In a small house, it is enough to install a fan directly in the bathroom, at the air outlet into the ventilation duct. For convenience and energy saving, you can combine turning on the fan with lighting.
Calculation of optimal performance
Before going to the store and purchasing equipment for installing forced ventilation in the toilet and bathroom, you need to make some calculations. To select the equipment that is optimal for performance, you need to know the exact volume and type of room.
Each room has its own air exchange rate. This characteristic shows how many times the air in the room should be completely renewed per unit of time (usually one hour). Since the bathroom and toilet are considered one of the wettest places in any apartment or house, a maximum air exchange rate of 10 is recommended.
To calculate the optimal performance of the exhaust system, it is necessary to calculate the volume of the room. To do this, you need to multiply the area of the room by the height of the ceilings.
Next, the obtained value is multiplied by the air exchange rate. The result of the calculation is the minimum power of the exhaust system for the bathroom and toilet (m3/hour).
If the fan cannot be placed in the optimal place for organizing intensive air exchange, then its power must be multiplied by 2-3 times
You should also immediately provide openings for air flow. To do this, you can leave a gap of up to 2 cm between the floor and the door, install special grilles at the bottom of the doors to the bathroom and toilet, or drill holes yourself. But the last option does not look the most attractive.
Ventilation rings or grille
If the methods described above seemed labor-intensive to you, then stop at the simplest option - inserting rings into the bathroom door or installing a grille. These accessories can be made of wood, metal or polymer materials. To install the rings in the door, you need to drill holes, having determined in advance the location of the rings and taking into account their size, treat the inner surface of the holes with sandpaper and varnish, and then insert the rings. The ventilation grille is installed in a similar way, with the only difference being that you will need to make a larger hole in the door. After installing the rings and grille, make sure that they are in a stable position and will not fall out.
In conclusion, it must be said that today many owners of suburban real estate, large dachas and cottages equip their bathrooms with air conditioners. Remember that installing an air conditioner does not mean that your bathroom does not need ventilation . Using an air conditioner you can only change the temperature in the room, but not control the humidity. In addition, air conditioners supply the bathroom with air that has passed through cleaning filters, but do not take in fresh air, which means that sooner or later you will still be faced with the need to remove moist air from the bathroom.
Classification of exhaust fans
When planning the installation of a ventilation system, special attention should be paid to the principle of its operation and individual components. After all, productivity, noise level of equipment, installation cost and durability depend on this.
For forced evacuation of exhaust air from the room, three types of fans are used:
- diametrical;
- axial;
- radial.
The first type of devices is designed to work in heat guns and air conditioning systems. Therefore, it is not suitable for organizing ventilation in the bathroom and toilet. It remains to choose from two other types.
The main difference between axial models and radial ones is their low cost and high power. But the device will make quite a lot of noise. An axial fan is an impeller to which blades are attached. The system is driven by an electric motor.
As for radial units, their operation is based on the action of centrifugal force. Due to the rotation of the impeller together with the blades, air masses move.
In this case, you can change the inclination of the blades, thereby reducing the amount of energy consumed by the device and reducing the level of noise it produces. Our recommended article will introduce you to popular models of silent fans intended for installation in bathrooms.
To prevent air from the ventilation shaft from returning back into the room, it is recommended to buy devices with a check valve. Such devices are indispensable in modern apartments.
Operating principle of ventilation systems
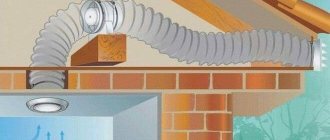
All ventilation systems can be divided into systems with natural draft and mechanical drive. The main problem in the operation of natural draft systems lies in the very principle of their operation. Air moves from the warmer room of the bathroom to the street through air ducts due to the difference in temperature and density of warm and cold air. In this case, the amount of draft developed directly depends on the height of the air column from the air intake point inside the bathroom to the street - the larger it is, the better the draft.
The numbers in the figure indicate: 1 - ventilation grill in the bathroom on the 1st floor; 2 - influx of outside air through windows; 3 - common exhaust duct with access to the roof; 4 — ventilation duct deflector.
If in winter this scheme works perfectly, then in summer problems arise due to the fact that the air temperature in the house is lower than outside and the natural draft is disrupted - the air “does not want” to go outside.
What to do? Breathe what you yourself exhaled? Of course not. There are different ways to ensure sufficient air exchange in any home, read below to find out what solutions are offered for this today.
Basic criteria for choosing equipment
Manufacturers offer a huge range of fans for exhaust systems. Therefore, it is not surprising that every unprepared buyer falls into a stupor and does not even know what he should order.
When buying an exhaust device for the bathroom and toilet, you need to pay attention to the following points:
- Duct diameter . Depending on this characteristic, the fan pipe is selected. As a rule, standard models have a diameter of 150, 125 or 100 mm.
- Presence/absence of air ducts , as well as their location in the room. These criteria influence where the fan will be installed.
- Power . Characteristics are important when choosing, so that in the future the exhaust equipment copes with the functions assigned to it.
- Availability of moisture protection . This indicator is marked with the Latin letters IP. The minimum required value for a plumbing unit is IP30, but it is better to spend a little money and order a device with IP44. In the latter case, it will be located in a special sealed casing, protected from moisture and splashes.
- Noise level . Few people pay due attention to this important characteristic, but in vain. After all, a silent exhaust system will make being in the bathroom and toilet more comfortable.
Taking these subtleties into account, you can choose a model that will be inexpensive and satisfy all your wishes.
Typically, the fan package includes the device itself and four dowels that will be needed for its installation. In most cases, a cardboard box is used to package the device.
Practice
Important
: we provide all the tips below for arranging a forced ventilation system.
Hood performance calculation
It is worth going into detailed calculations in the following cases:
- if you have a large apartment area (relatively speaking, from 60-70 square meters) and/or high ceilings (above 2.7 m);
- if there is no ventilation shaft in the bathroom (for example, if it is a remodeled apartment, or a private house to which a bathroom has been added);
- if in the bathroom you have additional sources of hot steam: a jacuzzi (because people usually soak in it for a long time, which means there will be more steam than from a quick shower), sauna, swimming pool;
- if the hood in the bathroom is the only point of air removal from the apartment (for example, if there is no ventilation shaft in the kitchen at all, or if it is “occupied” by the air duct from the kitchen hood and does not have a separate grille).
If you have an apartment/house of a normal layout, and its area is no more than 60-70 square meters, and if the ventilation in the kitchen works well, you don’t need to go into complex calculations.
Our advice: in such a situation, you can take either a fan that will “drive” the volume of the bathroom every 5-6 times in 1 hour, or a fan that will “drive” the volume of your apartment in 1 hour.
How to make ventilation in the bathroom: implementation options
Let's consider all the ways in which ventilation can be carried out.
Installation options if the
bathroom has a ventilation shaft
:
- if there is a gap under the door, check the functionality of the ventilation duct and install an exhaust fan on the ventilation hole;
- If there is no gap under the door, we cut a transfer valve into the door leaf and install a fan on the ventilation hole.
What to do if there is no ventilation shaft
in the bathroom :
- if the bathroom borders the street, we install a duct with a fan through the wall, install a check valve inside the room so that cold air does not enter from outside;
- if the bathroom borders the kitchen, and there is a ventilation shaft in the kitchen, we lay an air duct through the wall to the ventilation shaft in the kitchen, install a tee in front of the entrance to the shaft: we connect the duct from the bathroom and the hood above the stove to one outlet, leave the other outlet free to constantly remove air from kitchens, we plug the third outlet into the shaft;
- if the bathroom borders the kitchen, but there is no ventilation in the kitchen, we make a connection to the street, to this connection we lay an air duct from the bathroom, from the kitchen hood, and a free outlet for constant removal of air from the kitchen;
- if the bathroom does not border the kitchen, we draw the closest route from the bathroom to the street through the next room, and lay an air duct along it (you can hide it under a suspended/suspended ceiling) with a fan, with an outlet through the wall (the most unfortunate and rare scheme).
For any type of connection to one channel of the exhaust from the kitchen and from the bathroom, you must:
- install a check valve on each outlet (otherwise, when you turn on the hood in the bathroom, the air from there may go not to be removed to the ventilation shaft or to the street, but to the kitchen);
- install as few turns as possible, because each of them worsens traction.
Which method of turning the fan on and off should I choose?
Our options are:
- startup and shutdown together with the lighting (turn on the light - the fan turns on, turn off the light - the fan turns off);
- start together with the lighting, turn off by timer after X (can be selected) minutes after turning off the light;
- startup and shutdown using a humidity sensor built into the fan or remote;
- starting and shutting down with a separate start (cord/button on the case, or a remote switch on the wall, or from a remote control, or from a smartphone).
The last option is the most successful. Switching on and off using a timer or with lights is a bad idea because the smell and humidity can linger longer. And the humidity sensor will not be triggered by smell.
Therefore, it is best to set the fan control separately, from a button or remotely (from a remote control or smartphone), regardless of the light, timer and humidity sensor (although a sensor can be installed).
What is useful to complement the bathroom ventilation system?
- Fan speed controller. It is especially useful if you have an apartment on the top floors of the house, and natural ventilation works very poorly - you can leave the fan running at low speeds all the time.
- Hygrometer and thermometer. Just to understand what your microclimate is like.
- Heating. If you don’t have a heated towel rail, it’s better to hang one. If you are planning ventilation at the stage of bathroom renovation, then you can also lay a heated floor (electric or water). The heat source will help get rid of excess moisture.
- Overflow door valve. Useful if your bathroom door is always closed and there is no gap under it. Yes, if there is, it’s also worth installing a reflow, especially if the apartment is large - so that the flow of air from other rooms can more easily pass to the ventilation shaft.
Having this is not necessary, but it is very useful, and for the price tag it will be inexpensive. A good speed controller (for example, from Soler & Palau) costs 1.5-2 thousand rubles. Hygrometer with thermometer - another 400-600 rubles. An electric heated towel rail will cost at least 2500-3000 rubles, and regrinding a door will cost approximately 1000. Total - 5.5 thousand, not counting the purchase of the fan itself.
What to do if the front door freezes: solutions
Rules and schemes for arranging ventilation for a country house
Related Posts
Additional equipment functions
An excellent solution would be to order a fan with additional functions. Most often, buyers prefer models with a built-in timer.
In this case, the user can leave the factory settings or program the operation of the device independently, changing the operating time, start delay, etc. Thanks to this, it is possible to automate the process of ventilation of the toilet and bathroom.
Devices with a built-in timer are quite expensive. Therefore, their choice should be taken with full responsibility. Products from Maico have proven themselves best. This manufacturer offers a number of models that are equipped not only with a timer, but also with other additional functions.
Fans that allow you to switch the base load will help save energy. That is, the unit can operate in two modes: half its capacity and full power, when you need to refresh the air in the room in the shortest possible time. Thanks to this function, the noise of the ventilation system is significantly reduced and energy is saved.
A good solution would be to buy a device with a clock or backlight. These additional features will make showering or bathing more convenient and comfortable.
Any specialist will prefer a device with a built-in humidity sensor. Its peculiarity is that it turns on only by a signal from the built-in hygrometer. Thanks to this function, energy is saved and there is no need for a separate electrical outlet for the fan or connecting the device to a light switch.
Why is natural ventilation not effective?
Modern urban homes often lack fresh air. Poorly functioning ventilation is largely to blame. Here are some of the main reasons for its ineffective operation:
- The tightness of a modern apartment. Plastic windows and metal doors retain heat inside, but at the same time do not allow fresh air to enter from the street. The natural flow is disrupted, the air in the rooms moves more slowly and stagnates.
- The ventilation duct is clogged. This is especially true for old buildings, where they often become clogged (garbage, long-term dust, accumulated grease, bricks that have broken off during repair work, etc.).
- Blocking of air ducts by neighbors who decided to block them for certain reasons. At the same time, air from the lower apartments ceases to be vented outside.
- Incorrectly installed exhaust hood in the kitchen and bathroom. Excessively powerful, it can disrupt air circulation through the shaft of an apartment building.
If nothing prevents convection in the ventilation duct, the shaft is clean, not blocked by neighbors, and air movement is still weak, it is recommended to install auxiliary means to improve ventilation. First, let's figure out what kind of ventilation happens in a living space and how it is organized.
All the most interesting things about stretch ceiling ventilation >>>
System components and materials
Today, ventilation is assembled from air ducts of round or rectangular cross-section. As a rule, they are made of metal or plastic. These elements are mounted behind a suspended ceiling.
If we are talking about bathrooms and toilets in a small apartment, then in such housing the ventilation duct is a hole in the wall into which a fan is inserted. In this case, there is no point or need to design a complex, branched system.
As for private houses, ventilation for them is constructed from the following elements:
- Air ducts . It is much more convenient to install rectangular air ducts. They fit compactly under the ceiling and do not take up extra space. These are pipes whose length can be 2, 1 and 0.5 m.
- Fan . A surface-mounted or built-in device is used. The latter type is best used in branched and complex systems. Overhead models are recommended for ventilating one room.
- Swivel elbows . In the case of rectangular pipes, the rotary bends can be vertical or horizontal.
- Connecting couplings . These elements are used to connect straight sections of the ventilation system.
- Check valves . They are designed to prevent air and insects from entering the mine.
During the installation process you will also need fastenings. It is much more convenient to use ready-made elements. They will greatly simplify the installation process and speed up the work.
But if you need to save money, you can make the fastening elements yourself
In the event of a design error or insufficiently efficient operation of the ventilation system in the bathroom and toilet of a private house, the problem can be eliminated by installing an exhaust ventilation valve in the wall. Features of choosing the specified device and installation rules are given in the article, the contents of which we advise you to familiarize yourself with.
How to make ventilation in the bathroom with your own hands
Making ventilation in a private house with your own hands means first of all deciding where this room is located relative to other rooms. There are many options here, but the most convenient option is if their wall is external. For natural ventilation, you just need to make a hole in the wall for the air duct, install it there with an outlet to the street and connect it to a vertical riser, which you assemble yourself. The riser must be raised 1 m above the roof, and it will have to be insulated. If forced ventilation is used, then a window or duct fan should be installed on the wall from the side of the room.
If there is no such wall near the toilet and bathroom, then you will have to run the air duct through other rooms. This is usually done through the kitchen, combining the common system into one. That is, from the toilet and bathroom there is a horizontal section of air duct under the ceiling through the kitchen, to which an outlet for the kitchen space is connected. The air duct leads through the kitchen wall to the street. After installation, you can decorate the ventilation using boxes made of plastic, wood, or plasterboard.
Using an exhaust fan
If a forced exhaust ventilation scheme is used, then the fan is installed outside the common main. If it is natural, then the air duct is led out onto the street above the roof ridge.
It is important to choose the right type of fan installation. For obvious reasons, this cannot be an overhead structure. Either a channel type, or a radial one, or a roof type is suitable here. The easiest to install is a duct fan. It is simply inserted into the wall, and an air duct from the horizontal section that runs through the kitchen is connected to it, and on the other side there is a small riser. Although here it is better to draw the conclusion above the roof, so that unpleasant odors do not seep back into the house.
Installing air ducts is simple, because they are assembled either according to the principle of a socket system (one into one), or using special adapters for clamps or sealant. The duct fan is simply inserted into the wall without being attached to anything. The only thing that needs to be done is to foam the space between the wall and the pipe.
With a supply valve
The supply valve is a pipe in the wall, closed on the outside with a mesh and with an internal filter. It turns out that the air simply passes through the pipe, entering the bathroom or toilet in a private house. Not a bad option, but it is better to choose valves with a gap adjuster and insulation inside the pipe. This option makes it possible to regulate the flow of fresh air through the wall.
It is clear that the valve itself does not solve the issue of air exchange. It is designed specifically for direct air from the street into the room. The outflow is still carried out through the installed riser. And the air valve itself is installed in the same way as a duct fan. That is, a through hole is drilled in the wall, where the device is inserted. And also the gap between it and the wall is filled with polyurethane foam. No fasteners. That is, the most difficult thing in its installation is drilling the hole.
Complex ventilation systems
Separate systems of a complex type are not used in the bathroom and toilet of a private house. That is, there are no ventilation systems specifically for individual rooms. Complex ones can be installed throughout the house with connection to the toilet and bathroom circuit. At the same time, the design can be very complex: with filtration, noise dampers, recuperators, with the help of which the supply air is heated. Manufacturers add electric or water heaters to some models.
These are actually ventilation systems that are complex in design and quantity of equipment. But we must pay tribute that they are by far the most effective. Their design is a block in which all the above-mentioned devices are located, and a network of air ducts scattered throughout the house for both the supply and exhaust sections. Usually the unit is installed in the attic, and a circuit of ventilation pipes with entry into the rooms through the ceiling is assembled here.
Such systems are difficult to assemble yourself. Therefore, their installation is carried out by professionals. Although manufacturers claim that their designs are assembled on a modular basis, like a large construction set.
Installation of ventilation in the bathroom and toilet
Before starting installation work, it is necessary to carry out preparatory work. First of all, you need to compare the diameter of the exhaust device with the size of the shaft.
If the ventilation hole is large, then a plastic pipe or corrugation is inserted into it. In this case, the voids should be sealed using polyurethane foam. If the entrance to the ventilation shaft is smaller, it can be expanded using a hammer drill.
Determining the installation location
For forced ventilation to be as effective as possible, it is not enough just to purchase powerful equipment. It is equally important to choose the right installation location.
Since the hood in the bathroom is designed to remove hot, humid air, the optimal solution would be to install it at the top of the wall, which is located opposite the door.
It is important to organize the flow into the room - you will have to build a special grille into the lower part of the door or leave a regular gap under the door (a more economical way). These options will allow fresh air to flow from the living space into the bathroom.
Diagnostics of the condition of the ventilation duct
If you are thinking about remodeling a bathroom or toilet, then before starting any work you should diagnose the operation of the ventilation ducts using methods accessible to the owners.
First of all, the traction is checked, for which a sheet of plain paper, a lit match or a lighter is leaned against the shaft. If the paper sticks to the ventilation grille and the flame tilts towards the duct, then this is a good sign.
To improve draft, it is recommended to check whether the ventilation duct is clogged with debris left behind after inept repair work or for some other reason. After cleaning, check the draft with the door open and closed.
Selecting a device connection diagram
If we consider a standard apartment in a new building, then in the vast majority of cases natural ventilation is not enough to remove all excess moisture from the bathroom. The only exception is a private house, the toilet of which has a window.
But when installing forced ventilation, the question is: how long should the exhaust device work? Often, apartment owners connect a fan to a light switch. This means that the device will be able to work exactly as long as a person is in the bathroom. This may not be enough.
The second method is based on connecting the fan to a separate switch. But in this case, the user will forget to turn on/off the device. Therefore, a suitable solution would be to install a fan with a humidity sensor. Such devices operate autonomously and remove excess moisture from the bathroom without human intervention.
Due to convenience and energy savings, the most popular method is when the fan is connected to the light switch. But this method is not very effective
Fan installation details
Before you begin installing the ventilation system, you must read the instructions that come with the devices. In the vast majority of cases, the entire installation process is described in detail in the insert. This will greatly simplify and speed up the work.
The most labor-intensive stage is installing and connecting the fan.
If there are no manufacturer’s recommendations or there is no translation into your native language, then you should perform the actions in the following sequence:
- Remove the front cover.
- In those areas where the fan is adjacent to the wall, it is necessary to apply polymer glue, silicone or liquid nails. All of the above mounting methods are perfect, since exhaust devices are most often made of plastic and, accordingly, are light in weight. Therefore, liquid nails will be enough.
- Insert the fan so that its working part (electric motor and wheel with blades) is completely “recessed” into the wall.
- Press the unit body tightly so that the adhesive has time to set.
- Install a mosquito net. This element will protect against various insects and debris from entering the room from the ventilation duct.
- Secure the front cover using self-tapping screws or dowels that are included in the kit.
The final stage is laying the cable and connecting the ventilation system to the electrical network.
The entire installation process is quite simple, but if any problems or difficulties arise, it is better to entrust this work to professionals
Forced ventilation significantly increases the volume of air removed from the room. But since the front cover blocks a considerable part of the channel when the device is turned off, the flow rate decreases several times. Because of this, its performance drops significantly.
The above problem is solved by installing an air intake grille. This will help restore normal performance. The second method is to leave a small gap (1-3 cm) between the front cover and the wall. Air will be sucked into the resulting gap and ventilation will operate normally.
When connecting the ventilation system to the electrical network, you must adhere to safety rules. First of all, you need to make sure that the wires are de-energized. In addition, to connect them it is better to use terminal blocks rather than “twists”
Common installation mistakes
If an inexperienced craftsman is installing a ventilation system, then situations often arise when, after finishing the work, its performance does not satisfy the wishes of the residents or it is not efficient.
The reason for this is due to errors during installation. To avoid basic problems, you need to know some nuances.
The most common errors encountered when installing a ventilation system are:
- the channel is designed incorrectly, which significantly impedes the movement of air;
- fans make a lot of noise when operating;
- the tightness of the shaft connection is broken;
- The ventilation system passes through the living space and its noise interferes with the normal life of the family.
If the design was done incorrectly, then the problems listed above will certainly appear. However, to correct them, it is often necessary to completely redo the ventilation system.
In some cases, a strong hum when the fan is operating is a clear sign of its incorrect installation and an error called “alignment”. This problem is solved by dismantling the device and reinstalling it, but with strict adherence to technology
You can go the easy way. For example, to reduce noise, it is recommended to use noise absorbers. As for increasing ventilation performance, to do this you will have to install a new, more powerful exhaust device and check the quality of the air flow into the bathroom and toilet.
Installation procedure
Ventilation duct installation diagram
- When installing ventilation yourself, the ventilation duct is first cleaned. To do this, use a brush or a weight suspended on a rope. It is lowered several times into the channel in a rotating motion. The channel is cleaned if the indicator - a sheet of paper brought to the ventilation shaft - deviates towards the room or is not held by the force of gravity on the grille.
- All work is carried out with the electricity meter turned off at a height. To do this, you need to provide a stepladder.
- The installation is installed under the ceiling in the zone of maximum humidity, opposite the source of air intake.
- Taking into account the size of the fan and the location of the power supply, the position of the wiring and the installation itself are marked.
- Installation work is carried out with the presence of a grille, glue for fixing it, a screwdriver, and dowels. You may also need a piece of hose for the air duct, as well as a plasterboard box to mask the pipe and unit.
- The fan is installed in the air duct. If the model is of an overhead type, the box is first strengthened.
- The terminals located on it are connected to a two-core cable line with a cross section of 0.2 cm.
- The fan housing is mounted directly. For this purpose, most models have latches. Otherwise, dowels are used for these purposes.
- If the installation cannot be connected directly, the air duct is expanded. It is disguised in a box or decorated. For this purpose, a flexible, semi-rigid or rigid hose is used.
- To save energy and use equipment rationally, it is convenient to start the fan when turning on the light: you need to run a cable from the fan to the switch.
- After installation and connection, voltage is supplied to the network and the operation of the forced ventilation system is checked.
Before assembling the fan into the duct, the power supply is also turned off, but the procedure is slightly different.
Nothing should interfere with the movement of air masses
- The unit is placed strictly vertically in the channel, as deep as possible. This position is securely fixed so that during operation it does not fall due to the vibrations created.
- The supply cable must be new, without kinks or damage to the insulating winding, designed for “zero” and phase. It connects to the fan.
- A switch is installed in a convenient place to start the equipment into operation.
- Voltage is supplied to the network and the correct connection is checked, as well as the operation of the equipment.
Attention! The main element of forced air exchange is the ventilation unit. You need to buy it according to the calculated parameters with a passport and manufacturer’s warranty.
Recommendations from experienced specialists
It will be useful for people who are encountering the organization of ventilation in the bathroom and toilet for the first time to familiarize themselves with tips from experienced professionals. First of all, they recommend ensuring a normal flow of fresh air into the room. Otherwise, the operation of the exhaust fan will be meaningless.
There is no need to buy expensive and bulky systems. Spending enormous amounts of money is not always the best solution. It is enough to select the devices correctly and competently, then even cheap models will cope perfectly with the ventilation of the room.
When choosing a fan, you should never skimp on quality. After all, the health of each family member, as well as the service life of the device, depends on this. It’s better to spend money once, but order a device that will faithfully serve for decades
If the house has an air conditioner, ionizer, purifier, household humidifier and similar devices, then it is still necessary to install ventilation. After all, none of the devices listed above provides a flow of fresh air into living spaces.
Features of bathroom ventilation in a private house
The air enters the bathroom and toilet from other rooms. For ventilation, leave a small gap (2-2.5 cm) between the floor and the door leaf or purchase special doors whose leaf has round ventilation holes. Air escapes through an open ventilation duct. If the doors are solid, and a very responsible installer did not leave even a single crack, the bathroom will have to be left open for ventilation. The same goes for the toilet. With doors slightly open and air flowing, unwanted odors will leave the room faster than if it were sealed. This is how natural ventilation works.
A well-designed ventilation system is an integral part of a bathroom or toilet.
This system is as simple as possible, but unreliable. In modern houses and cottages, ventilation is increasingly failing. Complicating the work:
- Sealed doors and plastic windows;
- Reducing the lumen of the canal as a result of contamination with dust, dirt, cobwebs;
- Incorrectly designed hood;
- Windy weather;
- An uninsulated channel, inside which the air quickly cools and slowly rises.
Attention! When the fan is running, it is necessary to ensure the flow of air into the ventilated room. Otherwise, air exchange will not be effective.
If the device removes 100 m3 of air per hour, at least the same amount must be supplied, which is impossible with hermetically sealed doors.
Rules for operating the exhaust system
In order for the equipment to serve as long as possible, it is necessary to regularly carry out preventive maintenance. After all, dust and dirt accumulate on the fan blades over time. This does not allow the device to work at its maximum capabilities and provide decent air exchange. Moreover, if cleaning is not carried out in a timely manner, the device may fail.
Preventive maintenance includes regularly inspecting the ventilation system for blockages and washing the fan blades. This approach will allow you to always breathe fresh and clean air even in a modern house, which is highly airtight.
Fan selection
The fan must meet a number of requirements:
- Safety. The device will be connected to electricity and installed in a damp room, so moisture protection must be provided, and the fan must also be resistant to steam.
- Low noise level. This parameter should not exceed 35 dB during device operation. Otherwise, the constant hum will irritate residents, and in some cases, neighbors. You will have to spend money on sound insulation.
- Fan capacity. It should be enough to change the air in the room 5–8 times per hour.
USEFUL INFORMATION: Design and decoration of a bathroom in Provence style 11 photos