02/06/2020 The base is a part of the foundation that is raised above the ground and encircles the lower part of the building. Protects against moisture, freezing, pollution, mold and insect infestation. In order for the base to perform these functions, it must be finished with a waterproof protective layer, which will give a complete look to the entire building.
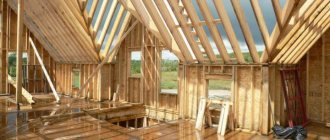
Types of base
When choosing a finishing material, you should take into account the design features of the base, which comes in three types:
- A protrusion that extends several centimeters beyond the contours of the building. Ideal for thin walls. Requires mandatory protective flashings for water drainage.
- Built flush with the wall. A flush plinth increases the likelihood of condensation accumulating inside the building.
- Sunken when the contour of the base is smaller in diameter than the contour of the house. Economical option, does not require additional drainage.
In any option, the base must be protected with an external moisture-resistant finish to protect the foundation and building from destruction.
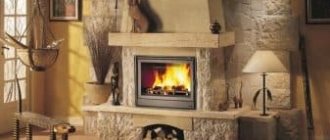
Cladding the basement of a house with clinker bricks
The material is much stronger than its simple clay counterpart, since it is made by firing. Thanks to special technology, the structure of ceramic products is homogeneous, there are no voids or pores. They are resistant to any mechanical stress. Production technology allows making clinker bricks of different colors by adjusting the firing process.
When upgrading the base, you must follow the exact installation instructions. The bricks should be laid in dense rows. Work must begin from the bottom up, creating five layers each, followed by drying and hardening. Excess mortar is removed with a trowel and used for the next elements when applying other rows. After installation is completed, the joints are rubbed down, filled with a special mixture and embroidered.
Material requirements
Facing materials and methods of finishing the base must meet the following requirements:
- 100% waterproof;
- not susceptible to rot and mold;
- frost resistance;
- resistance to UV rays;
- mechanical strength;
- resistance to sudden temperature fluctuations.
It is necessary to pay attention to the weight, compatibility with the appearance of the entire building, and take into account the time and labor costs that will have to be invested in the facing work.
General rules that must be followed when cladding the upper part of the foundation:
- before starting work, the surface of the base must be thoroughly cleaned, sanded, and treated with an antiseptic solution;
- if necessary, level vertically using a primer;
- on the protruding base, form an upper cut with a slope to drain rainwater.
Only by complying with these requirements and rules can you be sure that the foundation of a private house will be strong and will stand the test of time.
Arrangement, types and technology of installation of ebb and flow sills for plinths and foundations
The junction of the plinth with the load-bearing wall is most susceptible to moisture penetration through the gap between the structural elements. As a result, materials may become damp. Even with waterproofing, there is no complete certainty that flowing water will not get under it. To solve this problem, ebbs located above the cladding are used.
The cheapest option is plastic models. They are characterized by a high level of water resistance, but do not tolerate low temperatures well, and they are also a very fragile material that can crack and split under mechanical stress.
Some of the most durable include ebbs made of copper, aluminum, and steel. Their cost is in the middle price category. At the same time, the products are impervious to moisture and tolerate temperature changes well. Installing the building material is simple; it is done using self-tapping screws.
For overhanging foundations with brick or stone cladding, concrete overhangs are a good solution. To increase their strength, ductility, and frost resistance, special plasticizers are added to the mixture during production.
One of the most expensive products is clinker tile construction. Clinker is resistant to various external factors and mechanical damage. Some models are covered with a layer of glaze.
Having chosen a suitable visor, you can begin installing it. The installation of each specific model will depend on the material from which it is made, as well as on the design of the building. For example, for wooden walls it is better to use plastic or metal options that are attached using self-tapping screws. For brick and concrete structures lined with tiles and stone, it is better to install concrete or clinker structures that are laid on the mortar. At the same time, their installation is carried out during wall cladding; if the finishing is already ready, it is better to use metal products. Before installation begins, it is necessary to carry out preparatory measures. Seal the junction of the plinth with the load-bearing wall, using a level to make markings.
Installation of metal and plastic ebbs
The tides are chosen depending on the color, texture of the future facade and the personal preferences of the owner. Elements must be in harmony with all finishing materials. Otherwise, they will stand out unfavorably, and the slightest defect or distortion will be evident. Metal and plastic products have good performance characteristics.
Metal castings are made according to customer dimensions. You can leave them natural or paint them. Installation starts from the corner. For correct calculations, use special corners that come with the planks. All products match in color and size. At the next stage, the protruding parts of the building are finished.
According to preliminary calculations, low tides are marked. At the required points, at a distance of 50 cm, holes are drilled, applied to the wall and fixed with dowels and self-tapping screws. The lower part is attached to the foundation with an identical pitch. The joint between the ebb and the wall must be covered with silicone sealant or putty. Sheathing of straight sections is done last. The elements are overlapped.
Installation of concrete and clinker slabs
Such flashings are installed before the façade cladding or together with it, since adjusting them to size after complete installation will be difficult. It is better to use concrete and clinker structures in combination with a base made of natural stone, porcelain stoneware, or brick.
The ebbs are attached to a special adhesive composition for exterior use. Installation starts from the corner. To minimize processing of dense material, it should be positioned correctly immediately. It is necessary to calculate in advance the length of the ebb, taking into account the size of the parts, the width of the seam, the number of defective corner elements. If necessary, trimming is done with a tile cutter or grinder.
The back side of each tile is treated with glue. The clinker has special dovetail grooves for high-quality pouring of the mixture. All elements must be fastened strictly along the intended line. After complete drying, the joints are treated with putty and cladding of the building begins.
Finishing the base with plaster
Plastering the base is a fairly reliable way to finish the base of a private house. The durability of plaster depends on the solution and adherence to application technology. Many developers choose this option for finishing the base as the most affordable and versatile in design. The following types of plaster mixtures for finishing the base are popular:
- mineral;
- acrylic;
- silicate;
- silicone (based on liquid glass).
Advantages of plaster:
- many application options, shades, types of mixtures;
- the ability to correct errors during the application process;
- maintainability during operation;
- good thermal insulation qualities;
- high mechanical strength;
- relative resistance to weathering;
The last advantage largely depends on the main filler of the plaster mortar.
This type of cladding also has disadvantages:
- over time, crumbled plaster must be renewed;
- labor-intensive and lengthy application process;
- the durability of plaster is strongly dependent on adherence to technology and the quality of the solution.
With the help of plaster mixtures you can bring interesting design ideas to life. Decorative plaster involves adding color to the solution and using the plastering technique with a “fleecy surface”. Mosaic plaster, which is a mixture of marble chips and acrylic resin, is durable, decorative, and durable.
Resin based tiles
Resin based tiles
Externally, this material can successfully imitate sandstone or clinker brick. The big advantage of such tiles is their surprisingly small thickness - 3 mm. The material is characterized by good flexibility; it can even be used for cladding arched bases. Also, such tiles can be safely bent at the corner joints of walls, which greatly facilitates the work.
If necessary, the tiles can be easily cut using scissors. It can be glued to plaster, concrete base and even insulation. The tile can have a corrugated or smooth surface. Good selection of colors available.
Resin based tiles
First step. Determine the top level from which you will begin installing the cladding elements. The best option is to lay a whole number of tiles. Therefore, determine how many horizontal rows of tiles you can glue to your base, determine their total height, and then subtract the smaller value from the larger value. This way you will determine the required gap.
Set aside the required gap from the top edge of the base. Finally, you will fill the remaining gap with acrylic or other suitable composition.
Second step. Start gluing the tiles. Start installation of elements from the corner of the base. Apply the glue with a notched trowel you already know. Glue 4 rows of cladding at once in one go.
You don't have to fill the seams. The protruding glue will perfectly cope with the functions of the filler. You just need to carefully distribute it along the seams using a brush.
Third step. Protect the tiles from rain. To do this, the cladding can, for example, be covered with plastic film. The protection can be removed after the glue has completely dried, i.e. in 2-3 days.
Base finishing
Externally, such cladding is practically no different from finishing with natural materials, and it costs much less. To protect the base, be sure to install a rain cornice (drip).
Cornice
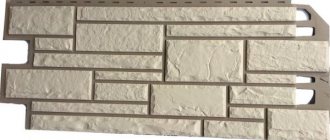
Finishing the plinth with façade (plinth) panels
Facade panels are a multilayer building material in the form of a sandwich, which provides aesthetic appeal and has good thermal insulation characteristics. Vinyl and acrylic PVC panels are inexpensive and light weight. The finishing of the base with stone panels looks impressive.
Advantages:
- the presence of an effective thermal insulation layer;
- strong and durable outer layer;
- does not weigh down the building structure;
- relatively low price;
- fire resistance (except for vinyl, which melt without supporting the combustion process);
- excellent aesthetic properties.
Disadvantages of panels for finishing the base:
- fragile, requires careful installation;
- not repairable.
The panels are used for the basement of a private house, where there is less chance of accidental damage.
How to finish the plinth: considering budget and not so budget options
Whatever house is built, its entire structure is always based on a reliable foundation of one type or another. The importance of this structural element simply cannot be overestimated - it is it that takes on and distributes all the main weight loads. As a rule, the foundation always protrudes somewhat above the surface of the earth, forming the so-called basement part. And so the owner of the house inevitably faces the question - how to finish the base?
How to finish the base
There are many options for solving this problem. But first of all, it’s worth figuring out - is finishing the base really necessary?
Why is the base covered?
Many home owners consider finishing the basement only as a special design touch in the overall exterior design of the house. The desire to make your home as beautiful as possible in appearance is quite understandable and justified, but it turns out that decorativeness in this case, although important, is still secondary. The main purpose of the plinth cladding is still different:
- Even such a seemingly indestructible element of a building as the foundation needs protection from external influences. The cladding minimizes the impact of precipitation, high humidity, temperature changes, and direct sunlight on the base material.
- The walls of the house at the basement level are most susceptible to contamination. The liquid dirt that falls on them always contains a lot of chemically aggressive substances that can cause erosion processes even in monolithic concrete.
- The base should also be protected from the development of forms of biological life on its surface - mold stains, fungal colonies, insect nests.
- If possible, it is necessary to provide for insulation of the basement of the building. At first glance, it’s a paradox: why insulate it if all the living spaces are located higher. However, this opinion is wrong:
— The base array itself becomes a very capacious cold accumulator, forming not even a “bridge”, but an entire “highway” for the penetration of low temperatures into the premises, from which even a conscientiously insulated floor of the first floor may not save. A significant part of the energy resources spent on heating will simply be wasted.
— The material from which the foundation is made, be it concrete, brick or stone, under the influence of low winter temperatures can freeze through, which will activate erosion processes and reduce its strength.
Expert opinion: Afanasyev E.V.
Chief editor of the Stroyday.ru project. Engineer.
So, the conclusion is categorical - the base needs high-quality finishing for both operational and decorative reasons. What type of finish should I choose? This will depend on the design features of the building, the preferences of the homeowner, and his financial capabilities.
We recommend that you familiarize yourself with the material on finishing a house with siding, and the step-by-step technology and description will help you decide on the choice and finishing technology.
In addition, on our portal we have posted detailed instructions for installing siding with insulation - here.
Types of materials used for finishing the base
Plastering and painting
One of the simplest finishing methods is to apply a layer of durable plaster to the surface of the base.
One of the simplest options is plastering the base
This finish will create a good sewn layer, characterized by high vapor permeability. The main advantage of this method is its low cost and availability of materials. Carrying out such work yourself or finding a master plasterer is usually not a big problem. And there are many options for adding decorativeness to such a base.
High-quality plastering and painting will give the base an accentuated neatness
- Firstly, it can simply be painted with special durable facade paints. There is a wide range of shades on sale, and there is always the opportunity to choose the one most suitable for the intended exterior design of the building.
- Secondly, an excellent solution would be to apply a finishing layer of decorative plaster. A wide palette of colors and “rich” textures should satisfy any homeowner’s needs.
Variety of decorative plasters
- But that's not all. If you show your imagination, you can give even a simply plastered surface a very original look.
Stone?
No, this is a plastered plinth... In the photograph, the plinth appears to be trimmed with stone. In fact, each “cobblestone” is nothing more than a pile of ordinary concrete mortar, molded by hand directly on the surface of the base.
…the “cobblestones” of which are sculpted by hand...
To sculpt such “stones” you don’t need any special skill - the main thing is to make a high-quality dense solution. Everything else is the imagination and efforts of the home craftsman. After hardening, all that remains is to decorate with dyes - and the plastered base will become indistinguishable from a stone one.
...and tinted with paint
The disadvantages of the technology for finishing the base with plaster include the comparative fragility of the coating - you will have to constantly monitor the condition of the applied layer and timely repair or update damaged, cracked areas.
Finishing the base with DSP panels with real stone and granite chips
Of course, stone is the best option for cladding the base. But the question of price stops many. Eskosell panels from the Komak Plat brand were developed especially for those who want to get a reliable and “expensive” plinth for many years.
DSP panels
You get natural stone for the price of plastic. How does this happen? The basis of the panels is a rigid DSP board, onto which chips of stone and granite are applied. The large size of the crumbs (5-6mm) qualitatively distinguishes the panel from plaster and analogues. Eskosell can provide your home with high-quality protection from mechanical damage and vandalism; they can easily withstand changes in temperature and humidity. A layer of epoxy adhesive compound and natural stone chips is not only home decor, but also a protective waterproof layer. It should also be taken into account that Eskosell is made from natural ingredients and does not emit various harmful substances even in the event of a fire.
Types of panels
Prices for cement bonded particle boards (CPB)
Cement particle boards (CSP)
Advantages of Eskosell round stone chip panels:
- ECOLOGY : does not contain substances such as formaldehyde, asbestos, phenol, etc.
- FIRE-RESISTANT (G1) : in case of fire, does not melt and does not release harmful components into the air;
- FROST-RESISTANT : installation can be carried out at any time of the year; they will not crack from frost or temperature changes;
- MOISTURE-RESISTANT : the front surface of the slab is moisture-resistant;
- BIORESISTANT : Eskosell prevents the appearance of fungus and mold;
- RELIABILITY : will serve you and your home for more than 50 years;
- VANDAL-RESISTANT : hard, hard, vandal-proof material;
- EASY INSTALLATION : can be installed without additional elements, using self-tapping screws or glue.
Panels with Eskosell chips
You can simply cover the plinth with panels using screws. Or glue it with foam glue. Unlike other Eskosell panels, they do not require additional elements for installation.
Finishing the base with natural stone
This type of finishing can certainly be called “elite”. A building with such a plinth always looks very advantageous, and the natural material has excellent performance characteristics and will last a very long time.
Base with natural stone cladding - looks very rich
For cladding, specially prepared stone slabs are used - slabs, usually 20 ÷ 30 mm thick, which can have either a regular geometric shape or uneven edges, which gives a special decorative effect.
Rectangular slabs of gray granite
The surface of the stone can also be chosen to suit your taste - from polished to mirror-like to rough chipped.
For all the beauty and practicality of this type of base finishing, it also has many disadvantages:
- Such cladding has a very significant weight, and therefore puts additional load on the foundation of the building, especially in cases where the base has a large surface area. If finishing with natural stone is planned, this is usually calculated at the building design stage.
- The large mass of stone slabs also predetermines the increased complexity of their installation. Thus, very often even the highest quality adhesive solution is not enough, so there is a need for additional reinforcement and the use of special stops.
- Another significant drawback is, of course, the price of the material and the cost of installation work, which are not always available for independent execution.
Expert opinion: Afanasyev E.V.
Chief editor of the Stroyday.ru project. Engineer.
Even the most inexpensive types of natural stone - shell rock or limestone - cost more than 1200 - 1500 rubles per m². More expensive types include granite and marble, with a polished or chipped surface.
Finishing with polished marble panels
Well, if there is a desire to achieve complete exclusivity, then wealthy homeowners sometimes resort to cladding with materials such as gabbro or even labradorite, the price of which is generally “exorbitant”.
Video: facing the base with sandstone
Cladding with artificial stone
In the case when you really want to use stone cladding for the base, but the material capabilities or design features of the building make this impossible, you can resort to another option - purchase artificial stone.
Finishing with high-quality artificial stone is no different in appearance from natural stone
The cost of the artificial analogue is much less, the mass of the material is not so significant, and the illusion of naturalness is almost complete.
Such material is made on the basis of cement-containing mixtures, often with the addition of light fractions (for example, expanded clay crushed stone), special polymer plasticizers and micro-reinforcing components. Tiles are produced using vibration casting technology in special silicone molds that exactly replicate the natural texture of the stone, or by hyper-pressing.
Laying hyper-pressed tiles “under the stone”
The release form may vary. Thus, piece tiles with standardized correct sizes are widely used. No less popular are sets that are assembled per unit area, the individual tiles of which can have different linear dimensions. This type of finishing of the base is carried out in the usual way - by laying it on construction tile adhesive for external work.
Artificial stone panels of the “Canyon” type
To facilitate the installation of the plinth cladding, you can purchase ready-made artificial stone panels, for example, the “Canyon” type. At the production stage, metal mounting brackets with a precise geometric arrangement are embedded into their concrete structure. These parts allow you to mount ready-made panels on the surface of the plinth not with mortar, but with fasteners - an indisputable advantage, especially when cladding along subsystem guides.
Find out how to install artificial stone with your own hands with detailed instructions from our new article.
If desired, such panels can also be installed on an adhesive solution - brackets bent inward will only increase the reliability of adhesion to the surface.
Another option is that tiles made of artificial stone are attached with reliable polyurethane adhesive to a rigid base, with or without insulation - this can be a slab made of OSB, fiber cement or glass magnesite. Such a substrate greatly simplifies the installation of the cladding and gives it additional thermal insulation qualities.
Rigid base panels
The well-thought-out locking part of the panels completely hides the joints between them, creating the effect of natural stonework. The texture of the outer surface can be chosen to suit your taste - rock, crushed stone, tuff, slate, etc. Mosaic solutions with the inclusion of artificial mini-slabs of a different texture or color are also popular.
Prices for the range of plinth panels
Plinth panels
Finishing the base with brick or “brick-like”
The severity of the brickwork of the plinth always gives the building a special respectability and is in perfect harmony with any possible type of decoration of the rest of the façade area. To achieve this effect, you can use one of the existing options:
- Cladding the base with natural brick. This approach has the advantage that it is possible to create a ventilated gap between the base itself and the cladding, or fill this space with insulating material. In addition, the brick itself will also serve as additional thermal insulation, especially if hollow varieties are used. However, it must be remembered that the brickwork itself will need a strip foundation - this issue should be taken into account when planning construction. Although they do it differently - they create their own support for the masonry, which will subsequently be combined with a concrete blind area around the foundation.
Cladding the base with bricks
Various types of bricks are used for cladding the base.
- The heaviest - hyper-pressed, characterized by very high strength and extremely low water absorption - something that is especially necessary for the base. You can purchase bricks of a variety of sizes - from the “Russian” standard 250 × 120 × 60 mm to the elongated “American” one.
— The most economical option is sand-lime brick, but it is not particularly popular for such finishing work.
— Ceramic bricks, including clinker bricks, usually have a hollow internal structure, which significantly reduces the weight of the cladding itself and provides a pronounced thermal insulation effect.
- However, it is not always possible to make real brickwork and, to be honest, it is not always advisable, because such a decorative effect can be completely achieved by using clinker facing tiles.
A simpler and more affordable option is clinker tiles.
The material used to make it is in no way inferior in its performance characteristics to brick, and correctly laid tiles give an absolutely reliable appearance of full-fledged brickwork. A variety of sizes, colors, external textures, special methods of surface decoration (using artificial aging technologies, uneven firing, inclusion of additional fragments) allows you to give the building’s base an absolutely unique look.
Variety of shapes and colors of clinker tiles
As a rule, collections of clinker facing tiles also include corner elements, which make it possible to simplify the masonry as much as possible without disturbing its overall pattern.
- It will be even easier to veneer the protruding part of the foundation “like a brick” if you use plinth panels.
They can be produced on a thermal insulating polyurethane foam or polystyrene base. The tiles (clinker or artificial stone) are placed and fixed on them in precise compliance with the rows of “brickwork”; tongue-and-groove joints will not allow mistakes during installation. Spaces are provided for placing fasteners for mounting panels to the wall or subsystem guides. There must be elements for decorating external corners without disturbing the linearity and “spacing” of the rows.
Base thermal panels - both decorative finishing and reliable insulation
In this case, polyurethane foam is preferable - the panels are more durable, the tiles are glued into them especially reliably, and they have better thermal insulation qualities. If you have to purchase expanded polystyrene panels, then preference should be given to extruded polystyrene foam of high density.
Video: installation of base thermal panels
- If there is no need to insulate the base, then it is worth purchasing similar panels without a thermal insulation layer. In this case, the basis for rows of clinker tiles can be glass-magnesite, OSB or fiber cement panels.
— Fiber cement – durable, environmentally friendly, highly resistant to impact loads. However, they are quite heavy, which makes installation difficult. In addition, such panels do not like fracture loads, that is, they require special care during transportation and temporary storage.
— Panels based on OSB have practically no disadvantages - they are light, environmentally friendly, not afraid of external influences, of course, with the proper quality of the base.
— Glass magnesite is the most modern solution, since the material does not burn, withstands heating to very high temperatures, is not afraid of frost, and is resistant to ultraviolet radiation. A particular advantage is flexibility, which allows work to be carried out on walls even with slight curvature that could not be eliminated by other methods.
Corner cladding element on glass-magnesite base
The usual thickness of the glass-magnesite base is 8 mm, and this does not reduce the strength of the products or make the overall cladding design heavier.
Finishing with basement siding
The design features of the plinth or the entire façade cladding system do not always allow the use of natural or artificial stone (brick). It’s okay, very high-quality finishing can be done using basement siding, which will give full visibility of the natural material.
Base finished with polymer panels - siding
The term “basement siding” covers a huge variety of finishes. Panels can differ significantly in size, design, and material of their manufacture.
Base siding is made from polyvinyl chloride, polymer sand mixtures, fiber cement, and other composite materials. As a rule, the panels are mounted on the subsystem guides (in rare cases, directly on the wall), which makes it possible to place the required thickness of the insulation layer.
The sizes of the panels and their shape can also be very diverse. Most often, the panels have a locking part and specially provided areas for attaching them to the guides.
One of the types of plinth PVC panels
There are so many options for surface texture, imitation of this or that material, and colors that it is difficult to even roughly describe them.
The variety of options is beyond description
In addition to the traditional “stone” structure, basement siding panels can also take the form of rounded wooden beams (block house), ship planks or roughly chopped shingles.
An original solution - basement siding imitating wooden shingles
The main advantage of this approach to finishing the base is the light weight of the material, ease of installation, relative durability of the resulting cladding and ease of maintenance.
Video: polymer base siding “under the stone”
A necessary element for finishing the plinth is ebb and flow
The basement of the building may have a different location. So, it can be slightly “recessed” relative to the surface of the walls. Sometimes the base is flush with the rest of the facade, although this option is considered the most unsuccessful - it does not provide adequate protection of the base from precipitation. Most often, the base protrudes outward in the form of a kind of step. It is in this case that its finishing will lose its meaning if it is not accompanied by the installation of ebb tides.
A mandatory element with a protruding base is ebb tides
These structural finishing elements will reliably protect the protruding part of the foundation from direct precipitation, remove water from the surface of the base, and prevent moisture from penetrating into the cracks between the wall and the cladding materials
The ebb tides can be made from different materials.
- In most cases, metal castings are used, which are made of galvanized steel sheets coated with a polymer coating, which provides additional protection against corrosion and gives the required decorative effect.
The most common are steel with a polymer coating.
You can find ebbs made of aluminum, and as the most expensive option - even from sheet copper: they will harmonize especially well with the copper roof of the building.
Exclusive option - copper sheet ebbs
Video: installing metal ebbs on the plinth
- Plastic moldings will cost slightly less, but this material does not have the same durability as sheet metal, simply for reasons of lower mechanical strength. To protect the base, this option is rarely used. Although, if the walls of the house are decorated with PVC siding, then the polymer cast will look very advantageous.
- If the plinth ledge is large enough, and its cladding is made of brick or clinker tiles, then laying out ebbs from profile ceramic (clinker) blocks is an excellent option.
Figured clinker bricks
They can be in the form of a brick with edges beveled in one direction, or in the form of rectangular tiles with a plane inclined to the horizon to ensure water drainage. The surface can be ordinary or with a glazed layer applied (smalt tiles).
Profile clinker panels with smalt coating - beautiful, but expensive
This low tide belt looks very impressive. But, however, its arrangement will require large material costs and a labor-intensive installation process, which can only be performed by a very highly qualified master.
So, there are a great many options for finishing the base. You should evaluate in advance your financial resources, the fundamental feasibility, feasibility, decorativeness and operational qualities of the selected cladding, and the availability of its independent implementation. Ideally, all these issues need to be thought through at the stage of drawing up the design of the future structure.
Finishing the base with artificial stone
Artificial stone is a material made from gypsum and cement interspersed with modifying components. Installation is carried out like brickwork, using an adhesive mortar.
Finishing the base with artificial stone has the following advantages:
If you use special treatment for such masonry, the durability of the cladding can be significantly extended.
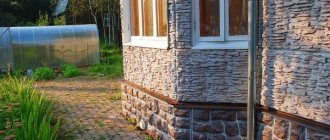
Stone cladding
Cladding with natural stone is an option for an elite finish.
A building with such a base looks luxurious and expensive. Stone goes well with wood; houses made of laminated veneer lumber look especially impressive with a stone base. In addition to high aesthetic qualities, natural stone has excellent performance characteristics: it is strong, durable, and can withstand bad weather, humidity, and frost. Mainly granite, marble, sandstone, and dolomite are used for finishing, which are produced in the form of slabs 20-30 mm thick.
Flagstone finishing is very popular. This stone does not undergo factory processing, but is sold in the form in which it is mined. Flagstone has different shapes with uneven edges, which allows you to create original and unique compositions.
But there are also disadvantages, and this is, first of all, the large weight of the material, which creates additional load on the foundation and complicates installation. Stone cladding does not allow for insulated finishing of the base, since the material is laid directly on the base. Perhaps the most significant disadvantage is the high price of the material, which makes such finishing unaffordable for many.
But if you really want the base of the log house to be lined with stone, but there is no money for natural material, you can use an alternative option - finishing the base with an artificial analogue.
Artificial stone is much cheaper, but nevertheless very skillfully creates the illusion of naturalness. The material consists of mixtures based on cement and various additives. For its production, silicone molds are used that replicate the structure of natural stone.
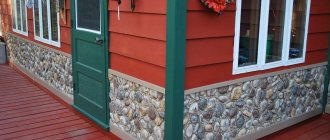
Brick plinth finishing
To cladding the base as a brick, base siding panels produced using polymer casting technology are used.
Advantages:
- low load on the structure;
- quick and easy installation;
- does not fade in the sun;
- service life up to 50 years;
- easy to wash and clean.
Flaws:
- during installation, it is necessary to take into account the expansion coefficient when temperatures change;
- lower mechanical strength than natural stone.
Used as an inexpensive alternative to ceramic bricks, which require a permanent foundation.
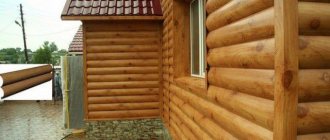
Finishing the foundation in a wooden house
Finishing the foundation of a wooden house creates an additional heat and moisture insulating layer and increases the service life of the foundation. Typically, natural materials are used to decorate a wooden house:
- a natural stone,
- brick,
- clinker tiles,
- porcelain stoneware
The foundations of wooden houses are also finished with vinyl panels (siding).
The peculiarity of finishing the basement in a wooden house is that in this case proper waterproofing is especially important. A waterproofing layer is made on the foundation at a height of 20-30 cm from the ground. Thermal insulation is also installed. After this, you can line the foundation. Some experts recommend doing this not after the walls are completed, but as soon as the foundation is ready, so as not to damage it during the construction of the rest of the house.
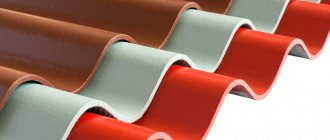
Finishing the base with corrugated sheets (profiled sheets)
Corrugated sheeting is a metal shaped sheet with a thickness of 0.5-0.9 mm.
Advantages:
- very durable;
- moisture resistant;
- does not deteriorate from the sun;
- can be used in conjunction with insulation;
- relatively inexpensive.
Flaws:
- without insulation it freezes;
- the design is not suitable for every building.
Profiled sheets are chosen for finishing the base for their durability and strength.