How to choose a brick?
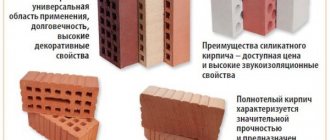
Bricks come in different strength levels: M-75 and M-100 are weak, M-125 and M-175 are medium, M-200, M-250 and M-300 are strong.
For private construction, the M-175 is sufficient. Materials are also distinguished by frost resistance, which is designated by the letter F and a number after it, for example F25. The number is the number of freezing cycles that the material will withstand. If the house is being built in the northern regions, the higher the number, the better.
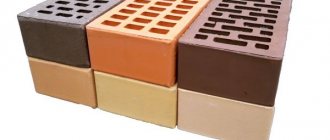
In construction stores, bricks are divided into two large categories: construction and facing. The first is the load-bearing material. Facing blocks are needed for beauty; they are more expensive and have a neater appearance.
Mortar for brickwork
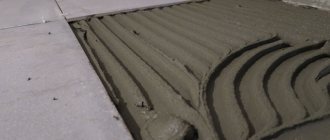
The brick is laid on a cement-sand mortar. Cement is used not lower than M400, sand is clean, gully. The proportions for the specified brand are 1:4 (for M500 - 1:5). Mixing is done manually or using a concrete mixer, but the order does not change.
First, the sand is sifted, a binder is added to it, everything is mixed in a dry state until a uniform color is achieved. Then add water. Its quantity is 0.4-0.6 parts, but it is determined by the plasticity of the solution. It is more convenient to work with plastic mortar than with rigid mortar, but when laying hollow bricks, in this case the consumption of mortar greatly increases: it fills the voids. In this case, it is more practical to make a rigid solution.
The brick laying technique depends on the consistency of the mortar.
To improve plasticity and more convenient work, add lime, clay or liquid detergent to the composition (you can use hand soap, available in large flasks). The amount of additives is quite small - no more than 0.1 part, but the characteristics of the solution improve significantly: it is easier to install, it does not delaminate longer.
It’s worth warning right away: do not mix large volumes at once. The mixture must be used within two hours. And in the last half hour it can be difficult to work with it: water may begin to separate, or it may begin to set. It depends on weather conditions and the quality of cement, on the thoroughness of the batch. If laying bricks with your own hands is your first experience in this area, it will be slow. Therefore, it is better to make small portions of the solution.
Approximate solution consumption
Often, beginners who plan to lay bricks themselves have a question: at what temperature can they work. Without special additives you can work at positive temperatures. In the best case – not lower than +7°C. This is the threshold at which cement sets normally. At lower temperatures, the hardening process practically stops; as a result, the solution may crumble and the strength of the wall will be low. To lower the bar, there are special antifreeze additives, but the cost of such a solution is already high: the price of these additives is considerable.
Brick laying for jointing: nuances of the process
Before moving on to directly solving the question of how to lay a brick under the jointing, we will first deal with the question of what it even is. According to many people, a stitcher is a special tool that forms a beautiful facial seam. But many people forget that jointing is a kind of template that allows you to maintain equal distances between individual bricks. In most cases, this tool is the length of half or most of the brick, which makes it quite easy to use for leveling masonry.
The joint is either a thick plate with a curved handle, or a tube cut halfway along the length. The latter option was actively used by masons in the past, and today flat jointing has become widespread, which makes the seam more neat.
Brick laying for jointing photo
So, we’ve sorted out the jointing, now it’s time to clarify the situation with the question of how the masonry for the jointing is done? In principle, there is nothing complicated here, especially if you clearly lay out the first, fundamental row in the level. Let's start with it.
There are several ways to lay out the first row while respecting the horizon, but in most cases experts use only one. Beacon bricks are installed at the corners or edges of the wall - their uniform level can be checked using hydraulics or a laser. A thread is stretched between these bricks, relative to which the first row is laid out.
Now the second row and all subsequent ones. This is where the fun begins - you will have to learn how to apply the solution in a certain amount. This is where you will need the jointing, which can be used as some kind of template. The solution is applied to the previous row in a slide, the height of which is twice as large as the width of the jointing. Then the brick is seated with a hammer, and the seam gap between it and the previous row is controlled by jointing. It is simply inserted into the seam, and the brick is lowered all the way. It should be understood that such control will have to be carried out on all sides of each brick.
How to lay brick under jointing photo
Each brick of the facing masonry is laid in this way. This, of course, may seem difficult, but believe me, after a maximum of several unsuccessful attempts everything will work out in the best possible way. As the mortar dries, it is additionally necessary to cultivate the seams - the jointing is again driven into the seam, and with its help, the mortar in it is smoothed out with a longitudinal movement. Here it works as a spatula. Do not forget that this tool needs to be wetted with water more often, then the solution will not stick to the metal, and the seam itself will remain smooth. And yet, in this way the seams can be given any color. This process is rather similar to grouting tile joints, only it is done much more carefully. After drying, excess mortar or grout is removed with a special brush with wire bristles.
Brickwork for jointing photo
Bricklaying - making corners.
Next, using the knowledge you have already acquired, place the corners brick by brick. Do not forget that the quality of the masonry of the entire wall will largely depend on how correctly the corners were set. That is why we recommend using not only an eye gauge, but also other devices that can help in correctly setting angles.
Use a plumb line to check the verticality of the masonry. A plumb line is considered to be a fairly accurate device for checking the verticality of a surface. And it is probably the easiest to use and the most accurate in comparison with the building level, which sometimes gives false indicators. If you have 1-2 rows of masonry, there is no point in using a plumb line, since it is quite difficult to determine the discrepancy from the vertical in such a small area by eye.
In the image we marked 3 points that are equidistant from the masonry. Based on the fact that the distance on these segments is the same, we conclude that the masonry is laid exactly vertically. To use a plumb line, you need to have a good eye, because all the distances between the masonry and the plumb line are determined by eye.
In order for the horizontal seams to be identical and to control the horizontalness of the masonry, we recommend using orders. This device will be relevant for those who do not have enough experience in bricklaying. The orders must be installed strictly vertically and attached to the masonry using U-shaped brackets. The distance between the divisions of the order should be 77 mm for a single brick (since the brick thickness is 66 mm + 12 mm seam) and 100 mm for thickened bricks (88 mm + 12 mm).
How to joint joints in brickwork
Experienced builders know what jointing is. Those who are working with bricks on their own for the first time need to become familiar with this procedure. We are talking about the final stage of sealing the space between the rows of masonry. Thanks to it, the seams and the walls themselves acquire an aesthetic appearance, and a reliable artificial obstacle is created in the path of atmospheric moisture. For load-bearing structures such treatment is not necessary, but it is always performed on the facade of the house and brick fences.
Seam jointing - types
There are several options for processing walls, where the seams are given a certain shape:
1. Semicircular concave - used to disguise bricks of different sizes in the overall masonry, as well as to decorate walls made of rubble or flat stone.
It is done quite simply, even if you don’t have the right tool at hand. Here you can use a curved steel rod (diameter no less than 10 mm). To make the seam neat, the brick wall is first smoothed vertically, and only after that the bed lines are unstitched. Finally, the “steps” formed at the joints are removed.
2. Pustoshovka (recessed rectangular) - suitable only for ideal masonry made of high-quality bricks with minimal deviations in linear dimensions and geometry.
To form a seam you will need a thin scraper. It is not sold in the store, but you can make it yourself by driving a nail with a round head into a small wooden block. They are used to fill the gaps between the blocks by simply removing part of the mortar to a depth of 7-10 mm. In this case, the brickwork looks more prominent due to the cast shadows. And so that the seams themselves become moisture resistant, they are additionally smoothed and compacted.
However, the use of this technology outside buildings is not recommended, as the waste area does not provide sufficient protection from atmospheric influences. More often, a similar scheme is used for interior cladding work, as well as for finishing natural stone.
3. Undercutting is the simplest flat jointing that turns the masonry into a continuous surface.
This is done with a wooden spatula or the edge of a trowel, when the solution has set a little, but has not yet crumbled under the tool. This treatment is only suitable for decorating internal seams or directly during the construction of load-bearing walls. Masons consider it to be obsolete, but for beginners this method is the easiest.
4. Single-cut or beveled - this type of jointing is considered the best scheme for working on a facade, since it allows the masonry to successfully withstand any atmospheric influences.
The hardened mortar, cut at an angle, effectively removes rain and melt water, preventing it from accumulating and penetrating into the pores of the brick.
However, it is important here that the vertical jointing of the seams is carried out correctly: each line should move to the side by about 3-4 mm. You will have to smooth the mixture several times until you get flat slopes and grooves that drain water
There are other technologies according to which stone or brickwork is decorated with relief, double-cut or super-convex decorative seams. However, without experience in such work, you should not take on it, since it is easy to spoil the appearance of the wall.
Laying fence posts: basic technologies
Typically, the pillars are 1.5-2 m high and 38×38 cm or 51×51 cm wide (for three-meter supports). Strength is achieved by the method of laying bricks. The seam between the bricks (8-10 cm) of the bottom row should overlap the surface of the top brick. This masonry scheme ensures that the rows are connected to each other.
Operating procedure
To correctly assemble a brick pillar yourself, you need to follow the following procedure.
- Laying waterproofing under the support so that it does not become saturated with moisture. The wet brick begins to deteriorate. For insulation, roofing felt or special insulation with bitumen (“Gidroizol”) and mastic are used.
- Each layer is checked with a level. Use the handle of a trowel, tapping it on the masonry. You must also have other devices for laying brick pillars - a hammer with a rubber tip and others.
- It happens that poorly wiped mortar drips onto the brick. It is recommended to lightly moisten the material with water. This makes it easier to clean the brick.
- After laying out several layers, measurements are taken. By tapping with a hammer, displacements (even 1-2 mm) are corrected. Fill vertical gaps with mortar.
- The voids between the pipe and the masonry are filled with mortar; if it is large, crushed stone is mixed with sand, poured into the voids and secured with mortar.
Laying brick pillars under rods
Masonry with rods allows the mason to make beautiful seams, since usually excess mixture crawls out onto the plane of the brick, and the seams are made uneven. The rod (side - from 8 to 10 mm) is cut into pieces that are 10-15 cm larger than the pillar. Lay the first row, then the rod is laid along the edge. A layer of mortar and bricks of the second row are applied. The metal prevents them from sagging. A trowel is moved along the rod, removing excess. Bricks are checked by level. The same method applies when laying the rod on its side. The solution is applied with a trowel, the excess is also removed, a level is applied, and the workpiece is removed. The rod is removed and the seam is held in place with a trowel.
Installation of mortgages for fastening fence sections
The master often misses a detail - what to attach the fence to. For fastening to the pipes in the middle of the column, embedded parts (angles, studs, etc.) are welded at the same height so that the crossbars stand level. For a solid brick wall, use 8 cm thick wire loops for every fourth row. In the case of corrugated sheets and wood, a cut is made in the brick and metal plates are attached to support the weight of the blade. Logs are welded onto the mortgages to secure the fence.
Jointing during construction work
The jointing is done both directly during brick laying and after the building is erected.
Jointing during construction work is done after several rows of bricks have been laid and on a slightly set viscous mortar. As a jointing tool, you can use a 15-centimeter piece of ordinary rubber hose cut lengthwise - with its help you can make a convex or concave jointing.
The step-by-step process is as follows:
- A brick is placed on top of the generously laid mortar, and all the mortar that comes out from the outside is cut off flush with a trowel, i.e. flush with the masonry.
- the solution is allowed to set a little, but not completely dry.
- Using a piece of rubber hose or jointing, the seam is smoothed, compacted and, if we are talking about deep jointing, pressed 2 mm deep into the seam.
If jointing is done after the construction work on bricklaying has been completed, then in this case the mason, while laying the brick, must leave free space for subsequent filling with jointing mortar.
By the way, a few words about the mortar itself: to open the joints, it is not necessary to use the same mortar on which the bricks are laid. The fact is that jointing solves mainly aesthetic problems and does not in any way affect the strength of the walls being built. Therefore, the solution may be different. To make the mortar, you need three main components in the following proportions: cement and lime - one part each; granular construction sand - six parts. The humidity of the solution should not exceed 15%.
All these ingredients are mixed using an ordinary drill with a paddle attached to it. The consistency of the solution suitable for use should be plastic and thick.
Guide to facing bricks - types and sizes of bricks, masonry technology and ensuring the reliability of seams.
Installation of a suspended plasterboard ceiling - photo and video instructions for constructing a plasterboard ceiling.
Characteristics of bricks, varieties
In order for a wall or stove to serve for a long time after installation with your own hands, you need to know what kind of material is used and choose it correctly. Apply a suitable linking scheme. A brick block may contain several components that affect its characteristics.
At the same time, clay or sand is the main component, and lime and other additives are additional, increasing the strength, frost resistance and other properties of the material.
Any bricks, regardless of type, have standard sizes. They may differ in thickness and are:
- Single (standard) – 250x125x65;
- One-and-a-half - 250x125x88;
- Double - 250x125x138
As for the types of bricks, there are only 2 of them:
- Silicate (sand-based);
- Ceramic (clay based)
Both types of bricks can be hollow, which makes them less durable, but increases their ability to retain heat.
Bricks are also divided into classes according to their strength:
- Weak;
- Average;
- Durable.
Required additional tools
Auxiliary devices will be needed if you need to create a seam of an atypical shape. It will not be possible to make such a line using jointing alone. The exact set of tools is determined by the technical condition of the brick wall, but the most widespread set will consist of the following assistants:
- hammer;
- concrete mixer;
- chisel;
- electric drill;
- triangular trowel;
- soft-bristled paint brush (or roller);
- Kratsovka;
- brush with hard steel bristles.
A chisel, which is struck carefully with a hammer, will help clean out the old mortar from the joints. If you don’t have such a tool, you can replace it with a hammer drill
Making grout most often requires a drill and a mixing attachment. This component makes it easier to mix the solution.
A concrete mixer is not particularly needed if the scale of work is small. The trowel helps both in removing excess mixture and in applying it. Wall cleaning is carried out when the grouting and grouting itself has already been completed. A flute brush is often used to wet the stripes. A wooden strip 1 meter long is used to support the tool. The reservoir where the grout is prepared must be deeper than wide - otherwise the solution will set very quickly.
Sequence of the jointing procedure
Before preparing the grout, you must read the product instructions on its packaging. After this, you can begin making vertical seams. The composition must have the following properties:
- softness;
- plastic;
- density.
If the grouting solution is made liquid, it may flow through the masonry. Having made all the preparations, you can begin to carry out the work. To do this, you need to perform a series of basic steps:
- Use a trowel to apply a layer of grout so that it is larger than required to fill the joint. To prevent the bottom row of bricks from getting dirty, you can use a plasterer and place it in the right place.
- Remove excess mixture with a rib, smoothing the surface with the most suitable hand tool.
- Press down each seam firmly so that the space between the grout and the old mortar does not have any voids.
- Process horizontal rows using a strip, under which you will need to draw a straight line, like under a ruler.
- After completing the jointing of the brickwork, its front side will need to be cleaned of traces of mortar using a stiff brush.
- While the mixture is gaining strength, care must be taken to ensure that it does not dry out or get wet in the rain.
The special jointing used after the solution has set can be replaced with a piece of hose. Each seam should be smoothed and compacted slightly, pressing the compound 2 cm deep if necessary.
After summing up all the results, it is necessary to take into account some additional points, without which the jointing will not be of high quality:
- carry out the procedure in cloudy weather when there is no precipitation;
- start jointing with vertical rows.
The main advantage of jointing is considered to be an increase in the heat and sound insulation parameters of the wall. The jointing procedure allows for a high level of protection of the masonry joint from the influence of moisture on the wall surface. Brick laying under jointing is not only easy to use, but also durable when compared with a plastered surface.
Technological process
How to make brickwork for jointing? When is it permissible to start such work?
If you decide to use the technology of laying facing bricks while simultaneously preparing the seam areas for jointing, then the excess mortar mixture is removed with a trowel in such a way as to ensure a common level with the plane of the wall.
As soon as the mortar mass begins to set, it is given the required shape using a jointing template. The mortar located between the brick rows is pressed inward by about three millimeters, compacting the mass well. This helps improve the quality of not only the masonry, but also the entire wall as a whole.
Regarding the time when it is best to start such a procedure, observe the following points, which are the most significant:
- monitor the consistency of the solution and the degree of its plasticity;
- control natural factors - air temperature and the percentage of humidity in it;
- speed mode of work of a master laying brick stone.
Masonry with simultaneous jointing
A similar procedure is started by preparing several rows of masonry, the solution in which begins to gradually harden.
You must act in a certain sequence:
- The brick stone is laid on a sufficient thickness of the mortar layer and lightly pressed. The mixture that is outside the seam is removed flush with the brick surface;
- the solution that has set, but has not had time to harden, is smoothed out with jointing or a piece of a simple hose, compacting and pressing the mass into the seam;
- if the jointing will be done a little later, then it is recommended to leave a little free space in the seams so that there is room for the jointing solution.
Carrying out jointing after masonry
Making bricks for jointing is possible on long-constructed walls. To perform such work, you will have to remove a certain amount of old masonry mortar. The formed cracks are moistened, a new solution is placed in them, which is expanded in a known way.
It is recommended not to prepare the mixture yourself, but to purchase ready-made formulations in dry form, which can only be diluted with water. Such materials retain their shape perfectly after the jointing procedure.
Masonry using rods
This technique is based on the use of a steel rod of round or rectangular cross-section, which is laid along the entire length of the bottom row on both sides. Then all that remains is to fill the free space between the metal elements with a mortar mixture, lay out the brick stone in a row, adjusting it in place with a wooden mallet.
Carrying out such work requires a large supply of metal rods of the same cross-section, since the embedded steel elements should be removed after a certain number of brick rows have been removed from above. Pull out the rods carefully, and then immediately wash them with water to remove traces of the mortar mixture.
The advantage of this method of jointing is that after removing the rod, an attractive and even joint remains, evenly filled with sand-cement mortar. There is no need to further modify it; you won’t even need to clean it with a metal bristle brush.
True, the contractor will need special attention when laying out the first row - it should turn out perfect, laid out strictly in a line. The check is carried out at the building level
By unstitching seams with a metal rod, you get the following advantages:
- masonry joints are characterized by perfect evenness;
- if all work is carried out carefully, then the front surface of the brickwork retains its cleanliness. This is especially true for expensive facing stones, the surface of which is difficult to clean from dried mortar particles;
- There is completely no need to form seam sections - all work is performed by a metal rod.
By the way, many people prefer to use round steel elements, because square shapes do not always make it possible to maintain the general level for brick stone and mortar mixture. This type of seam requires additional filling with jointing compound.
Ways to perform jointing
In addition to their decorative appearance, the finished horizontal and vertical joints of the brickwork conceal certain functional meanings.
The seams are unstitched for the purpose of:
- creating protection for the sand-cement mortar, preventing it from falling off;
- to mask uneven staining of the mortar mixture used in the construction of masonry;
- for the purpose of decorating suture lines in various color shades;
- improving the tightness of the entire brick stone structure.
To know how to lay brick floor jointing, it is recommended to study the masonry design options used for this, which are:
- rectangular recessed. The masonry mortar is removed by five millimeters, and new decorative material is laid;
- rectangular undercut. The solution is removed with a trowel and a brush with metal bristles flush with the surface of the brick stone;
- concave. The remains of the mortar material are cut off, the suture areas are processed with devices with rectangular shapes;
- beveled. Using a sharply sharpened trowel, the mortar mixture is cut to a depth of four millimeters, maintaining an acute angle directed towards the brick edge.
Rules for mixing the solution
The mortar for laying facing stone is made from cement grade M-500 and fine sand cleared of debris in a ratio of 1:4. Water is poured in small portions, the finished solution is thick and uniform in shape. You can check the correct consistency using a special construction method: a ball made of cement mortar must retain its shape and not crumble under light pressure.
Laying the bottom row and corners
Since for the aesthetic appeal of external wall cladding it is necessary to consider the optimal way to place seams, it is better to lay the first row without mortar. Professional craftsmen recommend working from the corner, using a level to level each brick and seam. Before laying on cement mortar, ceramic clay bricks are soaked in water.
The angle is formed to a height of 5–6 lines. A square metal rod with a cross-section of 10x10 mm is placed on the outer edge of the first or previous row, on top of which the solution is laid. The brick, pre-soaked in water, is carefully laid on the mortar and a metal rod, the horizontal and vertical lines are checked, and the distortion is leveled
Then the rod is carefully pulled out and excess solution is removed
Wall covering
Wall finishing begins after the work with the formation of corners is completed. A construction cord is stretched and fixed between the corner blocks of one row.
A square metal rod is installed along the outer edge of the previous row of masonry. The resulting cavity is filled with cement mortar, brick is laid on top
The reinforcing bar is removed carefully and carefully so as not to disturb the masonry. As experienced builders advise, every 5-6 rows of masonry you need to take a break so that the cement mortar can set well and does not lose its original shape under the weight of the elements laid on top
Binding
Attaching the façade masonry to the supporting wall is carried out using tying wire, anchors and dowels.
For 1 sq. m of facing wall requires at least 5 fixation points. As a standard, fasteners from anchors or dowels are placed every 4 rows vertically and every 70 cm horizontally.
Laying slopes and jointing
To give the building an aesthetically attractive and decorative appearance, the vertical slopes are laid out from stone of a different color. The cladding is carried out according to the stud pattern.
A facing brick column-slope, formed from one vertical straight line, may slightly protrude beyond the finishing edge of the wall.
Upon completion of the masonry, they begin to joint it. The surface is thoroughly swept, the remains of dried cement mortar are removed and the masonry is moistened. The mixture for filling joints is prepared from M-500 cement, lime and clean fine sand. The ratio of cement and lime to sand is 1:1:10. Water is added in small quantities and stirred constantly. The solution ready for sealing joints is a homogeneous and paste-like mixture.
Restoration
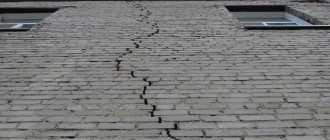
During restoration, the old mortar is removed to a depth of 10 - 15 mm
During operation, when exposed to atmospheric conditions, the mortar gradually crumbles out of the wall. To protect building materials from destruction, restoration work is carried out.
To do this, you first need to prepare the surface:
- Remove the old mortar to a depth of 10 to 15 mm using a narrow wooden wedge or chisel and hammer.
- Clean dust and dirt from walls and from spaces between bricks. This can be done with a brush or a high-pressure cleaner. Dust prevents building materials from sticking together.
Then a solution is prepared for jointing. You can buy it or prepare it yourself. The materials are mixed in the following proportions: 1 part cement, 1 part lime and 10 parts sand. Prepare such a volume that they will have time to consume 1.5-2 hours before it hardens. If necessary, add coloring pigments for concrete.
Next, jointing is carried out in the same way as at the construction stage. To prevent the solution from spreading, a plaster falcon is held under the treated area. They also apply the solution horizontally. For more information about the restoration, watch this video:
If the solution turns out to be liquid, you can remove moisture from it by placing a dry red brick in the mixture for a few minutes, it will absorb the water.
The size of vertical and horizontal gaps must be monitored during work. The gaps in 5-6 rows are measured, the resulting number is divided by the number of rows, and the size of the bricks is subtracted. The resulting indicator must correspond to the figure specified in the project documentation.
When calculating, we take into account that the width of the seam in the brickwork should be the same. It should not be that in one row the indicator is, for example, 8 mm, and in another 16 mm. Correctly calculated indicators and precise implementation of work technology will ensure reliability and durability of the building.
Restoration of brickwork
How to count brickwork
Brick wall in the kitchen interior
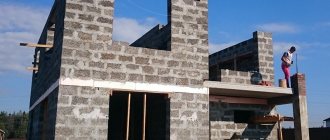
Laying fence posts: technologies
In most cases, fence posts are made of 1.5 or 2 bricks, the cross-section is 380*380 mm and 510*510 mm, respectively, and the height is up to 3 meters.
The masonry is carried out with bandaging (offset) - the seam of the bottom row is overlapped by the “body” of the brick lying on top. The standard seam is 8-10 mm. The diagram for laying columns of one and a half and two bricks is in the photo below.
Brick pillars of 1.5 and 2 bricks
Laying pillars: work order
Cut-off waterproofing is spread on the finished foundation. It can be roofing material in two layers, but it is better to use waterproofing with bitumen mastic. This layer is necessary so that the brick does not “pull” moisture from the soil. If wet brick freezes, it will quickly begin to crack and crumble. Therefore, waterproofing is necessary. Rolled waterproofing can be replaced - coat the foundation twice with bitumen mastic, and in areas with high humidity it is better to do double waterproofing - coat it with mastic, and then lay “Gidroizol” as well.
According to the size of the pillar, a layer of mortar a little more than 1 cm is applied to the waterproofing. Bricks are laid on it, according to the diagram. They are leveled in vertical and horizontal planes by tapping with a special rubber hammer. Craftsmen can use the handle of a trowel, but in this case, the remains of the mortar can fly off the surface of the trowel, staining their hands and the brick, and it is difficult to wipe off the cement.
Ceramic brick absorbs moisture very quickly, so if you hesitate a little, it will be difficult for you to “put” it in place. To ensure that the solution retains its plasticity longer, the brick is dipped in water for a few seconds before laying. The same maneuver makes it easier to wipe the solution from the surface (it is removed immediately with a dry cloth).
We hit with a hammer
The second row is laid in the same way: the mortar is spread on the bricks, the bricks are placed on it, but with a bandage - unfolded so that the seam is blocked. Level again. Then take a tape measure and check the dimensions of the laid rows. Even a small displacement of 1-2 mm is eliminated. Tap the end of the brick (called a “poke”), moving the bricks closer. Then, if the side edges were not coated, fill the vertical seams. All subsequent rows are placed similarly.
If there is a void between the inner reinforcement pipe and the brickwork, it is filled. If the distance is small, you can use masonry mortar; if the void is significant, to save space you can fill it with crushed stone, compact it, then pour it with liquid cement-sand mortar.
Masonry under the rod
The masonry of pillars described above has long been tested, but for beginners, when making it themselves, it is difficult to maintain an even seam. Another problem is that the solution comes out of the seam, staining the surface. It doesn't turn out very nice. To make the work easier, we came up with a laying under the rod. Take a square metal rod with a side of 8-10 mm, cut it into pieces, 10-15 cm longer than the dimensions of the post.
Bar layout
Having laid the first row, a rod is laid on it along the edge of the brick. Fill the area with a small amount of solution, with a larger layer being made closer to the pipe. Then, running a trowel along the rod, remove the excess, clearing the rod of the solution. But at the same time, the slope of the solution is maintained. They place a brick and level it. At the same time, the rod prevents it from settling too much, and we control the position of the other end with a level.
Apply the solution to the side edge under the rod
Then take a short piece of rod about 10 cm (for a vertical seam), place it along the butt, apply the mortar with a trowel to the side of the laid brick, also removing the excess along the rod. The second brick is placed and leveled. After the level is set, the seam is pressed from above with a trowel, and the vertical rod is removed.
We take out the rod, holding the seam with a trowel
This is how all the bricks are laid out in a row. Then the rods are removed and proceed to the next row. This technology for laying brick pillars allows you to control the seams and make them neat. Even a novice amateur mason can fold a pillar this way with his own hands.
It is only important to control the parameters of each row during the process (so that the column in the cross-section is the same size)
Video lessons
A more complex version of a brick pillar - twisted with a screw
Features of working with ceramic bricks
Types of masonry
Brick walls can serve different roles. In some cases this is only finishing, in others - partitions, and sometimes - permanent load-bearing walls. Based on the purpose and technical tasks, the type of brickwork is selected:
- Half a brick. Most often this is how cladding is done. The thickness of such a wall is 125 mm. To save money, you can put the material on a spoon, then you will get a wall the size of a quarter of a brick. When installing these (in 1/2 or 1/4), a reinforcing mesh is laid in every 4-5 rows. It is necessary to increase the rigidity of the wall and create additional connections that increase the strength of the masonry.
- Into the brick. These can already be partitions or two load-bearing walls of small buildings. Wall thickness - 250 mm.
- One and a half, two and two and a half bricks are already load-bearing walls.
Types of brickwork: half a brick, one brick, one and a half and two bricks
Dressing and names of rows
Although a brick wall is made up of many small elements, it should work as a monolith. To provide increased strength, the seams, which are the weak point in this system, are made offset. Experts call this technique “bandaging.” It seems to connect different elements into a single whole, allowing the load to be redistributed over large surfaces.
Spoon and tie rows in brickwork
To ensure the necessary displacement of the seams, the bricks are placed in different ways:
- if they are turned to the front side by the smallest part - a poke, such a row is called a poke row;
- if turned with the long side - a spoon - the row is called spoon .
Moreover, the first one in the masonry - on the foundation - is the bonded one, which is also used to finish the masonry. Moreover, it is mandatory to use solid bricks.
Single row dressing
Alternating such rows gives a very good result. This method of ligation is called single-row or chain ligation. It is practiced on walls that are not planned to be finished: it looks neat. Using this system, both external and load-bearing walls can be built.
Wall masonry schemes
Examples of a single-row brick wall of 1.5 and 2 bricks are shown in the photo below.
Single-row dressing in the wall from 1.5 and 2 kripich
In the case of laying a wall with two bricks, two more terms appear. The two outer rows of spoons are called versts - the outer verst is directed towards the street, the inner verst is directed into the room. For them, they use smooth, good material, especially carefully selecting those that are directed outward. The space between them is called backfill . Since this element is closed on all sides, you can use lower-grade material, for example, used.
Please note that this type of masonry also requires sawn bricks: half and three-quarter. The three-quarters in the diagram are crossed out crosswise, the halves are crossed out with one diagonal stripe. How to connect partitions to walls made using this technique is shown in the photo below.
Joining walls with single-row ligation
Corner schemes
Laying the corner in this case is very important. According to the method, the corners are first driven out, a cord is pulled between them, and then the wall is laid according to the diagram. But the corners are placed first; how evenly and correctly they are set determines how level the entire building will be. The scheme for laying a corner of 1 brick with a single-row dressing is located as follows. The laying begins with the installation of two 3/4 pieces, followed by whole ones.
One-brick corner with single-row dressing
See the video for the sequence of actions. Very detailed explanation with step-by-step demonstration of the procedure.
The same system, but in a wall of 1.5 bricks. In addition to whole pieces, 3/4 pieces and quarters are required. The spoon row alternates between the inner and outer miles.
Scheme: an angle of one and a half bricks with a single-row dressing
When laying a corner of 2 bricks in the first row, the same two three-quarter pieces are required, as well as another 6 quarters or, as they say, checks. In the second, one 3/4 and two checks are already required.
Scheme: corner of two bricks with single-row dressing
Multi-row dressing
With multi-row dressing, several spoon rows - 6 (for a single brick) or 5 (for a one-and-a-half brick) - are interspersed with one bonded one. The first and last ones are also placed with pokes. This method is also suitable for laying external and internal walls. Only they are usually planned for insulation or finishing.
Wall masonry schemes
To prevent such a system from creating free-standing columns, the spoon rows inside are also tied up. To ensure displacement of the seams, crushed bricks are used.
Do-it-yourself brickwork: multi-row ligation scheme of 2 and 2.5 bricks
The joining of walls with this method also occurs with bandaging. This ensures increased strength of the junction of the walls. The diagrams are in the photo below.
Layout schemes for adjacent walls
Schemes for laying corners
And again about how to place corners, but with multi-row dressing. If the wall is one brick, the even and odd rows (except the first) are the same.
Scheme for laying a corner of 1 brick with multi-row dressing
Watch this tutorial video.
If the wall is 1.5 bricks long, in the first and second rows with bonded bricks, but located either in the outer or in the inner verst. The third and fourth rows are exclusively placed on spoons.
Scheme for laying a corner of 1.5 bricks with multi-row dressing
The fifth row is placed similarly to the third, the sixth - to the fourth. Then the system is repeated. At times, not a multi-row system (with 5 spoon poisons) is required, but a three-row system. Then from the fifth row the clacking is repeated.
Waterproofing
After we have sorted out the foundation measurements, we move on to the next stage: waterproofing the upper part of the foundation. It is performed using 2 layers of roofing material. The second layer is laid overlapping the seams of the first by 10 - 15 cm. Ruberoid can be laid in several ways:
- dry, I temporarily press the roofing felt to the foundation with bricks (so as not to be blown away by the wind);
- on bitumen mastic or heated bitumen;
- gluing by heating the surface of the roofing material with a burner.
Modern roofing felt has several modifications: rubemast, glass roofing felt (stekloizol), euroroofing felt. In terms of their characteristics, they are superior to ordinary roofing felt, but their price is higher. The TechnoNIKOL company offers a wide selection of roll waterproofing.
Why do you need to waterproof the foundation before brickwork?
? It’s simple - so that moisture from the foundation does not move into the basement or brick walls. Moisture can be not only due to rain and melting snow, but also simply from capillary suction of water from the ground by our foundation. Moreover, if we have a brick base and brick walls, then we will need to waterproof it twice:
- between the foundation and the plinth;
- between the plinth and the brick wall.
Preparatory activities
Joining can be carried out immediately after laying the brick or after erecting the walls. In the first case, the mason brings the masonry into proper shape after several rows have been completed and the mortar begins to set.
In the second case, when laying, the master leaves the outer part of the seam empty for subsequent filling with jointing mixture, and they begin refining the wall after a certain time has passed, necessary for complete shrinkage of the masonry.
Before restoring old masonry, it is necessary to remove the mortar from the joints to a depth of 15 mm and clean the wall from dust and dirt
Preparing the masonry is carried out in the following sequence:
- If it is necessary to update the cladding of an old wall, parts of the old jointing are removed from the seams to a depth of 10 - 15 mm. To avoid damaging the bricks, it is better to use a narrow wooden wedge and a hammer. If it is not possible to knock off parts of the frozen solution, use a chisel;
- Use improvised means to remove dust and dirt from the walls of the building;
- The seams are cleaned using a stiff brush or a high-pressure apparatus. This work should be carried out very carefully, since dirt and dust particles interfere with the adhesion of the jointing solution;
- After cleaning, the seams are moistened using a roller or soft brush and a bucket of water.
The preparation of the cement-sand mixture begins only after the surface has been completely prepared for the next stage, at which the jointing solution is prepared.
You can make the jointing mixture yourself or use a ready-made factory-made composition, which is sold dry. and in wet form. Since the solution is used for decorative purposes, concrete dyes can be added to it.
A concrete mixer will speed up the process of preparing the jointing mixture
If you prefer to do everything yourself, then to prepare the optimal mixture, take lime, sand and cement in a ratio of 1:10:1 and mix with water until the consistency of very thick sour cream is obtained. Remember that the composition remains mobile for up to 1.5–2 hours, so mix only the amount that you can use during this time.
If the mixture you receive is too liquid, you can remove excess moisture from it by placing dry red brick in a container with the solution for 1 - 2 minutes.
For large volumes of work and the presence of assistants, a concrete mixer will help speed up the process.
Working method
To get started, you need to prepare the following materials:
- Trowel;
- Solution;
- Water;
- Joining;
- Brush, sponge.
It is worth understanding that the layer of mortar between the bricks can be made in different shapes: concave, convex, triangular and others. All this is done using the appropriate tool, which was mentioned above. When laying the selected material, excess mortar is removed with a trowel.
This will prevent the mixture from drying out and will facilitate the jointing process. To avoid inter-seam voids, you need to press an additional amount of mortar inside, which will thoroughly compact the material.
Types and methods of installation
If we talk about what brickwork is, then it is a structure made of bricks, and they are laid in a given order and connected to each other with mortar.
The classification of brickwork will depend on its complexity and where it is used, so there are several groups:
the simplest masonry, it is used for cottages and houses, it involves the construction of any walls, and the work is carried out without architectural elements;
If the height of the corbels and cornices is no more than 4 bricks, they are not considered architectural elements, and this type of masonry is classified as the simplest.
- simple complexity, in this case decorative parts in the form of cornices, bay windows, belts, semi-columns and other elements make up no more than 10% of the wall surface;
- medium complexity, the part of the wall with architectural elements is no more than 20% of its area;
- complex, in this case decorative elements account for up to 40%;
- It is especially difficult when creating arches, domes and other elements that have a complex curvilinear shape.
Depending on what materials are used during masonry, it differs into the following types:
- Made from solid brick made by plastic pressing, it is used to create walls, chimneys, and underground buildings.
- Hollow bricks are used to make any building walls. If we compare such masonry with that made of solid brick, then its thermal conductivity will be less, which makes it possible to make the wall 20-25% thinner, and its weight is 20-30% less, which reduces the load on the foundation.
- Concrete stones are used to create foundations and underground spaces.
- Walls are made from hollow concrete stones; if they are lightweight concrete or slag concrete, then to protect them from the effects of natural factors, such surfaces must be plastered.
- Hollow ceramic stones have low thermal conductivity, which allows masonry to be made 50% thinner than that made from hollow bricks.
- Silicate stones are used for the construction of any walls.
- Natural stones are used to construct foundations, underground structures and plinths.
- Natural stones that have the correct shape.
The masonry option with insulation in the photo below allows you to insulate brick walls during masonry.
Both brick and stone have edges: an upper and lower bed, spoons, which are the long side sides, butts, the short side sides, and there are ribs at the intersection of the edges.
Third stage jointing
It is better to use a chisel to remove old mortar.
- Now use the stiff brush again to remove all traces of the old solution. Unyielding elements are removed with a chisel or the apparatus we mentioned earlier.
- Prepare a scaffold for opening the seams at the top of the wall; you can use a stepladder, but the most effective way is to install scaffolding.
- Now that the surface is completely ready, you can begin applying the solution.
Note! Remember that the mixture must be homogeneous; the presence of lumpy elements is not allowed in it.
Apply the solution with a small amount of excess, which is immediately removed with a trowel.
The seam should be rubbed in so that it fills the entire space between the bricks
Using a narrow jointer, press the mortar into the vertical joints. Press it down rather than smooth it, this allows you to get rid of excess air that could remain between the old and new layers.
This is how vertical seams are processed using jointing
- For horizontal seams, it is better to use long jointing, distributing the mortar evenly along the seam.
- Now it remains to give the necessary shape for the new solution. From available means, you can use a piece of rubber hose or plastic tube, then you will get a concave seam. You can also use a wooden strip to make a beveled seam, you just need to “adjust” its size.
A sharpened wooden peg allows you to make a deep seam in a simple way
If necessary, if it suddenly rains, you should isolate the treated surface from precipitation using ordinary plastic film.
As you can see, there is nothing complicated in this process; all work can be performed even by an inexperienced builder, that is, by you
It doesn’t matter at all how much time you spend on this, the main thing is that you do everything yourself and save on workers
And do not forget that when constructing walls, expansion joints must be provided. Otherwise, stress from uneven shrinkage, temperature changes and seismic vibrations can damage your structure.
For your information! The expansion joint in a brick building plays an important role, so it is better to carry out jointing every few years, depending on the condition of the mortar. In some regions of Russia it will deteriorate much faster due to atmospheric influences, in others it will take 8-10 years before the seams of the brickwork weaken.
We tried to convey to you in as much detail as possible information about seams in a brick building, what to do with them, why they are “important”. All you have to do is accept and heed the advice, inspect your house, and if you find cracked and crumbling parts of the mortar, immediately begin jointing.
In the video presented in this article you will find additional information on this topic (also find out how to lay brick partitions).