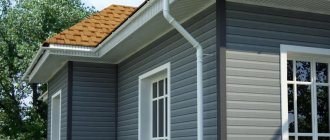
Siding is an excellent material for cladding a house. At its affordable price, it has many positive operational and technical characteristics.
DIY siding installation
You are offered detailed instructions for installing siding yourself. The guide is universal. Following its provisions, you can finish it with any siding that requires installation on a lathing: fiber cement, wood, metal, vinyl, etc.
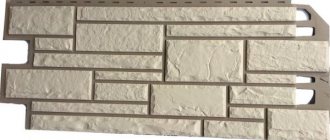
Different types of siding
Installing the sheathing
Siding is best attached to pre-installed sheathing. We work in the following order.
The first stage - choosing the material
Scheme for calculating the amount of siding for cladding a house
The frame can be assembled from a wooden beam or a metal profile. Metal products are stronger and more durable. In addition, metal lathing is much easier to attach to an uneven base.
Find out how to calculate siding for a house, and also familiarize yourself with the calculation algorithm with an emphasis on possible nuances.
Installation of profiles is carried out in half-meter increments. Hangers are used for wall mounting. This technique will allow you to level out differences in the surface and secure the frame elements at a level.
Vertical lathing
Wooden sheathing is cheaper. When choosing this option, pay attention to the condition of the wood. It is prohibited to:
- the material has peeled off;
- was deformed;
- had bluish spots and traces of rot, etc.
Elements of wooden sheathing must be impregnated with fire retardant and antiseptic. If the house is built of wooden elements, the walls should also be treated with the listed preparations.
Wooden sheathing
Stage two - preparing the base
The sheathing is easiest to attach to a flat base. First of all, we remove any parts that may interfere. These are all kinds of tiles, bars, platbands, gutters, etc.
The third stage - installing guides
Siding is best mounted horizontally. In this case, we fix the bars or sheathing profiles vertically.
To attach the guides to wooden walls, we use nails or self-tapping screws. If the house is built of concrete blocks or bricks, we fasten it with dowels, having previously drilled holes for them in the wall of the house.
We align each rail by level.
Important! If you plan to perform external wall insulation, it is best to install the siding sheathing after all insulation work has been completed. In this case, there will be two lathing: for insulating materials and for cladding. In this case, the slats of the two frames should be placed parallel to each other.
Insulation
Scheme for attaching siding with insulation
You can, of course, try to lay insulating layers after attaching the siding sheathing, but this is not very convenient.
Siding location
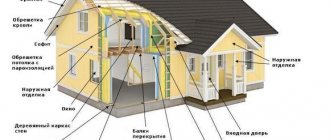
FRAME FOR SIDING
Siding installation work begins with the creation of a frame or sheathing.
The sheathing for vinyl siding can be wood or metal. In the first case, wooden blocks with a cross-section from 20 to 40 mm are used, in the second - PP 60/27 plasterboard guides. The frame is attached to brick walls using dowels; for houses with a wooden facade, self-tapping screws are used.
If siding is installed horizontally
- the sheathing is installed vertically in increments of 300-400 mm along the entire perimeter of the building, as well as around corners, door and window openings.
- installation begins with the installation of corner guides on straight hangers, with the help of which the frame is measured and fixed in one plane.
- if the project provides for insulation of the house, then the first stage is to install a vapor barrier along the wall of the house, then hangers are installed, insulation and wind protection are laid, and only after that the frame is assembled and fixed.
Important! Don't forget to make cuts on the windbreak for hangers.
Mounting J-profiles
The starting guides must be secured perfectly, because... The quality of the entire cladding depends on the correct installation.
Starting profiles must be installed strictly horizontally
First step. Take a level and find the lowest point on the sheathing. We step back 50 mm from it and put a mark. To do this, screw a little self-tapping screw into the rail.
Second step. We consistently move around the building and continue to place marks with self-tapping screws to fix the starting profiles. We also screw screws into the corners of the house.
Third step. We stretch the ropes between the corner marks.
Fourth step. We mark the boundaries of installation of corner profiles on the slats. We take the profile itself, apply it to the corner of the frame structure and put marks along the edges with a pencil.
Mark the location of the edges of the fastening strips on the sheathing
Fifth step. Moving further along the rope, we make a 6 mm horizontal gap from the edge of the corner profiles and fix the starting guide to the frame slats.
Important! We leave a 1-centimeter gap between the profiles to compensate for temperature deformations.
Leave a gap between the starting guides and the nail strips.
Technological indentations when installing starting siding profiles
To avoid making a 6 mm indentation, you can cut off parts of the nail strips so that they do not rest against the J-profile during temperature changes.
Instead of indentation, it is possible to trim the profile fastening strips
Important! Starting profiles must be mounted strictly horizontally! Correct deviations as long as necessary.
If you install guides that deviate from the level, the siding will also warp. It will be extremely difficult to correct this in the future.
Prices for profile mounts
Profile fastenings
INSTALLATION OF THE STARTING BAR
- Using a building level, determine the lowest point from which installation will be carried out.
- Step back 50 mm from it and screw in the self-tapping screw.
- From this point, mark with a rope around the perimeter of the entire building. The line formed by the rope will be the upper boundary of the starting profile.
The distance between adjacent starting bars and between the bars and corners must be at least 6 mm
We install external corner profiles
Attaching the external corner siding profile
First step. We mark the soffits. We need to see where the edges of these elements will be located in the future.
Second step. We apply the guide to the corner of the frame. We do this with a 3mm gap to the soffit or roof. We fasten the profile with self-tapping screws.
Place the bottom border of the element 0.6 cm below the edge of the starting profile.
Third step. Checking the vertical installation. If there are no deviations, we fix the bottom, and then the remaining places. Experts do not recommend placing fasteners in corner elements too often.
The principle of increasing the length of a corner profile
If the house is higher than 300 cm, the profiles will need to be placed one on top of the other. To do this, we trim the top profile. As a result, there should be a 9 mm gap between the planks of the joining elements. When laying the elements, maintain an overlap of 2.5 cm.
Power saw for cutting siding
To cut vinyl siding panels, use tin snips, a hacksaw, a cutter knife, or a hand-held power saw with an abrasive wheel.
Important! We join the profiles at the same level on each side of the house.
If the base has a protruding structure, shorten the profile so that there is a 6 mm gap between it and the base.
Helpful advice! Instead of a corner profile, it is allowed to install 2 J-elements (starting). This way you can save money. But this solution also has its drawback - the corner will not be as tight as when using a special corner profile. If you decide to use this method, first glue the wall around a similar corner with a strip of rolled waterproofing material.
Using two starting J-profiles of siding instead of a corner one
Soffit installation
The final stages of vinyl siding installation can be carried out in different ways:
- Using a wind bar. If its size is sufficient to cover the front board, then a finishing strip is attached along the edge on top of the front board. The wind board is trimmed if necessary and mounted with the top edge to the finishing strip. In this case, the soffit is attached between the J-chamfer and the wind board with self-tapping screws to the sheathing.
- Through the outer corner - if the size of the wind board is not enough to cover the frontal strip. In this scheme, the soffits are attached to both sides of the outer corner and fit into the grooves of the J-profiles. They are also attached to the wall and along the top edge of the front board.
We install internal corner profiles
The procedure for installing these elements does not differ significantly from the technology for arranging external corners - we leave a gap of 3 mm between the profile and the soffit, and lower the lower end of the profile below the J-bar by 0.6 cm.
If there is a protruding plinth or other element from below that stands out from the general level, then between it and the profile we also leave a 6-mm indentation - the profile of the internal corner must not rest against it.
There are 3 methods for arranging internal corners, see the picture.
3 options for implementing internal corners for siding
If the wall height is more than 300 cm, we splice the profiles. The technology is the same as for arranging external corners.
Example of splicing internal corner profiles
We leave a 9mm gap between the slats, carefully cutting off excess material. The overlap of the upper element on the lower one is 2.5 cm. We install fasteners in 4-centimeter increments, placing them strictly in the center of the holes intended for this. The exception is the highest point. Here the fasteners need to be installed at the top of the hole.
Before you start installing siding - tips
- When starting to cover your house with vinyl siding, always keep in mind that this material has a high coefficient of linear expansion. This means that there must be a gap of 5-7 mm between the starting planks, as well as between the rows and the planks. And if installation is carried out at temperatures below -10 ° C (which is generally unacceptable from the point of view of common sense, but is quite common in domestic practice), then the gaps should be at least 10 mm.
- There must be a gap between the working surface of the material and the fastener. Below we will talk about this in more detail.
- Vinyl siding must rest at least a couple of hours at outdoor temperature before installation work begins.
- Under no circumstances should siding be screwed all the way through. This approach to installation can lead to cracking of the sheet of material. But, if such a need arises, fix the sheet not where the nail holes are punched, you must first drill a hole for the hardware, and only then fix the sheet or additional element.
Despite the fact that fastening siding with self-tapping screws is the most common in domestic practice, you can also use fasteners such as nails and staples.
We install frames of openings
Installation diagram of a siding panel near a window under the finishing strip
For most inexperienced craftsmen, difficulties arise precisely at the stage of framing window and door openings. The order of work will vary depending on how the openings are arranged in relation to the plane of the wall.
Openings in the same plane with the facade
Method of connecting near-window profiles
In this case, we do the following.
First step. We waterproof openings.
Second step. We attach platbands or J-profiles to the openings. We equip each opening using 4 platbands: a pair of vertical and a pair of horizontal.
Third step. Connecting profiles.
Method of connecting near-window profiles
To make the connection of the platbands as neat as possible, we do this:
- we create bridge cuts on each side of the upper profile;
- bend the bridges down so that precipitation is diverted into the profile below;
- remove pieces of material on the side elements that prevent connection with the casing at the top;
- We connect the side and top profiles. As a result, the bridges should be inside the profiles.
Installation of platbands and near-window profiles with correct technological indentations
The platband at the bottom is connected in exactly the same way, only the bridges will need to be cut and bent on the side elements for their further laying on the profile below.
Openings are recessed into the facade
The location of the sheathing slats around the perimeter of the window for attaching the finishing siding profile
Location of the finishing siding profile on the window opening frame
When installing near-window profiles, we follow the same recommendations as when installing platbands, i.e. We create cuts on the profile corresponding to the depth of the opening, and then bend the bridges and insert them into the finishing elements.
Take the time to understand the principles of bending such bridges. We make them so that they cover the joint of the cladding elements. As a result, moisture will not be able to penetrate inside.
A technique for creating bridges (or tongues) to remove precipitation and moisture from profiles
Installation of finishing strip
The final element in the installation is the finishing strip.
It is installed:
- along the cornice
- in places of transition from one type of siding to another
- under and above window and door openings
The finishing strip is installed before the last siding panel is attached. Attached to the sheathing with self-tapping screws. The last panel is inserted into the finishing strip. You can trim the siding if necessary. After this, it is very important to make notches with a notch and bend them to the outside. Install the panel, snap it into the lock of the previous panel, fix the edge under the finishing strip.
You can carry out minor siding repairs if necessary.
- Replacing a siding panel - Using a mounting hook, open the lock by sliding along the length of the panel. Remove the nails and repair the damaged panel. The new panel is secured with self-tapping screws or nails into the sheathing, and the lock is latched with the same mounting hook.
- Replacing a corner profile - cut off the face strip of the damaged profile, leaving the nail strip and the bottom of the receiving channel. On the new profile, cut off only the nail strip. Attach the resulting strip to the previous nail strip. You can replace the H-bar in exactly the same way.
Installing the first panel
Excessive fastening density will deform the siding during temperature changes and the panel will “give waves.”
We begin the cladding from the least noticeable wall of the building. This way we can practice and work out all sorts of inaccuracies.
Installing the first siding panel and properly engaging the profile lock
First step. We insert the first cladding panel into the corner profile and into the locking connection of the starting strip.
Important! We leave a 6 mm temperature gap between the first cladding element and the lower part of the corner profile lock.
Second step. Attach the panel to the sheathing.
It is important to maintain the dimensions of technological indents. If the cladding is carried out in warm weather, we maintain a 6 mm gap; if in cold weather, we increase the gap to 9 mm. When installing panel trims, the indents can be reduced.
Siding fastening
Panel installation
When all the rough and preparatory work has been completed, you can move on to the key stage of cladding. At this point, a strong and level structure should already be created, which will serve as the basis for installing vinyl siding panels. Before attaching them, you need to cut them. The length of each panel must be calculated with the addition of a small error, which is due to the expansion of the material at changing air temperatures. Typically this value is 0.1-0.2 cm.
The starting bar always has a lock for fastening the panels. Using this lock, the first strip of siding is fixed and screwed to the top strip with self-tapping screws. This scheme is used to cover the entire wall area. Self-tapping screws are used to fix the panels not constantly, but at intervals of 0.4-0.5 m, leaving a gap of 0.5-1 cm on the racks.
Self-tapping screws must be screwed in not from the edge, but in the middle of the oblong hole, and not fixed tightly so that the panels move freely. To maintain clear lines and evenness, you need to check for horizontalness every three rows. If unevenness is detected, then action must be taken to correct the distortions. Distortions can occur for various reasons, including due to loose connections or incorrect placement of panels. Constant monitoring of work will help prevent this problem.
Lastly, siding is attached around pipes and any openings. Special panels are sold for hard-to-reach areas. Or you can cut parts of a given size from the material yourself.
Extending panels
Extension of panels
We extend the cladding elements with an overlap or using an H-profile.
When attaching panels with an overlap, you must first shorten the locks of the facing panels and the fastening frames so that the resulting overlap has a length of 2.5 cm.
Fastening and location of the H-profile on the sheathing
The installation of the H-profile is carried out similarly to the corner elements - at the top we retreat 0.3 cm from the soffit, at the bottom we lower it by 0.6 cm in relation to the starting profile.
Important! We leave a 6mm gap between the H-profile and any obstacles on the façade of the house.
Panel assembly
Once the frame is completed, you can begin the sheathing process. Panels from different manufacturers have different designs of additional elements and locking locks. But instructions for connecting them are usually included with the vinyl siding. However, there are general principles for fastening panels:
- corner profiles are attached strictly vertically;
- fix the siding panels starting from the middle to the edges;
- When attaching the plates, the self-tapping screws or self-tapping screws are not tightened to the very end.
Helpful advice! To get a gap between the screw and the siding plate, screw it until it stops and then unscrew it one turn.
Assembly begins with the installation of starting and corner strips. Ordinary vinyl panels are subsequently inserted into them. Since corner strips are quite flexible, they can be used to create both obtuse and sharp corners. To obtain an obtuse angle, the bar is pressed down a little, and for an acute angle, it is compressed.
A special H-connector is provided for joining row panels. It is necessary when the length of the plate is not enough to completely cover the wall. You can do without using this element. Then the plates are screwed together with an overlap.
Installing the rest of the siding
Installation of horizontal siding
We continue covering the house with siding. The operating technology is similar to the procedure for attaching the first panel.
Important! Every 2-3 rows we check the horizontality of the cladding using a level.
Having reached the opening, we remove the unnecessary piece of the panel falling on the opening.
We ensure reliable fastening of the panels using “hooks”. For this we need a punch.
Siding Installation Tools
We install an additional finishing profile at the bottom of the opening. This will allow the cladding to be leveled.
Siding finishing
Rules for installing vinyl siding yourself
Installation of any siding begins with the assembly of the frame. It can be vertical or horizontal. Most often, a vertical frame is suitable for panels such as shiplap or blockhouse.
Choosing insulation for a house under siding
How to soundproof a house?
Installation under the roof
Installing the finishing siding panel on the wall
We attach the J-profile under the roof structure.
We work in the following order.
First step. We measure the distance between the bottom of the lock of the finishing element and the lock of the penultimate facing panel.
Second step. We subtract a 1-2 mm indent from the resulting measurement.
Third step. We mark the whole panel, cut off its upper part with the locking connection.
Fourth step. We create “hooks” in the upper part of the element in 20-centimeter increments. To do this, we make cuts and bend them to the front side.
Fifth step. We insert the trimmed element into the penultimate siding panel. With a slight upward movement, we snap the inserted element into the locking connection of the finishing profile.
Fixing the finishing siding panel in the lock
Installation of ordinary siding panels
Let’s immediately make a reservation that row panels can be attached in a circle, or you can finish one wall. From the point of view of siding installation technology, this does not matter.
Installation takes place in several steps:
3.1. The first strip of siding is inserted into the vertical grooves of the corner or H-shaped profile and secured with a self-tapping screw exactly in the center of the nail holes.
In this case, hardware is attached from the center of the panel to the edges, towards the vertical strips.
Good to know. To make it easier to insert the strip, you need to slightly bend it outward.
As already mentioned, the siding panel is placed in the outer or inner corners. If you are using a budget installation option, you can arrange the internal panel using the methods shown in the figure.
How to install siding panel correctly
At the same time, do not forget to leave a gap for expansion.
3.2. The siding panel must be lowered to the starting strip and clicked into place. To do this, you need the lock of the strip to catch on the starting bar. Do not “pull” the panel under any circumstances. Because in this case the radius of the panel will stretch and the locks will be deformed. How to install the siding panel correctly - see the picture.
Installation of vinyl siding - installation Installation of vinyl siding - correct installation
Good to know. If, after the lock of the next strip snaps onto the lock of the previous one, the panel can be moved horizontally, then its installation was carried out according to the rules.
3.3. Once the panel is installed, it can be secured with hardware.
3.4. All remaining rows, with the exception of the last one, are performed in the same sequence.
If you need to connect the panels to each other, and you did not provide an H-shaped profile or you do not like the way it looks, you can do it as follows.
- First, remove the lock joint from the panel.
- Secondly, place two sheets on top of each other.
- Thirdly, lock the cut part of the sheet.
Connecting siding panels to each other
Connecting siding panels The photo shows what it looks like in practice
For your information:
- Some manufacturers produce panels without locking fastening at the end of the siding sheet.
- The panels are not sealed at the joints.
- The installation line can be straight, or it can be offset.
We mount the pediment
We sheathe the pediment around the perimeter. All fasteners, except the top one, are installed in the center of the holes. We install the upper fastening element at the top of the hole. It can be sheathed either with profiles for arranging internal corners or with a starting profile.
Pediment framing
The installation procedure is similar to fastening wall panels. We trim the edges of the elements and connect them to the locks of the receiving profiles. We remember the 6 mm indentation when installing in warm weather and 9 mm when doing work in winter.
We fasten the last element of the gable cladding directly through the panel material - this can only be done here.
Trimming edges
The cladding is complete.
Find out how to cover a balcony with siding from the outside, and also consider calculations and a step-by-step guide from our new article.
Installation of gable siding
Typically, the same method is chosen for finishing the pediment as for the facades. Or you can choose to place your vinyl siding panels vertically. To do this, you need to measure the length to the nearest millimeter and carefully cut the panels at an angle and length.
When decorating gables with siding, you need to leave a temperature gap. Installation must begin from the back of the building, so that you can get to the front of the building and do the work with perfect precision.
Advice from siding experts
In order for finishing a house with panels to be as successful as possible, you need to know certain subtleties of performing such work. There is a list of general recommendations for any siding, as well as specific tips for panels made from a specific material.
General Tips
- We drive/screw the fasteners strictly into the center of the factory holes.
- We do not press the fastener caps too tightly against the panels - you need to leave a gap in case of temperature deformation of the material.
- We attach the trim from left to right and from bottom to top. We place the panels horizontally.
- We fasten metal and vinyl siding with a small gap - these materials are subject to temperature deformation. In principle, experts recommend fastening panels made of other materials with a slight gap.
- We attach vinyl siding exclusively through the holes intended for this purpose. You cannot pierce the panel itself - this will have a bad effect on its service life. There is only one exception, and it was discussed above. The same recommendations remain relevant for panels made of other materials.
The only time you can attach a siding panel directly through the vinyl is the last panel - We fasten wooden siding only with galvanized products, otherwise the wood will very soon begin to rot.
- We carry out the cladding of a log house only after the building material shrinks, i.e. no earlier than six months after completion of the construction of the building. Otherwise, when the wood shrinks, the entire finish may be damaged.
For different materials
Now you can carry out siding installation at the highest level yourself.
Siding installation completed
| Name (model) | Benefits | Length x width x thickness, mm | Quantity per package, pcs. |
| Vinyl Siding "Canada Plus" | 1.Dyeing in dark colors is performed using the “Cool Color” method (heat absorption), which involves the use of masterbatches. 2.Excellent appearance remains unchanged even when exposed to high and low temperatures, the range of which ranges from -50°C to +60°C. 3. Retains shock resistance, even if the ambient temperature drops to -20 to 60°C. 4.Not susceptible to microbiological corrosion (fungi, mold). | 3660 x 230 x 1.1 | 20 |
| Acrylic Siding "Canada Plus" | Among other useful qualities of acrylic siding “Kanada Plus” it is worth highlighting: •Increased resistance to direct ultraviolet rays; •Excellent tolerance to acidic and alkaline solutions, as well as to various fats; •Good tolerance to washing with chemical detergents; •High degree of deformation resistance (perfectly tolerates temperatures up to 75°-80° C). | 3660 x 230 x 1.1 | 20 |
| "Alta-Siding" - Vinyl Siding | "Alta-siding" is: •one of the safest finishing materials on the Russian market; •frost resistance and the ability to maintain strength even at very low temperatures (from -20 to -60°C); •resistance to significant temperature changes and environmental influences; •durability: the service life of “Alta-siding” is up to 30 years; •resistance to aggressive substances (detergents can be used to clean siding); •not susceptible to infection by mold fungi. | 3660 x 230 x 1.1 | 20 |
| Facade metal siding INSI | INSI siding is made of galvanized steel coated with a layer of polymer composition, which means it inherits all the advantages of this material: •resistance to temperature changes (-50°C - +80°C) and mechanical damage; •long service life with preservation of original properties (about 50 years); •environmentally friendly; •non-flammability; •possibility of installation both horizontally and vertically; •protection of the building from overheating (in a ventilated facade system); •and when choosing one of two new colors (alder or rosewood) – a complete imitation of the appearance. | Length up to 6000, width up to 200, thickness 0.5 | — |
Good luck!
Siding prices
Siding
How siding is attached
The main problems with the exterior finishing of a house with siding are related to violations of installation technology. Therefore, it is necessary to treat this very carefully and strictly follow the recommendations. Manufacturers may have a different set of additional elements - profiles for joining planks and decorating openings - but the installation is the same:
- Secure the starting profile exactly horizontally.
- To securely fasten the siding, you need to insert it into the lock along its entire length. To do this, you can lightly tap it on top (only lightly).
- After installing the strip, do not pull it up, but mount it in its “natural” state.
- When installing siding with your own hands, it is important to attach the strips correctly: in the middle of the mounting hole. They are specially made oblong so that when the size of the slats changes due to thermal expansion, they can move. It is also important to under-tighten the screw a little, leaving at least 1 mm of the leg free so that the panel can move.
- When joining with additional elements (corners, window and door frames), it is necessary to cut the boards so that they do not reach the stop 5-6 mm. This is also an allowance for expansion.
DIY installation of vinyl (acrylic, metal) siding requires compliance with these rules
There are requirements for the type and size of fasteners:
- The use of screws or nails is allowed.
- The fastener head must have a size of at least 8 mm (diameter 4 mm). For self-tapping screws, it should be round, not flat.
- The thickness of the rod is 3 mm.
When installing metal lading, it is recommended to use galvanized fasteners: it will not damage the zinc protective coating. For other types of self-tapping screws, it is better to use white, not black: they can withstand heavy loads (the head of black ones often breaks when twisted).
This is true for this material of any kind: vinyl, acrylic, and metal must be properly secured. Watch the video to see what violations during installation lead to.
Frame installation
Finishing a wooden house begins with the installation of guides. The vast majority of siding requires the sheathing to be mounted vertically. Its pitch is selected depending on the insulation. The clear distance between the guides should be a couple of centimeters less than the width of the mineral wool. For polystyrene, the distance is selected exactly to match the width.
To make wooden sheathing, bars measuring 40x40 mm or 50x80 mm are most often taken. When using the metal version, you will need a set of special profiles of different sections.
The frame slats are installed in increments of 40 cm, incl. around openings. There should not be any slats at the very bottom
Nails or self-tapping screws are used to attach the frame to a wooden wall. The former must have an anti-corrosion coating made of zinc or aluminum. Before fastening the sheathing with a construction stele, a vapor barrier is installed. To do this, you can use regular plastic film, but it is better to buy a special vapor barrier membrane. The choice of materials in a wooden house should be taken extremely responsibly. It is not recommended to use those that will block the movement of air through the walls. For this reason, membrane is better than film.
When finishing a wooden house with siding, the vapor barrier is attached with an overlap of 10 cm. Before starting work, it is recommended to read the manufacturer’s instructions. Next, the guides are attached at the required increments, starting installation from the corners. Levelness is checked using a building level.
Insulation is placed between the sheathing guides. It is better if it is mineral wool - due to its good air permeability. A layer of waterproofing and wind protection needs to be fixed on top of the wool. The best option would be modern vapor diffusion (not to be confused with vapor barrier) windproof membranes.
Installing the launch pad
Insert the first panel into the start profile. Place the ends into the grooves of the corner elements. Make sure there are end clearances. We start fixing the panel from the middle, moving towards the edges. Don't forget about the gap under the screw head.
If the panel is shorter than the length of the wall, use a connecting strip - H-profile - for extension.
You can do without a plank; in this case, we install the siding with an overlap.
Physical properties and structure
Materials
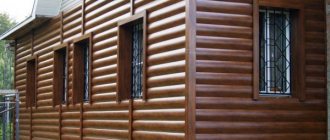
Various materials are used to produce siding: wood, PVC, acrylic, steel. However, the most popular and widespread is polyvinyl chloride , so we will consider this material.
Polyvinyl chloride
PVC is a synthetic polymer. It is chemically inert, not afraid of solar radiation, temperature changes, parasites, moisture and is not subject to corrosion.
A coating made from this polymer can last more than 50 years. At the same time, care is very simple: just wash off the dirt from time to time with water and detergent.
Their PVC coating does not change color and is not afraid of frost.
Effect of temperature on PVC
However, the structure of polyvinyl chloride is such that when the temperature changes, its volume also changes, and quite noticeably. Therefore, the fastening of the panels to the base should not be rigid. It is also important not to join the panels close to each other; it is necessary to leave a gap or overlap.
READ ALSO: Covering a log house with siding - a new face for an old building
It is also not allowed to seal holes or gaps between façade parts. Siding requires a ventilated covering so that moisture does not accumulate under its sheets and panels.
Work progress
When the base is prepared and all materials have been purchased, you can proceed to the installation itself.
- Lathing guides are installed on the walls according to the markings. The sheathing pitch varies depending on the material. For a steel profile - 60 cm, for a wooden profile 40 - 50 cm. The fastening is selected depending on the wall material. Installation of sheathing usually begins with the installation of corner guides.
When using wooden sheathing, do not forget to treat the bars with antiseptics.
- Siding installation usually begins at the bottom of the rear facade. The first step is to secure the starting bar; it is set according to the level. The evenness of the entire coating will depend on its correct installation. A rope is stretched between the two corner guides of the sheathing, along which the level of the plank is established. The rope is stretched at a distance of 50 cm from the bottom of the sheathing.
Rope to check the level of the starting bar.
To measure the level between the two ends of the thread, use a hydraulic level.
- Marks along the width of the corner profile are applied to the corner guides of the sheathing. The starting strip is fixed so that the distance to the corner profile is 6 mm. This gap is made in case of thermal expansion. When attaching the planks in series, leave a gap of 12 mm between them. An alternative method of fastening involves cutting off the fasteners of the corner strip.
Deformation gaps between planks.
For fastening, self-tapping screws with a head of at least 8 mm and a diameter of at least 3 mm are used. They are not twisted completely; a distance of 1 mm should remain between the cap and the siding panel for temperature changes in volume. Correct fastening is checked by moving the panel along the horizontal axis.
- After installing the starting strip, the corner profile is installed. It is also fastened with self-tapping screws; the distance between fasteners should not exceed 400 mm. At this stage, you need to decide where the soffits will be located; the distance from them for the corner strip should be 3 mm.
A soffit is an element for lining an overhang. It is similar in shape to a siding panel, but has a larger area. Cornice soffits also have perforations so that air can get inside the roofing “pie” and provide ventilation.
- If the height of the corner exceeds 3 m, then add another corner profile. To join, it is necessary to trim the fasteners, then one strip is inserted into the other. The overlap should be no more than 25 mm.
Attaching the outer corner strip.
In the same situation, you can use several types of additional elements. For example, instead of a corner strip, you can combine two J-profiles. Read more about additional elements in the article “Additional elements for siding installation.”
After this, you can begin installing the first panel. It is fixed in the lock of the starting strip, and the side part is inserted into the corner bar. A gap is left everywhere in case of expansion of 6 mm.
Common mistakes when attaching vinyl panels.
When installing siding, adhere to the following rules: screws must be installed in the center of the hole, without screwing the hardware all the way, also do not screw the screws at an angle, try to ensure that the fastening element enters at a right angle to the wall. Do not stretch the sheets; try to maintain a distance of 400 mm between fasteners. A temperature gap of 6 mm must be maintained between adjacent elements.
- If the holes do not fit within the sheathing pitch, a cutout can be made under the factory hole using a punch or other available means. The joining of panels can be done overlapping or using connecting H-panels. The principle of fastening H-panels is similar to the corner strip.
- A finishing strip is installed under the window openings. Various additional elements can be installed on the window depending on the depth of the opening. If the opening is flush with the wall, then platbands are installed. For deep openings (more than 20 cm), several additional elements are used (platband, finishing strip and slope). For openings of medium depth, a near-window profile is used; it replaces all other parts. To connect, the side elements of the platbands are cut at an angle of 45 degrees. The “tongues” at the top element are bent so that water flows around the window profile.
Installation of near-window profiles on the opening.
- At the gable where the roof overhang creates an angle, the panels must be trimmed. This can be done with a grinder or metal scissors. Otherwise, the installation scheme is no different from the main part of the house.
Trimming row panels to fit the shape of the gable overhang.
Finishing strips are installed under window openings and eaves overhangs. Then you can move on to filing the spotlights. Read more about the installation of soffits in the article “Soffits for filing the eaves overhang .
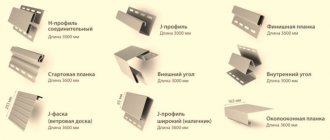
Parts, accessories and fittings
Siding kits include many parts. However, this is intended to make your work easier, as the manufacturer tries to take into account all the difficulties and problems.
So, the standard set includes the following accessories:
- Starting bar.
- Inner corner.
- Drain strip.
- Outer corner.
- Window frame.
- H-profile for joining panels.
- Chamfer or wind board.
- J-profile.
- Finish bar.
- The main panels or siding itself.
- Platbands.
All parts can be easily adjusted to the required dimensions and architecture. PVC is easy to cut, the panels weigh quite little, so installation is simple.
- Siding: installation technology
How to calculate siding for a house
You have decided to cover your house with siding, but the question arises - how to calculate the siding for the house? Yes, very simple! Since siding is a finishing material with clear geometric dimensions and a specific purpose, its quantity can be calculated up to 1 m².
To begin with, during the calculation process you will have to use the following items:
- tape measure - to take initial measurements;
- a leaf and a pencil - for sketching sketches;
- calculator - for calculations.
The amount of siding for cladding the building is calculated in stages. The first step is to calculate how many siding panels are required, and at the second stage of calculations, the required additional elements are calculated.
Before you start making calculations, you should decide on the exact value of the area to be covered. To complete these steps, you should start drawing up a schematic drawing of the building, which you will later measure.
An important point : if the building that needs to be faced has complex geometry, then in your schematic drawing, in addition to the dimensions, the placement of the panels should also be indicated.
This way, you create a foundation for the correct use of the material, and reduce the likelihood of encountering unplanned waste and siding shortages.
The following formula will help you in your calculations:
Sр = Sst – So
where, Sр – design area, Sst – area of walls, Sо – area of windows and doors.
Now, we calculate the siding, taking into account the material that will not be used, according to the following formula:
Sc = Sp + %
where Sc is the siding area, and % is unused material.
The amount of waste is taken to be 7-10% in the case of cladding rectangular walls. And from 10 to 15% if trapezoidal walls are sheathed, or the walls have a large number of protrusions, recesses, etc. The more complex the configuration of the building, the greater the percentage of waste generated.
The next stage is dividing the resulting area Sc by the usable area of one strip of siding. For example, a strip of siding has a total area of 0.89 m², then its useful area is approximately 0.777 m2.
By the way, the mathematical approach for calculation is most often used by sellers, due to the fact that their responsibilities include selling as much material as possible.
To avoid possible inaccuracies, it would be appropriate to draw up a plan that will accurately describe the detailed location of each strip of siding on a specific wall. If you use sketches, the calculation will be more accurate and you will get a clear installation diagram.
This calculation method uses the following formula:
N = H / Sp
where N is the total number of panels, Sp is the useful area of one panel, H is the height of the building.
Removing shutters, grilles, drainpipes and other fixtures from the surface on which the siding will be installed.
Installation of sheathing for siding. When using wooden slats, they should be impregnated with an antiseptic, since they have a moisture content of no more than 15-18%. Vertical slats are mounted at fixed intervals of 30-40 cm.
Covering a house with siding photo
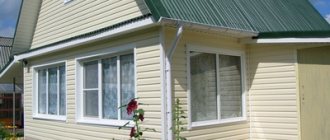
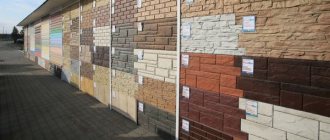
In this material, you are presented with examples of how to cover a house with siding - photos of buildings, the exterior decoration of which is made using classic vinyl siding, wood siding and facade panels. If you are choosing finishing materials for your home, then here you will find a lot of information for yourself!
Not every person planning to improve the facade of their home has a clear picture in their head of what their home should look like. Most often, when choosing siding, the main factor influencing the purchase is color. Much more rarely, someone thinks about complementing the main color scheme with various accessories of the same color, or contrasting elements. And this, despite the fact that siding provides almost limitless options, and not just a couple of colors!
One project can be implemented using different colors and textures of siding. How do you like the implementation of a background lined with inexpensive siding with premium siding inserts? Sometimes, even due to small nuances, for example, the color of the gutter, the finishing of the jambs or the filing of the cornice, you can achieve great results in transforming the facade!
We wish you that the presented photographs will help you decide on the choice of the desired color, or push you to your own bold idea in cladding the facade with siding.
Features of installation in winter
If you install siding in winter, there is a high risk of doing something wrong. The discomfort of workers due to low temperatures is taken into account, and technology is additionally taken into account. The material can react differently to frost, taking into account the difference in humidity. The main thing is to avoid significant overheating of the material and try to maintain a stable temperature.
If you unload the panels near heating devices, deformation will certainly occur. When vinyl siding is on hand, it should only be uncovered indoors. Preparation of the panels also takes place under the roof. Already at a temperature of -5 degrees, plastic becomes unusually fragile. Even if you work with an angle grinder, a large crack may occur, so the specialist decides on the ability to bend the workpiece, this is reflected in the number of defects.
As mentioned earlier, when working in winter, the indentation of the panels is taken into account. In the cold, the siding will definitely become smaller and straighten out when it gets warmer. In order not to miscalculate the gap, it is important to leave a distance of 6 mm. If the temperature does not rise sharply, everything will be fine.
Workpiece length compensation is partially compensated by the adjacent panel. Another secret lies in the use of fasteners; self-tapping screws are considered effective, but nails increase the chance of damaging the siding. Elements with a 2 mm head are selected, the screws are fixed clearly in the center, work along the edges is not allowed.