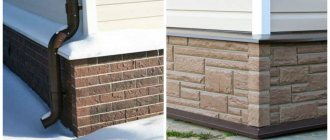
You can decorate the facade of a building using various materials that are manufactured for the purpose of external decoration of walls. Popular external coatings include: plaster, brick, stone, siding, and hanging structures.
The most unpretentious and at the same time durable material is siding. A prefabricated structure made of various types of panels is a decorative design for walls, and is durable and environmentally friendly.
Panels can be made of metal (aluminum or steel), polyvinyl chloride, ceramic, acrylic.
In this article we will tell you how to cover a house with metal siding with your own hands.
Metal siding: preparation for work and equipment
To properly install metal siding, you must first prepare the walls : clear debris from them, seal cracks (if any), cover them with a primer mixture. Inspection of the walls is important: you should check the perpendicularity of the corners, the vertical and horizontal lines of the wall (check by level and plumb line).
At the stage of preparatory work, the markings should be applied correctly: the quality of installation of the metal cladding depends on how correctly it is done.
In addition, it is important to properly prepare the cladding material itself: it is necessary to cut and cut the panels for further work .
The metal sheets are covered with protective foam, which must be removed before starting work. If a panel with a protective film is left in the sun, it will be quite difficult to remove it, since under the influence of sunlight the film sticks to the surface even more.
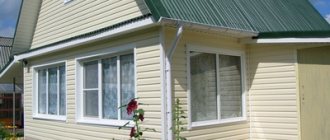
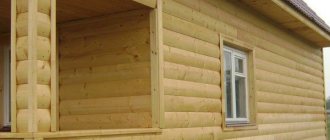
House with metal siding
Siding cover kit
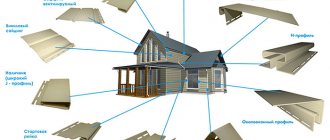
In addition to the main covering - metal siding panels - it is necessary to purchase component materials for the complete design of the cladding :
- Cornice strips . Necessary for the design of window and door openings, as well as for the design of panel joints;
- window trims . For the design of slopes of openings and windows;
- external corners . For decoration of external corners;
- internal corners . To design internal joining corners of panels;
- starting bar . To create a lower support and guide under the siding panels;
- finishing bar . To design the top (finish) panel;
- soffits _ For decoration of the cornice part of the facade and overhangs;
- connecting strips . To design connecting adjacent planks;
- J-bar. For decoration of windows and doorways.
NOTE!
When purchasing siding panels, you should immediately purchase components. It is recommended that all materials be selected from the same manufacturer: in this case there will be a complete match of elements in fastenings and a complete match in color.
If you take additional elements from other manufacturers, the color and dimensions may not match.
Metal siding is divided into the following types:
- Under the tree;
- Under the beam;
- Ship plank;
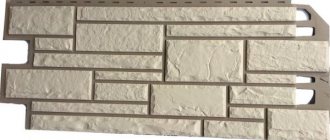
- Under a stone;
- Under the brick;
- Under a log.
Equipment
Installing panels
After fixing the insulating material, we install additional elements. Since after the sheathing it will be inconvenient to secure them, and it will be impossible to break them through. We install and secure with self-tapping screws complex corners, strips, basement drains, slope strips on windows and window sills.
Installation of panels
Cladding a house with metal siding begins from the bottom up. The starting bar is installed strictly horizontally; a level is used for this.
- The first row is secured to the starting strip with self-tapping screws, going from the center to the edges (you can use galvanized roofing nails). They are not driven completely into special oblong slots at a distance of 40 cm from each other.
- Then the next row is fixed. To avoid distortions, check the level more often. When fastening the next row and subsequent rows, it is imperative to leave 3-5 mm gaps between the panels.
- Do not fasten siding strips end-to-end to additional elements that are located vertically, because the finishing material will change its size (expand and contract) due to temperature changes. And during operation, the surface of the panels will be deformed. Corners are formed using an external corner.
Advice!
Remember, nails cannot be driven into metal siding panels! There is a special strip with holes on the panel for nails and screws.
- Siding panels can be fixed either around the perimeter of the entire building, or each wall in turn. After completing the installation work with the panels, we begin installing the soffits.
- The soffits are attached between the J-Bevel strip and the J-Trim strip. J-Trim flashing is attached along the roof eaves to the finish trim, J-Trim flashing is attached to the gable edge. Measure the distance between the slats, subtract 6 mm for possible expansion and contraction. Cut the soffits to the required length, insert J-Trim and J-chamfer between the strips, secure with self-tapping screws in the center.
- Covering the last row with metal siding is done as follows. Finishing strips, corner and shaped elements are used here. At the corners, the cuts of the planks are connected by special outer corners. Shaped products are attached to the vertical sheathing.
- The cornice is hemmed, for this purpose profile flooring is used. Its length should correspond to the length of the eaves plumb. Try to ensure that the profile flooring is solid.
A video on the Internet will help you on how to cover a house with metal siding and avoid mistakes when installing walls and openings.
View of the house after finishing To make the facade of the house complete, the door and window openings are finished with special accessories.
You can design the openings before starting the installation of the panels, or after. A slope strip and platband are used, and sometimes external corners are used. Before installing window and door frames, first insert the top and then the side parts. The corners are installed on top of the siding (already attached to the wall). We install a window drainage system on the finished window sill. If the window openings are deep, then they can be decorated with the help of soffits. The drainage system is installed last; we install fasteners every 30 cm. For a better idea of how to properly sheathe window openings, take a look at the photo.
Window finishing So, the sequence of cladding with metal siding will be indicated by the instructions for carrying out installation work.
- Preparing the building facade
- Marking according to calculations vertically and horizontally.
- Installation of fasteners
- Installation of sheathing
- Laying insulation and protective film
- Facing
- Installation of additional systems
- Setting the corners
- We seal the joints between the panels and the roof.
The main thing when carrying out installation work is to carefully follow the rules and recommendations. By following the instructions and reading the recommendations, you can cover your house with metal siding yourself, saving a considerable amount.
Cost of finishing material
Beautiful and modern The average price of metal siding ranges from 190-270 rubles per 1 sq.m. When purchasing finishing panels, make a technological reserve of 5%. As a rule, it goes to cutting panels.
In order to save money, buy decent metal siding for the main and street facade of the house, and for the garden facade you can buy it cheaper, but in the same color. The cost of installation work is usually determined by 40-60% of the total cost of all finishing materials.
Preparing tools
Despite the fact that installation of metal siding is done manually and does not require special equipment, you should still stock up on the necessary tools :
- Tin scissors (or metal saw) for cutting panels;
- a puncher for making mounting holes (or a punch);
- a screwdriver for screwing in self-tapping screws;
- hammer (if using nails for fastening);
- a drill attachment for screwing in self-tapping screws with a seal;
- tape measure (preferably fabric, so that the metal tape measure does not damage the panel coating);
- level (preferably laser or other long);
- a plumb line to track the verticality of walls and sheathing;
- square (wooden or plastic if possible).
You should also stock up on protective equipment: glasses, gloves. It is necessary to purchase self-tapping screws and a small can of paint similar in color to the panels to paint over accidentally damaged parts of the material .
CAREFULLY!
You should not use a grinder to cut metal siding panels: the tool can damage the protective polymer layer, which will lead to corrosion of the material.
In addition, it is not recommended to use staples when fastening elements (corners, planks).
Tools
How did vinyl siding come about?
In order to understand whether it is worth covering a house with siding, let's delve a little into the history of this material. The history of vinyl siding began in the middle of the last century in North America. Most of the population lived in the suburbs, in small private houses. The walls of the houses were frame, so the outside was sheathed with boards, which were laid overlapping at an angle and then painted. The main disadvantage of this finish was the fragility of the board. Exposure to rain, sun, and wind led to deterioration of the boards and fading of paints. To ensure that the exterior of the house remains attractive and the property does not decrease in value, wood siding is used.
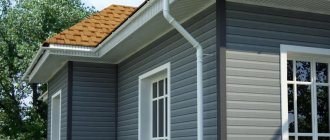
Houses covered with siding
The solution to this problem, at the end of the 50s, was the development of the polymer industry and the development of special finishing materials. This new material consisted of panels made from dyed vinyl (PVC), imitating the appearance and shape of traditional wood paneling. This is how houses covered with siding appeared, the cladding of which was not afraid of any vagaries of the weather. In addition, in terms of technical and functional parameters, installation speed and durability, this material had no analogues.
The economic benefits of using vinyl siding were visible to the naked eye. Having installed it, the owner of the house could forget for many years about the problems of repainting, repairing, updating the facade, wasted nerves and wasted money. It is thanks to its technical characteristics that vinyl siding very quickly became popular in the construction market of North America, subsequently conquering European countries and the whole world.
Over half a century of siding production in the USA and Canada, a wealth of experience in its production has been accumulated. Therefore, houses covered with siding can be found everywhere. Currently, siding is not only a material for exterior work, but also a culture for covering the facade of buildings. It is not for nothing that the word siding itself is translated as cladding, outer covering.
Initially, vinyl siding was developed for cladding frame houses, so if you are planning to build a frame house, you can consider this material. The frame of the house, as a rule, is built from dry wood, this guarantees that the percentage of drying out will be extremely low. Therefore, there is a guarantee that when drying out, the siding coating will not deform.
Houses made of timber have other cladding options. Firstly, if the timber is planed or glued, then it is not at all necessary to sheath it. The look of natural wood is a natural addition to any structure. To maintain its aesthetics, it is enough to periodically update its paintwork. Secondly, a wall made of timber allows you to use other materials in decoration, for example, plaster, tiles, etc. It is enough to prepare the appropriate foundation.
The only option when siding can be considered for a house made of timber is if the wood from which the house is built has dried out and cracks have appeared in its walls. In this case, in addition to the siding itself, you will have to properly insulate it using mineral or stone wool.
As for stone houses, I consider it a complete waste of time to decorate them with vinyl siding. By using siding in decoration, you will never be able to make a house different from others. Vinyl siding is very limited in its ability to create unique designs. In addition, there are restrictions on the length of the elements, which forces the use of additional connecting elements, and this is completely bad taste.
Wall sheathing for siding
Cladding panels should be mounted on pre-installed sheathing . The sheathing can be made of metal profiles or wooden beams.
If wooden guides are used, they should be prepared: dried, treated with special agents against the formation of mold, mildew, beetles and coated with protective agents against moisture.
A metal profile is most often used for metal siding : it can withstand the load more reliably (metal siding has sufficient weight), is durable, and also does not require additional processing.
For wood sheathing, beams with a cross section of 5x5 cm should be used . It is permissible to make a metal lathing from a metal profile, which is used for installing drywall.
Installation of the sheathing begins with the lower and upper guides, as well as from the corners.
The direction of the frame lines under the siding is determined in accordance with the laying of the panels : when the panels are placed vertically, the guides are attached horizontally and vice versa: when the panels are laid horizontally, the sheathing is done vertically. The sheathing step is recommended to be from 30 to 50 centimeters .
Around the windows, bars (or metal profiles) are mounted close to the window. The lathing around doorways is done in a similar way.
It is recommended to install insulation under metal siding: it reduces heat loss and increases sound insulation. Therefore, after completing the sheathing, insulation is laid.
Lathing
Metal siding installation cost
Recently, many organizations have appeared on the market of building materials and services offering turnkey installation of facades. They provide calculations, purchase of materials, installation and insulation of the facade in accordance with customer requirements. The price for turnkey installation of metal siding ranges from 1,100 rubles per 1 m2 to 1,800 rubles per 1 m2, depending on the chosen design and complexity of the work.
Speaking of prices, the price for installation of metal siding without material in Moscow and Moscow Region is 550-600 rubles per sq.m. The high cost is associated with the specifics of installation, accuracy, provision of a written guarantee for installation, as well as the responsibility of installers for damaged material (scratched, bent, etc.).
| Name of works | Work prices |
| Wall decoration with metal siding panels | 400 rub./sq.m. |
| Creating a frame from lathing | 50 rub./sq.m. |
| Vapor barrier film | 50 rub./sq.m. |
| Membrane (waterproofing) | 50 rub./sq.m. |
| Laying one layer of insulation (50 mm.) | 50 rub./sq.m. |
| Laying a double layer of insulation (100 mm.) | 100 rub./sq.m. |
| Installation of ebb tides | 30 rub./m.p. |
Waterproofing, vapor barrier, wall insulation
A layer of waterproofing is installed under the metal siding on the insulation : the water that gets under the ridge of the roof in the form of snow or rain flows down the walls.
At the same time, when it hits the waterproofing layer, it falls down to the foundation and into the drainage system. At the same time, the waterproofing layer protects the insulation ; it also does not prevent the escape of vapors from the room.
If there is no insulation, it is still necessary to install waterproofing under the metal siding.
Along with the waterproofing layer, it is recommended to lay a vapor barrier layer under the insulation to remove wet vapors from the side of the building and protect the insulation from them.
In cases where the building is built from materials with vapor-tight properties, a vapor barrier is not installed. But in this case, it is contraindicated to insulate from the inside: there is a high probability of the insulation getting wet.
Under metal siding, mineral wool or glass wool is most often used as an insulating layer : they provide good insulation and are good sound insulators.
The insulation is placed tightly between the sheathing guides over the entire area of the facade without gaps between the joints. Installation is carried out on a vapor barrier membrane. A waterproofing film is attached to the top . Next, the siding is installed.
Vapor barrier
Finishing a house with metal siding: pros and cons of comprehensive renovations
The repair advantages of siding are due to its layered structure and modern technologies in the production of such cladding:
- Ease. A square meter of facade siding weighs about 1-1.5 kilograms, which means not only ease of installation. Many facade walls will not physically withstand cladding with stone or other heavy panels - siding allows you to significantly save on strengthening the wall base;
- Strength and durability. Siding based on steel sheets, coated with zinc and polymers, has the strength of steel, it is very resistant to atmospheric adversities and accidental mechanical shocks;
- Wide selection of colors and textures. Collections of large companies include metal siding for logs, the installation of which is relevant for walls, panels for roofs and plinths, elements for precise mating, and high-quality fastening fittings. Metal siding makes it possible to clad a house from the roof ridge to the drainage ditch according to a single design plan. Other materials will have to be combined, selected separately, purchased, installed, etc.;
- Cost-effectiveness and speed of repair procedures. Compared to natural wood or artificial stone, siding is several times cheaper. It can be installed on newly finished, so-called “fresh” walls, at any time of the year. The remains of the panels can be used as decorative inserts for interior decoration, so that there is almost no installation waste left;
- Possibility of finishing walls with fancy geometry. With a limited repair budget, there is often simply no other opportunity to veneer complex surfaces;
- Installation of metal siding is the installation of a ventilated facade. Internal installation gaps can be easily insulated without additional investments, or this procedure can be combined with insulation of the walls from the inside. Thus, an attractive appearance will be combined with full thermal comfort of the entire house.
Of course, finishing a house with metal siding has its own characteristic “disadvantages”, but they are few. Firstly, this is the need for careful and labor-intensive installation of the frame. Secondly, the need for a large number of auxiliary materials - from initial profiles to fastening fittings, cornices and corners. Thirdly, with a lack of experience, a common mistake is inaccurate (uneven) cutting of siding panels - as a result, they are rejected, and new ones have to be used in place of the “inset”.
With the development of installation skills in working with siding, all the mentioned disadvantages are more than compensated for by the repair and design advantages of durable metallized cladding.
Installing starter siding strip
Before you begin laying the main siding sheets, you must install a starting strip. To do this, you need to determine its location.
The starting bar should be 40 centimeters higher from the bottom horizontal line of the building . To secure the starting strip evenly, you should draw a line along the entire perimeter of the building on which the starting strip will be attached.
To attach the plank, you should attach it to the marked line with the upper edge and secure it with self-tapping screws in the wall. This option is suitable for a wooden wall.
If the walls are concrete or brick, then, having attached the plank to the intended line, you should mark the fastening points and drill holes for the dowels, and then fasten the plank with self-tapping screws by screwing them into the dowel .
IMPORTANT!
When attaching the starting strip, a gap of several millimeters should be made between the ends to prevent deformation of the coating.
The pitch of fastening the starting strip should be up to 40 mm.
Installing the starting bar
Installation of cladding
Installation of cladding
This event begins with the placement of the starting strip, which is the beginning and starting point for the subsequent installation of siding panels. When fixing it, it is important to use a building level and carefully measure every millimeter, since the slightest deviation from the vertical can subsequently lead to curvature of the entire facing surface.
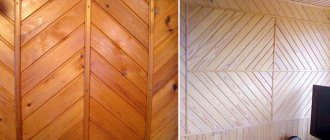
Wood-look metal siding
We fasten the sheets using metal staples, screws and self-tapping screws, depending on the available consumables. When placing the panels, they should not be installed tightly relative to each other, but a gap of 2–3 mm should be left, which will ensure subsequent adjustment of the installed surfaces.
As a rule, installation of “block house” siding begins from the center, gradually moving to the corners of the structure. At the points of contact, intermediate strips are installed, as well as external and internal corners. At the end, the finishing strip is fixed, and the overall facade of the house becomes similar to a “natural log house”.
As you can see, installing metal siding under a log is an effective and relatively affordable way to create a unique insulated and aesthetic facade. If all operations are carried out correctly, this material will function for a significant period of time and protect your home from the harmful effects of the external environment.
Setting internal and external corners
Any angles must be set in strict accordance with the vertical line. If the angle deviates even by a few degrees, the entire structure will be uneven and incorrect.
When installing a corner (internal or external), you should step back from the top edge of the facade about six millimeters and down from the starting strip - about 8 mm.
In order to evenly fasten the corner strip, it should be applied to the fastening point, fixed in a strictly vertical position, first on the two upper screws (not tightly), and then screw in the remaining fasteners sequentially from below.
The corner elements should not be fastened tightly enough with self-tapping screws (leaving a gap of 1-2 mm).
If you screw the screws in very tightly, the metal sheet may subsequently become deformed.
If it is necessary to lengthen the corner element, then an overlap of 2.5 centimeters is made by placing the upper part on the lower one. The peculiarity of the joining for all corner parts is the execution of the joining seam at the same level .
Setting obtuse angles
How to cover a house with metal siding step by step diagram
Step 1: Calculation and preparation
It is necessary to measure all the walls (and the basement with the roof, if included in the cladding plans). It is best to take measurements from scaffolding - this way you can evaluate the strength of the wall base for metal siding. If the plaster from the wall is falling off in whole layers, if the masonry is loose, and the beams are cracked, decorating a rotten house with siding will not help, you will only waste money and effort.
For proper fastening reliability, the strength of the walls is necessary. If necessary, a mesh can be applied to individual areas, followed by plastering with cement mortar, or individual bricks or beams can be replaced. It is necessary to carry out such installation preparation several days before installing the siding panels - the cement must “set” well.
Step 2: Cleaning and marking
The entire wall surface is swept with a broom, layers of mortar, flaking paint, remnants of the previous generation of putty, etc. are removed from it. All foreign objects (nails, trim, other decorations, etc.) must be removed from the walls.
The basic fastening element for wall siding is a proprietary bracket.
They are screwed in vertical rows, with a distance between each row of 50-70 cm and the same clearance. To fasten the brackets to the walls, use long (at least 50 mm) self-tapping screws. Vertical marking lines must be applied strictly according to the level, drawing even grooves on the walls. As a result, the house will be “lined” with vertical stripes for future fasteners.
Step 3: Mount the frame
A huge advantage of branded brackets is justifiably considered to be their adjustability in height (that is, distance from the wall). After installing the vertical rows of brackets, T-shaped strips are screwed to them
It is important to use metal T-bars, not wood! Saving on this fittings will lead to unreliability and a short service life of the entire cladding. Bolted (that is, collapsible) fastening of metal frame strips is preferable
T-shaped metal strips can be fitted to the brackets using pre-punched mounting holes. However, the size of this adjustment is small, it is only a few centimeters. The frame is measured using a long (up to 2 meters) and precise level. If any part sticks out or is recessed, the brackets are reinstalled. Auxiliary planks are placed under them or the wall is cut down. The main task is to ensure that the T-shaped metal strips are completely plumb and parallel to each other.
Step 4: We complete the installation of the frame and insulate the walls
After precise installation of the T-shaped moldings, fastening strips under the siding itself are screwed to them using short self-tapping screws
It is important to maintain consistency of size between the fastening strips, with an accuracy of a few millimeters. Otherwise, the configuration of the metal siding will shift, and the entire structure will soon deform
Before covering a house with metal siding, it is necessary to decide on the insulation and type of wall insulation. Any type of thermal insulation can be installed under the metal sheathing - from rolled polymer to the usual polystyrene foam
It is important to leave a gap between the insulation and the back of the frame in order to maintain internal ventilation of the facade
Step 5: Finish siding
With high-quality and durable installation of the frame, siding panels are installed quickly and easily. Work starts from the bottom up and goes all the way to the roof. It is convenient to cut metal siding with a sharp hacksaw. The joining of individual strips is carried out using special joining strips or overlapping; the first option is more reliable in the long term.
Short self-tapping screws for facade fastening are assembled with rubberized washers - they seal the holes and take into account the thermal expansion of the metal. Taking into account the large number of screws used (the installation pitch is from 12 to 18 cm), it is necessary to stock up on a screwdriver - manual installation of siding with an area of \u200b\u200b10 m2 or more will lead to calluses from a screwdriver on the most tired hands. Corners and joints are covered with decorative strips last, when the entire surface has already been tiled.
Mikhail Malofeev
Recently, old houses, as well as new buildings, are faced with decorative facades.
This is done so that the constructed building looks finished and beautiful.
The latest direction is siding.
Today we will talk to you about how to properly line a house with metal siding. Let's consider installation, advantages and disadvantages, and also perform some calculations.
Installation of H-profile
H-profile for metal siding is an element that serves as a design for the joints of the main cladding panels.
Installation of the H-profile is not difficult: the main thing is to correctly calculate its location .
Installation is carried out similarly to the corner elements: first, the upper screws are attached, then other screws are screwed in along the entire perforation in 4-cm increments . In this case, it is necessary to indent a few millimeters above the cornice and retreat down from the starting strip - 6 mm.
To lengthen the H-profile, the profiles are joined with an overlap (the upper part overlaps the lower by 2.5 cm). It is recommended to join the profiles at the same level so as not to disturb the decorative design.
Installing the H-connector
How to get around window and doorways
J-profile is used to design window and door openings . You can use special platbands.
The depth of window openings (including door openings) can be different, which is why installation is carried out differently.
Windows that are located in a recess in the wall are designed similarly to the corners.
If windows and doorways are located in line with the wall, then you should use elements designed for this purpose - aprons - to decorate them.
Installation of the apron begins from the bottom of the window recess . Next, its side parts are attached. It should be taken into account that the side elements should be located on top of the bottom bar. The top bar should overlap the side elements.
NOTE!
When using a J-profile, installation is carried out with an overlap. With this type of fastening, two side strips should be used, as well as an upper and lower one.
Without decorative design of openings (both window and door), a mark is made on the profile located at a distance equal to two lengths of the width and height of the opening.
Next, cuts are made in the corners, and the profile is bent in the shape of the letter P. It is fastened along the perforations in the central part, at a distance of approximately 15 cm from the corners. Next, the J-profile is installed .
Doorways are designed in a similar way.
Installation of window openings
Types of siding
Siding - decorative metal panels intended for cladding facades and lining cornices. It is possible to produce three types of profiles:
“Shipboard”, “Lbrus”, “Woodstock®”, as well as “Lbrus” soffits. The panel is made of thin galvanized steel with a polymer coating in various colors, including imitation of various natural materials.
“Shipboard” siding is the classic, most popular siding profile. Thanks to its shape, it is easy to install and convenient to use. Most often used for wall cladding. Source material: rolled galvanized steel with polymer coating.
Siding "Lbrus". The groove on the siding resembles the shape of a famous mountain, and the letter “L” stands for Light, emphasizing the advantage of steel imitation timber over its wooden counterpart in terms of weight and ease of installation. It is used as wall cladding (in a vertical or horizontal arrangement) and lining the eaves of buildings when completing roofs.
Steel siding Woodstock®-28x330, having all the advantages of steel siding, is distinguished by its original shape and attractive appearance, imitating a rounded log. Woodstock® will give your home the look of a natural log house and create a feeling of coziness and comfort. Woodstock® from Metal Profile accurately imitates the profile of log masonry and has a deep profile geometry that completely recreates the texture of natural wood. The material is protected from corrosion, mechanical damage and fading in the sun by zinc and polymer coating. Woodstock® steel siding is an environmentally friendly material. Unlike wood, it does not burn, does not rot, is not susceptible to insects, and at the same time allows you to preserve the aesthetics of a wooden structure.
Panel characteristics
| Siding name | Metal thickness, mm | Length, mm | Full width, mm | Working width, mm | Profile height, mm | Weight 1m2, kg |
| Ship board MP SK 14x226 | 0.4; 0.45; 0.5 | up to 6000 | 260 | 226 | 14 | 3.96; 4.24; 4.71 |
| Lbeam 15x240 | 0.4; 0.5 | up to 6000 | 264 | 240 | 15 | 5.19; 5.69 |
| Woodstock® 28x330 | 0.45; 0.5; 0.7 | up to 6000 | 356 | 330 | 28 | 4.13; 4.59; 6.42 |
Additional elements
| External compound corner plank PUNS-75x75x3000 PUNSW-75x75x3000 | External corner plank PUN-30x30x3000 PUN-50x50x3000 PUN-75x75x3000 |
| Internal compound corner strip PUVS-75x3000 PUVSW-75x3000 | Internal corner strip PUV-30x30x3000 PUV-50x50x3000 PUV-75x75x3000 |
| Complex docking strip PSTS-75x3000 PSTSW-75x3000 | Docking strip PST-50x2000 PST-60x3000 |
| Complex finishing strip PZS-30x25x3000 | Finishing strip PZ-65x3000 |
| Initial siding plank PNS-10x20x3000 | Universal docking strip PSU-50x18x3000 PSUW-50x30x3000 |
| Initial siding plank PNW-12x15x3000 | Z-shaped strip PZ-32x15x3000 PZ-30x23x3000 |
How to attach siding
To ensure that the cladding does not deform and the panels hold securely and firmly, during installation you should follow some fastening rules :
- The self-tapping screw should be fastened with a gap of up to two millimeters to ensure free expansion of the material. In this case, deformation of the sheets can be avoided;
- Rubber washers should be placed under the screw heads;
- You should use self-tapping screws that are treated with a coating that protects hardware from corrosion;
- the panels should be fastened to each other using specially designed locks that snap into place, making the seams airtight;
- the step of fastening elements should be no more than 40 centimeters.
In addition to securely fastening the panels in the area of corners, window and door openings, it is advisable to lay insulation to prevent moisture vapor from entering the structure.
Correct fastening
Choosing siding
Before you start exterior finishing, decide on the type of siding it will be:
- vinyl,
- wooden,
- metal,
- fiber cement.
Metal siding is widely used in cladding houses. This is the most popular option chosen by owners of wooden houses.
What are the pros and cons of this type of siding?
Metal siding is long panels, lightweight, 120, 300 and 550 mm wide, made of thin galvanized steel, usually with a thickness of 0.35 to 1 mm. Each panel is equipped with locks with which they are fastened together.
Important: Advantages of metal siding:
- lasts a long time
- resistant to different temperatures and their differences,
- mold and other bacteria do not form,
- durable,
- non-flammable
- the presence of hidden fastenings, which make the structure look neat.
Metal siding is covered with a polymer material (polyester, plastisol, pural) or painted with a special powder. With the latter method, the color can be more varied.
Help: Disadvantages of metal siding:
- the likelihood of corrosion due to atmospheric conditions,
- low level of sound insulation (for example, in rain),
- possibility of peeling off the polymer coating from the galvanized layer.
Laying siding panels
Installation of panels, regardless of direction, starts from the corner. The first panel must be brought around the corner and inserted with the end part into the starting strip .
It is recommended to fasten each element starting from the center, moving towards the edges . Each subsequent row of sheets must be attached to the previous one by snapping into the lock.
The required opening is cut out under the windows and the panels are installed sequentially in rows.
This is how the entire front part of the siding is laid out up to the penultimate row. Next, the finishing strip is installed.
Laying the last row and finishing
After completing the installation of the penultimate row, you should then attach the finishing strip . The distance to the last row of siding panels is measured from the edge of the plank. The strip should be bent so that it fits into the lock on the bottom of the panel.
In this way, the entire last row of covering on the facade is designed. Next, if necessary, install panels on the gables .
Installation of finishing strips
Sizes and price
On the market of modern building materials, metal siding is presented in a very wide range of colors, thanks to which it can be used to implement any design solutions. Geometrically, the dimensions and thickness of the metal from which the siding is made may vary. Woodstock produced by MetalProfile is distinguished by a larger convexity, that is, a larger bending radius, than the same one from GrandLine. A blockhouse made by different factories does not fit together due to dimensional discrepancies and design differences in the locking bends. Unlike, for example, a ship's plank, components from different manufacturers also usually do not correspond to other people's panels. Therefore, if you need to purchase additional material, you need to look for products from the manufacturer purchased initially.
Even the appearance of the panels varies between factories. For example, a blockhouse can imitate a single or double log, and the dimensions of the panel change accordingly. Structurally, a log blockhouse is a sheet of metal curved outward with a certain radius. On the top strip of such a panel, oval holes are punched for subsequent fastening of self-tapping screws. On the bottom bar there is a lock that engages with the lower bar of the already secured panel. The length of the panels varies from half a meter to 6 meters. The most convenient size for transportation is considered to be 3-4 meters.
Attention : When purchasing metal siding, you must check with the seller the full and usable width. Full is considered taking into account the assembly strip, useful - the distance in assembled form.
The warranty period and the price of siding depend on several factors: the thickness of the metal sheet (0.45 mm or 0.5 mm), the presence of galvanization, and the type of coating. The drawing is usually applied using photo-offset printing technology. It is important to note that this type of metal siding belongs to premium finishing building materials, so it is difficult to call it cheap. The price per square blockhouse will invariably be higher than, for example, a ship plank due to the need to use more technologically sophisticated equipment. Therefore, imitation logs are mainly used in the decoration of private cottages and country houses. Construction organizations prefer more affordable ship planks.
Restoration of an old house
Metal siding prices
Metal siding