For an unprepared person, the variety of exterior finishing materials available on the market today can cause some confusion.
Such advantages often become decisive factors when choosing siding for cladding a house. The only question remains the installation technology, which should be discussed in more detail.
If you do not have experience in finishing work, the best solution is siding, which has a number of advantages over other types of finishing:
- There is no need for “wet” work (applying plaster, etc.).
- Restrictions on weather or temperature conditions are set by the employee himself according to his own feelings.
- Installing the material does not require any special skills; the ease of installation makes it possible to cover the house yourself.
- The result of the work looks very impressive and lasts a very long time.
This article is a step-by-step instruction for installing siding for dummies.
Brief description of siding and its types
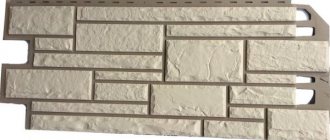
Siding is a cladding material used for exterior finishing of buildings. It has the shape of elongated narrow stripes with a longitudinal relief applied to them, imitating various options for wooden construction (most often) or, less commonly, masonry.
The strips (panels, lamellas) are equipped with special sides for fastening to the support on one side and for connecting to each other on the other . The design allows you to assemble canvases of any size from them.
The siding is assembled right on site, which is convenient and practical. The panels are lightweight, so they are easy to lift and carry. In principle, it is possible to work alone, but for large areas with long panels, an assistant is needed.
The birthplace of siding is Canada, where it was first produced.
The first samples were wooden, today there are different types of material:
- Wood.
- Metal.
- Plastic (PVC, acrylic, etc.)
- Fiber cement.
- Ceramic.
The most common are plastic (PVC) and metal types of siding, which have the best characteristics or most successfully combine quality with price.
In addition, there are many profile options:
- Under the beam.
- Under a log.
- "Herringbone."
- "Ship board".
- Timberblock.
- Under a stone, etc.
According to installation direction:
- Horizontal.
- Vertical siding.
Some types allow installation in both directions at the request of the owner.
Developers are constantly adding to the model range, so there cannot be an exhaustive list; the list always remains open.
Cost of siding removal work
If you find a little-known company, it will dismantle the siding for 100 rubles. per square meter. There are individuals who take on work for a price tag of 500 rubles. per square meter, average price 300 rubles. per meter This cost includes the following steps:
- Departure of the brigade.
- Inspection of the object.
- Removing siding.
- Removing decorative trims.
- Removing flashing strips.
- Closing the ends.
- Dismantling the planks.
- Disassembling the frame.
- Removing the sheathing.
- Removing insulation.
- Final disposal of materials.
When choosing a specialist, their professionalism is taken into account; you need to read reviews. If the company does not offer a full range of services, it is better to refuse. It is important to get advice over the phone and answer all questions.
Siding kit
In addition to panels capable of forming only planes, additional elements (extensions) are produced, which are used to design the joints of different panels at an angle or in the same plane, for finishing window or door openings, etc.
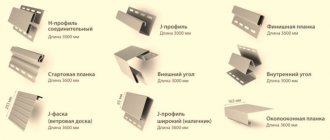
Standard types of additions include :
- Simple and complex angle (external and internal).
- H-profile.
- J-bar.
- Starting bar.
- Finish bar.
- Platband.
- Soffit.
- Near-window profile.
All additional elements fully correspond to the main panels in terms of material type, color or type of protective coating.
Attention! Sometimes trims of a different, contrasting color are used as decoration, which gives the cladding an elegant and original look.
Choosing lathing - which is better, wood or metal?
The sheathing is a system of planks arranged in a certain order perpendicular to the direction of the panels and serving as support for them. It is customary to use wooden blocks or metal guides for drywall as the material for the sheathing .
Debates about which material is better have been going on since the very first days of using cladding. Wooden planks have low thermal conductivity, while metal planks conduct heat very well and require insulation.
At the same time, wooden parts have a common disease - they are susceptible to warping, deformation during drying and rotting. The metal profile does not create such problems; it is protected from corrosion by a layer of galvanization .
Another problem with wooden blocks is curvature. Choosing a perfectly straight one from a pack of bars is a difficult task, since the wood is highly susceptible to bending or twisting with a screw . The metal profile is almost perfectly straight.
Thus, a metal profile seems to be a more successful option for creating sheathing, but you should take into account the cavity it creates and fill it in parallel with installing the insulation.
Siding selection
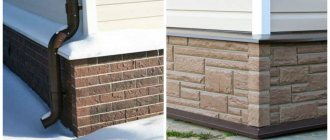
The Americans came up with the idea of calling the cladding of buildings siding. At first, the cladding was ordinary boards mounted horizontally overlapping. Each top bar hangs over the bottom. This helps protect the walls from getting wet. If you cover a house made of such lining with siding, it will be warm in winter and cool in summer.
Today, not only small 6x6 private houses, but also reputable hotel complexes are upholstered with siding. This type of cladding is used for new buildings and restoration of old houses. The choice of material and decorative design of siding panels has gone far beyond natural wood.
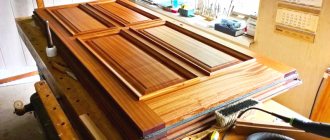
Wood siding
Classic wood siding consists of edged boards that must be attached to the sheathing. In honor of the homeland of this technology, it is called “American”. Creative homeowners have used their imagination and clad their homes using unedged boards. It looks rustic, but original, fits perfectly into the natural landscape.
A country house covered with profiled façade boards has a more civilized look. Another variety is “American” lining. To the beveled profile and the protruding front edge, tenons with grooves have been added to provide an airtight seal.
Fiber cement siding
The siding, which is similar in composition to artificial stone, is made in appearance like a wooden board. In terms of aesthetic perception, it is no worse than natural wood, and superior in service life.
Installation is carried out traditionally, with self-tapping screws. Be sure to equip a lattice frame. The inner surface is adjacent to the sheathing in a continuous layer. Externally, the cladding looks like a herringbone. Fiber cement siding is non-flammable, not afraid of ultraviolet rays, and is not subject to thermal expansion like vinyl. The material is distinguished by high resistance to mechanical stress.
Wood polymer siding
The wood-polymer composite (WPC), intended for exterior decoration of a house, is based on recycled wood waste and polymer. The technology involves recycling wood waste to produce panels that can withstand atmospheric influences.
WPC is more durable than natural wood - 25 years without changing the original characteristics. Does not require additional treatment with fire retardants and antiseptics. The cost of manufacturing such siding turned out to be higher than similar products made from coniferous wood. WPC profiles differ in thickness, “locks,” and stiffeners.
Metal siding
Aluminum and steel are used to make facing metal siding. Steel ones are stronger and more durable. They are thin cold-rolled galvanized sheets with a protective and decorative coating.
Externally, siding imitates wood. There are three options:
- ship plank;
- classic herringbone;
- block house.
The most popular is block highs. Thanks to this siding, the exterior of the building looks like a neat wooden house with neatly fitted rounded logs. The strength of the product is given by carefully calculated stiffening ribs.
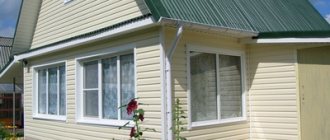
Vinyl siding
Vinyl facade siding is affordable. The colors and textures are very diverse. Installation is simple, maintenance is even easier. The polymer is weather resistant. The durability indicator competes with facade boards made of natural wood, even if it is processed according to all the rules.
The vinyl “economy option” does not look poor at all. With its help, you can inexpensively decorate an old house or make a “candy” out of your dacha. Compared to fiber cement and metal, vinyl cannot convey the texture of a log home as naturally. But stone or brick repeats perfectly.
Non-combustible siding for exterior decoration
The wood burns quickly and completely. Even if treated with a fire retardant. Vinyl siding, when added with fire retardants, does not support combustion, but emits dangerous gas. Metal profiles are susceptible to corrosion, so they have a polymer coating, which will begin to burn out and smoke in the event of a fire. Fiber cement siding is less fire hazardous.
Relatively recently, chrysotile cement siding appeared on the market. Consists of cement, mineral fillers and cellulose. Safe for the environment, absolutely non-flammable, has no flammable layer. It is moisture resistant and has low thermal conductivity. Due to its frost resistance, it is used in suburban construction in cold regions of the country.
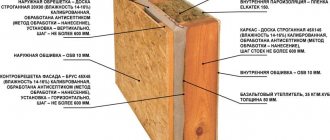
Installation of the selected sheathing
Installation of the sheathing begins with the installation of the outermost strips (if you plan to install vertical siding, then the upper and lower ones). They are attached to the wall at the corners, the position is checked by plumb line . Then a cord (at least two) is stretched between the outer planks, which serves to check the position of the intermediate strips of the sheathing and ensure flatness.
The intermediate strips are installed in increments that allow the insulation boards to be tightly laid between them. To ensure flatness, pieces of wood, plywood, etc. should be placed under them in the right places. (for wooden sheathing) or adjust the height of the metal profile above the wall plane when using a direct (U-shaped) drywall hanger.
After installing the first layer of planks and carrying out intermediate operations, a counter-lattice is installed, which will directly serve as a support for the siding. It is installed perpendicular to the planks of the first layer (and, accordingly, to the siding panels), with a step that ensures optimal fastening of the sheathing (40-60 cm, in some cases - 30-40 cm).
The counter-lattice performs the additional function of providing a ventilation gap between the sheathing and the wall pie, allowing steam to escape .
NOTE!
If you do not plan to install external insulation, then the load-bearing layer of the sheathing is installed immediately (perpendicular to the siding panels).
Step-by-step instructions for covering your house with siding yourself, photos and videos
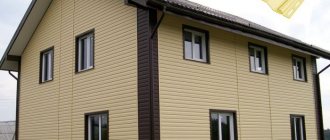
Siding is a dry type of exterior finishing and is suitable for most types of residential and commercial buildings, especially those made of foam concrete and sandwich panels. Its light weight will not put a significant load on the foundation, which is why such cladding is also used on old wooden houses.
The growing popularity of siding is explained not only by its low price, but also by its durability, because it will not crumble like plaster over time, easy maintenance, excellent protective properties and a wide selection of shades and textures. The undoubted advantage of siding is that you can give a modern look to even an old house with your own hands, significantly saving on the services of builders.
Tools and materials
Before covering your house with siding, you should check the availability of the following tools:
- grinder or saw with small teeth, metal scissors,
- screwdriver and screwdriver,
- hammer,
- tape measure, square and level (a laser tape measure will greatly simplify the work),
- a stepladder that is high enough to reach the roof of the house.
Siding manufacturers offer a full range of elements and panels for covering a house, even with a complex configuration. As a rule, the buyer should indicate the area of the walls of the house and their dimensions, the type of roof and the number of windows, and the seller himself will calculate the required number of certain parts; a schematic plan of the house from the outside will facilitate this process.
Knowing some points will help you control or check the calculation. So, the components for installing siding include the following elements:
- External corner - the height of this element is 3 m, and if the house is one-story, it is worth using entire elements for each external corner of the house; if the height of the walls is more than 3 m, then sum up the length of all external corners in meters and divide it by 3, taking into account that there should be a margin for margin when joining. Corners are used not only for decorative purposes, but also due to the fact that the ends of the siding must be closed.
- Internal angles are calculated using the same principle. If the roof eaves are finished with siding, internal corners are also used in the areas where it connects to the wall. In cases where the finishing of the cornice was done earlier or will not be done at all, use a finishing strip.
- To finish the cornice, elements such as soffits and wind boards are used.
- The required length of the starting strip is equal to the perimeter of the house minus the width of the doors and gables.
- In areas connecting extensions, height differences and roofs of different levels, a J-profile is used.
- The perimeter of the windows is covered with a window strip; it must be taken with a reserve so that the joining points are not visible. Also, to frame the windows, flashings are needed, which also should not have visible joints.
- A drain strip or ebb sills are installed around the perimeter of the base if its width of 40 cm is not enough.
- If the length of the house wall is more than 3.66 m - the standard length of siding panels - the connection is made using an H-profile. It is necessary to think about the location of its installation so that the proportions of the building are maintained.
- The number of siding panels themselves is approximately calculated using the formula: “((area of all walls of the house – area of windows and doors)/panel area)*1.10”
. A reserve of 10% is needed to cover scraps and waste. - For installation, it is preferable to use galvanized self-tapping screws 25-35 mm long, since their use makes it easier to maintain the recommended gap of 1 mm. For 1 sq.m. Approximately 2 self-tapping screws are consumed, they should also be taken with a reserve. If possible, then you should choose self-tapping screws with a rubberized head, which will definitely not leave rusty stains after a few years.
Preparatory work
Before covering with siding, it is necessary to carry out preparatory work. First, all protruding parts are dismantled: doors, trim, grilles, etc. Seal all cracks in the walls, around windows and doors with cement mortar or foam. The walls of an old house are cleaned of dirt and dust, chipped plaster and paint, mold and rotten areas. Wooden houses are treated with antiseptics and antipyretics; walls made of foam concrete can be treated with a deep penetration primer.
Installation of sheathing
The first step is to install a sheathing made of metal profiles or wooden slats, since it is strictly forbidden to attach the panels directly to the wall. Galvanized profile is the only option for metal siding and for brick and concrete walls. As a profile, you can use a CD profile for drywall. If the vinyl profile is attached to a wooden or frame house, you can use 60*40 mm slats with a residual moisture content of 15-20%, treated with an antiseptic and thoroughly dried.
Using a tape measure and level, mark straight lines on the walls of the house so as to obtain a closed contour. Having carefully measured the distance in the corners of the house from this line to the base, they find the minimum, and, putting it down, draw another contour. Subsequently, a starting bar is installed along this line, and if it deviates from the level, the cladding panels will warp.
Then, using U-shaped fasteners, vertical guides are mounted, starting from the corners. It is necessary to ensure that they fit tightly to the wall, for which you can put pieces of wood or dense foam. The distance between them is 30-40 cm; in those places where the siding will bear additional load, for example, street lamps, as well as near corners, windows and doors, you need to add guides. The vertical guides should not be connected by anything so that there are no obstacles to ventilation, since the lack of air flow will lead to the appearance of mold.
Waterproofing and insulation
For wooden and aerated concrete walls, installation of waterproofing is mandatory, and a layer of insulation is optional. As a material, preference should be given to a water- and wind-proof membrane. If insulation is not performed, then the film is fixed directly to the wall of the house in order to maintain the distance necessary for ventilation of the siding. When installing an insulating layer, waterproofing is laid over it, and then the sheathing is rebuilt to provide a gap for ventilation.
Fastening the guide elements
Installation begins by installing the drainage system on the base, placing its upper edge along the previously marked line. It is a rigid structure and is easier to keep level than a flexible starter bar. Then a series of corner profiles. They must be firmly secured with self-tapping screws in the upper part of the first hole. Subsequent screws are screwed into the middle of the hole.
If it is necessary to increase the length, the upper profile should be laid overlapping the lower one with an overlap of several centimeters. Then, along the previously marked line, a starting bar is attached to the top of the drainage system. It should be 5 mm above the bottom edge of the corner profile.
Window strips or J-profiles are attached around the windows so that the outer bottom edge is a few centimeters lower than the inner one. Door openings are edged with J-profiles. The corners of these elements can be filed at 45 degrees, or they can be overlapped, placing the top planks on the side ones.
When installing H-profiles vertically in pre-designated locations, a level is used. As when installing other vertical elements, you need to leave a gap of 5-6 mm to the cornice and base so that the planks do not bend when expanding. A finishing strip is installed under the roof or where the area provided for siding ends.
Installation of panels
When all the guide elements are installed, you can proceed directly to the installation of the panels. The first row is attached to the starting bar until the lock clicks from below; at the top, the panel is secured with self-tapping screws in the center of oblong holes every 40 cm. All other panels are installed according to the same principle, row by row rising to the roof or window. You should not pull the panel up and fasten it rigidly; it should move slightly to the sides. The top row of siding ends with a finishing strip.
What should you consider?
Rule #1.
Under no circumstances should siding panels be firmly secured. The material from which they are made contracts when cold and expands when heated, length fluctuations can reach 1%. This is what causes the elongated shape of the mounting holes. The fasteners cannot be screwed or driven through the panel, but only into the center of a special hole, and the screw is not screwed in all the way, with a gap of 1 mm between the plates and the head. If this rule is violated, the siding may simply burst under extreme heat.
Rule #2.
There should be a gap of about 10mm between the planks and the guides (less when installing in hot weather), so that the siding does not bend when it expands. When covering a house in the summer, it is worth protecting the material from the sun.
Rule #3.
Siding can be installed at any time of the year, but please note that at temperatures below -10 degrees, elements may crack when cut, so you should be careful and use an angle grinder.
With the help of siding, if you follow the rules and installation technology, you can renovate your house and protect it from atmospheric influences for 30-40 years, this is exactly the service life that manufacturers promise.
Insulation and waterproofing
During installation of the sheathing, external insulation of the wall can be performed. A material with a vapor permeability higher than that of the wall material is selected as insulation . This point is very important, otherwise water (condensation) will accumulate at the boundary of the two materials, which will sooner or later cause the destruction of the wall.
Therefore, the most preferable insulation would be slab mineral wool, which allows water vapor to easily pass through. To cut off the ingress of moisture from the outside, a layer of waterproofing should be installed . This is done at the stage of completing the installation of the first layer of sheathing and insulation.
A layer of waterproof membrane is installed on top, a material that facilitates the removal of steam, but prevents moisture from entering from the outside. The counter grille is installed on top of the waterproofing layer.
IMPORTANT!
You can find out more about siding insulation here.
Installation of the starting strip (J profiles)
The starter strip provides support for the bottom row of siding panels. To install it, you need to draw a horizontal line along the perimeter of the house, which is 40 mm above the estimated bottom edge of the panels . Then the starting strip is applied with the upper edge to this line and fixed with self-tapping screws on the sheathing.
CAREFULLY!
The screws should not be tightened tightly; a small gap should be left for the free movement of the strip. The self-tapping screw is screwed in exactly in the middle of the elongated holes so that during temperature changes the part can move and compensate for the change in size without deforming the plane of the skin. This rule applies to all siding elements.
The next strip is not attached closely, but at a distance of 6 mm from the previous one to compensate for temperature stretches.
Calculation of material for cladding and necessary tools
To calculate consumables, you need to calculate the area of the facade covered with siding, and then divide it by the square footage of the selected panels. In this case, it is necessary to take into account the sizes of windows and doors that the house has, removing them from the calculations. You also need to take a 10% margin for adjustment so that everything can be finished without problems or restrictions.
To decorate a house with siding you will need the following set of tools:
- Level and plumb;
- Ladder;
- Hammer;
- Screwdriver;
- Roulette;
- Scissors and hacksaw for metal.
If the walls of the cottage are built of concrete or brick, then you will need a drill to drill holes for the dowels of the sheathing. An angle grinder won’t hurt when doing siding on your own house. It will make cutting the panels easier and faster.
How is siding attached?
The siding panel is inserted with its lower edge into the lock of the starting strip, snaps into it, and the upper edge is fixed with self-tapping screws on the sheathing. The following panels are attached in a similar way, the sheathing “grows” from the bottom up (or sideways if the vertical type of siding is chosen) .
Attention! In some cases, a top-down installation is used. It is believed that this option is less successful due to the possibility of rainwater penetrating into the lining space, but in practice no problems were found.
Is siding sheathed in winter?
The most favorable temperature for installing siding is summer. There are no gusts of wind that can “twist” the panel, the façade is dry, and work is comfortable. If there is a need to do installation in winter, you must adhere to the following recommendations:
- choose a day when the temperature has not dropped below -5℃;
- the gap for thermal expansion between the starting strips or other adjacent elements in winter conditions is increased to 9 mm;
- the backlash when tightening the self-tapping screw is 0.1 cm;
- siding is not left outdoors overnight.
If the building is icy, no matter what material it was built from, the cladding is transferred to the warm season. When using a construction hair dryer to heat up the panels when trimming parts, you must be careful so as not to overheat the material.
Before deciding on installation work in winter, you need to find out what extremely low temperature the siding can withstand.
Installation of internal corner strips
The corners are installed before installing the main panels, immediately after attaching the starting strip. The internal corner profile is attached with the lower edge at the level of the starting strip; the screw density is recommended to be 25-30 cm.
If the starting strip prevents you from positioning the profile in the right place, nail strips should be cut from the corner profile to a length equal to the width of the starting profile plus the temperature gap.
If it is necessary to extend the corner strip, cut off the nail strips from the top by 30 mm and overlap the top one over the bottom one for proper water drainage. The amount of overlap is no more than 25 mm to ensure that the temperature gap is maintained.
You can make a corner connection using a J-bar, which is cheaper than a corner connection. This can be done using one plank, when it fits tightly with its outer edge to a row of panels on one side, and the panels on the second side are installed into it .
The second option is to use two strips on each side of the corner, in which case there is a danger of water entering the gap between the strips, since absolute tightness of the connection cannot be achieved here, in addition, temperature gaps are necessary in any case.
Which lathing to choose for siding?
An important choice before installing siding is the choice of sheathing. The structure can be made of wood or galvanized profiles.
- Wooden sheathing is cheaper and, at first glance, easier to install. In most cases, a cut or planed block with a cross-section of 40x60 or 50x50 mm is used, depending on the thickness of the insulation. The moisture level of the bar must be at least 20%, and it must also be acclimatized in the same environment where it will be used.
Even if all these conditions are met, the block will have the disadvantages inherent in all wood materials. These include flammability, susceptibility to the development of mold and mildew, and changes in geometry depending on humidity (shrinkage and expansion). Before use, the block must be coated with fire retardants, which increase the fire-resistant properties of the material, and with antiseptics.
Wooden sheathing is used on buildings with a small height, so that each block covers the wall in height, since it is not very convenient to build them up.
The thickness of any sheathing must be at least 50 mm. The gap should allow the insulation to fit inside the wall.
- Steel lathing is made of galvanized steel or aluminum, can withstand heavy weight, is designed for a long service life, the material does not support the growth of fungus and mold and does not deform under the influence of moisture. To create the lathing, special steel profiles with a thickness of 0.45 - 0.5 mm are used.
Steel sheathing option.
When installing siding vertically, horizontal lathing is used, and when installed horizontally, vertical lathing is used.
Types of profiles for metal lathing
If all the elements of a wooden sheathing are quite simple and usually do not raise questions, then metal profiles are divided into several varieties.
- UD profile - acts as a guide, installed on corners, cornices, around windows and doorways.
UD profile.
- CD profile is an element that forms the sheathing itself. It is installed in 60 cm increments and is built into the guide profile. The length of this element is affected by the height of the wall; if you plan to cover a high facade of more than 3-4 m, then the CD profile will have to be increased.
CD profile.
The connection of CD and UD profiles occurs at right angles.
- The CD connector is used to extend the CD profile in length. Two profiles are inserted into this element on both sides.
Connecting profile for increasing the length of steel sheathing.
- The ES bracket (also called direct hanger) is mounted on the wall and holds the CD profile. The selection of fasteners for installation depends on the surface material. Nails, dowel-nails, self-tapping screws, etc. are used. Direct hangers allow you to set the sheathing strictly at level. This makes it possible to compensate for unevenness of the main wall.
Direct hanger for fastening the sheathing.
Installation diagram for ES brackets.
Installation of external corner strips
External corner strips are installed in a similar way, adjusted for the reverse geometry of the element. The same overlap joining technique is required, temperature gaps are required, etc. As a replacement for a complex corner, you can use two J-bars located close to each other at the corners .
For external corners, a simpler design method is possible - using a simple corner that is installed on top of the panels. In this case, the siding is installed first without a corner, so that the joint of the planes is as neat as possible, after which a simple corner is screwed on top. Often this option turns out to be the most preferable because it is simpler and for untrained people this option seems optimal.
Frame for siding
The frame can be assembled either from wooden blocks or from a metal profile, which is used to install plasterboard sheets. Today, some siding manufacturers offer ready-made frame elements that are sold complete with cladding.
The question of which frame is better: wooden or metal is asked by many novice home craftsmen.
- Lumber is cheaper, but for lathing facade finishing, bars of at least 1st grade are required. That is, dry, without a large number of defects: delamination, cracks, bluish spots, wormholes and eyes. They must be treated with an antiseptic and fire retardant. But keep in mind that under the influence of high humidity and then drying, the bars may warp, which will affect the quality of the finishing of the wall of the house.
- In this regard, metal elements are better. They do not change their size under the influence of changes in temperature and humidity. They do not need to be treated with anything, but they are more expensive.
Installation of sheathing
Before installing the sheathing to the wall, you need to prepare it.
- Facade elements are dismantled: drainage system, window and door frames, drains, etc.
- If there are defects on the wall, then they must be repaired with a repair mortar, for example, cement-sand with a ratio of 1:2. You can use ready-made facade putty or plaster.
- Since siding is primarily installed horizontally, this means that the sheathing elements must be installed vertically. Therefore, first markings are made on the wall, where vertical lines are drawn every half meter. In the corners, regardless of the specified pitch, lines are drawn without fail.
- Along the marked lines, straight hangers are installed every 50-60 cm, which are attached to the wall with self-tapping screws on plastic dowels. That is, they drill holes in the wall, drive dowels in with a hammer, attach a hanger, which is tightened with a self-tapping screw. There are at least two fasteners for each suspension.
- Direct hangers must be installed along the perimeter of window and door openings. Here the installation step is from 30 to 50 cm.
- If the facade of the house is planned to be insulated, then this must be done right now.
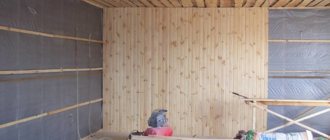
Wall insulation
For a facade that is covered with siding, it is best to use slab thermal insulation material. This is mineral wool or polystyrene foam. The main thing is to accurately select the insulation thickness. For central Russia, a thermal insulation layer thickness of 50-60 mm is suitable. Mineral wool and polystyrene foam boards are sold at this thickness.
If a house is insulated and covered with siding in the northern region, then the thermal insulation layer must be at least 100 mm. And here there is a difficulty, because the antennae of direct suspensions have a mounting length of 80 mm. That is, the insulation is thicker. In this case, proceed as follows:
- wooden blocks with a cross section of 50x50 mm are installed vertically on the walls along the marked lines, which are not aligned vertically;
- and then direct hangers are installed on them and attached to them with wood screws.
There is a simpler and better option - a short block of the same cross-section is installed under each suspension, which is pre-attached to the wall. And already there is a suspension for it. This is how the distance from the cladding to the wall surface increases, where an insulating layer with a thickness of even 130 mm will fit.
As for installing the insulation, through cuts are made in each slab with a knife so that the antennae of the hangers can squeeze through them. Therefore, it is very important to accurately determine the locations of the cuts.
Attention! You cannot make large holes for direct hangers. This will reduce both the strength and thermal characteristics of the insulation.
The slabs themselves must be laid tightly to each other so that gaps do not form between them. If any cracks still remain, they must be filled with foam sealant. This is foam in a can, but not mounting foam. It does not expand in volume in air.
Continuation of frame assembly
A profile is mounted in one corner of the facade. It is leveled vertically using a level and attached to the suspension antennae with special self-tapping screws, which craftsmen call bugs or seeds. Now four or five strong threads are tied to the profile, which are pulled to the opposite corner of the house. Here, each thread is aligned horizontally, having previously been attached to a self-tapping screw screwed into the wall. That is, the threads should form a plane that is even both vertically and horizontally.
First, a corner profile is installed along them, attaching it to the hangers, then the rest are intermediate. Be sure to install profiles around the perimeter of window and door openings.
Installation of H-profile
The installation of the H-profile is carried out simultaneously with the installation of the corner strips (immediately after the starting strip). The same rules apply as for corner profiles - trimming nail strips for joints and mandatory temperature gaps. The use of an H-profile makes the longitudinal joining of panels more aesthetically pleasing and allows you to immediately cut the required number of panels to length for a given area.
Installation of external corner profile
Before installing the corner element, mark on the wall where the soffits adjoin it, or install the soffits. When installing the corner profile, make sure that the gap between it and the soffit is 3 mm, fix it with the top screws on both walls. The bottom edge should be 6mm below the starting bar.
After making sure that it is vertical, secure the profile along its entire length. If the length of one corner element is not enough, you need to overlap the second one by 25 mm, cutting it so that the distance between the mounting pads is 9 mm.
You can do without an external corner profile and use two J-profiles. In this case, we gain in time, but lose in waterproofing.
Installation of ordinary siding panels
Installation of ordinary panels begins immediately after installation of the starting strip and corner and H-profiles. Siding can be immediately cut to the required length, not forgetting the need to leave temperature gaps, which for panels are 12 mm.
The starting bar has a lock, the same as the panels. The first lower strip is inserted into it until it is completely connected and secured along the upper nail strip with self-tapping screws .
The usual rules for siding apply - the self-tapping screw is screwed in exactly in the middle of the oblong hole and loosely fixes the part, leaving room for free movement. The next panel is attached in a similar way. The process of creating a plane itself is simple and does not require any special knowledge other than what is indicated.
IMPORTANT!
Every 3 rows, a horizontal check is made and measures are taken to eliminate distortions if they are detected.
Loose connections or other reasons may disrupt the correct position of the panels, causing slight distortions . If you do not carry out constant monitoring, then by the end of installation the changes may become noticeable and the entire work will be ruined. Therefore, periodic monitoring and correction of the accuracy of the location of the lamellas to the horizontal is necessary.
How to cut siding
The majority of the façade consists of solid panels. Small fragments of material will also be needed. Each type of siding requires a special approach when cutting:
- Vinyl panels are cut with an angle grinder, a construction cutter, a shoe knife or a jigsaw.
- Metal siding is cut with a hand saw or a grinder with a pobedit disc.
- Fiber cement siding can be cut well with a grinder and a diamond blade.
You need to put a carbide file on the jigsaw. Care must be taken to ensure that the workbench is stable. Vibration will degrade cutting quality.
How to go around windows and doorways with siding
Window and door openings are designed in almost the same ways, the only difference is the presence of rain tides on the window openings. The method of tying the opening depends on the depth of the block in the plane of the wall.
To design openings located in the same plane as the wall, platbands are used . They have grooves for the end placement of siding, so the installation of platbands is carried out before installing the main panels.
If the openings are up to 20 cm deep, then a J-bar is used. Its installation is carried out on top of the finished panels; the finishing strip must be attached to the window frame around the perimeter.
For large opening depths, sets of the same siding panels are used, cut taking into account the temperature gap along the length of the slope and assembled according to the usual principle. A universal strip is installed along the perimeter of the window block, and a complex angle is mounted at the outer joint of the planes . In this case, it is also necessary to install additional panels before installing the main panels.
To finish the slopes, it is necessary to first install the sheathing on them, which is usually done during the construction of the main one, since the openings need to be insulated along with the plane of the walls. Regardless of the angle of slope, the sheathing of the openings is installed perpendicular to the main one, and the angle is ensured by the position of the finishing or universal strips.
Selection and calculation of components
Manufacturers of vinyl finishing material also produce all the necessary components for its installation:
- Internal and external corners for corner cladding of a house with a usual length of 3 meters. To calculate the required quantity, measure and calculate the total footage along the total perimeter of the corners of the building, which will be divided by 3. It is better not to use short trims, so as not to spoil the external design of the building.
The starting film is 3.8 meters long, and the quantity is calculated by subtracting the length of the doorways from the house perimeter.- A J-profile will be required in those places where extensions are attached to the building (length is 3.8 m).
- The strip that frames the window opening (length is 3 meters) is calculated by summing the perimeter of the window opening.
- Window tides are installed if required.
- The finishing strip is required to connect the roof eaves to the house.
- The H-profile covers the gaps at the joints between the siding strips; they are mounted vertically, calculating the quantity by dividing the perimeter of the building by the length of the siding panel.
- The drain plate is mounted under the window openings.
- The platband is installed as a covering for any openings that are flush with the walls.
To install siding yourself, you will also need galvanized self-tapping screws with a press washer with a length of 0.3 meters. The quantity needs to be calculated based on the wall area of the walls - 20 pieces per 1 square meter.
Laying the finishing strip of siding
The finishing strip forms the top (final) edge of the last panel and fixes its position. installation is carried out almost simultaneously with the top panel. The plank is fixed strictly horizontally at the required height, the nail strip on the last panel is cut off .
The panel, with its trimmed edge, on which the locking profile remains, is inserted into the slot of the finishing strip and snaps into it. The shape of the profiles is such that the required gap is maintained, and the lock reliably fixes the panel in the plane of the canvas.
NOTE!
For the correct installation of the finishing strip and the last panel, an accurate calculation made in advance is required, or the possibility of some level discrepancy if a separate pediment cladding is planned.
Installation of siding panels under the eaves
Before installing the last (top) panel, a finishing profile is installed; you can use a J-profile or a corner profile. Taking into account the upper gap of 3 mm, the required part is cut out. Since the locking part is cut off, we use a punch to make hooks. We insert and snap the last profile.
Installing siding on gables
The gables are finished either in the same way as the facade, or using a vertical arrangement of siding panels in contrast to the main fabric. Some fairly precise cutting to length and angle will be required.
A design feature is the need to provide a temperature gap in combination with cutting the panels at an angle, which may result in errors, so careful measurements will be required. It is recommended to start installation from the back sides of the house so that you have some experience before moving to the front side.
Siding installation cost
If there is no opportunity or desire to install the siding yourself, you need to familiarize yourself with the price list:
- Installing plastic siding on a wall costs 250-300 rubles per square meter.
- Hemming the roof - prices from 300 rubles. per square meter.
- Work with fiber cement siding - 700-800 rubles. per square meter.
- Fixing the film - price per m2 60 rubles.
- Collection and installation of wooden sheathing - 100 rubles. per meter
- Lathing on a brick surface - cost per square meter is 200 rubles.
- Collection and installation of metal sheathing - the cost of work is 400 rubles. per meter
- Installation of metal sheathing on brick - 500-550 rubles.
- Using 50 mm thick insulation costs 100-150 rubles. per meter
- Fixing insulation with a thickness of 100 mm - the price for the work is 200 rubles.