Components and start of work
To properly cover a house with siding from the street, you must strictly follow the manufacturer's instructions. Most of the complaints about self-stuffed PVC cladding then arise precisely because of non-compliance with the banal rules of its installation.
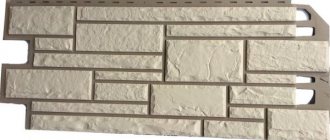
There are several types of vinyl siding planks:
Types of components
The variety of plank shapes only simplifies independent cladding. There is a set element for every corner and ledge of the house; you just need to correctly calculate the required number.
We are sheathing a shed or garage - why metal?
We will look at detailed instructions on how to work with the most common type, vinyl siding, a little below. Moreover, many panels are needed for the walls and facade of the house; it will be somewhat cheaper than other materials. But a garage or shed can be sheathed with metal. If possible, then it is better to purchase polymer-coated material. It will be more wear-resistant, and its service life reaches 50 years. Another undeniable advantage is fire resistance, which is so important, especially if it is necessary to decorate the walls of a garage or warehouse in which flammable substances are stored. In addition, due to their excellent strength, such panels are in demand for cladding shops, gas stations and even factories.
Covering a garage with metal siding
Having made the necessary calculations and purchased the material and components you like, you can begin installation work. We remove all elements from the walls of the garage so that they are as free as possible. Then we clean them of dirt and, if necessary, prime them. Next, we assemble the frame from the profiles, maintaining a distance between cells of at least 60 cm and no more than 1 m. Do not forget to leave a technological gap for ventilation, 5–10 cm is enough.
Since this type of siding has a long service life, the frame should be made only from galvanized profiles. Do not use wooden slats for it; they will rot much earlier than the cladding material becomes unusable. And if, for example, you have a wooden shed (often these utility rooms are made of timber), then such lathing will also allow you to level the surface.
Frame made of galvanized profiles
You need to wear gloves when working, otherwise you can get hurt on the sharp edges of the planks, and you should wear safety glasses when cutting the panels. Metal strips are assembled in the same way as plastic ones, from bottom to top. At the bottom there is a starting bar, and at the end there is a finishing bar, and during their installation a gap of 5 mm should be maintained. To protect the insides of the facade from precipitation, you can stick a special sealant on the frame around the openings, and then press it with metal sheets. In all other respects, the process of covering a garage, warehouse or shed occurs according to the instructions described in the next paragraph.
Calculation of material for cladding and necessary tools
To calculate consumables, you need to calculate the area of the facade covered with siding, and then divide it by the square footage of the selected panels. In this case, it is necessary to take into account the sizes of windows and doors that the house has, removing them from the calculations. You also need to take a 10% margin for adjustment so that everything can be finished without problems or restrictions.
To decorate a house with siding you will need the following set of tools:
- Level and plumb;
- Ladder;
- Hammer;
- Screwdriver;
- Roulette;
- Scissors and hacksaw for metal.
If the walls of the cottage are built of concrete or brick, then you will need a drill to drill holes for the dowels of the sheathing. An angle grinder won’t hurt when doing siding on your own house. It will make cutting the panels easier and faster.
How to calculate the required number of siding panels
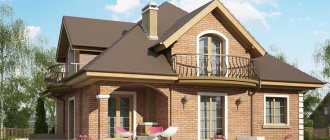
Any house, barn or mansion can be covered with siding. Even the most complex and unique architectural elements of a house (towers, columns or bas-reliefs) can be covered with this unique material. To do this, you simply need to calculate the area of the walls of your home.
But first you need to determine the area of one siding panel. Since the panels can be different in length and width (depending on the complexity and type of room), the area of any panel can be calculated by the simplest method, known from school: the length must be multiplied by the width. For example, the width of the siding panel is 30 cm and the length is 5 m. For convenience, you need to come to a single measurement system: either meters or centimeters. In this case, you can take meters. So, 0.3 m x 5 m = 1.5 sq.m. That is, one panel has 1.5 sq.m.
Using school knowledge in geometry, you will not need any other instructions to determine the square footage of the siding of your house. The easiest way to calculate the area of the simplest square or rectangular house, devoid of architectural frills. According to the formula for finding the area of a rectangle, S = AxB, where A is the smaller side, B is the larger side of the house.
Insulation and waterproofing of the house
Before you start covering the house, you need to clean the walls and seal the cracks in them. Old paint and plaster will not be visible under the siding, but it is better to get rid of them. If the house is made of wood or aerated concrete blocks, then a vapor-permeable waterproofing film must be attached to it under the sheathing.
The insulation is placed between the guides of the frame, which is stuffed under the finishing material in question for the facade of a private house. Next, another layer of waterproofing is laid on top of it. Moreover, everything is done so that an air cushion remains between the membrane and the heat insulator on the walls of the house.
Finishing work for a frame house
So, the brigade has arrived. Without wasting much time and with virtually no movement, the guys began to assemble the iron scaffolding.
After assembly, they very quickly began to pull the membrane and secure it to the OSB with a stapler. We made each wall separately, turning the corners and leaving an overlap for the window openings.
After the membrane was ready on the first wall, workers began attaching the sheathing. By that time, the timber had already dried well and after processing acquired a gray-green tint. Since the siding was delivered after the builders arrived, when work on its installation began, it turned out that the finishing J-trim strips were missing.
The work went very quickly, and since we only knew in theory about the order of work and some of the subtleties in execution, I carefully described each stage on one of the Internet resources, fearfully expecting a barrage of criticism. But to our common joy, it did not follow.
The sheathing was followed by installation of siding in full accordance with the instructions. The fasteners of the planks were not tightened with bolts, leaving the possibility of technological festivities due to temperature. Window and door openings were handled carefully, but this is where the first snag arose.
Since the house was initially planned as a stone house, and only then a design was made to convert it to a frame, a slight structural difficulty arose. Due to the close proximity of the window opening and the front door, the finishing strips did not fit. The situation was saved by the experience of the foreman, who cut the planks to size and carefully installed them. The connecting pieces were attached exactly to the centers, which gave the house a neat appearance.
Since I had free time during the day, I tried to be at the construction site as much as possible, and for good reason. Some important details or siding components were constantly missing.
My calculation, of course, gave an understanding of the overall picture, but it was not correct “to the decimal point.” I had to not only study in detail the assortment at nearby construction markets, but also go to a huge wholesale warehouse for rare parts.
The work was completed in twelve days. From early morning until late at night, the builders did their job efficiently. In addition to the exterior finishing, we ordered roofing and a complete redo of the terrace. The guys did everything with an A plus. The cost of finishing for the summer of 2015 did not exceed two hundred thousand rubles for consumables and work.
DIY siding installation
To attach vinyl panels to the sheathing, you can take:
- Staples
- Screws (self-tapping screws) with a diameter of 3.5–4 mm
- Nails with a stem section of 3 mm and a head from 8 mm
Their consumption when decorating a house with siding is calculated based on the step between these hardware on the planks of 30 cm. The fasteners must fit at least 20 mm into the wooden lath or metal profile of the frame. In this case, a space of 1 mm should be left between its cap and the PVC lining. If this is not done, the vinyl siding of the house will warp and ripple when the outside temperature changes.
Assembling sheathing for cladding a house with siding
The sheathing is made vertical or horizontal with a distance between the slats (profiles) of 30–40 cm. These guides must be placed across the main vinyl planks. But by definition there should be no crossbars between them. You need to cover the house with siding yourself so that there is space under the panels for natural air circulation.
To ensure reliable fastening of the PVC cladding, additional support rails are installed around the openings and along the corners of the building. They are also needed in places where lamps and drains are hung on walls. It is necessary to securely fasten not only the facade panels for the exterior decoration of the house, but also various decorative elements on them.
House sheathing
Installing the starting bar
The first to be fixed to the walls is the starting bar. To do this, a rope is pulled level around the house on nails at a height of 3-4 cm from the lower edge of the mounted sheathing. The starting profiles are attached around the perimeter of the building not end-to-end, but at intervals of 5–6 mm in case of thermal expansion.
Installation of low tide and starting bar. Low tides are installed from the corner of the house. The starting profile is mounted 30-40 mm above the ebb strip.
When covering houses with siding, it is extremely important to fix the starting strip correctly and evenly. It serves as the basis for the entire structure of the external cladding. The clarity of the geometric lines and the overall appearance of the siding decoration of a private house depends on it.
Setting internal and external corners
Next, external and internal corners are attached, installed at the joints of two walls. Their lower edge should be located just below the starting strip already attached to the house. The first self-tapping screw is screwed into the top hole for fasteners so that the corner hangs on it.
External and internal corners are installed so that the lower edge is 4-6 mm below the starting profile, and the upper part is 1-3 mm below the soffit or cornice
Then the corner is aligned strictly vertically. The remaining screws are screwed down the bar in 30 cm increments in the middle of the holes and not all the way. This is the only way the PVC cladding of the house can “breathe” and not deform.
The corner elements are built up with an overlap. At the bottom of the top bar, the inner side edges are trimmed by 25 mm. It is inserted into the bottom corner by 20 mm, which leaves a gap of 5 mm for thermal expansion.
Installation of strips on door and window openings
The next stage is covering the house openings for windows and doors with platband. In order for everything to turn out beautifully in the end, you will have to work hard here. In the upper horizontal J-profiles you will have to make cuts in the sides with a bend of the cut part of the panel, and in the lower ones you will have to make an angled cut at 45 degrees.
Trimming the window profile
Vertical strips are cut at an angle at the top, and cut out at the bottom with a similar bend on the side. The purpose of all these manipulations is not just to cover the house beautifully with siding, but to join the platbands so that water cannot seep into the joints anywhere.
Installing the main panels
With basic planks everything is much simpler. The first of them just needs to be inserted into the starting profile, and then fixed to the sheathing. The rest will follow one after another. It is the ease of installation of the main panels that allows you to decorate your house with siding with your own hands in literally a day.
If there is not enough siding length, we join several planks through an H-profile. To do this, do not forget to install and secure the connecting H-profile in advance. The distances below and above are the same as for the outer or inner corner
Installation starts from the starting profile and ends with the finishing profile or molding
Don’t forget to make “hooks” at the top of the panel
The finishing strip is attached to the upper edge of the wind board using “hooks” similar to the molding.
Soffits are installed between the molding and the J-bevel
The planks should be fastened from the middle to the edges, placing the screws exactly in the middle of the holes on the edge. The finishing touch to the vinyl cladding of houses is the installation of the finishing panel with the insertion of the topmost main PVC strip into it.
Why siding?
At the end of 2013, we acquired a plot of individual housing construction near the town of Solnechnogorsk near Moscow. A small village with a rich history pleased us with its flat landscape and silence.
It had everything we wanted:
- the house is about 50 km along a good road;
- walking distance from the site to the railway station;
- smooth;
- desired category.
The location in the village itself was a bonus. Fifty meters away there is a centuries-old mixed forest, a little further there is a large village pond. The most impressive thing was the view from the site to the snow-white old church, which pleases with the ringing of bells several times a day.
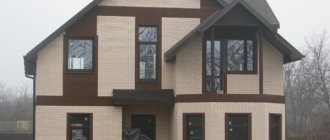
Despite all the advantages, there is also a significant drawback. There is no gas supplied to the village. We didn’t know when it would happen or whether it would happen at all. Therefore, when choosing a construction technology, priority was given to a light and warm frame house, focusing on the fact that house construction of this type has long been successfully used in Western countries. The house is relatively light, so it does not require a powerful foundation, a pile-screw foundation is sufficient. The box without insulation was quickly erected, covered with a roof, and windows installed. The next step was the exterior finishing.
Since, due to the structural features of the house, we could not consider options with greater weight, such as finishing brick or stone. It was possible to plaster on a grid and paint, but I also didn’t want to deal with wet work. Wood finishing has also been rejected due to the fact that cracks form when it dries, and this option is quite demanding to maintain: regular painting is required. Rather, by process of elimination we arrived at siding. As they say, I did it and forgot it.
- no need to paint or putty;
- lightweight, no need for a special foundation.
- large selection of colors.
- correct installation is carried out with a ventilation gap, which is a big plus.
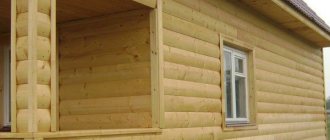
We didn’t like the classic options that look like horizontal stripes, despite the fact that there is a choice of thickness and colors. Since there is a beautiful forest not far from the house on both sides, I didn’t want to get out of the “natural” rut.
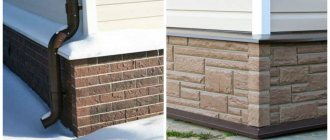
At first we were thinking about basement siding. It is visually very similar to natural stone; you could choose the texture and color to your liking. But when they started the selection process with a request for commercial proposals, they were unpleasantly surprised. The cost in the most inexpensive place started from two hundred and fifty thousand rubles.
After weighing all the pros and cons, we said goodbye to this idea with a sigh. Expensive. The houses in our block are all made of logs, so when, in search of the right option, I saw siding that imitated wood, I immediately realized that this was what I needed.
What to consider in order to properly sheathe a house with siding
The technology of work is such that house cladding can be done all year round. But at sub-zero temperatures, the siding should be taken outside in advance so that the material can acclimatize.
If the house is old, then there should be no problems with vinyl paneling. But the new building must be allowed to settle completely, otherwise the façade decor will necessarily be deformed. No amount of clearance will help in this situation.
Numerous photos of houses covered with siding are pleasing to the eye. In order for everything to turn out as well as possible during self-installation, it is extremely important to follow the installation instructions and leave gaps where necessary to compensate for the expansion of the material when heated under the sun.
Examples of correct and incorrect fastening of siding
Table of temperature gaps
When installing vinyl siding, consider the air temperature according to the table below. For example, if you carry out installation at a temperature of +10 degrees, then the main strip 3.6 m long can lengthen by 8 mm in warmer weather, and shrink by 12 mm in colder weather.
| Main strip, near-window strip, platband, L=3.6m | Temperature, C | ||||||
| -10 | 0 | +10 | +20 | +30 | +40 | +50 | |
| Max elongation, mm | 12 | 10 | 8 | 6 | 4 | 2 | 0 |
| Max reduction, mm | 8 | 10 | 12 | 14 | 16 | 18 | 20 |
| Soffit, J-chamfer, H-profile, External and internal corners, Starting profile, L=3.05m | Temperature, C | ||||||
| -10 | 0 | +10 | +20 | +30 | +40 | +50 | |
| Max elongation, mm | 10,2 | 8,5 | 6,8 | 5,1 | 3,4 | 1,7 | 0 |
| Max reduction, mm | 6,8 | 8,5 | 10,2 | 11,9 | 13,6 | 15,3 | 17 |
See also a video on covering a house with siding:
Preparing walls for cladding
Many people ask the question: is it worth removing the old siding of a house before covering it with siding? The answer to this question must be given by the owner himself. If the old cladding of the house is in unusable or unsatisfactory condition (wooden or plastic lining, plaster or other material), then you should think about completely removing it.
Siding is installed on a flat surface. To do this, you need to remove all nails, staples, wire, old shabby protruding sheathing if it will interfere with installation. It is better to seal all holes and cracks with sealant or mortar.
Why is it worth doing this? After all, siding is installed on profiles, and thus it will protrude from the walls by at least 5 cm. The answer is simple - if the wall has unevenness, then the profile installed on it will also have level errors. Therefore, you should always carefully and responsibly approach the preparation of walls for covering with any material. Since not only the beautiful appearance of the house, but also the service life and security of the walls depends on this.
If siding is installed incorrectly on uneven walls, it will have cracks and gaps through which moisture and dampness will enter, especially in winter and autumn. What will contribute to the pointlessness of installing siding if it does not cope with its task of protecting the walls of the house.
The situation is easier with old cladding, which is in poor condition, but smooth enough not to remove it. Under such circumstances, there is no need to waste your personal time dismantling the old casing. You can safely install siding.
The above instructions will save the homeowner from wasting extra time and headaches.
Preparing the surface for installation work
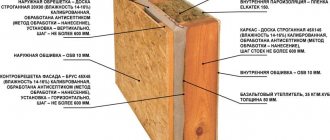
The installation of frame house structures ends with the installation of a windproof membrane in the form of an OSB board. To ensure normal air circulation under the siding and remove excess moisture, the siding should be attached to a sheathing of bars.
First, I install a hydro-wind membrane on the OSB board, onto which the sheathing is installed. This design will provide a ventilation seal under the siding and will preserve the elements of the entire house. On top of the installed membrane, I make markings for installing the sheathing frame.
Sheathing beams will have to be installed more often than framing posts to ensure the rigidity of the siding being installed. In this case, the bars must be installed from the corner of the house. I also frame all openings with timber so that the outer corner can be secured. I make sure to install the bars under the connecting profile so that the connection of the strips has the necessary rigidity.
Only after installing the sheathing can you begin cladding the facade.
Finishing the facade with siding: material selection criteria
Before choosing high-quality siding, every home owner will certainly try to conduct a comparative analysis of the products on the market, and in this case, it is important that all criteria are considered in conjunction with mandatory consideration of the characteristics of various types of material and the conditions in which it will be used.
There is a similar article on this topic - Cladding the facade of a house: which material is better?
Of course, one of the important criteria is the price per square meter of siding , since taking into account the fact that the sheathed surface has quite impressive dimensions, expensive types of material can become unaffordable for the developer.
The next objective criterion is the environmental cleanliness of products and their safety for the human body and nature. But it should be noted that this is mainly thought about if you plan to use siding indoors.
When comparing different types of material, you should take into account such properties and qualities of siding as:
- durability;
- susceptibility to temperature deformations;
- resistance to ultraviolet radiation and other adverse natural phenomena, aggressive environments, including chemical ones;
- resistance to mechanical stress;
- the possibility and level of complexity of repair work to restore damaged coating;
- features of installation work and their complexity;
- fire resistance and fire safety.
In addition, when choosing which siding is best for cladding a house , you should not lose sight of the following points:
- how uniformly the panels are painted both on the front and back sides. If everything is fine with this, then you can be sure that this material is of high quality and will retain its beautiful and presentable appearance for a long time;
- comparison of the thickness of the panels among themselves, as well as each separately, throughout its entire length;
- quality of holes for fasteners.
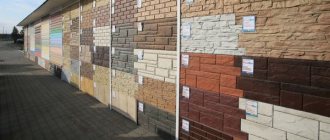
Siding photo:
metal siding
photo of stone siding
brick siding
photo of metal siding under a log
photo of block house siding
Brief description of siding and its types
Siding is a cladding material used for exterior finishing of buildings. It has the shape of elongated narrow stripes with a longitudinal relief applied to them, imitating various options for wooden construction (most often) or, less commonly, masonry.
The strips (panels, lamellas) are equipped with special sides for fastening to the support on one side and for connecting to each other on the other . The design allows you to assemble canvases of any size from them.
The siding is assembled right on site, which is convenient and practical. The panels are lightweight, so they are easy to lift and carry. In principle, it is possible to work alone, but for large areas with long panels, an assistant is needed.
The birthplace of siding is Canada, where it was first produced.
The first samples were wooden, today there are different types of material:
- Wood.
- Metal.
- Plastic (PVC, acrylic, etc.)
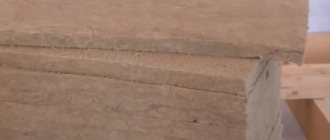
- Fiber cement.
- Ceramic.
The most common are plastic (PVC) and metal types of siding, which have the best characteristics or most successfully combine quality with price.
In addition, there are many profile options:
- Under the beam.
- Under a log.
- "Herringbone."
- "Ship board".
- Timberblock.
- Under a stone, etc.
According to installation direction:
- Horizontal.
- Vertical siding.
Some types allow installation in both directions at the request of the owner.
Developers are constantly adding to the model range, so there cannot be an exhaustive list; the list always remains open.
Installation of connecting H-profiles
Installation of H-profiles for siding - Installation of H-profiles for siding H-profiles are used for joining two row panels.
They belong to vertical siding elements, so during installation you must adhere to the rules for installing vertical profiles. The first fastener (nail or self-tapping screw) is installed in the upper nail slots with the fastener offset towards the upper edge of the hole. The H-profile will hang on this fastener. The remaining fastenings are carried out in increments of 20-40 cm along the centers of the holes. The placement of the H-profile on the wall must be thought out in advance so that the vertical section of the row panels, visually emphasized by the H-profile, fits organically into the overall picture of the siding sheathing. Since the installation location of the H-profile is almost always known in advance, two vertical slats are installed under it, or at this point the direction of the vertical slats is changed to horizontal.
H-profiles, like corner profiles, are installed on the wall before or simultaneously with the installation of the starting strips.
The H-profile, like the corner profile, has two nail strips, so marking and installing the H-profile is carried out in the same way as marking and installing corners.
Increasing the length of the H-profile is done by overlapping joining. The joining is structurally similar to the joining of two corner profiles - the upper profile overlaps the lower one.
Laying the finishing strip of siding
The finishing strip forms the top (final) edge of the last panel and fixes its position. installation is carried out almost simultaneously with the top panel. The plank is fixed strictly horizontally at the required height, the nail strip on the last panel is cut off .
The panel, with its trimmed edge, on which the locking profile remains, is inserted into the slot of the finishing strip and snaps into it. The shape of the profiles is such that the required gap is maintained, and the lock reliably fixes the panel in the plane of the canvas.
NOTE!
For the correct installation of the finishing strip and the last panel, an accurate calculation made in advance is required, or the possibility of some level discrepancy if a separate pediment cladding is planned.
Mounting J-profiles
The starting guides must be secured perfectly, because... The quality of the entire cladding depends on the correct installation.
Starting profiles must be installed strictly horizontally
First step. Take a level and find the lowest point on the sheathing. We step back 50 mm from it and put a mark. To do this, screw a little self-tapping screw into the rail.
Second step. We consistently move around the building and continue to place marks with self-tapping screws to fix the starting profiles. We also screw screws into the corners of the house.
Third step. We stretch the ropes between the corner marks.
Fourth step. We mark the boundaries of installation of corner profiles on the slats. We take the profile itself, apply it to the corner of the frame structure and put marks along the edges with a pencil.
Mark the location of the edges of the fastening strips on the sheathing
Fifth step. Moving further along the rope, we make a 6 mm horizontal gap from the edge of the corner profiles and fix the starting guide to the frame slats.
Important! We leave a 1-centimeter gap between the profiles to compensate for temperature deformations.
Leave a gap between the starting guides and the nail strips.
Technological indentations when installing starting siding profiles
To avoid making a 6 mm indentation, you can cut off parts of the nail strips so that they do not rest against the J-profile during temperature changes.
Instead of indentation, it is possible to trim the profile fastening strips
Important! Starting profiles must be mounted strictly horizontally! Correct deviations as long as necessary.
If you install guides that deviate from the level, the siding will also warp. It will be extremely difficult to correct this in the future.
Prices for profile mounts
Profile fastenings
Installation of horizontal row siding
See also P
Slide the first panel into the receiving gutter of the corner profile if you are starting installation from the corner of the house, or into the receiving gutter of the platband if you are starting installation from the doorway. Engage the bottom locking hook of the siding with the lock of the starter strip and pull the panel up until it clicks into place. Then you need to make sure that you have locked the panel lock along its entire length.
Don't pull the siding too hard or you may bend the hook.
Installation of siding panels - Installation of siding panels
Check if the panel can slide freely in the lock. Approach the corner profile (or trim) and move the regular siding panel so that a temperature gap is provided between the edge of the siding and the bottom of the receiving vertical gutter of the additional element, taking into account the outside air temperature at the time of installation.
Start attaching the siding from the center of the panel, moving towards its edges. The last fastener (nail or self-tapping screw) must be installed 10-15 cm from the end of the panel to take into account the net overlap of the next panel of ordinary siding.
When attaching subsequent panels to the wall or sheathing, make sure that there is no sagging at the other end of the panel.
Maintain uniform tension of all panels from one edge to the other: a slight distortion of one of them can gradually develop into a curvature of the entire skin. You can control horizontality using a building level - the longer it is, the better.
Try to maintain a horizontal installation line for rows of siding on both sides of the corners of the house. Coordinate the lines from the joined rows at all corners.
Dormer window of a frame house - Dormer window of a frame house
Siding joining rules:
- If possible, overlap panels should not be located on the main facade, and if this is not possible, they should be stepped in height with an interval of at least 60-70 cm from one seam to another.
- Avoid uneven vertical placement of seams. Place the joints vertically at the same level on at least two rows.
- Vary overlap locations every other row at least.
- Avoid overlapping panels above or below window openings.
During the exterior finishing of the cold attic of my frame frame with siding, I complied with the requirements of clause 8.1.4 of SP 31-105-2002 (roof structures must include ventilation openings that allow moist air to be discharged outside, penetrating into the attic from heated rooms), and equipped both facade dormer windows.
Siding installation video:
Installation errors: