The use of reinforcement technologies for monolithic floor slabs in low-rise residential construction is a prerequisite. Concrete and metal in monolithic structures complement each other. Concrete protects the reinforcing bars and provides a strong floor surface. The reinforcement takes structural loads and protects the concrete layer from destruction.
As a result, the structure receives a strong and durable floor. To enhance its strength and stability, in addition to the supporting reinforcement, the structure is provided with a crown that connects the frame being installed with the ends of the reinforcement of walls, columns, beams, and pylons.
For reinforcement, metal rods with a diameter of 6-25 mm made of smooth (AI) or ribbed (AIII) steel are used. Specific parameters are indicated in drawings, diagrams and reinforcement specifications.
The principle of operation of reinforcement in the ceiling
Monolithic structures are most often used in the construction of various types of beams. The ceiling is the same beam, but wider and thinner. The calculation of such a structure is carried out in a section along a given span. The upper part of the slab is compressed in the span. The lower part is stretched. The load-bearing lower reinforcing rod prevents the slab from collapsing. On supports, everything works the other way around. If the support of the slab on the supports is not pinched, then the tension above it is insignificant.
The task of designers and performers of floor slab reinforcement is to involve the majority of the structure in the work to ensure resistance to the slightest deformation. This is a general simplified principle of operation of a reinforced frame in a monolithic floor. Sometimes a simple understanding of this principle is enough for high-quality production of a floor frame in a small private house.
general information
Every person who is planning to build their own residential building knows that the best option for floor slabs is a monolithic slab.
This type of flooring is characterized by the highest price, is the most difficult to manufacture and takes the longest, but the result is the most durable and insulated slab that will not only last for decades, but even grandchildren are unlikely to think about its reconstruction.
Application of a monolithic slab for a swimming pool: device.
There are 2 options for floor slabs - a full-fledged monolith and one on metal beams (I-beams). The first option is more difficult and more expensive to manufacture, but also lasts longer, while the second is more modern, which has its advantages, but no longer has such strength parameters.
Step-by-step instruction
Preparation
The initial stage is inspection of the fittings before purchase. Usually it is packed in packs with product tags. They indicate the brand, weight and diameter, batch number, heat and other data. In the case when the material is purchased without a design, the required amount of metal is purchased by weight at the rate of 80-100 kg per cubic meter of monolithic flooring.
During the work process there will definitely be waste and scraps will remain, so the material is purchased with a reserve of approximately 10%. If for some reason it is planned to use more reinforcement than the specified norm, then this implies redundancy and irrationality of the slab reinforcement.
The rods must be smooth, without obvious kinks or wrinkles, without pronounced manifestations of rust in the form of “flakes”; a small coating of rust is acceptable.
The frame includes longitudinal and transverse rods and special-purpose products. The reinforcement works most effectively with the optimal location of the upper and lower mesh of the frame - they should be located in the thickness of the concrete as close as possible to the top and bottom of the structure, respectively. Otherwise: the reinforced frame must be tightly compressed with concrete, having a sufficient external protective concrete layer. Control of the thickness of the protection from the bottom and sides of the concrete layer is ensured by installing standard plastic clamps.
They are manufactured in various versions according to their intended purpose, for example, for installation on a base of sand and crushed stone or for fixing a concrete layer on the side surfaces of the formwork. You should not place various bricks or stones under the reinforcement if you can use inexpensive products for fixation.
The required distance between the meshes is ensured by installing “frogs” - homemade products made from 10 mm periodic profile.
Laying reinforced frame
Reinforcement already cut to size is supplied to the work site. Installation of the reinforced frame in the ceiling is carried out approximately according to the following scheme:
- All transverse rods are laid out along the shortest distance from one supporting wall to another. Longitudinal rods are laid on them in increments of approximately 3 m, and all intersection points are connected. It turns out like a sketch of the bottom layer.
- Next, all the longitudinal rods of the bottom row are installed with the required or design spacing. Fixation with wire is performed every two intersections. There is no need for a tie in each node, since the wire does not perform any other functions in the operation of the frame other than fixing the reinforcement in a given position. Welding is not used for several reasons: high temperature weakens the rods and can damage the formwork, and the process itself is labor-intensive and time-consuming.
- Tying the rods is done using special hooks. This simple device is used not only by amateur builders, but also by professional monolithic workers. Automatic knitting guns are used only for large volumes of work. By the way, the use of various kinds of devices for a screwdriver when tying reinforcement does not indicate the advancement of the work performer, but rather his lack of professionalism.
- If the length is insufficient, the rods are connected to each other with an overlap, the length of which should be in the range from 30 to 40 rod diameters, at least three knitting knots are performed. Overlaps in adjacent rows are spread to different directions.
- After the lower mesh is completely installed, “frogs” are installed. The installation step is calculated for a person weighing approximately 90 kg - he must move along the grid without its deflection. To work without a project, a standard solution is used: a step of 80x80 cm, with reinforcement of 12 mm and a cell of 20 cm. The frogs are aligned along a single line.
"Frog"
- The guide rod is routed along the “frogs” as closely as possible over the bottom reinforcing rod.
- Between the laid guides, reinforcing bars are laid without fixation in an amount equal to the number of corresponding lower bars.
- Next, additional products are placed on the lower grid in accordance with the project. These can be releases, U-shapes, reinforcement fittings for openings, communication channels, sleeves and other elements.
- The reinforcement of the upper mesh is placed on the guides with fixation at all intersections; it is better if the rods are located exactly above the lower reinforcement.
- Then the rods laid without fixation are lifted with hooks and tied to the upper reinforcement every two intersections.
- At the last stage, the assembled frame is lifted using mounting crowbars, and clamps are installed under it.
Technical difficulties for performers often arise when lifting rods placed without a ligament on the lower net. This operation requires certain skills. Then the debris is cleared from the structure, and control measurements of protective layers and other parameters are carried out. After which the frame is ready to receive concrete.
Types of fittings
According to their profile, the reinforcement is divided into ring, crescent and mixed.
In total, depending on various properties and characteristics, there are six classes of reinforcement. There are rigid and flexible reinforcement. In addition to the degree of rigidity, there is a gradation in terms of class differences and alloys that became the basis for certain reinforcement.
Depending on the cross-sectional diameter, heavy and light reinforcement are distinguished. There are fittings with a smooth profile or a profile equipped with periodic ribs. The latter variety is usually used for large quantities of concrete to ensure maximum adhesion. Typically the ribs are at different heights and at different angles to create the slab as a solid monolith.
Depending on the conditions of use of the reinforcement, this building material can be prestressed or non-prestressed.
There is also smooth reinforcement along the profile. It is made without notches.
The fittings are produced mainly at large enterprises specializing in metalworking. It is advisable to use a full technological cycle, which includes the use of waste generated from production.
The first stage is the acceptance of steel for reinforcement, which can then be processed by deformation, rolling or drawing. Drawing is the most energy- and labor-intensive process. Rolling in this regard is the most economical, as it is accompanied by a minimum amount of production waste. Reinforcing steel is deformed without the use of high temperatures and the result of this process is cold-drawn reinforcement.
After cleaning and straightening, the reinforcement is cut using special machines with specified rod dimensions. With certain grades of steel, welding of reinforcement is allowed for the construction of frame structures.
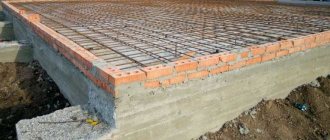
An example of reinforcement of a house floor slab 6 x 6 m
The thickness of the monolithic concrete floor is calculated from a ratio of 1 to 30 in relation to the span length. If the span exceeds 6 m, load calculations must be carried out by specialists. Therefore, you can consider a reinforcement device for a house with a 6 x 6 m floor - for such parameters you can use standard solutions:
- We use reinforcement with periodic profiles of grades A-III, A400 or A500.
- The span refers to the distance between the walls on which the ceiling rests. If it is rectangular, then the span is calculated along the short side.
- We lay the bottom row of reinforcement along the span, the diameter of the rods is 12 mm. Since the parameters of a 6 x 6 house are indicated along the axes, the length of the rods will be 6 m each for a brick (stone, monolithic) house. If the walls are made of porous blocks, then the overlap of the reinforced mesh on the walls should be at least 20 cm. We calculate it based on brick walls. The distance between parallel reinforcement for all mesh layers is 20 cm.
- We place 30 mm high crackers under it, providing a lower protective concrete layer.
- The next row is the lower transverse one, the diameter is the same.
- We tie with wire with a diameter of 0.8 - 1.4 mm at all intersections.
- Mesh separators are installed on the lower mesh. You can make them yourself from similar fittings. The step of the stands is also arbitrary - the upper mesh should not sag when a person’s weight is applied to it. After the final installation of the frame, you can add stands if necessary.
- The upper transverse reinforcement is placed on the dividers and connected to them.
- Next is the top layer of reinforcement along the span. The diameter of the rods is 8 mm. Connects at all intersections.
- At the ends of the frame along each row, U-shaped reinforcement products are installed, connecting the top and bottom of the frame into a single structure.
Thus, for a monolithic floor reinforcement device you will need:
- reinforcement with a diameter of 12 mm – 372 m;
- on the upper mesh - 8 mm reinforcement - 372 m;
- for the manufacture of mesh separators and U-shaped elements, the need for 8 mm reinforcement is approximately 10% of the total length of all rods - 75 m.
You can make complementary frame elements yourself using a simple pipe bender, or buy them as finished products. You can convert the length to weight using the tables, and also when purchasing reinforcement, it is sold by weight. Reinforcing the main mesh for a 6 x 6 m monolithic slab is usually not required.
Reinforcement and filling
- Drawing;
- Reinforcing rod A500S;
- The wire is soft;
- Concrete solution m200;
- Roulette;
- Shovel
Scheme of reinforcement of a monolithic slab.
This stage requires even greater precision in every action, because if something goes wrong, it will be almost impossible to redo it, or everything will have to be redoed from the very beginning. It is important to adhere in detail to what the drawing indicates. This will require additional workers, equipment, and also the ability to work quickly and efficiently.
- The first step is to make reinforcement. There will be 2 sheathings, completely identical to each other. First of all, the lower level of rods is laid out with a step of 0.5 m between each subsequent one, then another layer is laid perpendicularly on top with exactly the same step. As soon as the first 2 levels are laid out, they should be tied with soft wire at each joint, which is quite painstaking, but in the end the sheathing will be completely fixed and the free movement will be zero. The second lathing is made in a similar way, but under no circumstances should they be tied together.
- The staples are made from the same rod as the reinforcement. Each bracket is installed in the amount of 1 piece per 4 m2. The upper lathing is attached at a level of 2-2.5 cm from the top of the surface to be poured, while the lower one is exactly the same amount from the waterproofing. Here, similarly, you will have to bandage each joint with soft wire, but this will strengthen the structure to such an extent that it will no longer move, in either direction, under any pressure. The calculation of the reinforcing rod is made using the formula length * width * 8 + 3%, where 3% is future staples and what will be scrapped.
- For filling, you should use the services of automixers, because... It will be impossible to knead the required volume in one day with your own hands, and you should not delay pouring for more than 1 daylight hours, because the hardening will be uneven, therefore, the durability will seriously suffer from this.
- During pouring, be sure to constantly move and redirect the hose in different directions. This will reduce the pressure on the supporting structure, and will also allow an assistant to plow the concrete solution. Plowing is necessary in order to release air from the solution, and this will significantly increase the strength of the structure.
Typical errors in floor slab reinforcement
The most common cause of errors in the reinforcement of monolithic floors is the arrogance and incompetence of individual developers. Carrying out this type of construction work independently without professional knowledge is quite possible, but the contractor still needs a certain amount of knowledge. Insufficient quality reinforcement is also found in the work of contractors. The reasons are similar: incompetence, inattention, work “the old fashioned way”, without taking into account the specific conditions of construction.
Floor slab reinforcement project
The task of the engineering calculation of the reinforcement frame is to ensure the operability of the created floor and provide comprehensive information on its production. The form of the general design of a reinforced concrete structure is standardized and consists of a number of mandatory components:
- Specification . This is a complete list of metal parts required for reinforcement. The document indicates the characteristics, brands, classes, geometric and other parameters of reinforcing bars, as well as their required quantity.
- Drawings with sufficient and clear detail to determine the intended place for each rod in the reinforcement cage.
- Instructions for placing the reinforced frame in terms of creating a protective layer to protect the metal from corrosion.
- Data on the placement of embedded parts and calculations for their manufacture.
Of course, the project is the main and necessary part for performing high-quality slab reinforcement, but the process itself requires the professionalism of the performers and competent control on the part of the customer or the work manufacturer.
Manufacturing defect
Before starting to lay out the reinforcement in the formwork, the contractor studies the project or draws up his own diagram of the frame structure, based on his own skills and experience. Several common mistakes:
- Amateur builders often make mistakes, trying to “strengthen” the structure as much as possible; this leads not only to unnecessary costs, but also reduces its quality. For example, if the mesh is too thick, it is impossible to compact the concrete mixture as much as possible.
- An insufficiently strong frame may shift during installation under the influence of the concrete mixture.
- The characteristics of reinforced concrete are reduced by inaccurate placement of working reinforcing bars or by arbitrary changes in the grade of reinforcement.
- A common mistake is the incorrectly selected size of the protective layer of reinforcement.
The listed errors and a large number of other possible defects can cause:
- additional costs for strengthening the structure;
- restrictions on the operation of the floor with changes in permissible loads;
- dismantling the structure.
Control methods
Quite often, when constructing small private houses, there is no reinforcement design. The developer relies entirely on the experience and knowledge of the involved builders, or is completely confident in his construction abilities.
But mistakes do happen, including among professionals, which is why, when constructing significant objects, a document on “acceptance of hidden work” is drawn up. “Hidden” also includes reinforcement, because the frame is subsequently filled with a concrete layer. But the developer does not draw up such an act with himself, and one-time contractors hired to install the ceiling do not sign such binding documents.
Let’s assume that the ceiling turned out to be quite strong, but there are doubts about the quality of this important structure. In this case, non-destructive testing methods are used, which can be used to check:
- strength grade of the monolithic floor;
- exact location of reinforcing bars and rods with their parameters;
- level of damage to reinforcement by corrosion;
- homogeneity of the concrete layer with the presence or absence of technological defects in it.
Inspection methods are effective but costly, so it is important to carry out reinforcement work correctly and responsibly.
Installation work: main stages
Installation must be done after all calculations have been made and all components have been tested for strength. It is best to calculate all parameters several times. After all, if an error is discovered during the installation process, it will be very difficult to correct it.
As for the installation of fittings, it consists of several stages:
- preparation of material and elimination of damage received during transportation;
- fixing the formwork base;
- ensuring a fixed position and checking it for strength;
- pouring concrete.
In addition, there are many additional aspects that must be observed when installing reinforcement in slabs. Listed here are only the main provisions that require immediate implementation.
Scheme of methods for tying crossed reinforcement bars with wire
There are several ways to knit reinforcement into a monolithic slab. Mechanical fastening is considered the simplest. This method does not require the use of specialized equipment, in particular a welding machine. The rods can be knitted mechanically using special nippers, which are available for free sale at numerous retail outlets in the construction segment. Also, when it comes to small structures, you can use a crochet hook, which is used in the construction industry (not to be confused with its counterpart for knitting clothes).
But when it comes to larger-scale structures, it is no longer possible to do without special reinforced connections. The installation work of this type of frames is more troublesome and time-consuming, so here you need to use only specialized tools and it is best to trust the specialists in this field. After all, we are talking about a building that will subsequently be used as a place to live for a large number of people, so safety comes first here.
Shutdown
- Scrap;
- Polyethylene;
- Water.
When the work of pouring the monolithic floor is completed, everything should be covered with plastic film in order to protect it from unwanted influences from nature. But in the next week after pouring, you should add plenty of water to the slab so that it gains as much strength as possible, but do not pour more than it can handle.
As soon as a month has passed, you can remove the supporting structure, remove the polyethylene, and use a crowbar to dismantle the formwork.
If all the drawings were used correctly and the slab was made impeccably, then for the next 100 years you don’t have to worry about its condition. If this is an option with beams, then it will not last much less, but you can run wiring through the beams, and mount a suspended ceiling to them, which will fit perfectly, thanks to the step between the I-beams.
General recommendations for reinforcement
In order to carry out high-quality reinforcement of a concrete structure, general rules must be followed, taking into account construction technology and the properties of the materials involved. In private construction, they are often neglected, without accurate calculations and drawing up a detailed design, since one- and two-story houses do not place serious loads on the foundation. The reinforcement is laid according to schemes already used earlier, which saves time. In such cases, it is sufficient to comply with the minimum requirements specified in SNiP.
A monolithic reinforced foundation has a sufficient level of strength for the construction of multi-story structures. True, to create the foundation for a high-rise building, a more complex technology is used, which involves the use of several types of reinforcement, accurate calculations of slab dimensions and soil characteristics.
Basic installation errors
To provide the foundation with the necessary properties and protect it from destruction, it is necessary to strictly adhere to the reinforcement technology. As a rule, inexperienced builders make common mistakes:
Do not stretch polyethylene material over the poured concrete solution. The laitance leaks out and cracks appear on the surface;
- Having filled a cushion of sand and crushed stone, many neglect to compact it. The foundation shrinks and cracks form;
- on the installed formwork, the cracks through which the mortar mixture flows are not sealed, which leads to the appearance of unevenness;
- poor insulation of the slab from the soil surface will lead to premature destruction of the foundation, and restoration work will be quite expensive;
- It is a mistake to use stones as spacers;
- during installation work, reinforcing bars are fixed in the soil layer, the metal corrodes and quickly collapses;
- Before laying the foundation, a cushion of sand-crushed stone mixture is not poured, which reduces the strength of the slab. Another typical mistake is that only crushed stone is used to construct the cushion, but the minimum percentage of sand content in the cushion under the foundation slab before its reinforcement should be within forty;
- the spacing of the mesh rods exceeds the permissible maximum limit of forty centimeters, or does not at all correspond to the calculated data on load effects;
- there is no protective layer of concrete mortar on the side of the reinforcement ends, and the metal is subject to corrosion ahead of time;
- There are no vertical reinforcing bars under the installation of walls and columns, and the load forces are distributed unevenly.
These are the most serious errors that can clearly have a negative impact on the performance of the foundation. There are also more unobvious features that only experienced specialists can tell you about.
What reinforcement is needed for a slab foundation
Any rod used in the foundation frame must comply with the requirements of GOST 5781 of 1982. However, reinforcement, like most structural materials, has a classification:
- AIII – corresponds to the markings A400 and A500, has a variable cross-section, popularly called “corrugated”;
- AII – corresponds to the current class A300, the cross-section is periodic, discharged;
- AI – new A240 marking, smooth profile.
For the foundation, reinforcement A400 (AIII) is used, it has a crescent-shaped profile.
On sale you will most often find rods of class A500C (for welded mesh, frames) or A500. Reinforcement with index C at the end is suitable for welding and knitting, without index - only for knitting.
We recommend reading in more detail: What reinforcement is needed for the foundation.
Due to the complexity of calculations and the small dimensions of buildings in low-rise construction, a simplified scheme is recommended. Two grids at a distance of 10 cm vertically with at least identical cells. If the developer wants to save on pouring the slab, the calculation should be ordered from specialists who will calculate the minimum required reinforcement, use thin reinforcement in the center of the foundation, strengthen the perimeter, and the places where the internal walls pass.
If the foundation dimensions are more than 3 m on any side of the slab, it is recommended to use rods of at least 12 mm. To determine the minimum possible cross-section, the following method is used:
- calculation of the slab cross-section - length multiplied by thickness (for example, 6 m x 0.3 m);
- calculation of the minimum allowable cross-sectional area of the rod - the previous figure is divided by the minimum percentage of reinforcement (0.3% for concrete B20, 0.15% for grade B22.5, 0.1% for grade B15), for this example 1.8 m²/0 .15 = 27 cm²;
- calculation of the reinforcement area in each row - the result obtained is divided in half (in the example 27/2 = 13.5 cm²);
- determination of the minimum permissible cross-section of a rod depending on the mesh pitch (13.5 cm² / 31 rods every 20 cm for a slab 6 m long = 0.42 cm²;
GOST 5781 contains a table of assortments with reinforcement sections of different diameters. For example, for rod diameters 14 mm, 12 mm, 10 mm, this value will be 1.54 cm², 1.13 cm², 0.785 cm², respectively. Thus, even 10 mm reinforcement provides twice the reinforcement percentage compared to the minimum. Mating is done in the building spot after laying out in rows.
Template for laying reinforcement.
Then it is necessary to correctly calculate the total number of rolled metal products of each diameter. The rods are sold in 11.7 m lengths; the overlap for longitudinal anchoring is 40 reinforcement diameters. The length of the workpiece for each U-shaped clamp is equal to 5 dimensions of the slab thickness, their number coincides with the total number of longitudinal and transverse rods in one mesh. You can convert the length into kilograms using tables from the same GOST, but each construction market has similar conversion tables.
The upper mesh is laid on supports; the most popular in private construction are:
- spider - a U-shaped clamp with legs curved in opposite directions;
- the supporting frame is a lattice curved at a right angle.
The length of each of them is calculated individually, taking into account 2 pcs/m².
The spider is made of reinforcement with a diameter of 8 mm; such elements must be made in advance for laying the upper mesh.
Materials
Reinforcement is the strengthening of a concrete block from the inside using various materials. Rods or fibers can be used that, when the block is stretched, do not allow it to crack.
In practice, reinforcement materials can be divided into 3 groups:
- metal rods,
- composite reinforcement,
- fiber.
Steel bars
The standard length of a steel bar for reinforcing concrete structures is 11.75 m. The reinforcement can have different diameters and grades. Depending on the marking, the rods are joined into a reinforcing frame by welding or knitted with wire.
In the mass of concrete, the connection between the steel rods and the mortar is quite strong due to the corrugation on the rod. The steel frame inside the monolith redistributes the loads and keeps the concrete from cracking, since the metal has greater tensile strength. At the same time, concrete, in turn, protects the metal from corrosion.
Steel reinforcing frame
Composite material
Such fittings have a fairly wide range of source materials, increasing almost every year. To date, fiberglass and basalt plastic rods with spiral wrapping, simulating the periodicity of the steel reinforcement profile, are more or less used.
In addition, the construction market offers polyethylene rephthalate and hydrocarbon fittings, which have not yet received widespread popularity. The undeniable advantage of the composite is its low weight. But when constructing foundations or retaining walls, this advantage is of little importance, but the strength characteristics are very important.
Composite reinforcement is usually used in horizontal building elements supported on the ground
Fiber fiber
Fine material (fiber) is added to the solution at the mixing stage. Moreover, the fiber itself can have different diameters and lengths.
Fiber is made from fiber based on:
- become,
- glass,
- polypropylene compounds,
- basalt.
Fiber fiber to enhance the tensile strength of concrete