What is a metal fence? These are reliability, durability, beauty, affordable price and ease of construction and maintenance of the structure. The assembly of most of these fences does not require the involvement of professionals; with a little experience and suitable tools, it can be done on your own. Below we will get acquainted with different types of metal structures and clarify the intricacies of independently erecting such a fence.
Development of a fence scheme, construction of a drawing
Before installing a corrugated fence with your own hands, you need to develop a sketch of it and draw up a diagram on the basis of which you can calculate the amount of materials.
A fence made of corrugated sheets consists of the following structure: pillars, logs between them and a profiled sheet. In addition, you will need the following components:
- plugs for pillars;
- brackets, holders;
- hardware;
- planks;
- sand, gravel, cement;
- grinder, screwdriver;
- container for preparing the solution;
- shovel or drill;
- level and plumb;
- welding machine;
- primer, anti-corrosion compound, paint.
Marking the territory and installing poles
The stability of fences depends on strong posts. This is especially important for blind spans with large windage.
They install metal fences with different supports, but in order for them to look aesthetically pleasing, it is necessary to accurately mark the territory.
Marking for pillars
The first place to install the corner posts is marked.
In these places, wooden stakes are driven in and a cord is pulled between them, indicating the outline of the fence.
Fence posts are placed along the cord, and then all intermediate posts are marked for securing the spans.
When marking, you must adhere to sanitary standards:
- the minimum distance between the fence and the living space is 3 m, and from outbuildings – 1 m
- there should be no continuous fences between adjacent areas
For ease of marking, in addition to the construction cord, it is good to have a laser level on hand.
Three ways to mount racks
Depending on the technical characteristics of the material used for the spans, the pillars can be installed in three ways.
Hammering into the ground
The most economical and easiest way to install metal poles is to drive them into the ground with a sledgehammer. Such racks are suitable for simple spans of mesh or rods. Another convenient way to arrange temporary fencing is in a similar way.
You can drive in pillars in areas with non-stony soil, but saturated with durable rock deposits. This method is not suitable for loose and soft soil, since the pillars will soon acquire an inclined position.
The minimum depth for driving in pipes is 1.2 m. It will be difficult to drive in with a sledgehammer, but this is the only way to ensure the stability of the structure. The pitch of intermediate pillars is usually 3 m, but this figure may vary depending on the material of the span.
Zabutovka
On slightly hard ground, you can use the method of backfilling pillars. In the marked places, holes with a depth of 1.2–1.5 m are drilled with a drill.
The width depends on the diameter used. Usually it is enough to make the pits 150–200 mm wide. The bottom is covered with a 100 mm layer of sand, compacted well, and then the pipe is immersed.
The stand is aligned vertically with a plumb line or level, after which backfilling begins. The holes are filled with any fine stone.
This could be crushed stone, gravel or just construction waste. Each layer is spilled with water, compacted tightly with any thick rod or wooden stick. The topmost layer is covered with sand.
Concreting
The most reliable way to install pillars involves concreting them. The method is effective for any type of soil. Concrete supports can withstand heavy spans, so they are often equipped together with a strip support.
For conventional concreting, holes are drilled with a drill. The bottom of the pit is covered with a 100 mm gravel cushion. The vertically exposed pipe is fixed with temporary supports and a liquid concrete solution is prepared.
Its proportions are 1 part M-400 cement and 3 parts clean sand. The poured mixture is left to harden for at least two weeks, then the installation of spans begins.
Choosing corrugated board for a fence
There are several types of corrugated sheeting, but not all of them are suitable for cladding a fence. When planning to make a fence from a metal profile, pay attention to the marking “C”, or rather grades C8, C10, C20, C 21, C44 and NS35.
Class “C” corrugated sheeting is intended for wall cladding and fence installation. That’s what it’s called – wall corrugated sheeting. It is made of thin-sheet steel, has a small height and width of waves.
In some cases, when a more rigid and stable fence is required (heaving soils, strong winds), a load-bearing wall fence “NS” can be used. Its purpose is to install a roof. The number in the marking indicates the height of the profile, which directly affects the rigidity of the sheet.
For regions with a temperate climate, C8 grade corrugated sheets are suitable. If there are strong winds in your area, then make a fence from corrugated sheets of a grade no lower than C10. Such sheets have a thickness of 0.5 mm.
The manufacture of fences from metal profiles, and especially with brick pillars on the foundation, implies that the fence, in addition to its protective and fencing function, will also have a decorative function. In this case, it is worth considering the color of the fence, its combination with the facade of the house, roofing, brick pillars, etc. Here you should choose a profiled sheet with a colored polymer coating - one-sided or double-sided. By the way, painted corrugated sheets last longer and are less susceptible to corrosion than galvanized ones.
Features of metal fences
Unlike wooden or concrete structures, a metal fence has a number of undeniable advantages. When choosing an implementation project, you should pay attention to the following factors:
- a metal fence is much more durable than other types of fences;
- metal allows you to implement literally any fencing option - from a fence made of metal picket fence to a solid one made of corrugated board;
- the fence does not require additional maintenance: iron picket profiles, corrugated sheets, and mesh materials have a multilayer polymer coating;
- with proper development of the project, over time it is possible to replace the spans of corrugated sheets with a metal picket fence or welded mesh;
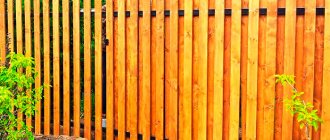
- a wooden fence on metal posts can be installed with your own hands as a temporary solution, and in the future you can simply replace the spans with metal ones;
- For gates and wickets, metal makes it possible to install any design - from swing frame options to automatic sliding gates.
Welded fence
The structures themselves (support columns, cross beams), as well as the filling of the spans, are not something unusual or complex.
Everything is extremely simple and reliable.
Fence support posts
The pillars are installed in a hole in the ground, concreted, and filled with sand and gravel. The distance between the pillars is no more than 2.5 meters. The height of the post is taken from the calculation of the desired height of the fence. To this value is added 1-1.5 meters for depth.
Digging of pillars into the ground and subsequent concreting occurs to the freezing depth, which is different in each region. In central Russia, the freezing depth is 1-1.3 meters, but it is better to play it safe and bury the pillars deeper to avoid deformation of the fence due to the mobility of heaving soil.
When making a fence from corrugated sheets with your own hands, be careful when choosing the material for the posts. It is better to take a profiled pipe 60 by 60 mm and 3 mm thick. If metal posts are mounted into the foundation, then you can take a pipe with a cross-section of 50 by 50 mm. In order to save money, many take a pipe with a cross-section of 30 by 60 mm, but these pipes often “walk” back and forth when the seasons change.
Currently, ready-made fence posts made from corrugated sheets are available for sale. Such posts have a special “heel” for support on a sand-gravel cushion, as well as holes for attaching corrugated sheets with hardware and an upper plug that prevents moisture from getting inside the post.
The thinner the pillars, the smaller the distance between them. The thicker the profiled sheet, the smaller the distance between the pillars can be, but we do not recommend making the distance between the pillars more than 3 meters.
Processing post holes
The depth of the holes for installing pillars must be at least 60 centimeters. You need to pour concrete into them, and before that, wet the ground. The hole is filled halfway with concrete and then covered with earth. If you need a stable iron fence, then all these steps are required. After the holes are filled with concrete, you need to wait a day until the concrete hardens.
After the concrete has hardened, pillars with holes already made are inserted into the pits. With their help, veins are made from rolled wire. The veins are secured using tie bolts.
The veins are needed to make the iron fence stronger; a chain-link mesh is attached to them. This mesh is attached using soft wire. Soft wire is wrapped around the pole, preferably two or three times. Return to contents
Transverse logs for a fence made of corrugated sheets
The logs can be made of a profile pipe with a cross-section of 30 by 20 or 40 by 20 mm, or from a wooden beam of approximately 70 by 40 mm. Metal, of course, is preferable, since wood is more susceptible to rotting, especially at fastening points, and has a shorter service life.
If you are installing a metal profile fence with your own hands using wooden logs, do not skimp on a good wood impregnation, which it is advisable to apply several times. Ideally, you can immerse wooden joists in a bath with an antibacterial solution, for example, Senezh Ultra, and soak in the solution for 20-25 minutes, and then dry thoroughly.
The number of logs directly depends on the height of the fence. If the fence is no more than 2 meters, then two transverse joists are enough. If the fence is from 2 to 3 meters, then install 3 logs. Anything over 3 meters needs at least 4 joists.
Step-by-step installation
Installation of metal poles is carried out in the following order:
- The profile is cut to size, the places where the jumpers are attached are marked, and holes are drilled for bolted connections.
- The profile is coated with a primer and painted (the operation is not carried out if the cross members will be welded).
- Using a garden drill with a diameter of 200–230 mm, pits with a depth of 70–120 mm are drilled at the location of the supports for the spans and for the wicket with gates.
- Gravel or crushed stone is poured into the bottom of the pits in a layer of 10–15 cm and about 10 cm of sand.
- First, the main pillars (for the entrance gates and gates), corner pillars, and outer supports of individual sections are installed.
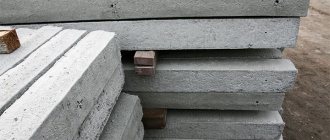
- Installation of metal supports with full concreting is done with cement-sand mortar in a ratio of 1:3 filled with rubble stone or broken brick.
- First, the pipe is installed in the pit and fixed with large stones. After leveling, the pit is filled with filler.
- After laying the stone, the foundation is poured with concrete and compacted.
- Immediately after pouring, the correct position is checked and fixation is done with wooden supports.
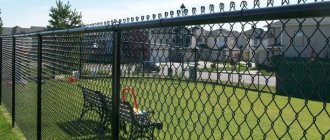
Installation of a mesh fence
Calculation of the amount of materials for the fence
How much metal profile will be needed to build a fence with your own hands?
To do this, you need to measure the area where you plan to install the fence along the perimeter. The footage of the metal profile depends on the type of fence:
- If the fence is sectional, then the total length of the fence is divided by the width of the sheet (if the width of the sheet = the width of the section) or by the useful width of the sheet (if the width of the sheet is 1.5-2 times less than the width of the section).
- If the fence is solid, then the total width of the fence is divided by the useful width of the metal profile sheet.
How many support posts will be needed?
The number of support posts = the total length of the fence is divided by the span between the posts, that is, 2-3 meters.
It is important to ensure that the posts are at the corners of the fence, as well as in the places where the wicket and gate are installed.
How many logs are required to install a fence made of sheet metal with your own hands?
Everything is simple here. First, decide on the number of lags between the posts: 2,3 or 4. Next, multiply the total length of the fence by the number of lags between the spans.
For example, if the length of your fence is 40 meters, and the number of logs between the posts is 2 pieces, each 2 meters long, then you will need 80 logs with a total length of 160 meters. Meterage is relevant if you buy a metal pipe, and not ready-cut logs.
Calculation of the quantity of other materials and components
Hardware
Hardware is attached to the 2 outer waves. Hardware is attached to the logs every 2 waves.
Thus, if you have two logs, then the number of hardware = 6, if there are 3 logs, then you will need 9 hardware. Next, multiply the number of hardware required to attach one sheet of corrugated board by the number of sheets. Round the value up, making it a multiple of the number of hardware in the package.
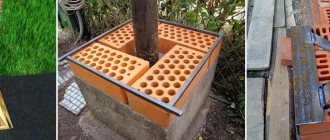
Stubs
The number of plugs for pillars is equal to the number of pillars + a reserve of 2-3 pieces. If you use posts with different sections in the construction of a corrugated fence, do not forget about this when you purchase plugs for the posts.
End strip
The end strip is calculated as follows: the length of the fence is divided by the length of the strip and rounded up.
Paint or primer
Take paint, primer and antiseptic based on consumption. Usually indicated on the can. In general, one small can of paint is enough - it is needed to mask the coating of the metal profile in places of scratches and damage.
Holder plates
To attach the logs to the posts, you will need holder plates if you do not use a welding machine. Number of holders – 2 pieces per log.
What are the advantages and disadvantages worth knowing?
When planning to build a fence with your own hands, you need to first evaluate its possible advantages and disadvantages.
Advantages of a metal fence:
- strength: a properly processed and installed structure will serve its owners for many years, easily withstanding wind loads and other adverse weather conditions;
- reliable protection: metal is quite difficult to break or damage in any way, it will protect the yard and house from intruders;
- fire safety: such a fence can become a good barrier to fire;
- resistance to wear: such a design does not suffer from constant exposure to moisture, sun, insects, and easily surpasses wood in terms of service life;
- no need for any special care;
- affordable cost: installation of such a fence will cost much less than the construction of a concrete fence;
- the ability to change the appearance by painting in a different shade;
- the ability to erect a structure with your own hands, without outside help, with a minimum set of tools;
- resistance to low temperatures and temperature changes;
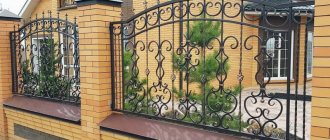
- aesthetic appearance: a forged or carved fence can become a real decoration of the site, a special frame for the house;
- the possibility of erecting a budget structure using chain-link and welded mesh.
Disadvantages of metal fencing:
- heavy weight, despite not even the most massive structure, which creates certain difficulties during installation or dismantling;
- the likelihood of corrosion, in which unattractive red-colored spots appear on the surface of the fence, which will have to be gotten rid of;
- the need to carefully select suitable materials (for example, you need to take a profile of acceptable thickness so that its wear resistance qualities are high);
- the need to own a welding machine (for independent construction of such a fence).
How to install a fence from corrugated board. Installation stages.
Preparing the site for fence installation. Marking according to the drawing and diagram of the fence.
- The soil surface should be thoroughly cleared of debris, building materials, stones, excess vegetation, bushes and trees - in general, of anything that could interfere with the installation of a fence with your own hands.
- If the terrain of the area is uneven, then it is worth trying to level the terrain. Otherwise, the installation of the fence will be carried out taking into account the difference in relief.
The next stage of building a fence from corrugated sheets with your own hands is marking the site. This requires:
- Determine the extreme points of the fence - the corners of the fence. In the corners, as mentioned above, there will definitely be support pillars.
- At the extreme points, pegs are driven in, between which a rope, twine or cord is stretched, allowing you to see the boundaries of the area.
- Next, according to the fence drawing, pegs are installed in places of other supports.
- In places where wells are drilled for concreting support pillars, tie plumb lines.
Installation of support pillars
When planning to build a fence from corrugated sheets with your own hands, consider the option of installing support posts:
- On the foundation. Here, the support will not be pillars, but rather the foundation on which these same pillars rest.
- On poles that are installed in dug wells and concreted. The pillars must be placed vertically and horizontally.
Installation of logs
After installing and concreting fence posts made from a profile sheet, you need to wait about a week for the solution to harden. Next, the logs are installed. The logs are attached to the posts in a welded and dismountable manner (using fasteners).
- The welded connection of the logs is carried out along the entire length of contact between the logs and the support column. First, the joints are thoroughly cleaned with sandpaper or a grinder. Welding a joist requires the help of a second person.
- Connecting the logs in a collapsible way involves the use of special plates for fastening, which are screwed to the support post, and the logs are already attached to them. This type of lag fastening is considered more reliable than welded.
Installation of corrugated sheets on a fence frame
When the posts and logs are installed, sheathing of the fence frame with corrugated board begins. The most important thing is the correct installation of the first sheet; then, thanks to the waves on the metal profile, the installation will proceed quickly and accurately.
- First, the permissible height of the extension above the edge of the column is determined. The sheet is secured with hardware at the top point in the middle.
- Next, using a level, the other edge of the sheet is installed and also secured with a self-tapping screw.
- After this, the remaining screws are screwed to the upper and lower joists in increments of 2 waves from the center.
- Subsequent sheets of corrugated sheets are screwed in the same way, overlapping the previous sheet.
- It is important not to tighten the hardware completely, maintaining the integrity of the sealing rubber.
Installation of decorative and protective elements
A protective decorative strip is installed on the upper cut of the profiled sheet. When building a fence from corrugated sheets with your own hands, people often forget about the decorative strip, but we highly recommend installing it.
The width of the strip must be matched to the height of the corrugated sheet. For example, if the height of the metal profile is 10 mm, then the width of the strip without rolling should also be 10 mm, and with rolling – 12 mm. The strip is installed using rivets in the color of the corrugated sheet.
Also, be sure to install protective caps on the top ends of the support posts.
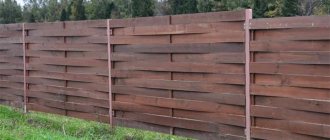
Metal 3D fence
The last option we will consider is a 3D welded metal fence. It is gaining more and more popularity due to its simplicity, reliability, reasonable cost and beautiful appearance. It is called 3D because it is not made flat, but with V-shaped notches. The photo shows exactly what the structure looks like.
On sale you can find a whole range of elements and fasteners from which this type of metal fencing is created. Installing a fence is practically no different from other options. It consists of supports and welded mesh or rods. The scope of use is huge. They are popular not only in private housing construction, but also for fencing hospitals, educational institutions, administrative and other buildings.
In the video below you can see exactly how the process of installing a metal sectional 3D fence is performed: