Aerated concrete is used in the construction of various buildings. To ensure the durability of the structure and prevent deformations, lintels are installed in aerated concrete walls. To do this, a transverse structure made of reinforced concrete, a U-shaped lintel or other types of support beams that support a lot of weight are laid on the wall blocks in the area of the opening. Some developers install metal lintels, others install concrete ones. In this case, installation is carried out using various methods. Let's look at the types of jumpers and the specifics of their installation.
Aerated concrete is used in the construction of various buildings
DIY window lintels
Window lintels are a mandatory element used in the construction of any residential buildings or outbuildings. Indeed, at a certain stage of construction of a summer house or country house, there is always a need to install functional lintels that provide rigidity and strength to load-bearing walls and enclosing structures.
Ready-made aerated concrete lintels
Ready-made aerated concrete lintels are a good solution that save a lot of time during construction. After all, you don’t need to prepare formwork, knit reinforcement, pour concrete and wait for it to gain strength.
But it is worth noting that long and thick jumpers weigh quite a lot, and it is unlikely to be possible to install them without a crane. Although there are thin jumpers that weigh 70 kg each, they can be installed with the effort of two people.
The reinforcement of the finished lintels is made from welded reinforcement coated with a special anti-corrosion coating.
Key Features
Modern construction technologies provide for the possibility of using several types of lintels:
- factory reinforced concrete;
- monolithic products made directly on site;
- metal;
- brick;
- combined.
Despite the reliability of ready-made reinforced concrete products, it is much easier and cheaper to make window lintels yourself, saving time and significant money on transportation costs, materials and labor.
A lintel is a part of a wall or partition that covers the top of a door or window opening. If the weight of the ceilings or enclosing walls is transferred to the wall in which the opening is located, then it is recommended to install load-bearing lintels. In the absence of such loads, self-supporting (non-load-bearing) reinforced concrete, metal or brick lintels are used. In some cases, wedge (arched) lintels are made, which serve as an additional decoration of the exterior or interior of the building. They are also used to organize openings in rooms with vaulted ceilings (ceilings).
Note!
When planning to make window lintels, you should remember to select the correct length of the product. In load-bearing walls, the support of products on the walls must be at least 250 mm, in self-supporting structures - at least 120 mm.
Today, experts recommend giving preference to concrete lintels, finished factory products or products made on the construction site. They are more durable and reliable, take less time to install and are designed for higher loads. The production of concrete lintels can be done directly at the construction site in two ways:
- Pouring on site, with further installation of the product.
- Filling over the opening using removable, collapsible formwork.
There is not much difference in the quality and reliability of such jumpers.
Note!
Problems may arise at the stage of lifting products and their installation. Therefore, as a rule, window lintels are made directly on the wall structure.
Types of lintels made of cellular concrete
Reinforced concrete structures are cold and require additional insulation. Aerated concrete lintels have the same thermal performance indicators as wall blocks.
To cover technological openings, use:
- Factory made;
- Prefabricated from U-shaped elements;
- Prefabricated using a metal corner;
- Monolithic.
The method of overlap depends on the length of the structure. To cover more than three meters, monolithic beams are made. Widths from 3 m to 1.2 m can be covered with beams made of U-shaped elements.
For openings with a width of 1.2 m or less, they do not need to be made if at least 2/3 of the length of the opening is to the top of the wall.
Installation of reinforced concrete lintels
To organize concrete lintels, formwork panels should be prepared according to the dimensions of the opening. To do this, first purchase wooden boards with a thickness of at least 20 mm, which will be fastened together with screws or nails. Experts advise using self-tapping screws, which can be easily removed later using a screwdriver.
Reinforcing mesh is laid on the lower shield and then the vertical shields are secured with self-tapping screws. For additional thermal insulation of the lintels located in the facade walls, insulation is laid on the outside of the formwork: mineral wool, penoplex or dense foam.
At the next stage, the structure is reinforced. The diameter of the steel reinforcement is selected taking into account the load-bearing load of the lintel, its length and width. Metal rods are laid along the lintel, fastening them together with a special knitting wire.
Note!
Experts do not recommend using welding when working with metal, only technological bonding.
To fill the lintel, prepare a concrete solution from high-quality certified cement, small crushed stone and washed sand. The solution can be prepared using an electric concrete mixer or manually in a large container, thoroughly mixing all the ingredients. It should be remembered that crushed stone is added to the finished solution last. Before pouring concrete, small chips of concrete or brick are placed under the reinforcing mesh to a height of 15-20 mm so that the metal is completely recessed in the mortar and the finished structure.
Note!
It will be possible to remove the formwork only after a few days, after waiting for the concrete composition to set. The lower formwork panels and spacers are left for at least 3-4 weeks until the concrete is completely strengthened.
How does the installation work?
In the process of installing jumpers, they rely on structural features.
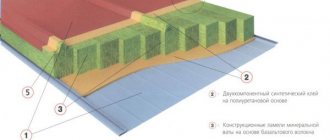
A reinforced load-bearing structure made of aerated concrete is used with a maximum opening length of 174 cm, while 25 cm is required to rest on the masonry. When laying aerated concrete, it is recommended to use 4 steel corners. It is better if the corners overlap the masonry by 30 cm. Aerated concrete is durable due to the presence of a steel frame. The lintels are a single-span beam with a load over the entire surface. The advantage is that there is no additional insulation of the building.- A load-bearing structure made of reinforced concrete with formwork in the form of U-shaped blocks can be used with an opening length of 300 cm, with the same calculation of support on the masonry as with aerated concrete. Installation is carried out without the use of special equipment, which is a big advantage. Also does not require insulation.
- A monolithic load-bearing structure made of reinforced concrete is installed depending on the length of the beam, with a support of 30 cm. This structure can cover an opening up to 3 m wide. This is an excellent solution when covering a wide distance. The proportion is maintained at 1:20. Be sure to add additional insulation.
Reinforcement is required for opening lengths of 1.20 m or more.
As for the non-load-bearing structure, reinforced concrete is used with a beam length of 2 m, support - 0.35 m with additional insulation. A metal corner and a recess at the base of the masonry are used.
Window hole
- The use of U-blocks when working with floors no more than three meters wide allows you to do without the use of special equipment, for example, a crane.
Reinforcement is made using metal rods with a strength of A400-500 and a diameter of 10-16 mm.
In case of tray width less than 120 mm, it is recommended to use reinforcement with two rods.
When the width exceeds 150 mm, it is better to take 4 reinforcements and connect them with wire in increments of 50 cm in order to obtain a strong lattice.
The value of the support zone of the outer blocks is 25 cm. To fasten the ends, you can use ordinary aerated concrete adhesive.
- Instead of U-shaped trays, you can build formwork from boards or aerated concrete blocks. Then reinforce and fill with concrete.
Reinforced lintels
Undoubtedly, the method of creating reinforced lintels inside gives strength and is a good basis for the final stage.
The dimensions are based on the length of the span and the width of the wall blocks.
Installation is carried out taking into account some points:
- - the parts are raised to the required height and placed with the arrow pointing upward, observing the condition of the reference depth of 30 cm. The width should be equal to the width of the block;
- - you can use 2 lintels in the opening, but the base of the opening must be monolithic;
- - all elements must be connected with a special gluing solution, and the second part must fit tightly to the window lintel, using a mallet. It is important that the integrity of the structure is not compromised;
- - the entire surface is leveled using a plane, and you can continue working after the glue has completely dried.
In this way, door and window openings are designed. The main thing is that the lintels rest on the walls as reliably as possible, which can be achieved with correct calculations.
"Collective farm" method
When building houses made of cellular concrete, installation with corners or reinforcing bars is often encountered, which professionals really do not like. However, this option does not lose popularity.
Interestingly, the use of steel corners is not regulated by GOST and is not specified in the rules for the construction of buildings made of aerated concrete.
This design is used in narrow openings up to 1.20 m and in one-story buildings. You need to buy powerful corners, with a cross section of 75x75x6 mm. They are installed with a support depth of 30 cm. When installing, you must adhere to the following rules:
- — the corners must be painted on all sides with an anti-corrosion compound;
- — the minimum value of the reference length for a metal corner is 20 cm;
- — the corners are connected using steel tape, welding, and screeds;
- — the corners must be recessed into the concrete to prevent them from protruding above the wall surface.
When plastering an aerated concrete building, the metal lintels should be wrapped with a special plaster mesh.
Nuances
- When the length of the opening is more than 120 cm and the height is less than 2/3 of the width, it is better to use lintels made from ordinary blocks with additional fasteners. In this case, the blocks are laid using temporary formwork and glue. The side structures should be recessed into the wall.
- To strengthen the wall, it is recommended to reinforce rows above the opening. The normal value of the reinforcement cross-section is 8 mm. The end of it must be brought beyond the border of the opening by 50 cm on both sides, giving them the shape of the letter G. Then they are anchored into aerated concrete masonry.
DIY lintel over window and door openings
Hello. This summer I started construction. I decided to build a small extension to the house. Naturally, with your own hands. After the construction is completed, I will describe the whole process, but for now I want to tell you how I came up with the idea of building reliable and frost-free lintels over window and door openings from improvised means.
There are a great variety of technologies for constructing lintels. Ready-made reinforced concrete lintels are sold, you can put metal corners, you can build formwork and pour it yourself from concrete, etc.
But ready-made jumpers are quite expensive, and you have to pay for delivery and unloading - you can’t bring them in a car)))). And then you can’t throw one up.
Metal corners are also not cheap (after all, you need quite powerful ones). In addition, I also encountered such a drawback - over time, rust passed through the putty and wallpaper. After all, the layer of putty above them is very thin - the plaster hides their thickness, and above them there is only putty. I do everything myself, I like to work alone, so I decided to pour concrete on site.
There are some “moments” here: The concrete lintel should not freeze, otherwise the window openings will “cry” in winter. This problem is usually solved by laying 5 cm of extruded polystyrene foam on the outside. It's not cheap either.
I build from gas silicate blocks. The manufacturer has U-shaped blocks that can be laid out on a support, and then concrete can be poured into the resulting trench. It seems to be normal, but... The cost of such blocks is not at all humane. (Exactly four times more expensive than usual), and again you have to go with a trailer for them..
So I did it easier.
So, we will need: 1. Boards for formwork. (Any ones you don’t want) 2. Gas silicate blocks. 3. Cement. 4. Sand, or ASG 5. Reinforcement.
First of all, we build the formwork:
So, I got a “permanent formwork” made of porous, non-freezing material. The space remaining in the middle, measuring 100 by 250 mm, is more than enough to make a powerful reinforced concrete lintel. (Especially since 250 is the height.)
All that remains is to make the concrete. I prepared it from M500D20 cement and sand and gravel mixture. It can also be made from sand, but I had PGS.))))). By the way, when making from sand, the volumetric proportions of cement/sand should be maintained at 1/3. And when using ASG, the proportion can be increased to 1/5 without losing the concrete grade. (If there is no clay in the ASG).
Having opened the barn, I sadly realized that getting a concrete mixer was not so easy. I haven't received it since the fall.
Then again sand and again cement. It’s better to do this on a steel sheet or concrete pad, but I only had unnecessary old film on hand.
We throw the resulting “sandwich” with a shovel to the edge of our site, pouring it strictly at one point. The point is that this creates a slide and the grains of sand, rolling down, completely collapse in the cement.
Since the blocks are now placed on glue, they are not needed. Therefore, I tied them together and placed them as reinforcement in the jumpers.
If you have little reinforcement and it is not enough for several layers, then do not forget that concrete works very well in compression, and very poorly in tension. Therefore, the reinforcing belt should be positioned as low as possible. From above he will not give anything at all.
That's all! The jumpers are ready. Maybe it will be useful to someone.
By the way, if I didn't have the partition blocks, I would just saw the big one. It will be cheaper this way - partition walls are more expensive than regular ones, if you count them in cubic meters. This is very easy to do, for example, using my homemade saw:
After how many days can the jumper be loaded?
Let's start with the fact that when you poured concrete into the formwork, you need to cover it with a film so that moisture does not escape from the concrete, and the concrete can gain the required strength. Also, the jumper itself must sometimes be shed with water.
In this condition, the jumper should stand for at least 5-7 days. Note that the higher the temperature, the faster the concrete gains strength. In cold weather, it is better to leave the formwork for two weeks.
If the weather is warm, the formwork can be removed and subsequent laying of aerated concrete can be continued within a week after pouring. If the formwork does not interfere with the masonry, then it is better to leave it for 28 days.
What is a reinforced concrete lintel
Most often, reinforced concrete lintels over window and door openings are divided into:
- non-load-bearing beams that can take loads from the wall above;
- load-bearing reinforced beams that take the slab load;
- large load-bearing part (purlin);
- a weakened thin bridge (pencil) used on weak partitions. Typically this type is used for doorways;
- a girder-shelf (crossbar) on which slabs or similar materials are placed.
Jumper prices
The cost of aerated concrete, reinforced lintels depends on their size and manufacturer. They are manufactured by factories specializing in the production of aerated concrete blocks.
As an example, here is the price list of one of the leading Russian manufacturers represented on the markets of Moscow and the Moscow region:
| Length x width, mm. | Wholesale price, rub./1 pc. | Retail from the factory, rub./1 pc. |
| 1 200 x 100 | 435 | 465 |
| 1,500 x 100 | 541 | 571 |
| 1 200 x 150 | 648 | 694 |
| 2,000 x 100 | 710 | 765 |
| 1,500 x 100 | 801 | 856 |
| 1 200 x 200 | 854 | 915 |
| 2,000 x 150 | 1 066 | 1 145 |
| 1,500 x 200 | 1 069 | 1 148 |
| 2 500 x 150 | 1 432 | 1 498 |
| 2,000 x 200 | 1 425 | 1 501 |
| 3,000 x 150 | 1 602 | 1 720 |
| 1,500 x 300 | 1 602 | 1 720 |
| 3,000 x 200 | 2 135 | 2 298 |
| 2,000 x 300 | 2 125 | 2 289 |
| 2 500 x 300 | 2 658 | 2 852 |
| 3,000 x 300 | 3 189 | 3 422 |
Reinforced beams are an integral element in the construction technology of cellular concrete. Designed to distribute the load from the rows located above, armored belts and other elements pressing on the base. The absence of cracks in the walls is guaranteed only if technological features and building codes are observed during their installation.
Basic production of lintels over windows
To make a reinforced concrete lintel you will need a small set of tools:
- fittings;
- metal corners, a set of nails;
- boards;
- wire;
- And also cement, sand and crushed stone for mixing concrete mortar.
Before starting work, you should correctly select the desired type of jumper.
So, for small, lightweight structures, it is recommended to use the usual simple option (as shown in the photo of the lintels above the window), which will significantly save the family budget.
And the technology for manufacturing reinforced concrete window lintels is quite simple:
- The lintel is poured directly above the desired opening. But keep in mind that you will first have to prepare the formwork.
- The work takes place on the ground and is subsequently installed in place. The second option will add a little complexity to the work, since you will have to hire a crane to install the jumper in the right place.
DIY formwork for lintels
Before making a lintel over the window directly at the opening site, you will have to tinker with the formwork, which will have to reliably withstand a large load from concrete.
There is an option to create a form from wooden boards that will serve as a shield. It is better to take a board with a maximum thickness of 25 mm, which is fastened with self-tapping screws and a screwdriver. When the formwork is no longer needed, it can be easily removed by unscrewing the screws.
The first step is to install the shield horizontally in the opening, and it should rest against the support. Then a mesh of reinforcement is placed into the shield and secured with self-tapping screws.
For greater convenience and tension stability, experts recommend attaching the shield to the reinforcing mesh with special wire. This fastening will help the shield fit tightly and be accurately attached to the window opening.
We insulate a reinforced concrete lintel
It is no secret that the opening between the masonry and the lintel must be properly insulated. As a rule, insulation with a thickness of at least 100 mm is used. It is placed in the formwork opening and filled with concrete mortar.
Typically, mineral wool is used for insulation purposes. In this option, it is necessary to lay the window slopes (openings) using bricks so that the window itself rests against it. And for greater reliability, the structure should be secured using polyurethane foam.
A simpler way to insulate the lintel under the window is to use extruded polystyrene foam, which is known for its strength. It is better to take sheets 30 mm thick.
To securely fix the window in the opening, it is reasonable to pour polyurethane foam into the space formed between the frame and the insulation.
Rules for making jumpers
When creating a reinforced concrete lintel, it is necessary to strictly adhere to the described technology. There are also some nuances and rules in the work:
- For greater strength of the reinforced concrete belt, the diameter of the reinforcement mesh should be 14 mm.
- It is recommended to strictly adhere to the dimensions of the reinforced concrete lintel: the height should not be more than 1/20 of the length of the opening itself, and the width should correspond to the width of the wall (without indents).
- It is more reliable to use ready-made lintels, or to make your own formwork.
- Used formwork should be removed only after at least 25 days, for greater strength of the concrete solution.
- When pouring the solution into the formwork, you should compact it carefully to avoid voids.
- When making lintels, it is better if the window is quarter-length.
Making lintels for windows is a very simple process that you can easily do yourself. The main task is to calculate the necessary materials and prepare them.
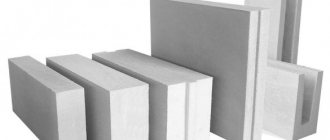
Dimensions of aerated concrete lintels
- The width of such jumpers ranges from 100 to 400 mm.
- Height from 200 to 400 mm.
- Length from 1300 to 3000 mm.
The use of ready-made aerated concrete lintels is very justified if you need to build a house in the shortest possible time, and also if the number of lintels in the house is very large.
What is needed to fill jumpers?
I used:
- fittings diameter Ø 12 mm;
- wire rod diameter Ø 6 mm;
- knitting wire diameter Ø 1.4-2 mm;
- edged board 25×200 mm;
- nails 70 and 100 mm;
- cement grade 400;
- river sand;
- crushed diorite stone fraction 20 mm.
I used reinforcement with a diameter of Ø 12 mm, since I plan to build a second floor or attic with a concrete floor and I was on the safe side so as not to calculate the load-bearing capacity of the structure; there will also be a seismic belt under the ceiling; I will describe how to make a seismic belt in the next article.
Filling jumpers
The photo shows how the formwork for the lintel is installed over a doorway measuring 800x2100 mm, the width of the interior wall is 200 mm, the minimum depth of the lintel support is 200 mm. Since the width of the board matches the width of the wall, there is no need to knock down the shields.
First, the height of the door is measured, taking into account the space for foaming and slopes. Since the board is 2.5-3 mm thick, you can immediately measure according to the height of the door. After removing the formwork, you will have a gap equal to the thickness of the timber used. Next, mark the level of the opposite side from the foundation base or from the first mark using a hydraulic level. After the marks are made, we nail pieces of boards in the shape of the letter - T, the upper edge of which passes under the mark. For this I used 100mm long nails.
Next you need to prepare 3 shields, for this I have 3 boards. Along the edges I have half a stone that will cover the ends of the formwork, the first board is 800 mm long and 2 more 1200 mm each, since the support depth is 200 mm and we must have a reserve. To extend the durability of the wood for further use, I wrapped the formwork boards with cling film, which costs $1 per roll. We lay the bottom board, 800 mm long, on already nailed T-shaped supports; there is no need to nail it to the supports. Next we install the side shields. First, we nail them along the edges to the wall, and then we knock the corners together diagonally from top to bottom. To facilitate the dismantling of the structure, 70 mm nails were driven along the top, on which a binding wire was attached to tighten the top of the lintel formwork. You can use pre-prepared timber, I used this method to save used wood, which can still be useful during the construction process.
Factory solutions
Factory-made lintels for aerated concrete blocks are ready for installation immediately after unloading onto the construction site. The parts are rectangular beams made of silicate cellular material with an embedded steel frame. The metal is treated with a special anti-corrosion compound.
The products have the following advantages:
- Precise geometric shapes and sizes. The size of the beams corresponds to the parameters of the blocks, which allows you to make continuous rows of equal thickness in the masonry.
- Optimal ratio of flexibility and strength. The volumetric iron frame made of reinforcement gives the beams the ability to bend under loads, and the gas silicate material ensures the creation of volume with good resistance to vertical pressure.
- Durability. Aerated blocks are impervious to temperature changes, humidity and ultraviolet radiation. The material is waterproof and reliably protects the steel core from moisture. Gas silicate is designed for 100 years of operation in dry climates.
- Ease of use. The aerated concrete lintel is lightweight. To lift it to a height, there is no need to use special lifting devices. The product can be delivered to the installation site using manual rigging devices.
- Low thermal conductivity. The material is identical to that from which aerated concrete blocks are made. Thanks to this, there is no need for additional wall insulation.
The only drawback of the products is their cost. But, given that private houses have a small number of external openings and internal partitions, this factor does not particularly affect the construction budget.
Ready-made version of reinforced gas silicate lintel according to GOST
The standards for aerated concrete lintels are determined by GOST and affect such parameters as size, specific gravity, resistance to frost and high temperatures, degree of bending and strength.
Manufacturers in Moscow produce products with the following sizes:
- height - 124 mm;
- width - 115, 150, 175 mm;
- length - 1300, 1500, 2000, 2500, 3000 mm.
- density - 800-1500 kg/m³;
- part weight - 60-150 kg;
- number of freezing/thawing cycles - 50;
- load - 200-500 kgf/m².
- frame material - reinforcing bars 10-16 mm (2, 3 and 4 cores).
The price per unit of goods depends on its size and the number of reinforcement strands. Transportation and storage of beams is carried out in a horizontal position using shock-absorbing spacers made of wood.
The stack height is not limited. It is recommended to store the material in a dry room, as it is hygroscopic and absorbs moisture well.
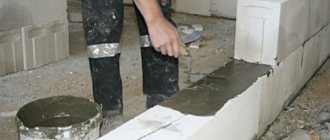
Installation of gas silicate columns is carried out using a special composition. Since the walls are smooth, a layer of glue 2-3 mm thick is applied when laying. This feature allows you to speed up the construction process, reduce its budget, and eliminate cold bridges caused by cement mortar.
U-block construction
You can save on materials by using prefabricated structures, which are much cheaper than ready-made monolithic analogues. This option is a U-shaped aerated concrete lintel. Its advantage is that installation can be carried out both on the walls and on the ground, followed by lifting and installation.
The part consists of the following parts:
- Base made of silicate material. The beam has a square cross-section, on the upper side there is a longitudinal recess in the shape of the letter U. The groove is designed to accommodate the core, which gives the finished product flexibility and strength.
- Steel frame. Depending on the length and width of the workpiece, it is made from corrugated reinforcement with strength A500. For walls with narrow windows up to 150 cm wide, a flat frame is made of two cores. Wider spans are covered with beams, the core of which has a spatial shape with a square section with a side of 40-50 mm, formed by four pins.
- Filler. Lightweight concrete grade M100-M150 is used. Expanded clay can be used as a filler. The solution is not poured into the groove to the top. The remaining 50 mm are covered with a strip of gas silicate.
U-shaped window lintels made of foam concrete can be sawed before assembly, adjusted to the desired size. The volume of concrete varies depending on the thickness of the walls.
You can make U-blocks yourself. To do this, several stones are laid and glued together on a flat base. After the solution has set, cuts are made using a grinder or wall chaser and excess material is removed. Then the workpiece is reinforced and concreted. After assembly, it becomes heavy; lifting requires the use of mechanical means.
Reinforced concrete
Precast concrete products are distinguished not only by their high strength, but also by their weight. They are designed for heavy loads, resistant to moisture, ultraviolet radiation and temperature changes. Reinforced concrete lintels are reinforced columns of standard sizes. Manufacturers produce products whose parameters correspond to the size of bricks or silicate blocks.
Due to the large mass, reinforced concrete products require an increased depth of support on the walls compared to aerated concrete beams. This leads to the purchase or self-production of longer and heavier beams. As a consequence, an increase in the construction time and budget and the involvement of lifting equipment.
Technical characteristics of reinforced concrete lintels:
- height - 124 mm;
- width - 115, 150, 175 mm;
- length - 1300, 1500, 2000, 2500, 3000, 3500 mm.
- density - 2200-2500 kg/m³;
- part weight - 160-550 kg;
- number of freezing/thawing cycles - 100;
- load - 600-2500 kgf/m².
- frame material - reinforcing bars 10-16 mm (2, 3 and 4 cores).
The posts are highly durable and do not require special conditions for transportation and storage. Products can be stored outdoors, including in places where there is a risk of flooding.
When choosing concrete products, one point must be taken into account - the material has high thermal conductivity. It is advisable to install it in aerated concrete walls only in cases where it is planned to insulate them. Otherwise, cold bridges will appear with the formation of frost and condensation.
How to reinforce lintels?
Using my door as an example, the following were prepared:
- 4 reinforcement rods with a diameter of Ø 12 mm, size 1200 mm;
- 6 wire rod quadrangles with a diameter of Ø 6 mm, size 100 by 100 mm;
- knitting wire.
The frame was knitted with a regular 100 mm nail. Since hooks must be ordered, for the convenience of tying the frame, 2 reinforcement pins, which are narrower than the size of the reinforcement, are driven into the wall.
The frame was knitted with a regular 100 mm nail. Since hooks must be ordered, for the convenience of tying the frame, 2 reinforcement pins, which are narrower than the size of the reinforcement, are driven into the wall. To start knitting, take 2 reinforcement pins and place them on the prepared pins driven into the wall, and mark a step of 200 mm with chalk or a marker. Along these marks we string prepared quadrangles from wire rod, distributing them according to the marks made with a marker, and tying the frames with knitting wire. Having tied the frames at the top, we place the remaining 2 reinforcements at the bottom and continue tying.
Arrangement of lintels in permanent formwork
The use of U-shaped elements greatly simplifies the closing of openings. The dimensions of U-blocks coincide with the dimensions of ordinary wall blocks. Their installation is carried out without the use of lifting mechanisms.
When installing prefabricated elements, a standard adhesive solution for aerated concrete is used. The thickened outer wall provides protection against heat loss. Additionally, mineral wool or foam insulation is laid along this wall.
U-blocks are prefabricated products, the standard sizes of which allow you to select the required length. There is a tray inside for reinforcement and concrete.
U‑shaped products – design dimensions
Installation technology
- To assemble U-shaped products, a rigid platform is prepared at the level of the last wall opening. To avoid sagging during pouring, it is supported in several places. The racks can be bars or metal pipes.
- They are laid on a platform with a launch on the walls of 250 millimeters. The supporting walls must be intact.
- The thickened wall should be placed on the street side. A layer of insulation is placed on it. The ends of the trays are glued together with an aerated concrete adhesive solution. Instructions for preparing the solution are located on the packaging.
- A three-dimensional reinforcement frame is placed in the trays. Four reinforcing bars with a diameter of 12 - 16 millimeters (2 at the bottom, 2 at the top) are fastened with wire with a diameter of 6 millimeters. The pitch of the transverse fastening is 40 - 50 centimeters.
- To fill the trays, fine-grained concrete M 200 of soft consistency is used.
- When pouring, it is necessary to achieve uniform filling of the cavity and enveloping the reinforcement. To do this, the solution is laid in layers and leveled with a trowel.
- The platform can be dismantled after 21 days.
Placement of reinforcement cage. Insulation is laid along the outer wall
Pouring concrete
There is another option for assembling U-products. Level the area on the ground or indoors. Set up a stable base. You can use plank flooring.
Make up a tray bridge of the required length on the adhesive solution. Blocks are placed along the edges to prevent the solution from leaking out. Installation of reinforcement and pouring of concrete is carried out according to the described technology.
After 21 days, she is lifted onto the wall. This way it is more convenient to assemble the structure. But lifting requires special equipment.
The video in this article shows how you can make U-blocks yourself.
Note! Concrete gains strength when wet in 21 days. Do not allow the surface to dry out.
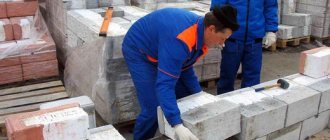
Work process
Aerated concrete lintels on metal corners
You can block window and door openings with blocks laid on the corners. For this, steel equal-flange profiles No. 75 are used. For structures over 2 meters, profile No. 100 is used.
Their strength will provide the beam with sufficient load-bearing capacity.
There are two ways to install material on a metal support:
- Cutting corner shelves in the center or 1/3 from the edge;
- Placing them along the outer and inner edges.
Metal products recessed into the body of the blocks do not disturb the appearance of the masonry. The wall can be painted without plaster. Only the lower part will have to be plastered.
When planning a layer of plaster on the facade, you can place corners along the edges of the beam. If you trim aerated concrete correctly, the product will turn out smooth. It is necessary to remove from the block a layer equal to the thickness of the corner flange.
Laying the block on corners with a cut in the center
Note! The paint applied to the rust falls off. Before painting, the metal surface must be cleaned with a wire brush.
Laying along the corners located along the edges of the blocks
Things to consider before use:
- The metal surface must be cleaned of rust, primed and painted;
- It is better to fasten the corners together by welding;
- To prevent them from protruding, make cuts and remove dust from the surface;
- Support on the masonry – 25 centimeters;
- For ease of finishing, immediately wrap the corners with plaster mesh;
- When laying on the ends of products and cuts for them, apply an adhesive solution.
Option for installing products on reinforcing bars
Window lintels for aerated concrete can be made using reinforcing bars. For openings up to 1.5 m, instead of corners, you can use rods with a diameter of 12 - 16 mm. For installation, three grooves are cut into the bottom surface of the material.
- If assembly is carried out on the ground, the products are turned over with the grooves facing up. The ends are glued together. The furrows are cleaned of dirt with a stiff brush and filled with glue.
- Cement mortar is placed on the laid rods and leveled with a spatula.
- After a week, the lintels are laid over the opening with the reinforcement down.
- If it is formed immediately, the reinforcement is laid on the walls. Rods with ends bent at right angles should extend 90 mm onto the masonry on each side. They are laid on a cement pad 1–2 cm thick.
- The prepared grooves and ends are lubricated with glue and laid on the reinforcement. The bottom surface is rubbed with a solution.
The reinforcement is laid in the groove
Monolithic lintels
The basis of monolithic lintels is concrete M 200. This is a cold material that requires high-quality thermal insulation. The installation of formwork also creates certain difficulties.
- Its advantage is that the design can cover large openings. Besides, its shape doesn't matter. You can, for example, make an arched entrance or window.
- For large openings, monolithic products are made with your own hands. The height of the monolith depends on the size of the latter. It must be at least 1/20 of the length.
- Calculation example: you need to cover a span of 2.8 m. 280: 20 = 14, its height must be at least 14 cm.
- For reinforcement, take 4 – 6 rods with a diameter of 12 mm. The spacing of the clamps is 50 cm. The supporting length of the reinforced concrete beam is 35 cm on each side. The supporting products are reinforced with a 1.5 cm thick layer of mortar over the reinforcing mesh.
- Monolithic lintel for aerated concrete is made in removable or permanent formwork. For a removable structure, boards or plywood are used. Insulation can be laid on the inside of the formwork.
- Another option is to make the width of the formwork less than the wall block by the thickness of two layers of insulation. Then the thermal insulation will stick after the formwork is removed.
The photo shows wooden formwork
It is convenient to make permanent formwork from sheets of extruded polystyrene foam. This material has very high thermal insulation and strength characteristics.
A reinforcement cage is placed inside the formwork. I raise it by 2 - 3 cm with the help of linings. The concrete under the frame should form a protective layer for the reinforcement.
The formwork is poured with concrete M 200. It is laid in layers so that voids do not form inside. Monolithic lintels for aerated concrete will gain strength in three weeks.
Construction of houses
When building any house, there is a need to use reinforced concrete lintels. You can order them or make them yourself. But given the price of reinforced concrete lintels, it is preferable to choose the second option. Of course, many people think that factory-made products are more convenient or reliable, but making high-quality jumpers with your own hands is quite simple. In addition, you will significantly save your money, since you only have to pay for materials. In this article we will look at the technology of self-manufacturing jumpers.
Content:
Types of reinforced concrete lintels
Reinforced concrete products are widely used in the construction industry. Their strength, durability and versatility place them at the forefront of today's building materials. Concrete lintels occupy a high place among other reinforced concrete products, despite their small size and weight. Without lintels, you will not be able to construct a single house from concrete and foam concrete stones, bricks, etc. Reinforced concrete lintels are needed to support the part that is located above the door or window opening. They are used to cover window and door openings in block, stone and brick walls.
A simple technology for the production of reinforced concrete lintels gives very effective results. This is due to the fact that the concrete composition is poured into the formwork with pre-laid steel reinforcement. Metal reinforcement takes the load for various bends and tensions, and concrete reinforcement takes the load for compression.
Lintels can be arched, steel, brick, reinforced brick, etc. There are several types - timber, prefabricated, window and load-bearing lintels. They are made of heavy grade concrete and are designated by the corresponding letters, which indicate the length, design load and standard size.
Reinforced concrete prefabricated lintels are the most popular. They are marked with the designation PR and consist of classic reinforced concrete bars and slabs. The prefabricated property is a huge advantage, since during the masonry you can install the lintel and continue to do the masonry. It is not necessary to cut bricks and lay out rows, due to the modularity of the lintel dimensions.
Concrete window lintels are used to cover window openings. This type is widely used in brick buildings, but can also be used in buildings made of natural or artificial stone.
Load-bearing reinforced concrete lintels are used when it is necessary to close the openings of load-bearing walls. Reinforced reinforced concrete lintels are needed to accommodate the loads from the partition slabs. Load-bearing beams take the load only from the wall located above the opening. Purlins are large lintels, and crossbars are horizontal beams with a shelf, which is necessary as a base on which higher structures will rest. Like all other types, they are widely used in the construction of various objects.
There is another type of reinforced concrete lintels. These are pencils - thin load-bearing jumpers, which are often used in interior partitions with a thickness of 120 millimeters. They are also often used in door openings. The most popular are lintels for window and door openings.
Methods for manufacturing reinforced concrete lintels
To make reinforced concrete lintels you will need the following materials - reinforcement, angles, boards, nails, a concrete mixer (optional), strapping wire, cement, crushed stone and sand for the concrete composition. You may need other materials that you can use if you wish. Before starting work, you need to choose the right type of jumpers.
For small buildings with lightweight construction, regular lintels can be used for additional savings. They should also be used in cases where the ceiling vaults of all floors place emphasis on reinforced belts, which themselves take the loads and distribute them evenly.
Let's look at the technology for making reinforced concrete lintels with our own hands. You can pour the lintel directly above the opening or make it first on the ground, and then install it in the opening. You can use a more convenient option. If you prefer the first method, you will have to tinker with the formwork, if the second method, you will have to lift and install the already made lintel yourself.
The latter option is heavier; you may have to hire a crane to lift it. In this case, it is necessary to make even two jumpers, the width of which is 150 millimeters. At the same time, the thickness of the backfill masonry is 300 millimeters - 100 millimeters of insulation and foam block.
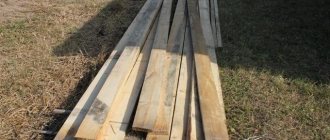
Making formwork for lintels
But if you give preference to the first method - filling the lintel already in the opening, you will save your effort, money and time. An additional advantage is that in this case only one jumper is needed. Installing formwork may raise some questions, but we will try to answer them.
The formwork for a reinforced concrete lintel must be securely fastened and hold fairly heavy concrete inside. The form can be made from wooden boards, from which shields should be created. Their thickness should be 20-25 millimeters. The boards must be fastened with screws or nails. It is recommended to use self-tapping screws and screw them in with a screwdriver. After use, you can easily disassemble the formwork by simply unscrewing the screws.
First, you should install a horizontal shield in the opening, which will rest on supports. You can place it flush with the infill masonry or slightly beyond it. If the shield extends slightly beyond the masonry, it should be installed on top of it, and not from the side.
Reinforcing mesh must be placed on the horizontal panel in the formwork. After this, the vertical shield should be secured with self-tapping screws. When pouring, for better stability of the shield, it can be tied to the laying mesh using binding wire. It must be tightened. This method will not allow the shield to move due to the concrete load, and it will be well attached to the window.
Insulation of reinforced concrete lintel
An insulating layer must be placed between the lintel and the facing masonry. As insulation, you can use mineral wool, which is also suitable for insulating walls. In any case, the thickness of the insulation should be about 100 millimeters. The insulation should be placed in the formwork and filled with concrete.
The use of reinforced concrete lintels - the pros and cons of a monolithic beam
Manufactured at specialized enterprises, reinforced concrete lintels are a prefabricated structure made of heavy concrete reinforced with a reinforcing cage. The beam also has sling eyes for transporting and installing massive products on the opening.
Reinforced concrete beam
A reinforced concrete beam has the following advantages:
- increased strength characteristics;
- resistance to negative temperatures;
- Possibility of installation on larger openings.
The design has the following disadvantages:
- increased mass. To perform installation operations, it is necessary to use lifting equipment;
- increased thermal conductivity. A reinforced concrete beam needs reliable thermal insulation protection.
Individual developers also use self-made products cast into wooden or plywood formwork.
Technology for strengthening openings with load-bearing reinforced concrete lintels
Lintels are laid in aerated concrete walls using lifting equipment.
Using lifting equipment, lintels are laid in aerated concrete walls
The technology for installing reinforced concrete beams is similar to the method for installing aerated concrete lintels:
- Cement mortar is laid on aerated concrete blocks.
- The beam is lifted by a lifting device to the level of the opening.
- A reinforced concrete lintel is lowered onto the opening with overlapping blocks of 35 cm.
Having completed installation, adjust the position of the beam and check its horizontalness.