In professional construction, they will never advise insulating a wooden house from the inside.
This is due to the dew point, which in this case hits the load-bearing wooden walls and gradually destroys them.
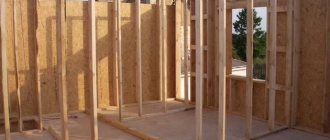
But sometimes the situation forces one to resort to internal insulation (in addition, frame houses, by definition, are insulated from the inside).
How to reduce harm to wood in this case, how to correctly arrange the layers and what materials to choose. All this will be discussed further.
Preparatory work
It is not advisable to neglect this stage, because after all the insulation work has been completed, the beam will be closed and to correct anything, you will have to completely dismantle all the insulation material. First, all walls are cleaned of dirt, and then all irregularities and cracks are sealed. Next, the wood is treated with a special agent that protects against rotting and the appearance of parasites.
If electrical wiring runs along the walls, it must be checked to ensure that it is in working order and properly insulated. Before directly installing the insulation material, you need to create some kind of vapor barrier to protect the insulation from moisture that will form on the wooden walls. Also here we must not forget about high-quality ventilation, without which, when creating a vapor barrier, a thermos effect will be formed and the walls will rot.
Note: A special membrane film can be used as a vapor barrier. It does its job very well, but is not cheap.
Technology
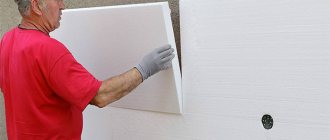
How to insulate a log house from the outside? To do this, it is recommended to carry out insulation using the “ventilated facade” system , which is a structure consisting of facing material, insulation (in the form of mineral wool), aluminum or wooden frame.
This structure is fixed to the wall of a log house in such a way that there is an air gap between the thermal insulation layer and the cladding through which air circulates. This is why such a façade is called ventilated.
Thanks to the ventilated façade, a system is created in which condensate is discharged outside without damaging the load-bearing walls, finishing materials and insulation.
This system works on the following principle: water vapor settles on the inside of the cladding, and the air gap between the insulation and the cladding promotes rapid evaporation of moisture and its release outside the structure.
“Ventilated facade” is an excellent option for log houses. So how to insulate facade walls?
Preparatory stage
Before starting to insulate the external walls of the house, the façade of the building must be prepared . The surface of the house should be freed from hanging elements, then the inter-crown insulation should be checked, caulked and treated with a special antiseptic. Preparatory work should be carried out in dry weather, which is especially important when impregnating wood with an antiseptic.
The solution is applied to the wood according to the principle of “dying” and if it is kept on the surface of water, the antiseptic will not be absorbed and will be useless. It is also necessary to seal the existing cracks. After preparing the outer part of the house wall, a vapor barrier layer is first laid, which will protect the insulation from moisture.
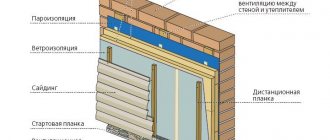
Installation of sheathing
A sheathing is installed on top of the vapor barrier layer. It is made from smooth and dry bars or metal profiles, the length of which should be equal to the height of the wall.
The size of the sheathing depends on the thickness of the selected insulation and should be equal to half of it. To properly install thermal insulation, you will need to make markings using a level, plumb line, liquid or laser levels. The distance between the guides must be at least 40 centimeters, but not more than the width of the insulation sheets. In this case, both vertical and horizontal placement is possible.
The profile is fixed with aluminum or galvanized brackets, and the wooden beam is secured with self-tapping screws.
Laying the material
Next, insulation is laid under the profile or timber. To prevent the material from slipping or peeling, special fasteners with a diameter of 5 centimeters must be used.
With their help, the insulation is firmly fixed to the vertical surface of the wall. It is better to lay the insulation in several layers, with each subsequent row being applied in a checkerboard pattern, overlapping the seams of the previous layer.
Membrane installation
Then there is a waterproof layer so that water vapor can easily pass through the insulation without getting it wet. The waterproofing is laid on the outside of the heat insulator.
The film is mounted with a construction stapler or a screwdriver, using small self-tapping screws. It is installed with an overlap of 10 centimeters relative to adjacent strips. Be sure to seal the joints using mounting tape.
It is also important to stretch the film the correct way. Usually the outer side is brighter in color, but different types have their own characteristics. It is better to read which side of the film is the outer side in the instructions from the manufacturer.
Slats are attached to the top of the waterproofing , making the fit of the insulation to the surface more dense and reliable. This creates a gap that ensures free air circulation between the cladding and the insulating layer.
Finishing
At the final stage, the wall is covered with clapboard, siding or other finishing material .
To achieve a high-quality result, when installing the facing material, you will need to make special eyelets at the top and bottom of the wall.
Internal ceiling insulation
Insulating a house should start from the ceiling, because warm air always rises to the top and if there is no insulation, part of it exits through the roof. If the house is one-story with an attic, work begins by spreading waterproofing material on the floor from the attic. Mineral wool or sawdust can be used as insulation, which should be distributed along the entire perimeter of the waterproofing. The thickness of the insulation can be 150-250 mm. Boards are laid on top so that you can move freely around the attic space.
Important: If the house has an attic, then insulation is carried out in addition to the interfloor ceiling and the roof slope. For wooden floors, bulk materials are poured between the joists, and for concrete floors, slabs or rolled material are laid.
The slope is first insulated with a waterproofing film, on top of which insulation is placed, and an impermeable membrane on top. Everything ends with lathing.
Note: Mineral wool can be used for ceiling insulation, and parchment can be used as a waterproofing layer.
In order to insulate the ceiling from the inside, a wooden frame is first made, in which the distance between the boards should be up to one meter. Parchment is glued between the boards using tile adhesive. An insulating material is placed on top of it, to secure which you can also use a small amount of glue. Next, the ceiling is covered with plasterboard. It is screwed onto a wooden frame with a screwdriver.
Important: Ceiling insulation should be carried out after construction no earlier than a year later and only during the warm period.
Climate
166 votes
+
Vote for!
—
Vote against!
Log houses are the warmest and most environmentally friendly. Wooden walls perfectly retain and accumulate heat and regulate humidity levels. On every corner we hear that a wooden wall with a thickness of only 240 mm has the same thermal conductivity as a brick wall with a thickness of 1 m. Impressive, right? But there are situations when you built or bought a new log house, lived in it, and with the onset of the first serious cold weather you realized that the house was cool and drafty. Then we seriously think about insulating the building, even at the expense of beauty. But there may also be more trivial situations: you bought an old wooden house, which is already quite “worn out” and requires serious insulation measures. So a serious question arises: how to insulate a log house, what materials can be used, and what absolutely cannot be done.
- Why is it cold in a log house - a little theory
- What materials can be used to insulate a log house?
- How to insulate a log house from the outside
- Caulking log walls
- Installation of a ventilated facade
- How to insulate a log house from the inside
- Insulation of ceilings, roofs
- Insulating the walls of a log house
- Insulating the floor of a log house
Why is it cold in a log house - a little theory
What problems do owners of log houses most often encounter when they complain that it is cold in the winter? Firstly, there are drafts in the rooms. Secondly, it blows on your legs. Thirdly, the house cools down quickly if you turn off the heating. Fourthly, the walls are too cold. And many accompanying nuances, from which the conclusion is drawn that the house urgently needs to be insulated, and it is imperative to start from the floor, since it is the coldest. Let's figure out what happens in the room when it is heated.
Imagine that we have a log house that we heat using some kind of heat source. What is involved in heat exchange: heat source, air, ceiling, walls and floor. How does this happen? Let's remember the school physics course. Heated by the heat source, the air rushes upward - to the ceiling. Resting against the surface of the ceiling, it spreads across it, giving off heat and cooling. As a result, we get a ceiling - the warmest surface in the room. Then the air flow reaches the walls and goes down along them. Since our walls are much colder than the ceiling, the air cools much faster and its speed increases. The air has already reached the floor, having accelerated considerably, and is rushing along it with such speed that the illusion of such a strong cold draft is created, as if there is no floor at all, and you are standing right on the snow.
If you place the heat source near the internal walls, as is usually done when heating with a fireplace or portable radiator, then the rate of heat transfer increases significantly. There is a constant draft in the room, it turns out that it is our own fault that the house is cold.
It’s not for nothing that there are rules that heating radiators should be located under the windows. The outer walls are initially the coldest, in contrast to the inner ones, which are completely inert. If you place the heat source near the outer wall, the air will rise up, then fall again onto the walls, but now not at the same speed and will not cool so quickly. After all, the internal walls are quite warm, so the air passing through them will not cool down too much. And as it descends along the outer walls, it will again rest against the heat source, where it will heat up and rise upward. As a result: the room warms up faster, the structures retain heat better, since it accumulates and is not wasted.
What needs to be checked to eliminate unnecessary heat loss:
- Ceiling . The very first outpost that should be checked for leaks, as up to 70% of the heat can escape through it. Be sure to insulate the attic or attic floor to trap heat inside the room.
- Walls . The second outpost is the outer walls and everything that is in them: windows, doors, etc. Improperly installed windows and doors are the bane of log homes. The lion's share of the heat can escape through them, without even having time to heat the room. Directly from the radiator and in the crack under/above the window. Plus, don’t forget to check whether the walls are thoroughly caulked; maybe cracks have already formed somewhere.
- Floor . The last thing that can be a source of cold is the floor. It should be checked for serviceability and insulated in the standard way. Also for the winter it is worth reducing the ventilation of the subfloor, blocking most of the air.
I would also like to note that in order to make the heating of a log house better, you can install “warm floors” in the house, in addition to the existing heating system. Then the warm air will be distributed more evenly throughout the room, due to which drafts near the floor will disappear and the house will cool down more slowly.
By the way, too thin walls can also cause cold in the house. For example, for a climate with cold, harsh winters but low humidity, walls with a thickness of 200 - 240 mm are sufficient. But for regions with wet winters, even with temperatures that do not drop below -20 ° C, it is advisable to use logs with a diameter of at least 400 mm, and preferably 480 mm. Such regions, for example, include Moscow and the Moscow region, St. Petersburg and the Leningrad region. Be sure to take this into account when developing a log house project, so that later it will not be excruciatingly painful.
What materials can be used to insulate a log house?
The standard procedure for insulating a log house includes insulating the ceiling or attic, caulking the walls and insulating window and door frames, as well as insulating the floor. If everything is done correctly, then no additional measures will be needed.
Considering that log houses are built with the goal of creating a home from natural, environmentally friendly materials, it would be foolish to use polystyrene foam for insulation. Then the whole meaning is lost.
To insulate the attic of a log house, you can use sawdust, ecowool (cellulose wool), seaweed, and straw. In extreme cases, you can insulate with mineral wool.
Caulking of walls is done only with natural materials: moss, tow, hemp, jute, tape insulation based on flax and jute. The main requirement for the material is that it must have properties similar to wood.
To insulate a wooden floor on joists, you can use natural backfill materials, or you can also use mineral wool in rolls. But a concrete floor will require a denser material; polystyrene foam, extruded polystyrene foam, cork and basalt wool in slabs with a density of more than 160 kg/m3 are suitable.
If, after all the standard procedures, the house is cold, maybe because the thickness of the logs was chosen incorrectly, maybe the house is just very old, or maybe the heating was calculated incorrectly, and you decided that without such a procedure as insulating the walls of a log house , you can’t do it, then you should know some nuances.
The material that can be used to insulate log walls must have the following properties:
- Be vapor permeable on a par with wood or to a greater extent if it is installed outside the building.
- Be moisture resistant so as not to accumulate moisture, which can lead to rotting of the wood.
- Be fireproof and resistant to pathogenic fungi.
- Easy to pass air.
- Have a structure loose enough to fit snugly against a rounded log wall and leave no gaps.
Considering all of the above, to insulate a log house from the outside you can use:
- Ecowool.
- Mineral wool (although it is not natural, it is easy to install and publicly available).
- Sawdust or sawdust granules (fill material).
- Expanded clay (fill material).
Wood is an unusual building material. It not only “breathes”, but is also a kind of air recuperator. And if someone assures you that the vapor permeability of wood across the fibers is slightly greater than that of reinforced concrete, know that you can object. Entering the thickness of the wood across the fibers, the air is then distributed along the fibers and exits through the end. In other words, the tree “breathes” at the ends.
Precisely because wooden walls are “living”, the following materials cannot be used:
- Styrofoam.
- Extruded polystyrene foam.
- Polyurethane foam.
- Polyurethane foam for sealing cracks.
- Sealants.
The use of vapor-proof materials will lead to the wood rotting or, if you protect it from the inside with a vapor-proof film, you will turn a wooden house into a thermos. In this case, the whole point of building a house from a log will be lost. But it’s still up to you to choose.
How to insulate a log house from the outside
As we have already found out, it is necessary to insulate the walls of a log house only when all other insulation measures have not brought the desired result.
If you are interested in the question of how to properly insulate a log house from the outside or from the inside, then here is a clear answer - from the outside . This is due to the properties of wood to breathe, accumulate moisture and release it. If the insulation is located externally, air and moisture will freely escape from the wood and erode.
You can start insulating only a year to a year and a half after the completion of construction, when the log house has settled.
Caulking log walls
Even if you have already made the final decision to insulate the house, the first step is to thoroughly caulk it. We inspect all walls for visible cracks. Then, in calm weather, we walk around the house with a candle, holding it close to the walls. If the flame leans towards the wall, then there is a gap in this place from which it blows in winter.
One of the most effective ways to find cracks in logs is in winter, when the house is heated, you need to go around and inspect all the walls. If you notice frost, it is sometimes called a “bunny”, it means that heat is leaking from the room in this place.
Caulking should be done in dry, warm weather, using tow, jute, hemp or roll insulation. We insert the material into the cracks between the crowns and push it with a special tool - a caulk.
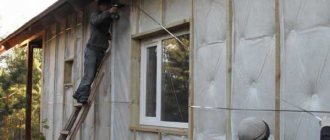
Installation of a ventilated facade
Insulation of a log house from the outside is carried out by installing a ventilated facade. This design allows the wooden wall to “breathe” and release moisture.
First, we treat the walls with an antiseptic and fire retardant to protect the wood from fire and mold. We fill the sheathing on top of the walls, which will hold the insulation. For this we use timber with a cross section of 50 mm. We stuff it vertically in increments equal to the width of the insulation boards minus 2 - 3 cm.
We will use mineral wool as insulation in slabs with a density of 35–50 kg/m3 and a thickness of 50 mm.
Important! When installing insulation on a log wall, we encounter some inconvenience. The fact is that the wall is uneven, laying the insulation closely without gaps is almost impossible. Therefore, we insert insulation into the gaps (openings) between the wall and the sheathing beams. To do this, you can use “Basaltin” in rolls or inter-crown insulation - jute, flax batting.
We insert mineral wool slabs between the sheathing, pushing them tightly into the opening. We do this from the bottom up.
We install a windproof waterproofing superdiffusion membrane on top of the insulation. It must have a vapor permeability of at least 1400 g/m2 per day or higher.
Important! Correctly selected wind protection for the ventilated facade of a log wall is almost the most important thing in insulation. This membrane will not allow moisture and wind to pass through from the outside into the thickness of the insulation and walls, but at the same time it will release moisture and air from the inside to the outside, thus giving the walls the opportunity to “breathe.”
On top of the windbreak we fill the sheathing with 50 mm beams. We install siding on the sheathing. This can be vinyl siding that imitates wood, or you can use a house block, then the wall will have the same log profile as the real one.
A ventilation gap is formed between the membrane and the facade over the entire thickness of the sheathing (50 mm). It is necessary to arrange vents at the bottom and at the top so that air can circulate freely.
How to insulate a log house from the inside
The option of insulating the house inside must be considered before constructing a ventilated façade. Perhaps standard insulation measures will be enough, and you won’t have to spoil the appearance of the walls.
Insulation of a log house from the inside includes the following procedures: insulation of the floor, ceiling, roof and walls. Moreover, experts are categorically against installing insulation inside the walls, since in this case the wood will become damp and rot.
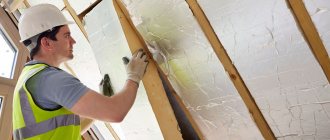
Insulation of ceilings, roofs
The first step, as soon as we discovered that the house is cold, is to insulate the ceiling and roof.
If the house is one-story with an attic, then we lay a waterproofing film on the attic floor, and pour a layer of insulation on top with a layer of 150 to 250 mm. It can be ecowool, sawdust, seaweed or ordinary mineral or glass wool in rolls. There is no need to cover the insulation. You can lay boards on top for ease of movement around the attic, but there is no need to install a floor.
If the house has an attic floor instead of an attic, then it is necessary to insulate both the floor between the floors and the roof slope. It is enough to lay 50 - 100 mm of insulation (any kind) into the ceiling. If the attic floor is wooden, then add insulation between the joists. If the floor is concrete, then we use basalt wool in slabs or, as a last resort, polystyrene foam. To insulate the roof slope directly under the roof, we lay a waterproofing film, then lay insulation (mineral wool) in a layer of 150 - 200 mm. We lay a vapor-proof membrane on top of the insulation so that the material does not become saturated with moisture from the room. We install sheathing and trim for the attic.
The above procedures should be enough to make the house warmer.
Insulating the walls of a log house
Let's move on to the walls. Since it is impossible to install insulation inside log walls, what can we do: thoroughly caulk the inside, insulate all window and door openings.
To insulate openings, we use rolled inter-crown insulation or, as a last resort, mineral wool, but under no circumstances do we blow out the cracks with polyurethane foam, it will quickly become unusable, since the walls of a log house are constantly in motion, and foam is a non-plastic material.
To decorate the walls of a log house from the inside, you can upholster them with wooden paneling. In this case, insulation cannot be installed between the wall and the finish. The house will become a little warmer due to the fact that the wall will have a slightly greater thickness, as well as air gaps on the side of the heated room between the flat paneling and the curved surface of the log walls.
Insulating the floor of a log house
In order for the floor in a wooden house to be warm, it must be equipped following all the technology for laying the floor on the ground. Backfilling, waterproofing and insulation are required. If the floor is wooden, we lay insulation between the joists in a layer of 100 - 150 mm. Above is the rough and finishing floor.
If the floor is concrete, then between the layer of “lean” concrete and the main layer we lay polystyrene foam or extruded polystyrene foam in slabs 50–80 mm thick.
Before insulating a log house with a ventilated facade, install a “warm floor” system in the house. Perhaps this will be more than enough to ensure a comfortable stay. Then you won’t have to sew up the beautiful log walls, because such houses are built because of their primitive beauty. What's the point if you cover the walls with siding?
Insulating a log house is a whole complex of measures. If everything is done correctly, start with the ceiling and roof, then thoroughly caulk the walls, insulate the windows and doors, and the floor, there will be no need to sheathe the outside of the house. If this does not help, there is another way to maintain heat in a log house, which is not described here, - to build a glass veranda on the coldest side of the house, thereby expanding the area and forming an air barrier.
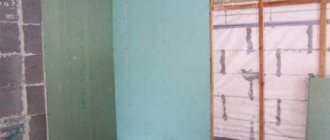
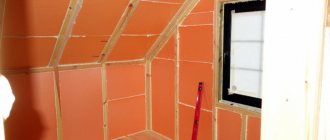
Internal wall insulation
First, they begin to install a waterproofing barrier. Then the vertical sheathing is installed. It is made from timber with a section of 5 * 5 in increments of thirty centimeters.
Note: Before installing the sheathing, the timber is treated with a special antifungal agent.
Before laying mineral wool on the sheathing, it is cut into strips of the required length and width, twenty millimeters greater than the distance between the beams. Each strip is carefully laid and firmly fixed with anchor bolts. A vapor barrier film is installed on top with an overlap of up to ten centimeters using a construction stapler.
Note: Walls can only be insulated with polystyrene foam of a smaller thickness than with external insulation.
To cover the heat-insulating layer, sheathing with 3*4 cm bars is also arranged. The walls can be covered with wooden clapboard. For thermal insulation of walls, you can also use ecowool, glass wool and polystyrene foam.
The process of wall insulation can be divided into stages:
- Cleaning the surface from dust and dirt;
- Sealing cracks with foam, linen felt or tow;
- Treatment of timber for sheathing with antiseptics;
- Installation of timber lathing;
- Mark where the outermost elements will be installed, since the evenness of the entire structure will depend on the design of the first bar;
- Fastening the bars with screws and dowels in increments of 25 to 30 cm;
- One meter is measured from the starting block and the second is attached parallel to the first. And so on around the entire perimeter;
Note: In the locations of the windows, the bars are trimmed around the window opening.
- Insulation is laid between the sheathing;
- Then a vapor barrier is made on top of the insulation using film or polyethylene.
- Wall sheathing using plasterboard, which is screwed to the sheathing beams.
Note: It is not recommended to use a metal frame for lathing, since metal has high thermal conductivity.
Vapor barrier and waterproofing of walls
Insulation of wooden houses begins with waterproofing . This is the layer of special film closest to the load-bearing walls, the main task of which is to ensure air circulation and protect the insulation layer from getting wet and freezing , preventing its destruction and preserving the wood from the development of mold bacteria.
Waterproofing is one of the most important aspects in wall insulation.
Waterproofing membrane
In the process of work, anti-condensation membranes, diffuse breathable films, polymer multilayer films, and vapor barrier membranes are used. When waterproofing, it is important to maintain complete tightness . To do this, the film is overlapped and nailed down using a stapler and staples, and the seams are sealed with mounting tape.
IMPORTANT!
Vapor barrier is a finishing coating that is laid on top of mineral wool and serves to protect against the penetration of water vapor into the insulation structure.
The fastening is similar to the installation of waterproofing.
Vapor barrier
Floor thermal insulation device
Floor insulation helps create warmth and comfort in your home. Here it is very important to follow the technology of installation of flooring on the ground. First, the bedding is done, then the waterproofing is installed, and then the insulation material.
If the floors are wooden, thermal insulation is laid between the joists in a layer of one hundred to one hundred and fifty millimeters. Then rough or finished floors are installed. And if it is necessary to insulate concrete floors, this can be done using the raised floor method. To install a raised floor, first begin by leveling the surface and eliminating defects. A waterproofing membrane is spread on the concrete surface, logs are laid with a pitch between the beams of up to fifty centimeters.
Important: The outermost joist to the wall should not be located closer than thirty centimeters.
With the help of beams, the floor is divided into even lines. The voids are filled with insulation, on top of which a membrane is placed and a flooring is made.
Often a log house is insulated with a heated floor system.
Is it necessary to insulate external walls made of rounded logs?
Signs that a log house requires thermal insulation are:
- rapid cooling of the building with the heating constantly on;
- feeling of cold in the lower part of the room near the floor;
- the appearance of drafts.
Cold walls, which may be thin, need to be insulated. Their optimal thickness in harsh climates is 40-48 cm.
Why is external insulation better than internal insulation?
Internal insulation is used less frequently due to the reduction of space in rooms when a thick layer of material is used. In winter, the unprotected outer surface of the wall freezes. Improper insulation leads to a shift in the dew point, resulting in condensation appearing on the surface of the base.
Wood exposed to moisture and freezing temperatures cracks faster and begins to rot.
Features of insulation materials
Mineral wool is considered a very effective and inexpensive insulation material.
It has the following advantages:
- Good sound and heat insulation;
- durability;
- has low density;
- not capable of deformation;
- affordability;
- comes in the form of flexible mats or hard slabs;
A competing material for cotton wool is polystyrene foam, which is practical and easy to use.
Although many experts do not recommend using non-ecological and flammable polystyrene foam as an insulation material, it has its advantages:
- With its help, you can reduce heat loss even with unsealed cracks;
- The small thickness of this material is quite enough to protect the house from winter cold;
- a wooden house with such insulation warms up much faster;
- easy installation;
- excellent sound insulation.
Another suitable material for internal insulation is ecowool. The material is breathable and not blown, with its help all voids in the wall are filled. Prevents moisture from entering and prevents the spread of mold and mildew.
When choosing glass wool for insulation, high-quality thermal insulation of the room will be necessary, since this material is capable of transmitting moisture, thereby worsening the thermal insulation properties.
Which insulation to choose?
When choosing insulation for the walls of a house, first of all you should pay attention to the ability of the material to pass steam and air while retaining heat.
The severity of the climate of the region of residence should also be taken into account.
Insulation materials include:
- interventional insulation materials used during the construction stage;
- and insulation materials used for insulation from the outside or inside.
Inter-crown insulation is used in laying inter-crown joints. Such insulation can be synthetic or natural (from jute, moss, flax, hemp). The main property of these materials is low thermal conductivity and the ability to accumulate and release the resulting moisture . The most common today are insulation made from flax and jute fiber.
To insulate walls from the outside or inside, basalt (mineral) wool or fiberglass wool in the form of rolls or mats with a density of 80-120 kg/m3 are widely used . In addition, it is an environmentally friendly material.
It is not recommended to use polystyrene foam or penoplex as an element of the cake , since these materials are vapor- and moisture-proof and prevent air exchange between the house and the outside environment.
The following materials may be suitable for insulation:
- mineral wool;
- Styrofoam;
- extruded polystyrene foam;
- penoplex;
- penofol;
- penoizol;
- polyurethane foam.
Mineral wool is the best insulation option
Mistakes when insulating a log house with your own hands
Some people believe the myth that the more insulation you put inside a building, the better. However, if there is a very thick layer of insulation, the dew point may move into the material itself, and if it has a cotton base, it may undermine its thermal insulation characteristics. As a result, your insulation simply will not last long.
Another mistake is the desire of some owners to insulate the house on both sides, which causes damage to the wall of the building itself. The point here is that the vapor barrier feature of the insulation simply will not allow the walls to dry out, which will provoke the spread of mold and mildew.
Insulation and ventilation
A house insulated from the inside is no longer an “environmentally friendly” building. Synthetic materials will keep all odors, moisture, carbon dioxide, etc. inside them. Ventilation in such houses is simply necessary. Good ventilation will preserve building materials and people's health.
It is necessary to ensure an influx of fresh air and the possibility of exhaust air. The load on the heating device will increase by approximately 1.5 times. Therefore, you need to take this into account and factor it into the power of the device.
Ventilation in a wooden house
Installing a recuperator (you can do it yourself) will help reduce heating costs.
You cannot skimp on ventilation. But if, nevertheless, the funds do not allow you to create a full-fledged system, then you need to organize at least forced exhaust. And for a house with stove heating, inflow is more important.
Expert advice
Professionals recommend adhering to the following rules when insulating a log house yourself:
- Insulating a wooden house from the inside should only be done in extreme cases; it is better to do it from the outside;
- Any insulation, whether internal or external, must be done during the warm period;
- If the façade of the building has cladding, then before insulating the interior it is necessary to ensure that there are vents between the wall and the cladding so that the wall can dry out;
- It is necessary to treat all wooden surfaces before installing insulation material. After insulation, a microclimate is formed in the walls, which is not entirely favorable for wood and excess treatment will not harm;
- It is better not to use materials such as polystyrene foam as internal insulation. Many people buy it for its low cost and good thermal insulation characteristics, but it is completely unsuitable for interior decoration.
If you decide to insulate a log house from the inside, then you need to do it completely, i.e. walls, floor and ceiling. If you only insulate the ceiling, then the heat will somehow escape through microcracks in the walls or floor. Now there is a huge selection of different insulating materials and tools, thanks to which everyone can insulate their home even without the help of professionals.
Sealing seams and joints of forming elements
This method is internal wall insulation aimed at sealing joints and cracks in logs . In this case, various sealants are used (silicone, latex, acrylic, linen rope, tow). This method is convenient because it can be easily done with your own hands and does not require special skills, it does not interfere with the release of steam and is the most economically profitable.
Technically it is carried out as follows:
- the edges of joints and cracks are cleaned,
- cavities are filled with rope, foam rubber;
- a layer of sealant is applied on top;
- the sealant is smoothed with a brush until a smooth surface is formed;
- Remains of sealant are removed with a rag.
Sealing with sealant
Sealing seams with fabric