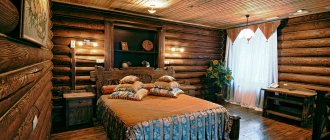
A wooden floor is not only a beautiful surface made of natural material, but also a practical element of any home that will maintain and retain heat in the room. Laying floorboards is a type of construction work that requires the appropriate skills and abilities, since wood is a capricious material.
Appearance of the material
Choosing a floorboard
To choose the right flooring board, you need to know which tree species have priority in the production of this building material. There are 2 main types of floor boards:
- From coniferous trees, for example, spruce and pine. Such boards have an affordable price policy and are most popular when laying wooden floors.
- From more expensive species: oak, beech, ash. The main differences between these species are a longer service life, as well as a beautiful pattern of the finished floor. But when installing oak and beech, difficulties often arise.
The criteria for choosing a floorboard starts with moisture. This is the main parameter, which should not exceed 8%, otherwise after laying the floor, the wooden covering will dry out and the boards will have to be removed and laid again. Even if the surface of the material is perfectly dried, it still needs to be kept directly on the site for at least 7-9 days before installation.
When choosing boards, you should minimize the presence of material with knots. If there are any, then they should sit tightly in place; boards with falling knots must be excluded.
Such a parameter as the thickness of the wooden floor (from 25 to 40 mm) should be selected based on the number of logs that are laid on the concrete. The more lags are located over the floor area, the thinner the boards can be chosen.
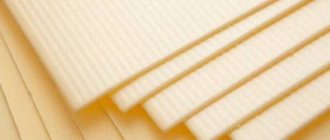
Features and characteristics of tongue and groove boards
This type of flooring material is a board with ridges and a milled groove, which allows you to create a completely flat surface without gaps. Distinctive characteristics are high installation speed and structural strength.
Typically, connection locks are located on either two or four sides of the part. On the back side of the lock there are bevels that ensure optimal air circulation in the structure being secured. The boards should be attached to the floor joists carefully, keeping to the same level. Thanks to the equal thickness of all elements, the floor covering is perfectly smooth.
Treatment with special protective compounds should be carried out on both sides. When choosing cheap copies, you may encounter a low-quality product that is processed only on one side. Experts advise paying attention to the presence of ventilation holes.
On what basis should the floorboard be laid?
Floorboards are a universal type of material created for laying wooden floors on any type of surface. It could be:
- Concrete floor.
- Laying on plywood.
- Lags.
- Wooden or parquet flooring.
The basic rule when laying floorboards is to fill the gap between the wood and the base (even if the installation is done on plywood). Basically, mineral wool is used for this, which also belongs to the category of insulation. Cotton wool does not allow excess moisture and cold to pass through; it can be laid directly on the base, even if it is made of concrete.
Log functions and requirements for them
Useful functions of the lag subbase:
- hiding utility lines;
- leveling level differences, achieving a flat horizontal surface for flooring;
- convenience in insulation - uniform placement of insulation into the cells without increasing the thickness of the base;
- sound insulation.
The structure of the floor on beams has sufficient rigidity for increased loads and laying of massive material.
Advantages of timber lag foundation:
- ease of repair of individual areas;
- maintaining the integrity of the flooring under seasonal influences of the external environment due to the same deformation properties of wooden elements - timber and flooring;
- insignificant load on supporting structures due to the lightness of the material;
- relatively low price of wooden beams.
With these positive qualities, it is worth considering that the lag structure reduces the height of the room.
Approximate indicators for reducing the height of a room
The log system refers to capital structures, and regardless of whether logs from boards are used or timber is used, the requirements for wood are:
- solidity;
- low resinity;
- absence of bark;
- low knotiness;
- lack of longitudinal-transverse curvature.
It is allowed to have a small number of healthy knots in the wood, fused with the base and not rotting.
The design features of the planned flooring system in a particular room and the type of flooring used determine the choice of logs - from timber or boards. Timber is used more often.
Important - the wood must undergo heat treatment (drying) in a drying chamber.
Sequence of laying floorboards
How to fix the floorboard? The floorboard has an easy-to-install design - just insert the boards into specially made grooves and secure them to any surface with self-tapping screws. The basic rule is the placement of a wooden floor: the boards must be positioned across the movement.
The board installation sequence is as follows:
- The first board is mounted from the far wall. In order to be able to insert the rest of the flooring elements into it, it is necessary to place the side with fasteners (called veneer) against the wall. Then the groove remains free for attaching the next board. To attach the board to the surface, use self-tapping screws, which are directed into the groove at an angle of 45 degrees. In order for the element to be securely fastened, it is necessary to use self-tapping screws whose length is at least 100 mm. The cap can be slightly deeper into the wood using a curved screwdriver.
Example of connecting boards - The next board is connected to the first, just guide the veneer into the groove and knock it down a little along its entire length using a rubber hammer. To ensure that the entire floor surface is level, each board should be leveled in relation to the previous one, using a building level. If the board is below the required floor level, then you need to place a small piece of wood under it and secure it with self-tapping screws.
- Having secured the last board, the veneer can be cut using a jigsaw and the cut cleaned. The penultimate stage is treating the floor with a sander and opening it with varnish or other substance. To change the color of the floorboard, you can use mastic or stain.
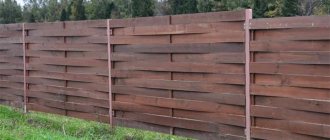
- All that remains is to install and secure the baseboard around the perimeter of the floor. If the plinth is made of wood, then it also requires processing and opening.
Many owners of private houses do not pay too much attention to aesthetics and install floor elements on top. To partially hide the screw heads, they are treated with sealant. Of course, this method will not add sophistication to the surface, but it is considered more reliable.
Insulation
As for insulating the floor in the apartment, I advise all my customers not to miss this opportunity. Especially when the apartment is on the ground floor and there is an unheated basement below you. Insulating the floor will eliminate heat loss.
Important
If a heated floor system is installed on the floor, then insulation of the floor is simply necessary. The insulation must have a reflective film on it. Due to this, all the heat generated will rise to the top of the apartment.
Various materials are used for insulation.
Expanded polystyrene
Expanded polystyrene is sold in packages. Depending on the manufacturer, the price ranges from 1.1 to 4 thousand rubles. Work per m2 will cost you 150 rubles.
Pros:
- Easy installation.
- Light weight.
- Environmentally friendly.
- Various microorganisms do not live in it.
- Does not allow moisture and heat to pass through.
- Service life 50 years and above.
Minuses:
- Flammable
- When the temperature reaches 90° it deforms.
Cork
A roll of cork 2 mm thick costs 1,200 rubles. The thickness of the cork is 6 mm and the price per roll is 3800 rubles. In my opinion, the use of this insulation is unjustified. There are much cheaper insulation materials. But in some cases this is the only optimal solution. The price for installation is 320 rubles. m 2.
Pros:
- Long service life.
- Environmentally friendly.
- Does not rot, does not spread mold.
- After time it does not lose its characteristics.
- Lets air through.
Minuses:
· Afraid of moisture. I do not recommend using in rooms with high humidity.
- Difficult installation process.
· High price. But in my opinion, the quality is completely worth the price.
Ecowool
One of the modern solutions. In my opinion, the most effective way to insulate a wooden floor in an apartment. Cost 1 kg – 28 rubles. Work for 1 m2 costs from 1600 rubles. (wet method). In my opinion, the ideal combination of quality and low cost.
Pros:
- Lets air through.
- Low cost.
· Does not grow mold, does not rot. It does not harbor insects and mice.
- Easy installation.
- Seamless insulation.
For your information
Cons: the main disadvantage is that after a while, dry laying of ecowool cakes. Therefore, when insulating the floor, I recommend compacting it thoroughly; on average, per 1 m3 the consumption will be 50 kg.
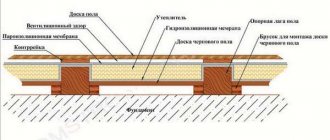
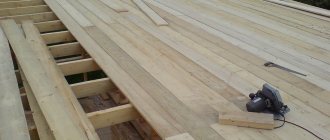
Laying floorboards on joists
The process of installing floorboards on joists is painstaking and precise, but if you have some skill it will not take much time. Logs are wooden beams that are laid along the entire floor. A floorboard is laid across these elements. As logs, you can use not only specially installed timber, but also ordinary beams from which the second floor is covered.
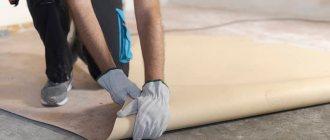
Before attaching the logs to the base, it is necessary to create conditions for the further use of the flooring. Humidity and cold penetrating from the concrete floor can significantly reduce the lifespan of even the highest quality floorboards. To prevent this from happening, you should apply the method of laying an additional layer of thermal insulation. The highest quality and inexpensive type of thermal insulation material is mineral wool. It should be remembered that before laying mineral wool on the base of a concrete floor, you must put gloves on your hands.
Laying insulation
Installation of floorboards and joists begins with their careful processing. Heated drying oil, to which you can also add wax, is ideal as an antiseptic. This composition will preserve the coating and provide protection from the effects of insects or harmful microorganisms.
The distance between the logs must be left at least 50 cm. Then the wooden covering will be reliable and strong, without any movement of the boards. To fasten the logs, you should use standard dowels; it is not necessary to use anchor bolts. The joists are drilled through and a hole is made in the concrete floor. Next, a plastic tip is hammered into the floor, and a self-tapping screw is screwed through the joists into the base of the concrete floor, thus fixing the covering in one place.
Be sure to watch the video about floor installation:
There is a way to attach the logs using mortar (not suitable for plywood). It is enough to make a small amount of solution and fill the logs in several places. The solution will not affect the service life of the timber in any way, but will make the structure quite monolithic.
Dimensions and consumer qualities
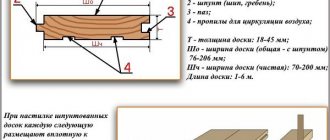
Tongue and groove floor boards - dimensions and design
Coniferous wood is most often used to make floor boards: pine, larch, spruce or cedar. Material made from ash, beech and oak is considered elite. Oak has a very beautiful, unique texture, and over time the color of the wood becomes brighter and more saturated. However, oak wood, like other first-class varieties, due to its increased density complicates the installation of floorboards, but if it is laid according to the rules, the result will exceed expectations in beauty and durability.
Technical parameters mean the dimensions of the planks:
- Length (3, 4, 4.5, 6 m).
- Thickness (28, 30, 32, 35, 40 mm). This characteristic is taken into account depending on the distance at which the logs will be laid. If the gap between them is more than 70 cm, then we lay thicker boards.
- Width (80-135 mm). The most commonly used planks are those whose width is 100-105 mm. When choosing them, you should take into account the size of the room and its design. A board that is too wide or, conversely, narrow can spoil the overall impression of the room.
Floorboards, like any finishing floor covering, have their own operating characteristics. Among the positive aspects, the following should be noted:
- Naturalness and environmental friendliness;
- Ability to withstand heavy loads (this is especially true for oak floors);
- Durability – depends on the type of wood;
- High level of sound and heat insulation;
- Antiallergic properties;
- Resistance to various types of deformation;
- Moderate cost.
Among the disadvantages are:
- Labor-intensive care;
- Rotting;
- Highly flammable;
- Predisposition to abrasion;
- Changes in volumes in the summer and winter seasons, which can lead to the appearance of cracks.
With proper care and use, wooden floors will remain in good condition for a long time and will be pleasing to the eye.
Laying floorboards with glue
There is a way to lay floorboards with glue. This method is practically no different from ordinary installation on logs, only the fastening elements are not self-tapping screws, but special construction adhesive.
Laying floorboards with glue
An epoxy composition containing epoxy resin components should be used as an adhesive. After hardening, the base of the solution becomes very durable and has a long service life. A replacement for epoxy glue can be a dispersed or polyurethane composition, which is practically in no way inferior in strength to epoxy.
Preparatory work
When choosing materials and methods of floor installation, you should first pay attention to the average soil moisture under the house. In some residential areas, logs are laid on the ground, with cut-off waterproofing laid under them. Such floors reliably last for several decades, but such dehydrated soils are quite rare.
Below we will consider a method of preparing the foundation, which is used almost everywhere in our area. The whole point of this method is to install a concrete screed on a waterproofing pad. In a country house, a concrete screed will serve two functions at once: to insulate the floor from moisture and to serve as a rigid foundation for a wooden floor.
When starting to lay out a concrete base for a wooden floor, you must make a small pit in the house and carefully compact its bottom. A layer of sand 20 mm thick or more must be poured into the hole. You can also add an additional layer of crushed stone under the sand, but this step is often skipped. After you have made the sand cushion, cover it with a cut-off waterproofing material, which can be used as cellophane film or roofing felt. It makes no sense to use vapor-permeable waterproofing, because its properties are not needed at this stage, and the overpayment will be significant.
Examples of floors
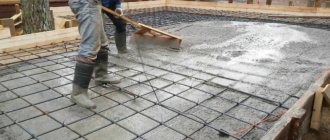
Pouring the floor in a private house instructions
To pour a concrete floor yourself, you do not need any special construction skills. The main thing here is to prepare the necessary consumables and calculate their quantities. If this is done, then filling the floor in a private house will be effective and simple.
Don’t forget, installing a durable and level concrete floor is the key to quality installation of any floor covering. To carry out quality work you must use:
- vibrating rammer;
- roofing felt;
- plastic film;
- expanded clay;
- foam boards;
- reinforced mesh;
- restrictive slats;
- building levels.
Work procedure or instructions for pouring a floor in a private house
1. First of all, you need to prepare the base surface for the future concrete floor. To do this, the top layer of soil must be removed to the required depth. Make an effort to ensure that the plane is as even as possible. Now, it must be compacted using broken bricks or crushed stone. A vibrating rammer will help you with this. If you do not have the opportunity to use such a tool, and you need to arrange the floor in a small area, then compaction can be done manually.
- 2. At the next stage of work, waterproofing and thermal insulation should be installed. It is most rational to use roofing felt for these purposes. If you want to save a little money on installing insulation, and you are sure that the groundwater level will never reach the floor in your house, then floor insulation can be done by laying several layers of a material such as ordinary plastic film. Here your personal preferences and financial capabilities play the main role.
- 3. When the waterproofing is completely installed, you should begin laying the heat-insulating material. For these purposes, you can use expanded clay or foam boards. Although this material is being used less and less, glass wool can also be used to create a heat-insulating layer. When insulating a concrete floor, take a responsible approach to the process of calculating the amount of consumables, otherwise, performing such repairs can cost you dearly.
4. Now, you can begin the process of filling the floor with mortar. Concrete is laid on top of the prepared surface from the end of the room opposite the door, while gradually moving towards the beginning of the room. The use of limit rails, which are set in accordance with the floor level, will help you in this process. It is very important here to strengthen the final layer with a metal frame. To carry out reinforcement, a regular chain-link mesh can be used. Using these actions, you can increase the impact resistance of the top layer.
5. Well, now we can proceed to the final stage. Here you will need to carefully make a screed using a leveling layer of cement, which has been diluted with water, until it turns into a liquid slurry. For these purposes, you can use a special leveling mixture, which is freely sold in specialized stores.
Clean coating from an environmental point of view
Wood floors come in different types.
When choosing, both price and prestige play a decisive role:
- Solid board is an expensive classic material that is often used for flooring. Perfect for a log house. Solid layers are always quite good.
- Parquet boards are made of wood and are equipped with grooves that make joining easier. The thickness of the standard material reaches 0.25 cm, and the length up to 200 cm.
- Parquet glue board is not much different from the previous version and is not inferior in quality. Has a long service life. Its top layer is usually made of valuable wood, its thickness can be up to 5 mm. Other layers are not so large.
- Regular parquet is a set of planks that have grooves. This material is ideally suited and is often used for creating exquisite floors.
What repairs and when to do them
Repairing a floor on your own is a rather complex, time-consuming and responsible process. First you need to understand the types of manipulations that will have to be carried out
To do this, it is important to assess the condition of the structure and decide what needs to be done: cosmetic or permanent. repair
Owners of new buildings have a floor with a ready-made and well-made screed. In this case, it will be possible to get by with cosmetic repairs: if necessary, fill in the leveling mixture and lay the floor covering.
An old apartment often requires capital. floor repair, especially if wood was used as a covering. Wooden floors have a limited service life; over time, the floorboards begin to creak or collapse when walked on. There can be no talk of cosmetically finishing a wood covering that has expired.
Types of floor repairs largely depend on the type of coating that will be used. There is a standard classification of coatings used in floor repairs. It includes such materials as parquet, laminate, ceramic tiles, linoleum, solid boards, stone coating, carpet, self-leveling floors.