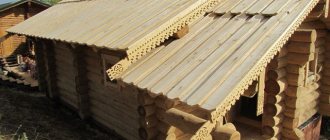
Construction of a T-shaped roof of a house. Phased construction of a T-shaped roof of a house
In this article we will describe the phased construction of the roof of a house, which has a plan shape resembling the letter “T” with the rafters resting on the mauerlat. When the gables are the same width, then the rafters and sills in the valley are created in the same way as described in the previous article “L-shaped roof of a house with equal gables.” Although there was only one valley, here there are already two of them.
We will look at roofs with different gable widths. Based on the previous article, one skate in such a situation will be lower than the other. This can be seen in the image above.
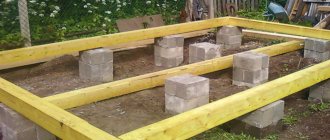
Stage 1: We assemble and install the ceiling beams and mauerlats (see image 1). The gables should already be assembled by masons. The inclined angles of the slopes are always the same. But if the width of the gables is different, then the height is also different:
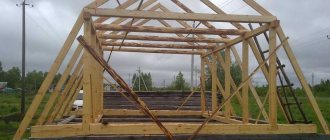
Stage 2: Installing posts and ridge boards (see image 2):
The roof is of the attic type, so the racks are removed upon completion in order to free up more living space. At the end, only the middle post will remain, shown as an arrow. In addition, next to it there will be another brace. This must be taken into account when planning spaces in the attic. This rack is very heavily loaded. We take a section for it of 100x150 mm. The dimensions of all temporary racks made of floorboards are 50x150 mm.
Stage 3: We make and install the rafters of the slopes (see image 3). We install the rafters using the same method as described in the article “Hip roof”:
We install the short rafter that connects the ridges in the center using a cord that is stretched parallel to the upper ridge (marked in blue in the figure) so that it is located in the plane of the slope.
Stage 4: Install the corner rafters in the valleys.
At the very beginning, we tighten the lace (see image 4):
The marking and assembly of this corner rafter was described in detail here... (step 4). There is no need to repeat. The finished result is shown in image 5:
We place a strut under the junction of the corner rafters with the ridge board, providing a load on the supporting wall (see image 6):
Stage 5: We make and install the sprigs (see image 7):
This is followed by spare posts and crossbars (if necessary), cornices and sheathing. You can learn about all this by reading past articles on the construction of a house roof.
Roof installation: correct slope
The structure of the roof implies its slope. Depending on it, roofs are divided into flat (with an angle of up to 5° relative to the conventional horizontal plane) and pitched (with an angle of more than 20°). In private houses, pitched roofs are most often made.
This is due not only to the traditional idea of what a cozy home should look like, but also to the greater water resistance of such structures. In addition, they allow you to “combine” the roof with the wall when constructing an attic and thus save money, because compared to the cost of 1 m2 of wall, the cost of 1 m2 of roof is usually cheaper.
The most convenient roof slope for installing an attic is 38-45°. If it is less than 30°, the internal space will be low and inconvenient for use, and if the slopes are too steep, an irrational zone will form under the ridge.
The choice of the correct slope of the structure is also influenced by the climate of the region in which the house is being built.
When there is a lot of rain and snow (for example, in Western Europe), the roof is made quite steep (with a slope of 45° or more). In case of frequent gusty winds (for example, in the southeast), the roofs are made more flat (with a slope of up to 30°).
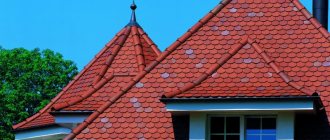
It is important to remember that the angle of inclination of the slopes affects the choice of roofing material. When using roll coverings, the slope should be 5-25°, piece coverings (tiles) should be at least 22°, and large-format coverings (metal tiles and slate) should be 25° or more.
Construction of a T-shaped roof of a house.
In this article we will look at the construction of the roof of a house, which has the shape of the letter “T” in plan with the rafters resting on the mauerlat. If the gables have the same width, then the rafters and sills in the valley are made in the same way as described in the article “L-shaped roof of a house with equal gables.” Only there was one valley, but here there will be two.
Now we will look at a roof with different gable widths. As mentioned in the previous article, one skate in this case will be lower than the other (the reason is described there). This can be seen in the picture above.
STEP 1: Install floor beams and mauerlats (see Fig. 1). Our gables have already been laid by masons. The slope angles are the same. But since the width of the gables is different, the height is also different:
Picture 1
STEP 2: Install racks and ridge boards (see Fig. 2):
Figure 2
Our roof will be attic, so we will remove the racks at the end to free up living space. Only the middle pillar, shown by the arrow, will remain. Also, another brace will appear next to it. This must be taken into account when planning rooms in the attic. This rack is quite heavily loaded. Let's take a section of 100x150 mm for it. All temporary stands are made of 50x150 mm floorboards.
STEP 3: We make and install the rafters of the slopes (see Fig. 3). Here we install the rafters in the same way as was described in the article “Hip roof”
Figure 3
We install the short rafter connecting the ridges in the center using a cord stretched parallel to the upper ridge (shown in blue) so that it is in the plane of the slope.
STEP 4: Place the corner rafters in the valleys.
First of all, we tighten the lace (see Fig. 4):
Figure 4
The procedure for marking and making such a corner rafter was described in detail here... (step 4). We won't repeat ourselves. The result is shown in Fig. 5:
Figure 5
Under the junction of the corner rafters with the ridge board, we install a strut that transfers the load to the load-bearing wall (see Fig. 6):
Figure 6
STEP 5: We make and install the spouts (see Fig. 7):
Figure 7
This is followed by additional racks and crossbars (if necessary), cornices and sheathing. Read about all this in earlier articles on building the roof of a house.
Gable roof frame structure
Roof installation consists of 3 stages:
- Installation of the frame (bearing beams, supporting roof system);
- Lathing arrangement;
- Installation of roofing material.
Rafters are the load-bearing system of the roof, so correct calculation of their installation is important when building a rafter roof. The appearance of the roof, its reliability and maintainability depend on this, so you should not skimp on materials. A winter with too much snow can damage a roof that is “weak” due to the spacing of the rafters. For the rafters, choose timber made of smooth wood (not cross-layered or twisted layers!) of only rectangular cross-section, without defects, cracks or rotting. It is best to take pine timber. However, such a roof can also be made welded from a metal profile pipe.
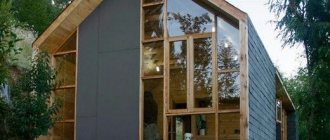
Combined roofs
Combined roof
The shape of the roof depends on many factors, including regional conditions and preferences, the type and purpose of the building, and the landscape in which the object should be integrated. At the same time, home owners and developers strive for originality. This is where combined roofs come to the rescue. Most often, such structures are found in cottage villages. The idea is to combine several roof structures into one structure to achieve a certain aesthetic effect. Combined roofs are also used in case of building expansion. So, for example, it could be a hip roof over a house, complemented by a pitched roof over an attached veranda or winter garden.
Shapes of roofs and rafter systems
Single pitch roof.
The simplest rafter system design has a roof with one slope, which is inclined at an angle from 14 to 26 °. If the house is small and its span does not exceed 5 m, then a layered rafter system is needed. It rests on the external walls, as well as on the wall inside the building (if there is one). When the span is more than 5 m, roof trusses must be used.
Installation of rafters for a pitched roof.
Gable roof
A roof with two slopes is also simple; underneath there is an attic or attic. Its slope is from 14 to 60 °. If the external walls are less than 6 meters apart from each other, a hanging rafter system is made. Layered rafters should be used when the span is large and there are internal supports.
Installation of hanging and layered rafters of a gable roof.
- Read more about it in the material: Rafter system of a gable roof and its structure
Hip roof
A roof with four slopes is called a hip or half-hip roof. Its slope varies from 20 to 60 °, and the span can be up to 12 m. In this case, there must be internal supports. In this case, there are no gable walls, which saves materials. However, installation of such a roof is more difficult than a gable roof. For such roof constructions, rafter systems are made either of a layered type or using roof trusses.
Design features of a hipped roof.
broken roof
The roof is sloping, or mansard, and the bottom can have a slope of up to 60 °. But at the top it is usually flatter. Due to this, the area of the attic increases. Such a roof is good for houses where the width does not reach 10 m. As in previous cases, a layered rafter system can be used. However, it is preferable to use trusses.
Construction of a sloping roof.
- The most common, but not all, roof shapes are listed above; for more details, see the material: Types of roofs of private houses by design and geometric shapes
Main parts of the rafter system design
When thinking about the design of a roof truss system, you need to know what parts this system consists of.
#1. Mauerlat is like the foundation of the entire system. It helps to evenly distribute the load on the walls.
#2. The rafter leg determines the angle of inclination of the slope, as well as the general appearance of the roof, rigidly fixing individual elements.
#3. Purlin – holds the legs of the rafters together. The ridge purlin is at the top, the side purlins are on the side.
#4. Tightening - prevents the rafter legs from moving apart, connecting them at the bottom.
#5. Racks and struts - give the legs of the rafters additional stability. They rest against the bed (which lies below parallel to the ridge).
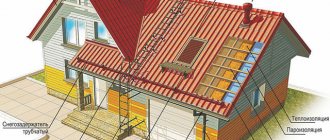
#6. Lathing - is stuffed perpendicular to the rafters and is in the form of edged bars or boards. It is designed to transfer the entire load from the roofing material to the rafter legs.
#7. The ridge of a roof is where two roof slopes meet. A continuous sheathing is installed along the ridge to strengthen this part of the roof.
#8. Fillies - used to create an overhang if the length of the rafter legs is not sufficient.
#9. A roof overhang is an element designed to protect against excess rainfall on the walls.
Now let's look at such a complex unit as a roof truss. It has a flat shape, and in addition to rafters, it includes braces, posts and braces. They are positioned so that there is no load on the walls inside the house. Only its outer walls are supports, and the load goes vertically. The distance between the trusses is determined by calculations. If the span is large, then the truss consists of several parts. In the attic, the lower chord of the truss serves as a ceiling.
The above are examples of wooden roof trusses; in addition, in some cases, trusses made of concrete and metal are used.
broken roof
An example of a sloping roof is a mansard roof - this is a structure in which each slope consists of two parts: the upper one with a smaller angle of inclination and the lower one with a larger angle. A sloping roof can be two or four slopes. The use of this design improves the operational properties of the attic - the usable area increases. A sloping roof most often has a lower inclined plane at an angle of 60º, and an upper one of about 30°; layered rafters are used in the rafter system. It is best to use flexible tiles as a roof.
Broken mansard roof
The disadvantage of this option is that the design is more complex and difficult to implement, as well as the need for very careful preparation of the coating. Leaks may occur in areas where the slope is broken. Also, the difficulty of its implementation lies, in particular, in the appropriate arrangement of the rafters. In any case, it is better to entrust installation to specialists.