How important it is to have a roof over your head. This saying has long become synonymous with protection and comfort. During the construction of a new building, the construction company attaches great importance to this particular element of the house. After all, a person cannot live in the open air. No, it was like that once, but many centuries have passed since then.
Building a house with a flat roof (or a lean-to) has long been no secret. It's just a matter of the materials used for construction. And in our time, these are no longer just huge pieces of ordinary slate, but something more technologically advanced and environmentally friendly.
Virtual assistant
Before starting such a large and ambitious project, you should familiarize yourself in more detail with all the proposals that construction companies can offer.
In order to find them, you don’t have to go to every store and check all the details. Using the World Wide Web, you can find any information, including photos of the roof of the house.
The main thing is to correctly analyze the market and choose exactly the product that is most suitable.
A lot depends on the roof
When a person walks on the street, from time to time his gaze falls on the roofs of houses. For example, the roof of a one-story house (and not only that) very much depends on the correct slope. After all, the use of all the strengths that a canopy shelter has depends on the correct slope.
Roof project - varieties, construction options and the best modern forms (85 photos and videos)Roof from A to Z - a detailed overview of all types + expert recommendations
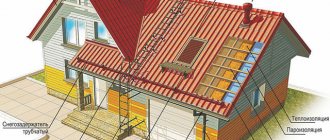
Roof insulation: how and what is the best way to insulate a roof. Tips for choosing materials and do-it-yourself insulation technology (110 photos)
And where the climate is usually harsh, the slope plays almost the most important role, since if it is built incorrectly, all precipitation that falls on the surface will flow into the building.
A very important component of the correct slope is the selection of roofing material. For example, if you plan to cover the house with slate or tiles, then in this case the slope should be at least 25°.
Choosing a slope for the roof
Based on the type of slope, roof surfaces are divided into flat and pitched. Slope refers to the angle of inclination of the roof relative to the horizon. As usual, it is measured in degrees.
The arrangement of the roof slope is due to the need to remove various precipitation from its covering. If there is no slope, roof leakage is inevitable. And the appearance of such coatings is more suitable for commercial buildings.
When choosing the degree of roof slope, you must keep in mind that the greatest load from snowfall on the roof is achieved when the slope angle is 30 degrees. Self-cleaning of the roof (snow rolls down independently) occurs at 45 degrees of inclination.
In addition to precipitation, powerful gusts of wind also affect the roof surface. Increasing the slope angle to 30% increases the wind load by 5 times. But a slight slope is also unacceptable, because in this case the wind, penetrating through the joints of the coating, can pull off the structure. Therefore, it would be logical to entrust the choice of roof slope and shape to experienced specialists who will take into account all the nuances.
Obviously, pitched roofs are much more expensive than flat roofs. But still, durability, strength and safety are much more significant than the initial costs. Consequently, pitched roofing remains the most famous among the coverings of private houses. As mentioned earlier, the slope of this type of roof is determined by snow and wind load. But besides this, aesthetic appearance is of no small importance.
DIY roof
If you have the proper qualifications, a person can make the roof of a house themselves. To do this, he should follow the instructions, which divide the installation of the canopy into stages:
- stage one - measurements of the house frame are taken (this is done in order to understand whether the dimensions coincide with the design plan);
- stage two - purchasing materials and collecting the necessary tools,
- stage three – treatment of the wooden base with a special strengthening agent;
- stage four - fastening the Mauerlat to the wall;
- this fifth is the installation of a ridge crossbar (but only if there is a need for it);
- stage six - installation of the frame base;
- stage seven - strengthening the roofing element with the help of struts and racks;
- stage eight – installation of waterproofing systems;
- stage nine - sheathing;
- stage ten – wiring of ventilation systems (or installation of a window opening);
- stage eleven - installation of drip pipes;
- Stage twelve - installation of the final coating.
Based on this information, a competent professional can easily install a roof on his home.
Stages of work execution
Mauerlat installation
The roof of a country house begins with a mauerlat. It is best to attach a wooden frame made of timber to special studs, which are embedded into the wall in its upper part in two ways:
- Through pouring a concrete armored belt. In this case, the studs are simply filled with solution.
- Through fixing the studs in the last rows of masonry.
Important: the height of the protruding part of the stud should be approximately 3 cm greater than the thickness of the timber (mauerlat). This is necessary so that the master can fix the wooden frame with nuts.
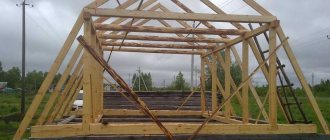
Installation of rafters
Step-by-step guide to building a roof for your home with your own hands
The rafter legs are mounted on the country house in the shape of a triangle. One edge (upper) rests on a parallel rafter or on a transverse ridge beam, and the second lower edge of the rafter rests on the mauerlat through an internal cut. At the same time, it is highly not recommended to form cutouts on the Mauerlat, since this will greatly weaken the overall structure of the house later.
In our case, we will join two rafters at the corners to each other without using a ridge. In order for all the rafter legs to be the same length and fit exactly together in the upper and lower parts, it is necessary to make a pattern (rafter sample) and then use it to form the inner lower cutout and the straight upper one. In order to make an internal cutout, step 50 cm away from the edge of the rafter (towards the roof overhangs) and apply a square block with a cross-section of approximately 8x8cm. Using it, the corner of the rafter is removed to rest it on the Mauerlat.
Now we lift the beam onto the roof of the dacha, rest it against the Mauerlat with one edge and install it at the desired angle. A vertical mark must be placed on the beam strictly in the vertical center relative to the frame of the house. This will be the angle of the triangular cut for joining the two rafters later. Using this pattern we cut out all the legs of the structure. We install the finished rafters in increments of 60 cm. In general, the width of the rafters depends on the final roofing covering. The heavier it is, the smaller the step should be. We fix all the elements to the Mauerlat and to each other with special angles, brackets and bolts.
Important: if the length of the rafters is more than 4 meters, then you can strengthen the roof skeleton with crossbars and racks with beams.
Installation of sheathing
As soon as the skeleton of the roof of the country house is ready, the lathing is done. You can use an unedged board of any section for it. Before attaching the sheathing boards, you can lay a vapor barrier material, and sew the boards on top of it. The spacing of the sheathing boards depends on whether you will insulate your roof. If yes, then the step can be made 30-50 cm. If not, then the sheathing is placed in steps of 60-70 cm.
Important: if roofing felt is laid on the roof as a finishing coating, then the sheathing should be continuous with a maximum pitch of 5-7 cm. This will not allow the material to sag over time. The last thing to do is to close the roof gables. They can be made from the same material as the frame of the house, or covered with wood and then painted. Now you know how to build a roof with two slopes and you are sure of one thing: “I’ll build the roof myself.”