Owners of country houses and individual houses outside the city sometimes have a problem with how to add an extension to their house. Either the family has grown, or they wanted more space, or for some other reason. From an engineering point of view, the most reasonable solution in this case is not to build another separate house, but to make an extension to the existing one. It is here that communications are brought in, and the layout of the site will not require changes. In this case, builders must solve a very important problem: how to connect the roof of the extension and the house. In this case, one wall will be common, the rest will have to be completed. The organization of the passage between the old and new parts of the house allows us to consider the extension precisely as an added area. This will be discussed in our review.
House with extension PHOTO: vashdompriozersk.ru
Types of extensions - why functionality is important
The extension, depending on the wishes of the owners, is assigned various functions. It can be a summer terrace or a kitchen, an additional warm room, a workshop or a garage. Some serve as a vestibule for the main house or have their own separate entrance. It can be located on the side of the main facade, at any end, or attached to the rear wall. And in height it is, as a rule, lower than the main house.
The extension has its own strength frame, independent of the main building. And even adjacent walls can be separate. Rigid attachment of the extension to the house is not mandatory. But the junction of two buildings must be closed from above from the flow of rainwater. For this purpose, the roof of the extension is combined with the main house.
The problem of connecting the roof of an extension to the main house has many solutions, which depend on the shape and design of the main roof.
Various options are possible. Roofs can be single-, double- and triple-sloped. There are also more exotic situations, but they will not be considered here.
Shed roof for house extension
If the roof of the extension is pitched, this is the simplest option. It should be adjacent to the wall of the main house. And its roof is slightly higher, and does not have any influence on design solutions. It is only important to show artistic taste and maintain the unity of the architectural style in the combination of the house and the extension.
The roof surface is one plane. It has a slight slope down from the wall of the main house to the outside. The structural basis is a set of rafters - beams running from the wall of the main house to the wall of the extension farthest from it. The upper ends of the rafters are laid on a special horizontal beam attached to the wall of the house. The lower ends of the rafters are fixed to the beam of the new extension wall.
Important installation features
- To attach the rafters to the house, you can do without grooves. Then use brackets in the shape of the letter “P”. These parts are installed upside down and attached to the wall.
- If struts are used, the angle between them and the building wall should be less than 45°.
- If the lower ends of the struts are attached to the wall of the house, grooves must also be made for them. Additionally, they provide fixation with corners.
- If the length of the rafters is designed flush with the wall of the extension and does not allow for a canopy, additional boards are nailed for it. The so-called “fillies”.
- The perimeter of the roof is sheathed with a wind board or metal end strip. The second option is suitable when metal tiles are chosen as the roofing covering.
Do-it-yourself shed roof for an extension
In this case, the shed roof of the extension is adjacent to the wall of the house. The covering material of a new building should be laid flush against the wall of the house. Between it and the wall you need to lay a seal, which for greater effect is coated with sealant or clay. A more technologically advanced option using a special wall profile. A seal and a special sealant are sold together with it. If the wall of the main house is concrete or brick, then the upper edge of the profile must be recessed into a specially grooved groove.
The roof of the extension must have an outward slope. This is necessary for water drainage in summer, and for snow sliding in winter.
A sheathing is laid across the rafters across the entire width of the roof - a set of slats with a cross-section smaller than that of the rafters. The frequency of laying the sheathing is determined by the roof covering material - the size of the tiles, slate sheets or roofing iron sheets.
Extension with a pitched roof PHOTO: yandex.ru
Connecting the roof of the extension to the roof of the house
There is a design option when the roof of the extension starts from the lower edge of the roof of the main house.
Attaching the roof of the extension to the house
This is a simple option. Both roofs have different pitches; the main house has a steeper roof. Sheets or tiles covering the extension must be placed under the roof overhang of the main house. In this case, it would not hurt to use a wall profile with a seal. This will protect the joint from leaking.
Joining two roofs PHOTO: sk-murom.ru
How to make the correct calculations?
Since they decide to install the extension with their own hands to an already built house (otherwise it would have been built along with it), you will need to make a drawing yourself. The required dimensions are easily calculated: according to the length of the house wall and the desired width of the extension.
In this case, the calculation of the roof requires compliance with special conditions . Namely: depending on the roofing covering, the angle of inclination is determined. It must be said that the strength of the structure depends on this value:
- if the slope is insufficient, precipitation will linger on the roof of the veranda, weigh it down, and increase pressure on the beams, walls, and foundation;
- if the slope is excessive, the roof may suffer during strong winds (its area and degree of windage increase).
The minimum slope angle has the following values:
- 5° for 2-layer roofing felt,
- 6° when choosing ondulin,
- 11° for soft roofing,
- 12° for profiled steel decking,
- 14° when choosing metal tiles,
- 15° for 3-layer roofing felt,
- 22° when choosing tiles, slate.
The maximum slope slope for all materials is 60°. However, it is better not to adhere to this parameter and take average values: 20°-35°.
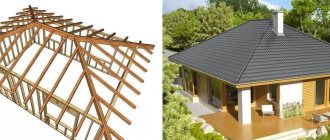
Extension to a house with a gable roof
A gable roof consists of two flat quadrangles, which are connected at the top with a ridge beam and separated at the bottom.
Installation of the extension roof
One edge of these rectangles is attached to the wall of the main house, the lower edge rests on the walls of the extension. The basis of the rectangles are the rafters. At the top, the rafters of two planes are connected to a ridge beam; their lower ends rest against the walls of the extension. There is a sheathing running along the rafters, and the roofing material is laid on it.
How to attach a roof to an extension to a house
The roof of the extension is attached to the wall of the main house through the rafters closest to it. The abutment line is compacted in the same way as in the case of a pitched roof. Since the roof boundary is sloping, the risk of leaks in this case is much lower than in the case of a pitched roof. But still, sealing the joint must be taken seriously.
Extension with a gable roof PHOTO: yandex.ru
What materials are needed for a barn roof?
Let's think about how to cheaply cover the roof of a barn to reduce costs. The most reasonable thing from the point of view of safety from wind and heavy rainfall would be to build a shed with a pitched roof, since fairly inexpensive materials will be needed. In addition, you will not have any problems purchasing them - everything is freely available in stores. And the number of consumables will be much less than for roofs of a more complex design.
During the construction of the roof of an extension to the house you will need:
- Wood . You will need pine beams with a cross-section of 100×100 or 150×150 mm, edged boards 50×150 mm, unedged boards 40×150 mm and a lath with a cross-section of 25×50 mm for the construction of the rafter system. The moisture content of the material should not exceed 15-16%, and its surface should be free of chips, cracks and stains. Using deep penetration antiseptics, you can avoid rotting and mold formation due to penetrating moisture.
- Roofing covering . You can select a suitable material in terms of quality and cost from a wide range of varieties on the market. A budget option would be slate, corrugated sheeting or roofing felt. A higher quality and visually presentable material – soft roofing, ondulin, metal tiles – will cost twice as much. If we are talking about covering a winter garden, greenhouse or veranda, you can use polycarbonate - a transparent material that perfectly transmits sunlight, a thermal insulating material.
- Waterproofing . This layer is designed to protect the wooden truss system of the roof of the extension from moisture penetration and, as a result, damage to the structure. For this, roofing material, film or diffuse membrane can be used. However, in practice, roofing material has shown itself to be the best, since it is the most durable of the above.
- Fastenings . There are many options for fastening consumables when installing a roof - self-tapping screws with rubber washers, nails, anchors, metal corners. In the case of self-tapping screws, their consumption per 1 m2 of area is about 10 pieces. So, to calculate the quantity, the consumption rate must be multiplied by the area.
Please note that choosing a roof covering similar to the main building will make the extension a harmonious continuation of the house. However, if this is not possible due to financial capabilities, it is worth choosing a material that is as close as possible in color. The choice of lightweight materials (ondulin, roofing felt or corrugated sheets) will make it possible to create a lightweight, simple frame.
Three-pitched roof of an extension to a house
A gable roof is formed from three planes. One of them is an inclined triangle, the other two planes are formed either by trapezoids or triangles.
How to make a roof on an extension to a house
The three-slope shape is a tribute to the architectural imagination of the builder; it does not bring practical benefit. The lower edges rest on the walls of the extension. There is a ridge beam on top. The assembly technology is similar to the assembly of a gable roof.
Connecting the roof to the house
The three-pitched roof adjoins the house along two lines. The docking requirements are the same as in previous designs.
Is it worth building a roof yourself?
A pitched roof is the simplest option for roofing construction, which even a non-professional can build. It is not necessary to hire a team of installers; any home owner can prepare the rafters, install them, and lay the sheathing from 25 mm unedged boards.
However, the design must comply with building codes and requirements, and it is still better to discuss finished drawings with specialists. The load-bearing capacity of the roof must correspond to the climate in a given region, and design errors can lead to too high a load and collapse of the structure.
You can provide your extension with a beautiful, strong and durable roof in just a few days. A wide selection of roofing materials will allow you to implement bold design projects, and the extension to the building will be completely protected from cold and adverse weather conditions.
Egor Kondratyuk
Author of publications on 1Drevo.ru with the topics: Houses made of rounded logs | House made of rounded timber | Gas boiler for home | Rounded garage | Choosing an electric boiler | Polycarbonate canopy | Clapboard finishing | Base finishing | Log house for shrinkage | External insulation | Cedar house | Profiled timber | Wooden fence | Finnish house made of timber | Roof installation | Shallow foundation, etc.
Collections of publications on topics:
Unedged boards Installation of soft tiles Wave slate
Was this publication useful to you?
Bookmark it on social networks!
Total score: 10Votes: 1
How to make a staircase to the veranda of a house: brick or wood
How to heat a wooden house: electric heating system
We recommend! — Encyclopedia Wooden Houses — NEW
You can find out detailed and expanded information on the topic of the article from the book “Wooden Houses,” which reflects all stages of building a house, from laying the foundation to installing the roof. Book price = 77 rubles.
You may also be interested in other BOOKS on building houses from wood with your own hands.
We recommend other posts on this topic:
How to properly make a bay window in a wooden house
Features of the design and installation of the roof in a log house
Wooden house 9 by 9 with an attic made of timber
How to properly arrange an attic above a log bathhouse
Shed roof made of metal profiles at the dacha
Methods of attaching rafters to a log house
Extension to a house with a sloping roof
The roof of the extension can have two, three or more slopes. A multi-slope structure is also colloquially called a sloping roof, and sometimes a hip roof.
How to make a roof for an extension to a house
If an extension with a multi-pitched roof is built with your own hands, then the design of the extension itself will be appropriate. Each break in the roof surface will go along its own rafter beam. The lower end of this beam rests on a post. The walls of the extension are created between the pillars.
The technology for joining the roof of an extension to the wall of the house, in principle, does not depend on the number of its slopes. The most important task in this case is to protect the junction of the roof and the wall of the house from leaks. The most dangerous part in this sense is the horizontal. But in a multi-pitched roof there may not be one at all, only inclined joints. They are less prone to leaks. But it is still desirable to use a special profile with a waterproof sealing gasket.
An extension with a multi-pitched roof PHOTO: m-strana.ru The roof structure differs from a three-pitched one in that there is no ridge beam. The surfaces that form the roof are in the shape of triangles, their vertices meeting at one point. The sides of adjacent triangles are connected. Their junction should be closed at the top with a corner that protects against rainwater leaks.
Design and calculations
Even the simplest roofing structures require preliminary calculations and the creation of at least a schematic design. To build a pitched roof for an extension with your own hands, you need to calculate the slope and area of the slope, the difference between the heights of the support posts, and the length of the rafters. Each of these parameters affects the efficiency and durability of the roof. To perform calculations, you can use special computer programs or turn to simple trigonometric formulas:
- The slope of the slope is calculated as the quotient of the difference between the height of the support pillars of a pitched roof and the width of the extension. This indicator usually lies in the range of 15-40 degrees; it must comply with the recommendations of the roofing material manufacturer and the climatic conditions in the construction area.
- The difference between the height of the support posts is obtained by multiplying the width of the extension by the angle of inclination of the roof slope. This parameter is calculated in order to correctly mount the structure, maintaining the calculated slope.
Calculation of the height of the support posts and the length of the rafter legs - The length of the rafter leg is calculated by dividing the difference in the heights of the support posts by the sine of the angle formed by the slope and the base of the roof. This parameter helps determine how much lumber you need to buy to install the rafter system.
- The area of the slope is calculated by multiplying the width by the length. These calculations will be useful when purchasing roofing material. However, you need to take into account that it is purchased with a margin of 15-20% for overlaps and trimming.
Calculation of the slope area of a shed roof
Note! The slope of the roof slope for the extension is chosen taking into account the climatic conditions in the region of construction. If the region is characterized by a high snow load in winter, the angle is made steeper so that snow and melt water slide off the roof surface by gravity. In windy areas, flat slopes with a slope of up to 15 degrees, which have less windage, perform better.
How to make a house with an extension under one roof
It is quite possible to cover a house and an extension with one roof. New, longer rafters are installed, their own sheathing and a new covering for the roof common to the house and the extension are laid on them. On the wall of the extension, a special frame made of good timber is placed under the rafters. In professional language it is called “mauerlat”. The upper ends of the rafters are laid and secured to the “ridge girder” beam. The lower ends of the rafters are fixed to one of the sides of the Mauerlat.
After finishing work on the new roof, the old one can be dismantled. This will raise the ceiling height a little.
Extension of the roof on both houses PHOTO: im0-tub-ru.yandex.net
Roof installation
The durability and comfort in the room will depend on how durable and high-quality the roof is built over the extension.
Let's consider a lean-to option, with the arrangement of a simple rafter system:
- Check the slope of the structure: if it is large, it will be difficult to install the roofing material, and if it is small, precipitation can break the covering;
- We lay the main fastening beam on which the rafter system will rest: along the edge of the load-bearing wall of the extension. At a distance of approximately 1 meter, markings are made for attaching the rafters, then using anchor wedges they are fastened along the lower base and upper trim. It is best to start with the outer rafters: having strengthened them, it will be easier to install subsequent ones;
- We arrange the sheathing for waterproofing, the selected material is laid on it;
- If a warm extension is being built, then the roof should be insulated with plywood or wooden sheets or mineral wool. A layer of insulation is placed under the rafters and sheathing;
- Now you can lay the roofing material.
Installation of a gable version:
- Again, you need to start with arranging the rafters. If you plan to allocate space for an attic, then you must immediately determine its dimensions and install separate racks for fastening the walls;
- The frame of the rafter system is installed along the load-bearing walls, it is attached to the base of the building; The rafters themselves are fastened in pairs, sewn together with studs or anchor connecting parts;
- After this, they proceed to arranging the sheathing for the roofing material and installing the roof ridge;
- Upon completion of this work, a waterproofing layer should be laid, over which the main roofing material can be laid.
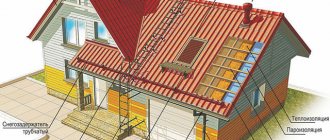
Insulated roof
If the extension will serve as a living space, and even in cold weather, then the builder will have to make a decision about insulating the roof. This is a more complex structure. The same design is used in the construction of two- and three-slope surfaces.
The insulated roof is equipped with several layers of various materials. It is necessary to ensure that steam escapes from the room, prevent water from leaking into the house, create a thermal insulation layer, and provide these layers with mechanical protection both above and below. For each of these functions, the appropriate material is used.
Insulated roof design PHOTO: stroyday.ru