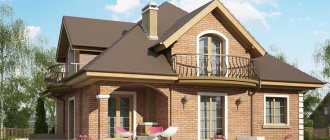
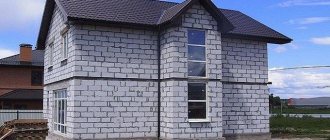
“I don’t have any useless space, I have as many as 100 square meters on the roof that can be used usefully,” says FORUMHOUSE member with the nickname victorborisov. His one-story house made of aerated concrete became popular on the Internet, and received the nickname “transformer booth” due to its flat roof, which is unusual in the Moscow region. Now on the roof of this “booth” there is an excellent lawn, a trampoline and solar panels are installed on it, and you can get there using an electric elevator.
The one-story house made of aerated concrete was immediately conceived as a “second apartment” outside the city - comfortable housing for year-round use, and it was actually built “in one helmet.” Looking back, Victor himself is surprised at the enormous amount of work he accomplished alone. This article talks about the design features and details of the independent construction of a legendary house made of aerated concrete.
Project and requirements for the house
Victor bought a plot for his house in SNT - so that the journey to work would not take more than an hour. He chose the project based solely on rational considerations:
- the optimal area should not exceed 80 m2 - for a family of 3-4 people this is enough;
- the house should have one floor, the second - complication of construction and “extra running up the stairs”;
- in the absence of main gas and at high electricity tariffs, a heat pump (semi-industrial ducted air conditioner) was chosen for heating.
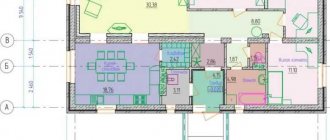
The project has been slightly modified, but this is almost the final layout.
Victor did all the work with his own hands, occasionally recruiting friends to help. He calculated that this approach allowed him to save two million rubles in two years.
At the start of work, our user did not have any construction experience other than major renovation of an apartment. The most difficult part was studying construction technologies and design, especially engineering systems.
VictorborisovFORUMHOUSE Member
The mechanical work itself, be it laying blocks or installing a heating system, is very easy. When you have a well-thought-out drawing and all the materials at hand, you just take it and do it.
During the preparation of construction, he ordered a well from “some office,” bought a change house and installed temporary electricity. The layer of fertile soil was removed and moved to the part of the site where the garden is planned, drainage, a septic tank and backfilling of the site were made.
DIY aerated concrete house foundation
Now Victor is sure that for a stone house without a basement there is no better foundation than the USP; but Victor from 2012 chose a classic foundation slab.
VictorborisovFORUMHOUSE Member
Then I was only able to realize the fact that a strip foundation installed at a freezing depth is not at all a competitor to a classic monolithic slab.
Slab dimensions: 8.5x10.5 meters, height 20 cm, reinforcement in two rows along the entire plane. At the base there is a compacted sand cushion. To prevent the cement laitance from flowing into the sand, a reinforced film is laid on it.
Composite fiberglass reinforcement was used in the construction of the foundation.
In the foundation section of FORUMHOUSE, fiberglass reinforcement is treated critically: its modulus of elasticity is 4 times less than that of steel. Such reinforcement is not recommended for use on floors that are subject to variable high (ultimate) loads at different points.
VictorborisovFORUMHOUSE Member
And in a slab foundation, fiberglass reinforcement is an ideal replacement for steel.
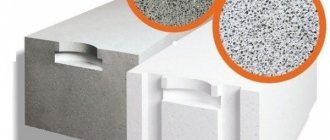
Box
For the walls, Victor chose 400 mm blocks to avoid additional insulation. Aerated concrete was developed, among other things, as a material for independent construction; working with it is relatively easy, although the blocks are quite heavy, and our user lifted and stacked them alone.
The first row of blocks was the most difficult: I had to work with both cement (at the base) and glue for thin-seam masonry.
At this stage of construction, Victor's labor productivity was one full row per day. He sought to achieve an even vertical cut when cutting the blocks so that there would be no gaps when laying them. Later, he himself admitted that this was redundant: such cracks could simply be filled with foam.
After laying the next full row, the horizontal surface was leveled to zero using a plane, so the error did not accumulate as the building grew; the new row always fit perfectly tightly to the previous one.
Additional reinforcement was made under the window openings (a block before them).
In seven working days, Victor laid out seven rows. The masonry rose, building became more difficult. At this stage, there was still enough scaffolding from the freed pallets from the blocks.
Then we had to buy additional boards.
Victor spent the rainy day making reinforcement cages for the lintels from wire and a simple template.
M300 sand concrete was used to fill the lintels.
Victor laid out 12 rows of blocks alone with minimal help. This took no more than a calendar month, and now the missing additional block is solemnly laid out in the last row of the box. The photograph shows the features of applying the glue.
The construction of the walls was complicated by the window openings: the blocks had to be cut much more often. For this purpose, a special device was designed - a miter box, which you can read about in our selection.
VictorborisovFORUMHOUSE Member
Nothing complicated, and with a permanent assistant, this work could be done twice as fast.
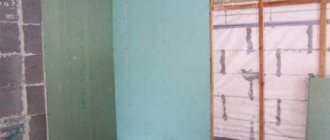
The first row of internal partitions was laid on mortar, the connection with the load-bearing walls was made through the row with metal plates for fastening profiles for drywall: two holes were drilled in the wall and secured with self-tapping screws.
Reinforcement of aerated concrete
To increase the building's resistance to forces arising from soil heaving, longitudinal reinforcement of the walls is performed. To do this, longitudinal grooves are cut into the laid row of blocks using a special device. For thick external ones, two grooves are made for two rods; for jumpers up to 200 mm thick, one thread is used. They should be at a distance of at least 6 cm from the edge of the block. When cutting two grooves, it is more convenient to maintain the distance by placing a board: one groove on one side, the second on the other.
When the grooves are ready, dust is swept out of them with a brush. Then they take 8 mm reinforcement and pre-lay it into prepared grooves. They arrange it so that there are solid rods in the corners: they are simply bent in the right place. The joints of the reinforcement should be located approximately in the middle of the block, but not in the corners of the building or at the junction of the walls.
One rod is placed on top of the other, laid side by side. The overlap should be 10-20 cm. To prevent the ends of the reinforcement from sticking out in the openings (doors and windows), small pieces can be bent by making small grooves under them.
Reinforcement of corners and junctions is made from solid rods
When everything is laid out, take out the rod, moisten the groove with water and fill it halfway with glue or concrete mortar. And it is necessary to clean and wet it, otherwise the solution will not adhere to the block material and the reinforcement will be of no use. We embed the rod into the glue, then we use a spatula along the grooves, removing excess and leveling the layer.
Such reinforcement is carried out in the first row, and then in every fourth. With regular dressing, even if the foundation settles unevenly, a house made of aerated concrete will stand normally.
But this is not all reinforcement. Above the window and door blocks, as well as in the last row of the floor, more reinforcement elements are required, but more serious, with 4 rods connected into a single system. There are special U-shaped blocks for this. They are placed as the last row under the ceiling of the second floor or under the roof slab. One side wall of the block is thick, the second is thinner. The thick wall is turned into the street, the thin wall into the room.
An example of the installation of a reinforcing belt during the construction of a house made of foam blocks
A continuous reinforcing belt is knitted from 4 reinforcement bars with a diameter of 10-12 mm. It is knitted according to the same principle as in a strip foundation. An example of a reinforcing frame is in the video.
The finished elements are placed into the cavity of the block and filled with M200 concrete. After the concrete reaches 50% strength, you can lay the floors or install the roof truss system.
Reinforcement of window openings of aerated concrete houses
According to the technology, if a house made of aerated concrete has a window opening wider than 1.8 meters, the penultimate row of aerated concrete blocks is additionally reinforced. To do this, two longitudinal grooves are made, which are at least 0.5 m longer than the window opening. To be on the safe side, you can make the projections larger - up to 1 meter - and reinforce them under each window opening.
The technology is similar to the wall one: two grooves into which the rod is placed are filled with glue or mortar. The last row of blocks is installed on top of the reinforcement, and subsequently the window frame is placed on top of it.
The general principles of working with foam concrete blocks are described in the following video; the principles of reinforcing window and door openings are also covered
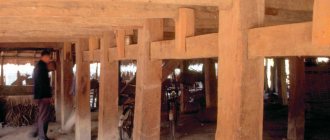
Roof
Victor chose a pitched roof for self-construction of a house made of aerated concrete for a number of reasons:
- erecting a rafter system alone is very difficult and quite dangerous;
- instead of useless attic space for a one-story house, you can get 100 square meters. meters of usable area;
- This roof design made it possible to obtain a closed “stone” contour inside, with normal ceilings.
The roof has a complex structure:
- prefabricated monolithic floor with aerated concrete filler
- extruded polystyrene foam (15 cm layer, for insulation)
- extruded polystyrene foam to create a slope. The height difference over a length of 7.5 meters is 15 centimeters.
VictorborisovFORUMHOUSE Member
Just in case, let me remind you: a flat roof is not flat, it has a slope of 1-5 degrees (usually 2), and a mandatory drain. There are no pools on a flat roof.
- screed;
- classic built-up waterproofing in two layers with top coating.
The ceiling was poured in the fall.
This stage of construction was the most nervous. There was a whole epic with low-quality beams: it turned out that the T-blocks did not physically fit into them; I had to wait several days for the supplier to replace them. All this time, our user continued to pay for the rental of telescopic stands. At the same time, the weather deteriorated sharply - it was heading towards winter, and heavy, prolonged rains gave way to a sharp cold snap. There were entire pools of water in the house, and the roof covering, which was prepared for concreting, was frozen over.
But, if you consistently solve all the problems that arise, they will be successfully resolved. Victor entered winter with the frame of the house erected. The rest of the roofing work was completed in May. And subsequently our user made a green roof.
VictorborisovFORUMHOUSE Member
The total duration of construction from the beginning of excavation work to concreting the floor is 4 months. Let me remind you that this is my first construction experience in my life.
The construction season could have been completed, but Victor still managed to complete the partitions, install windows, doors, take out the garbage, insulate the floor, install electrical wiring and prepare the walls for plastering.
Design
A house made of aerated concrete can be built either according to a ready-made standard project or according to an individual one. Individual design is more expensive, but there is the possibility of maximum consideration of the customer’s requirements and wishes. At the design stage the following must be considered:
- Foundation type;
- Roof type;
- Finish options;
- Planning and zoning of premises;
- Position of the house on the site;
- Estimated cost of construction.
The estimate is prepared by specialists who will take into account all the nuances of certain types of work, calculate the optimal scheme for ordering and delivering material, optimize costs and break down payment into transparent stages. After drawing up the project and estimate, all this is subject to approval. And after receiving permission, you can begin to carry out work.
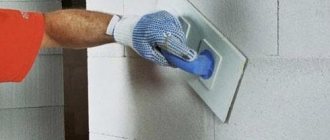
Do-it-yourself plastering of aerated concrete house walls
Viktor Borisov loves to mechanize and automate everything, but he loves saving time and money even more. Therefore, he decided to plaster the walls himself, with both hands.
Scope of work:
- facade of a one-story house 120 square meters,
- internal walls 240 square meters,
- floor with ceiling of 72 square meters.
Aerated concrete blocks are a material that requires mandatory priming before plastering.
Our user began finishing the interior with gypsum plaster from the ceilings: there are many seams in a prefabricated monolithic ceiling, and any of them can crack after some time. But suspended ceilings are not included in the construction budget, and our user has a dislike for plasterboard.
When plastering surfaces, beams served as beacons - fortunately, they lay flat.
The walls could be smoothed immediately after application, but with such a volume of work, at least four hands were needed. Our user decided that it would be better to then perfectly evenly putty and paint the walls.
The thickness of the plaster layer inside the house is 6 mm. Another feature of aerated concrete blocks: beacons can be attached to them without using a level.
The plaster mesh was used only on bases with poor adhesive ability - in partitions in doorways, where a 100x40 board, etc. was used.
Victorborisov plastered the facade with cement plaster, using four slats, which he rearranged immediately as the work progressed.
To maintain a high pace of work, he first plastered only smooth surfaces, and then slopes and corners, on which special plastic corners were used with a mesh attached to them.
There was an idea to decorate the house with decorative plaster, but the homeowner abandoned it in favor of white paint.
Foundation for a house made of foam blocks
As you know, foam concrete blocks are lightweight. On the one hand, this is good: the work is easier and the foundation for such a building is required with a lower load-bearing capacity, and, therefore, cheaper. But, on the other hand, when movements of the foundation occur, the walls, due to their low weight, cannot “press down” the processes like a heavier brick or compensate for them like wood. Which means that the requirements for the foundation for an aerated concrete house are increased: even minor miscalculations lead to the appearance of cracks, which are very expensive to “treat.” Therefore, it is better not to save on the project: it will cost more.
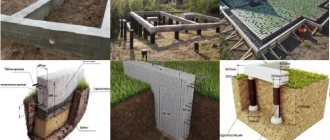
What type of foundation to use
What kind of foundations are made for a house made of aerated concrete? On soils that are not prone to heaving, a monolithic strip foundation is usually made. The depth is below the freezing level of the soil and nothing else. Due to its design, the reinforcement of the tape will compensate for all heaving loads that arise.
If the freezing depth of the soil is 2 meters or more, the strip foundation becomes too expensive. In this case, when soils with normal bearing capacity occur at this level, a pile-grillage foundation is made under the house from aerated concrete. In this case, you can’t do without a grillage: it compensates for uneven movements that often occur on a pile foundation: one pile has risen more, the other less. Without a grillage, this will lead to cracks, so installing one for walls made of this material is mandatory.
What kind of foundation is needed for a house made of aerated concrete is decided depending on the soil on the site
The most expensive, but also the most resistant to damage, is a foundation in the form of a monolithic slab. It is placed on soils with low bearing capacity - peat bogs, fine-grained loose sand. It may turn out that it is cheaper than a strip foundation at a depth of more than 2 meters. In this case, a slab is more appropriate if, due to geological features, it is impossible to make a pile foundation.
Prefabricated foundations are not recommended for this type of material. Most of the problems arise with houses made of aerated concrete on foundations made of FBS, building blocks or bricks. Due to the fact that they themselves have a tendency to form cracks, in tandem with cellular concrete this turns into a serious problem: too many and often cracks appear. Therefore, do not use prefabricated foundations.
And once again we draw your attention, only a designer with the results of geological studies of the site can answer with a 100% guarantee what kind of foundation is needed for a house made of aerated concrete.
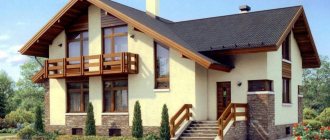
Aerated concrete is easy to process, which allows you to build houses with complex configurations
With or without base
Another feature of aerated concrete is its high hygroscopicity. As humidity increases, it loses its heat-insulating properties, and prolonged exposure to water can lead to partial destruction of the material. Therefore, a house made of aerated concrete must be placed on a plinth, making several layers of cut-off waterproofing. And this is in addition to all measures for waterproofing the foundation, which are also determined by geology and groundwater levels.
Do-it-yourself communications for a one-story house
The “apartment outside the city” was immediately designed without a boiler room, without a stove or fireplace. For heating, an air-to-air heat pump, also known as a ducted air conditioner, was chosen. In low-rise housing construction in our country, air heating is rarely used. Victor was one of the first to use it, and believes that heat pumps are the future.
VictorborisovFORUMHOUSE Member
The heat output of an ordinary electric convector is equal to the amount of energy consumed, while a heat pump can “produce” 4 times more energy than it consumes. And the use of air heating also solves the issue of room ventilation.
The external air conditioner unit is installed on the bracket of the northern wall of the house,
internal - on the ceiling.
In the photo below you can see how the layout of air ducts in rooms has evolved. The final version is below right.
The budget for water supply was limited: “we are solving the problem of how to do it cool with minimal costs.”
A five-meter deep well is located five meters from the house. The water supply system was installed from a 24-liter hydraulic tank, a mechanical filter with a pressure regulator, a well pump and reinforced plastic pipes.
The filter turns on the pump when the pressure drops below the set values and turns off when the pressure returns to normal.
There is a sewer pipe in the floor: it’s interesting here - an ordinary, several-layer 110th sewer pipe leads to the well, into which an insulated HDPE pipe is inserted, which can be pulled out and replaced.