Lining is a convenient, practical, durable, beautiful-looking material. Ease of installation also plays an important role when choosing this type of home decoration. And yet, any good owner wonders how to properly line the interior of the house with clapboard?
The beauty of a wall covered with clapboard depends entirely on strict adherence to technology. Failure to comply with installation rules results in unnecessary waste of time, effort and material.
Which material to choose
To decorate a house with clapboard from the inside, it is better to opt for the following materials:
- Tree;
- MDF panels;
- LDSP/LDVP;
- Plastic panels.
When listing the material, it was no coincidence that plastic ended up in last place, despite the fact that the cost-effectiveness and rich color palette, as well as ease of operation, are obvious. But environmental performance and resistance to mechanical damage relegate the quality of such cladding to last place. Another disadvantage of the plastic profile is its low fire resistance; already at a temperature of 100 ° C, the material begins to emit an unpleasant chemical odor, and with a further increase in temperature it can begin to smolder.
Metal lining is very heavy to decorate a room with. And in the summer, a room covered with such a profile will quickly and strongly heat up.
Wood is the most popular type of interior cladding. A chipboard product will have to be painted or coated with varnish that imitates the texture of wood. And this will lead to a delay in the progress of work, and will not give the desired result.
When choosing a wooden material, you should focus on the highest grades of lining - “Extra” and grade “A”. As a last resort, you can use “B”; class “C” material is only suitable for finishing utility rooms, such as a pantry.
Types and characteristics
The lining can be made from wood, MDF (wood waste), and also from PVC (plastic lining).
Made from wood
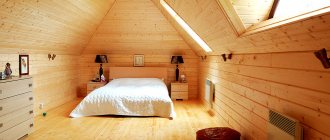
Wooden lining is the ancestor of all lining, which has not lost its popularity in our time. Wood lining is widely used in both external and internal cladding of buildings. It looks especially respectable in hallways or saunas. Of course, in order for the lining to have a long service life, even in places with high humidity, the basis for its manufacture must be the appropriate tree species, such as linden or alder. Other types of wood (pine, spruce) are suitable for use in more acceptable temperature conditions.
This material can also be different in shape. There are several types of profiles.
The standard profile is a face with equal bevels on both the groove and tenon sides. In this case, the outer corners and edges of the profile are straight and look somewhat rough.
From MDF
This material can be classified as wooden, but relatively speaking. The raw material for its production is finely chopped wood waste or wood dust. Thanks to specialized heat treatment of raw materials, a fairly strong and relatively light material is obtained, the environmental characteristics of which make it possible to use it even in children's rooms and bedrooms.
The undoubted advantages of MDF profiles include an almost limitless range of colors. Due to the ability to externally reproduce not only the patterns of wood, but also the patterns of stone, marble and other materials, the profile has gained particular popularity among people with modest material income.
Plastic
A plastic profile or PVC panel is a strong competitor to the first two types of lining. Often the plastic version is chosen because of its relatively low cost, light weight and the same ease of installation and reliability in operation.
It is successfully used in both external and internal decoration of the house. Although this material is environmentally friendly and can be used in almost any room, it is necessary to realize that such material will not add a certain comfort to the interior of the room. Walls (or some sections of them) lined with plastic clapboard on the balcony or in the bathroom look good. However, in a living room or bedroom, such a design may look somewhat awkward. Where PVC panels look especially attractive is on the ceiling, and then only in common areas, such as the kitchen, bathroom, corridor.
Briefly about varieties
Wooden profiles are divided into 4 grades:
- The highest grade is Extra. This variety is characterized by a high price, but also, of course, appropriate quality. The surface of the top-class board is smooth, there are no flaws, and also there are no knots;
- Class “A” lining allows minor defects, but in terms of price and quality ratio this option is considered optimal;
- The “B” class profile is determined by a much greater presence of knots, and there are also many more flaws on the surface, which are clearly visible on the front side;
- Well, in conclusion, grade “C” panels. Profiles of this class are technical; the presence of a significant number of knots, as well as other obvious defects, make such material unsuitable for cladding interior spaces;
- In addition to grade, wood for panels is classified by species. Covering the premises with panels made of coniferous wood will give the house a healthier atmosphere, and will retain the smell of coniferous forest for a long time.
Characteristics of eurolining for walls and its differences
Any wooden lining is made from edged boards, which are obtained after sawing round logs using special equipment. After drying, the board is processed on a milling machine on all four sides to create the required profile and interlocking joints. Finished products are sorted by types and classes, which determine the quality of the resulting products, and then packed into bundles.
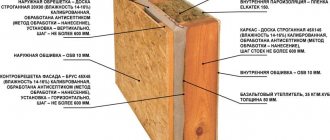
Eurolining is manufactured in accordance with the European standard DIN 68126/86. It provides for strict requirements for the geometric shape of the board, the quality of its surface treatment and the moisture content of the source material. Unlike ordinary lining, its European counterpart is distinguished by a wider key joint tenon, which ensures reliable joining of the sheathing elements.
In addition, the panels are equipped with ventilation ducts on the back side that remove excess moisture, preventing the formation of condensation at the joints of the boards with the sheathing elements. This protects the cladding from rotting and the insulation from getting wet. The channels have an additional function: eliminating internal stresses of the material due to changes in humidity and air temperature. In addition, Eurolining has external differences: when installing Europrofile boards, a pattern is formed on the cladding.
Depending on the type of wood and profile, any lining can have a thickness of 12.5-20 mm and a width of 95-135 mm. Classic eurolining has strictly defined characteristics and dimensions:
- board thickness - 12.5 mm;
- total width - 96 mm;
- working width excluding spike - 88 mm;
- board length - from 1.8 to 6 m;
- material humidity - 12±2%;
- number of panels in one package - 10 pcs.
The surface of the eurolining is manufactured according to the “Soft Line” and “Standard” options. The first version of the panel provides for rounded chamfers of the board. The cost of the panels depends on the type and species of their wood and ranges from 100 rubles/m2.
Preparation for installation
Before installing the lining, it must be thoroughly treated with chemicals that will prevent mold and also prevent the appearance of rot and pests. The material must dry well and sit in the house for at least a day so that the wood gets used to the atmosphere of the room.
Next, you need to make internal markings of the room, determine the location of sockets, switches and take into account window and door openings. This should be done to avoid unnecessary consumption of material and masking of unwanted joints.
DIY installation tool kit:
- Hammer;
- Level;
- Kern;
- Stapler;
- Hacksaw for metal;
- Plumb;
- Screwdriver;
- Screwdriver.
But you should be prepared for the fact that more tools may be required; this list does not include consumables such as screws, dowels, varnish and various putties.
How is the lining installed?
The process of installing the lining is very simple. To do interior cladding with your own hands, you need to have basic skills, as well as a simple set of tools: a screwdriver, a building level, wood screws, sealant. On average, installation work takes several days.
Installation of lining inside the house takes place in several stages:
- installation of wooden sheathing using small planks and bars;
- if necessary, create a layer of thermal insulation (for this you can use polystyrene foam or mineral wool boards);
- installation of the starting strip of the lining (if the panels are horizontal, their installation must begin from the bottom);
- careful adjustment of all planks (using the tongue-and-groove system) and securing the structure using self-tapping screws;
- final treatment of the finished surface with paint and varnish solutions.
The installation process looks very simple, and you can do it yourself without any problems.
Installing sheathing under panels
Everyone decides for themselves how their profile will be laid, but the choice is not large and includes only three options:
- Horizontal;
- Vertical;
- Diagonally.
But diagonally is not the most common installation method, since sheathing at an angle is very difficult, and also unreasonably expensive. And the only advantage is the original look. Masters use the following rules:
- The attic is sheathed only horizontally;
- Horizontal decoration of the room visually increases the area;
- The vertical one, in turn, visually raises the ceiling.
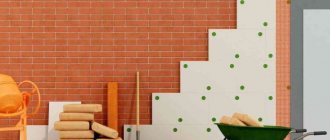
Having chosen the installation method, prepare the walls; the surface must be flat, which is determined by the plumb line. The surface must be inspected for flaws; if there are cracks and depressions, the surface must be leveled using putty. If your house is made of brick or concrete, then before paneling, sheet insulation is attached to the walls, which, in turn, will serve as a barrier to heat leakage.
The sheathing is installed perpendicular to the selected direction of the lining itself. For example, if you decide to install the panels horizontally, then the sheathing strips should be mounted vertically, and, conversely, when installed vertically, the sheathing is horizontal. The planks for the base are wooden blocks with a cross section of 2-4 cm, pre-treated with an antifungal solution.
It is best to mark the layout of slats installed on the wall with a marker or chalk cord. In the case of a horizontal base, the distance between the bars should be within 40-60 cm. The first and last rows are attached in such a way that it is convenient to attach the lining. Below we take into account the installation of the baseboard.
One of the most important conditions when installing the sheathing is to install it in one plane. For the horizontal installation method, the first frame rail must be attached strictly vertically; for precise installation, we use a plumb line. The block should be secured using nails or stainless steel screws.
Then we move to the corner opposite, where we install the same rail, after which we stretch a certain amount of nylon thread between them in order to create one plane. Then we install the remaining frame elements using this nylon thread. Nails or self-tapping screws are used if the walls of the room are wooden, but in the case of concrete or brick walls, dowels must be used.
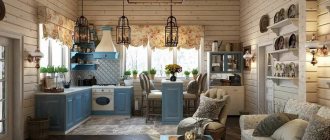
Examples of interior design of individual rooms in a frame-type house
Let's consider a frame house with a total area of 69 square meters. The basis of the finishing is whitewashed lining and imitation of profiled timber. Whitewashed imitation timber and white lining were used as the main finishing materials.
Kitchen
An insert of wallpaper against the background of timber makes the room more comfortable. Glazed porcelain tiles are used on the floor. The floor looks as if more than one generation of inhabitants of the house walked on it. Premises with “history” are a fashion trend. The ceiling is covered with snow-white lining.
Living room
Imitation timber is diluted with non-woven wallpaper in the television area. The ceiling is decorated with lining with imitation ceiling beams. The flooring is parquet boards.
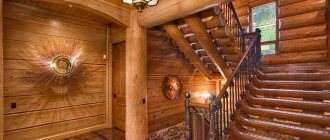
Hallway
The interior decoration of the hallway of the frame house is made in the same mixture of Scandinavian and country style. One wall of the room is decorated with bleached laminated timber, the other with artificial stone imitating natural brickwork. The floor covering is porcelain stoneware.
Bathroom
Light-colored materials were used to decorate the bathroom. The floor is covered with parquet boards. The lower part of the walls is white brick tiles, the upper part is decorative plaster.
Bathroom
The interior decoration of the bathroom was carried out using tiles and porcelain floor tiles. To save space, the classic bathtub was replaced with a modern shower cabin. The cost of the project under consideration for the interior decoration of a frame house is one million rubles.
We correctly calculate material consumption
Before you start decorating your house with clapboard, you need to clearly calculate the area that you will cover. This is done very simply: multiply the length by the width of the sheathed plane. From the obtained result we subtract the dimensions of the door and window openings. Then we measure the area of one profile. Usually its dimensions vary within the following range: length - from 100 cm to 600 cm, width - 15 cm, thickness - from 1.2 cm to 2.5 cm.
For example, let’s take a profile 3.5 meters long and 15 cm wide, then the area of one panel will be 0.525 m².
Once we know the area of the surfaces to be covered and the area of one panel, it is not difficult to calculate the number of panels required.
The lining is packaged in a special protective film, which allows you to preserve the material not only from damage, but also protect the appearance of the product from dust and other influences. Of course, it is advisable to take the material with a small margin, since defects are possible, both in the packaging itself and during operation.
Important tips from experienced builders
- The interior finishing of a frame house should be done in stages. You shouldn’t waste your energy on simultaneous renovation of several rooms at once.
- Any base for finishing must dry thoroughly. For screed or plaster, provided there is good ventilation, it takes from 5 to 15 days to dry.
- “Expensive” does not always mean “high quality”. Budget materials may well compete with their premium counterparts. The main thing is that the selection of finishes matches the characteristics of the room for which it is intended.
- The choice of finishing materials should be made in accordance with the characteristics of the room;
- Interior finishing should begin only after installation of utilities;
- For those who plan to save money, we recommend choosing materials that allow you to create perfectly smooth and at the same time attractive surfaces, without a rough base;
- When finishing, you should not forget about ventilation - the locations of pipes, grilles and hoods must be designated in advance;
- In the bathroom, regular tiles can be used as flooring, while the hallway and living room will require more durable and expensive porcelain tiles.
- When purchasing tiles and wallpaper, you should purchase the material with a reserve, since it is produced in batches that may not match in tone. And even if at first glance it seems that everything is fine, then on the wall the difference will be very noticeable.
- In order to avoid breaking walls or floors in case of force majeure, it is necessary to provide access to communications. It will also be needed to service them.
Wall decoration with clapboard
How to qualitatively sheathe the inside of a house with clapboards with your own hands - this is the question asked by every owner who decides to choose this particular material for the interior of his house. How to do this correctly, especially if you are doing it for the first time? If you follow all the sequence and rules, this is not at all difficult.
The following options are suitable for installing a profile:
- Using a clamper;
- Fixation with a nail in the direction of the tongue, driving the nail at an angle;
- Using an additional clip.
Clips provide an undeniable advantage during dismantling. When using this type of fastening, the panels can be easily disassembled without causing damage. During installation, remember to mask the fixation method. The next profile should hide the clip on the previous one.
You should start vertical installation from a corner, but you should choose from an inconvenient one, since adjustment to size is inevitable when finished. In the case of a horizontal installation method, you should start from the ceiling.
The final plank usually does not go in completely; in this case, trimming is required; unevenness during sawing can be easily hidden with a plinth.
Important advice: if you choose a horizontal installation method, then, in order to avoid dust accumulation in the grooves, it is advisable to place the lining with the groove down and the tenon up.
Fixing the first element is extremely important for subsequent work. To ensure the panel is installed perfectly, be sure to use a level. Using a clamp, we fix the profile. We attach the kleimer to the sheathing with three nails. It should be as close to the board as possible.
During installation, make sure that the profile does not deviate from the set level. The remaining fragments are attached to the groove of the previous panel and fixed in the same way, using a clamp.
During installation, the lining should not be the entire length of the area, but should be retreated by 20-40 mm. This is done to ensure free movement of air behind the panels, in which case the coating will last an order of magnitude longer, since the wall will not become damp. And to achieve an aesthetically beautiful look, skirting boards or other decorative inserts are installed in the corners of the room.
Installation of the lining using a self-tapping screw is also provided. This method is also considered secret, and also implies the presence of dowels. The self-tapping screw is screwed into the Europanel tenon itself, the subsequent profile is installed with a groove on the tenon, which hides the screw head. If you choose the method of fixation using a self-tapping screw into the body of the profile, the cap must be recessed and the remaining hole must be sealed with a dowel using glue. After that, the dowel should be treated with sandpaper to give the coating a beautiful and smooth look.
The simplest and fastest option, but at the same time much less common for obvious reasons, is fixation using staples and nails from an air gun, which are fired into the tenon with an angle of 45°. Complete immersion in wood does not interfere with further installation.
You can also fasten the profile using nails driven into the groove. In this case, you need a hammer or a core; you can use a larger blunt nail. With this installation method, you should be extremely careful to avoid the appearance of cracks on the back wall of the groove. This method also implies a tiny gap between the panels, no more than 1-2 mm, this allows you to adjust the shape of the panels if deformation occurs due to high temperatures and high humidity.
The final stage is the installation of ceiling and floor plinths. This stage is inevitably carried out in order to hide flaws during installation, and also to mask air holes. Often the profile does not reach the end of the surface to be covered, and then it is worth joining the panels together, and in order to hide the joints, use decorative strips.
Interior decoration of a residential building
Step 1. Preparing the material for interior wall cladding. Before proceeding with installation in a wooden or any other structure, you should prepare not only the walls, but also, first of all, the lining itself. It must be coated with special bioprotection products that will prevent rotting, mold and other factors unfavorable for the wood.
Step 2 . If you want to get lining in an unusual shade that perfectly matches your interiors, treat the material with stain or special compounds that will give the desired tone.
Step 3. Dry the lining well and keep it in the room where the repairs will be done for 24 hours. This is necessary so that the panels “get used” to the temperature and humidity conditions of the room and do not shrink after installation. In addition, such “adaptation” also protects the material from drying out in the future.
Step 4. Prepare the sheathing for installing the boards. The panels will be installed on a wooden sheathing. In order to make such a supporting structure, you can purchase ready-made slats for the frame, but to save money you can make them yourself. This is not difficult to do: using an electric saw, slats are cut from boards with a small cross-section. Next, using self-tapping screws, the sheathing is attached to the wall in increments of 50-70 cm.
In order for the frame to be strong and its service life to be as long as possible, a slight gap should be left between the cladding and the surface of the walls: this is necessary for good ventilation. If necessary, insulation material and a vapor barrier are installed in the frame. It is also important to treat the sheathing with a primer to protect it from mold or mildew, which can ruin the appearance of the lining and, most importantly, shorten the service life of the material.
Step 5. Fastening the lining. Before starting sheathing, you should choose the optimal method of attaching the material. Can be secured with nails, clamps or staples. You can make the fasteners hidden or external, use ordinary nails or special decorative screws, staplers, etc. for fastening. The main thing is to try not to cause any damage to the material during the installation process (if handled carelessly, the wooden surface may well crack).
If you prefer a hidden fastening method, the lining is fixed to the frame from the groove side, where it meets the tenon. The method most often used is the most accurate, but also the most complex: nails are carefully nailed into the grooves of the lining. At the same time, the fixation points become almost invisible.
Special devices for such material – metal clamps – will also help ensure high-quality installation of the lining. The clamp is cut into the groove of the lining with its teeth; on the other hand, it is nailed or screwed to the sheathing. It is very convenient to install wooden finishing material using clamps.
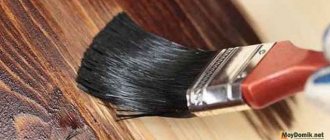
Painting after installation
Upon completion of the work on installing the finishing in your home, another important question arises - what solutions to protect the cladding of your house with, how to cover the lining to extend its service life, to avoid the appearance of insects, and also to protect against rot and mold?
It would be unreasonable to neglect such an issue, especially due to the fact that nowadays hardware and construction stores have a truly huge assortment. Therefore, it is very easy to choose any variation of impregnations and protective solutions for your lining.
Painting and processing of lining
After finishing the cladding, as a rule, another important problem arises: how to protect the lining from inside the building? This factor should under no circumstances be ignored. Currently, shopping centers provide their consumers with a significant variety of impregnations, also of different compositions, in order to protect the cladding.
In some cases, eurolining is varnished if the building does not stand out due to any criteria. For example, if the conversation is about the walls of a steam room or sauna. It will be necessary to use protective measures that can not only protect against the negative effects of humidity, but also protect against high temperatures.
Method of painting inside the house: paint is applied, then rubbed. After ten minutes, if it is soaked, remove excess oil with a gentle, lint-free cloth. The image appears more clearly due to the fact that the azo pigment remains in the grooves, but is removed from the ascending lobe.
In addition to paints, classic stains are used. Aqua solutions shade a variety of tree species; you just need to choose the appropriate tone. Be sure to embellish or compensate with wax in order to remove the pale tone. Wood stains in a dry base can be used as the main coating.