No. 3. Facing brick
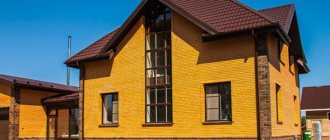
Brick has always been one of the most popular materials for facade finishing. It is clear that for these purposes, not ordinary building bricks are used, but special decorative bricks, which are called facade, facing or facing.
Depending on the composition and production method, facing bricks are divided into the following groups:
- clinker;
- ceramic;
- hyper-pressed;
- silicate.
Each of these types has its own performance qualities, but they are united by an excellent appearance, a wide variety of shades, textures (can be glazed, with mineral chips or a matte surface) and shapes (there are bricks in the shape of a parallelepiped, and there are shaped ones in a figured form). In addition, all bricks have excellent resistance to negative environmental factors.
Clinker brick
Quite expensive clinker bricks are produced from special plastic grades of clay by pressing and firing. Natural dye can be added to the mass. In terms of overall performance qualities, this is the best option for facing bricks.
Advantages:
- high mechanical strength;
- durability;
- frost resistance. The material can easily withstand up to 300 freezing/thawing cycles without losing its basic properties;
- resistance to direct sunlight and high temperatures;
- resistance to aggressive substances;
- low water absorption coefficient;
- environmental friendliness;
- aesthetics and large selection;
- No special care or maintenance is required - the façade is simply easy to clean.
Among the disadvantages are the high price, considerable weight and difficult installation. An alternative to this material is clinker tiles, which are made according to almost the same principle, can have a lot of relief and color options, but at the same time have a small thickness, and therefore less weight.
Ceramic brick
Ceramic brick, made from clay by firing it, is well known to each of us. Its facing variety amazes with a wide variety of colors and textures, but this is not the only advantage of the material.
Advantages:
- durability;
- environmental friendliness;
- good sound and heat insulation characteristics;
- resistance to temperature changes, sunlight, fire;
- relative cheapness.
Flaws:
- not always accurate geometry;
- there may be inclusions of limestone, which, absorbing moisture, will stand out in a darker color;
- the possibility of shedding or destruction if errors were made in the choice of solution, product brand or installation;
- high level of water absorption, which can reach 10%, reducing the frost resistance of the product.
Hyperpressed brick
This material is obtained using cement, shell rock and some special additives using the semi-dry pressing method. Outwardly, it resembles ceramic brick, but in many respects it is ahead of it.
Advantages:
- durability and strength;
- good geometry;
- frost resistance;
- a large assortment;
- ease of processing.
The water absorption of such bricks is at an average level - about 5-6%, and the obvious disadvantages of the material include high thermal conductivity, the ability to change color over time and heavy weight, which affects transportation.
Sand-lime brick
Facing sand-lime bricks are made from a cement-sand mixture using the autoclaving method; special additives can be used. Due to the ease of production and low cost of raw materials, sand-lime brick is considered one of the most affordable materials among other types of bricks.
Advantages:
- high strength;
- precise geometry;
- environmental friendliness;
- good soundproofing qualities;
- low price.
Flaws:
- Compared to other types of facing bricks, sand-lime brick does not have the best decorative qualities;
- heavy weight;
- low thermal insulation qualities;
- high level of water absorption (more than 15%);
- low frost resistance.
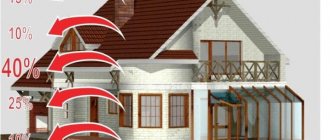
Why is thermal insulation needed, its types
The main function of thermal insulation is to save energy and reduce costs for housing and communal services. Coating walls, ceilings and floors with insulation from the outside or inside not only increases the temperature in the room, but also makes it possible to eliminate mold and other fungi that often form inside damp and cold buildings.
The fact is that mold often occurs due to a significant difference in temperature on the inner and outer surfaces of walls, and an increased level of humidity in the room only aggravates the situation. Therefore, most experts recommend insulating brick walls on both sides at once.
In fact, the insulation of brick walls can be divided into three types:
- external;
- internal;
- intrawall.
The last type is the construction of a building using the well masonry method and the placement of a heat insulator during the construction of the building.
As for the internal type of insulation, this is not always effective; moreover, it takes up a considerable part of the room area, and also provokes dampness in the walls.
The advantage of this option is the ability to perform work at any time of the year, as well as the relatively low cost of coating materials.
If you are still wondering which of these types to choose for a building made of brickwork, then it is better to give preference to the external type of thermal insulation.
Advantages of external insulation
If, in the case of an internal type of insulation, you need to take care of it in advance, then internal thermal insulation can be done at any time. Moreover, it will not depend in any way on weather conditions. Nevertheless, experts still recommend insulating your home from the outside, since this type of thermal insulation has a number of significant advantages.
Among them are:
- protection of walls from external factors, which significantly extends their service life;
- a noticeable reduction in home heating costs;
- the possibility of decoration, thanks to the creation of the architectural design of the house to your taste;
- absence of moisture, fungi and mold on the inner surface of the walls.
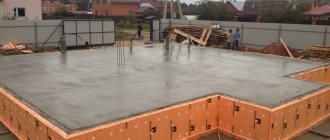
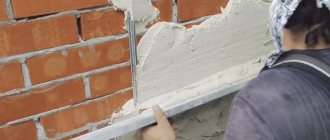
Plaster finishing of brick walls
Finishing brick walls begins with plastering work. If the walls have significant curvature, it is necessary to install beacons, which are T-shaped guides made of light metal alloys. Installing beacons will make the process of wall alignment easier. You will need:
- Long rule, its height should be slightly less than the height of the walls;
- A short rule: choose its length based on your convenience; you will use it to level the mixture between two adjacent beacons;
- Self-tapping screws;
- Pencil;
- A thread;
- Gypsum mixture;
- Building level;
- Trowel;
- Putty knife
The process of installing beacons is painstaking and quite lengthy, but the final result depends on the accuracy of this work.
Preparatory work
First of all, beacons are installed along the edges of the wall. The evenness of their installation is achieved by screwing in self-tapping screws at the top and bottom on both sides of the wall.
- Secure the thread between the top left and bottom right screws;
- Pull the second thread between the upper right and lower left screws;
- Remove the threads, apply gypsum mortar in a vertical stripe;
- Install the beacons all the way to the screws;
- Check the level for accuracy and, if necessary, adjust the rule.
The installation of the main beacons has been completed. Intermediate ones are installed according to the same principle, only the threads are stretched horizontally, from above, below and in the center of the wall. After installing intermediate beacons, you need to check their level.
Using a primer on a brick wall
Before attaching the beacons, it is necessary to prime the wall with a deep penetration primer, which will remove dust from the surface, strengthen the brick and reduce its absorbency. An unprimed brick wall absorbs moisture from the plaster wall, which negatively affects its strength.
Reinforcing materials
When applying a thick leveling layer, there is a possibility of cracking of the plaster layer. Reinforcement, which is performed using metal or fiberglass mesh, will help reduce risks and increase the strength of plaster. Reinforcement is required when the layer of cement-sand mixture is more than 3-4 cm. For gypsum plasters, reinforcement is used when the layer thickness is more than 5 cm. If the brickwork is fairly level and the differences are not particularly large, you can reinforce places with a high risk of deformation:
- window and door openings:
- corners;
- joints of dissimilar materials;
- arches;
- exterior walls.
The fiberglass reinforcing mesh is applied to the freshly applied mortar by pressing. It is necessary to recess it in such a way that it remains in the upper third of the plaster layer.
Installation of the metal mesh is carried out at a distance of 5-10 mm from the wall from top to bottom. The upper edge is fastened with self-tapping screws, then the self-tapping screws are fastened in a checkerboard pattern at a distance of 40-50 cm from each other. At the junctions of the mesh, it is necessary to maintain an overlap of 10 cm. Beacons are installed after installing the mesh.
Polymer compositions
In the case where the thickness of the plaster layer does not exceed the permissible values, it can be reinforced by adding polypropylene fiber fiber to the solution. The thread diameter is about 30 microns, length up to 30 mm. The low weight of the additive reduces the load on the walls and foundation, increases the strength of the plaster, and increases its service life.
Applying plaster
After the gypsum mixture has hardened, a solution is thrown between adjacent beacons and leveled with a short rule. After the mixture has dried, the beacons must be removed by plastering the places where they are installed. The beacons left in the thickness of the plaster are bridges of cold.
Drywall and plaster
Internal cladding using plasterboard sheets has many positive aspects:
- An economical finishing option; The work of finishing with plasterboard is uncomplicated and allows you to carry it out yourself without special skills and quite quickly; When finishing gypsum plasterboard, the effect of a perfectly flat wall is achieved; Drywall is an environmentally friendly material and does not have a harmful effect on the environment and humans; The use of plasterboard allows for further decorate it in almost any way; When covering gypsum boards, you can insulate the walls without difficulty.
This finishing of brick walls inside the house can be used when insulation was carried out outside. In most cases, it is needed when decorating with liquid wallpaper or decorative plaster.
In order to plaster the walls, it is first necessary to prepare the surface. The walls must be cleaned of dust, mortar buildup, and other contaminants. Then apply priming.
You need to start plastering work from the floor, gradually moving higher up the wall.
The first layer of plaster should be made with a high content of binder, the layer thickness should be about 5 mm. After a few minutes, it is necessary to level the layer of plaster using the rule.
Before applying each subsequent layer, it is necessary to treat the surface with a primer. This should be done when the previous layer has already dried.
Leveling the walls must be carried out in several approaches, and a layer of no more than 1 centimeter should be applied at a time in order to avoid subsequent peeling of the plaster.
Design of facade thermal panels
Ready-made blocks of thermal panels are intended for external decoration of buildings. But sometimes designers use them in interior spaces. Ready-made panels do not weigh down the walls and do not create excess pressure on the foundation.
Structurally, thermal panels have the appearance of a layer cake.
- The top layer is decorative. The layer pattern repeats brick or stone masonry. It also performs the protective functions of the main layer from the actions of nature.
- The main layer serves as thermal insulation. Expanded polystyrene and polyurethane foam are used for its production.
The panels are manufactured at the factory using the latest technology, using special matrices. High-precision connection of panels masks possible installation defects. Cold bridges are never created in the panels. The fastening is reliable and can withstand even the force of slanting rain.
Decorative panels with imitation stone or brick are in demand by consumers due to their decorative qualities. Imitation of natural stone is difficult to distinguish from masonry. And it is easy to care for - just clean it from dust once a year with a damp sponge. The panels have beveled hidden edges that provide a seamless finish. The type of stone finish is resistant to fading in bright sun. There are no scratches on it.
Brick-like thermal panels are popular and considered traditional. They are suitable for many structures and buildings. There are many proposals for choosing the color and texture of bricks. The color of the brick can be white, yellow, gray, red, terracotta. In appearance, aged or burnt, with a rough or smooth surface.
Finishing of a plastered brick wall
The final finishing of the plastered interior walls of a brick house is limited only by the owner’s imagination and financial capabilities. If the preparatory work is done efficiently, the thickness and phasing of the applied solutions is observed, and the intermediate drying time is maintained, you can begin to design the interior of the brick house.
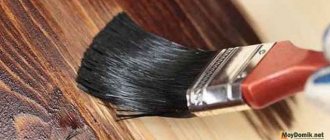
Painting the walls
This type of finishing requires the most careful surface preparation. The slightest unevenness made when plastering walls or applying finishing putty will be noticeable under a layer of paint, so it is necessary to sand each finishing layer. Irregularities in the plaster can be removed with coarse sandpaper or a metal mesh, and the finishing putty must be sanded with fine sandpaper, periodically checking the walls with a long level. To achieve an ideal surface, the puttying and sanding cycle must be repeated several times. Before painting, the surface must be primed. Depending on the hiding power of the paint, two or more layers will be required.
Fiber cement boards and siding
Relatively recently, a new cladding appeared on our market: fiber cement boards and siding made of the same material. They consist of wood fiber, quartz, mica, cement, and may contain chlorine and asbestos (some materials used only for exterior decoration). This mixture is formed into sheets, then dehydrated in several stages, and fired using some technologies. Then a protective and decorative coating is applied to the surface:
- acrylic - inexpensive, fade-resistant;
- hydrofilceramic - high resistance to abrasion and fading (30 years), very low percentage of water absorption, but expensive;
- photoceramic - retains color for a long time, dirt is easily washed off, price - average.
The coating can be smooth - glossy or matte, or can imitate brickwork, wood and other finishing materials. It is installed on guide mounting strips and secured to the wall with clamps. This material may be suitable for you if you do not know how to cover the outside of a frame house: it creates a continuous surface, the panel joints are airtight and precipitation will not get inside.
This house is also lined with fiber cement slabs
Watch the video to see how to attach fiber cement boards.
Fiber cement siding is produced using the same technology, only it is molded into long strips. They are basically standard: 3600*190*12 mm. This material is cut with a jigsaw, installed on a wooden sheathing with an overlap (like a cone) and nailed to it or screwed with self-tapping screws.
Cork and wood covering
The mounted panels are varnished on top.
Cork panels are used for finishing bedrooms and children's rooms. This material has good sound insulation, has a pronounced texture and intricate pattern, and its installation is not difficult:
- the plug is attached with self-tapping screws to a wooden frame made of a block, previously installed on the surface to be finished;
- the seams between the panels are sealed with a special sealing material;
- The process is completed by coating the panels with varnish.
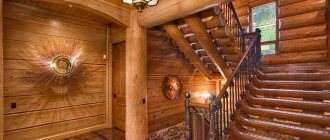
Various wooden materials are actively used for interior decoration. They do not require additional finishing, as they have an attractive appearance and go well with wooden furniture.
When finishing interior brick walls, the following important features must be taken into account:
- Such coatings should not be allowed to come into contact with moisture.
- When installing wooden coverings, it is necessary to use a membrane vapor barrier, and its fastening must be done on top of the sheathing.
- Wooden finishing boards, lining and other materials are connected to the frame and to each other without gaps, which eliminates the need for additional processing of the seams.
- Wooden coverings have good thermal insulation properties. For more information on how to cover walls with plasterboard, watch this video:
The color range of this material is quite diverse, which allows you to choose the necessary colors that harmoniously combine with the surrounding interior.
Siding installation instructions
To ensure that the cladding of the walls of a house with brick siding is reliable and durable, you should select good quality materials and ensure the availability of appropriate components and accessories for installation.
Tools
Some manufacturers offer the necessary tools for attaching siding with the panels, but they can also be found at home. To work you will need equipment for:
- markings: level, cord, tape measure, marker;
- cutting: hacksaw, grinder;
- hole preparation: drill;
- fixing the sheathing and panels: screwdriver, screwdriver, hammer.
It is also necessary to correctly calculate the required number of fasteners to avoid excessive waste.
Calculation of materials and components
Calculation of the amount of materials and components takes into account the surface area, as well as the type of finish.
Calculation of materials and components
For frame
For the lathing you will need wooden beams or a metal profile. The area of the surface to be coated should be calculated.
Next, it is important to decide what cell size is needed
Based on the selected size, the quantity of the required profile is determined.
For insulation
Calculations of thermal insulation material also directly depend on the surface area, as well as on the type of insulation and the number of layers.
This is important, since the heat insulator will be adjusted, which will lead to overspending. Also, for insulation, a second row of sheathing will be required to provide ventilation.
This also needs to be taken into account when calculating materials.
For siding
Next, you will need to divide this figure by the area of one panel to find out the required amount of material. Here you will also need to add 10%, since trimming is an integral process when facing.
Marking and installation of the frame
Installation of any brick siding begins with the arrangement of the frame. To do this, you will need to mark using a tape measure and a level.
Frame installation
Insulation
Thermal insulation materials begin to be mounted from below and move upward
It is important to ensure that the insulation fits tightly to the frame, and it should also be additionally secured with dowels or self-tapping screws
Thermal insulation of the building from the outside
To increase the water-repellent properties of the material, it is necessary to place a waterproofing membrane on top of it. Next, you will need to install a second layer of sheathing, providing a gap for ventilation.
Setting the corners and starting bar
Manufacturers offer special corner parts. It is with their installation, as well as the starting strip, that the process of laying siding under brick begins. The starting strip is attached 4 cm above the bottom edge of the future first panel. When fixing this element, you should check its evenness, since it is on this that further cladding will be oriented.
Installation of corners
An important requirement is strictly vertical fixation.
How to finish slopes and junctions with window and door openings
To cover window and door openings you will need to use a special profile. It must be fastened around the perimeter of the window or door, while ensuring a tight fit of the elements. This profile will become the basis for attaching the siding.
Installation of brick siding
Installation of the panels is very simple, since each panel has a locking connection. The siding must be attached to the profile using self-tapping screws or dowel nails.
Panel installation
The fastening begins from the starting bar, and is fixed at the top with the finishing element
It is important not to completely tighten the fasteners, which will prevent deformation from thermal expansion.
Finishing technology
Procedure:
- Fix the starting and corner profiles. Then they set the finishing bar. The screws are not tightened approximately 1 turn to compensate for the expansion of the material.
- The vertical H-profile is fixed using the marks in increments of 30-40 cm.
- Sheathing begins from the bottom. The panel is inserted into the starting strip and secured to the profile with self-tapping screws. There is a gap of 5 mm between the cap and the material.
- The next lamella is inserted into the groove of the previous one, snapped into place, and also secured with self-tapping screws.
- The last element is inserted into the finishing strip until it clicks.
Wood sheathing is not installed on a brick wall.
Real brick - solution for units
For obvious reasons, this option is suitable only for a few. If you value authenticity in your interior, there is no better solution than a wall made of real brick. But we must understand that such a wall can only appear if the building itself was built of brick.
In this case, we can get the texture and texture of the material by exposing it, stripping it of existing plaster or paint, revealing its true, rough and austere character.
Uniqueness, exclusivity, environmental friendliness and authenticity - an ideal solution for true connoisseurs
Cleaning an old surface from plaster is a labor-intensive process, but the result is truly impressive.
This solution can be used in old one-story or apartment buildings whose walls were built of brick.
… “Brick is a durable natural building material, it is resistant to mechanical damage, fire and moisture, while retaining heat well and fading little”...
Of course, someone persistent might suggest building a new interior wall adjacent to the existing one. Yes, the wall will be made of real brick, but this method of creating an interior has too many disadvantages.
Disadvantages of building a second wall from whole brick:
- Firstly, the new wall will not serve as the main one, that is, this already has a certain decorative element;
- Secondly, by laying solid brick, we significantly reduce the space of the room;
- Thirdly, the load on the load-bearing structures of the building increases and in this case, before starting work, a calculation by a professional architect is required;
- Fourthly, the cost of finishing work is rising.
In addition, the authentic, rough and uneven masonry makes it possible to recognize a real old wall. But only a few builders can do everything perfectly.
However, it is quite possible to consider creating an accent wall from real brick when purchasing a new apartment with an open plan. But in this case, we will definitely need old brick and a real master mason.
How can you decorate the walls inside the house?
If you are going to finish the walls inside a brick country house, which you rarely visit and only in the summer, then you should not use drywall under any circumstances, because it “does not like” moisture and temperature changes. You shouldn't cover walls with wallpaper.
because they also may not withstand a long period without heating. In this case, finishing with “wet plaster” (description below) is most suitable.
The interior decoration of brick walls also initially consists of plastering. But the last stage in finishing the walls of a residential building has many different options and possibilities.
When insulating a brick house from the inside, it is necessary to create a continuous vapor barrier layer, otherwise the insulation will absorb moisture from the warm air of the room, which over time can lead to a loss of thermal insulation properties.
Work on finishing the inside of brick walls is divided into rough and fine finishing.
The rough work includes laying utilities and insulating walls (if provided for in advance). You can also add additional sound insulation. This is done using glass wool, mineral wool, cork, sandwich panels, and isover.
When performing final finishing, all work is done from above: ceiling, walls, floor. This will help eliminate a significant number of problems. The finishing of the ceiling directly depends on the material from which the ceilings are made.
If the floors are wooden, then plasterboard or lining is better suited. With reinforced concrete ceiling beams, the ceiling needs plastering and putty, just like the walls. Nowadays, suspended ceilings made of PVC and suspended ceilings made of plasterboard are becoming increasingly popular.
The finish of the floor depends on what material the flooring is made of. If it is made of reinforced concrete, then the screed is made using a solution of cement and sand or gypsum mixtures. A wooden floor may require sanding and removal of possible defects.
To insulate brick walls from the inside, you can use “warm” plaster with a thickness of 30 mm. This plaster is applied to a woven mesh, which will provide good adhesion. Let’s look at finishing the walls on the inside of a brick residential building in more detail. The classic finishing of a brick house inside is plaster. In addition to its decorative and leveling function, plaster can also have a heat-insulating function.
For this purpose, “warm” plaster is produced. Thermal insulating plaster has been used for a long time in Europe. In the former Soviet republics, it began to be used about 10 years ago. This plaster can compete with polystyrene foam tiles, but has significant advantages. Plaster delamination and crumbling are prevented by its properties such as homogeneity and solidity.
It is an environmentally friendly material. “Warm” plaster performs two functions at once: finishing and insulation. You can also decorate the walls of the house with decorative plaster. In this case, the walls will have their own unique decor. A wall finished with plasterboard, which is attached to a wooden frame installed on the brick walls of the house, or to an aluminum profile, which creates a layer of air that increases heat retention in the room, also looks good.
They can also be glued directly to the wall. You can glue drywall using ready-made mastics, using the instructions included with them. Plasterer tools: mortar, spatula, level, hatchet, scoop, plaster spatula, trowel, plaster trowel, rule, grater, trowel, corner leveler, plaster trowel. Now, after necessary review, let's get down to specific business. We have a brick wall.
We begin finishing it with plastering, if this wall has already dried well and the mortar in the masonry has completely hardened, otherwise the plaster may soon begin to crumble and fall off. We carefully scrape out the seams on the wall to 1 cm in depth, and clean the rest of the surface of the brick wall with a brush. Next, before directly applying the mortar, thoroughly moisten the wall with water or spray it with a liquid mortar with an increased amount of cement (this will create additional unevenness to improve the adhesion of the plaster). The wall is ready to begin the main work. To finish walls with plaster, you can use tools such as a steel brush, scraper, grater, trowel, usually steel templates (beacons), and a spatula.
Nowadays most people use profile beacons. The beacons are placed like this: they are applied to the wall with a spatula, after which they apply the beacon, which is leveled along the wall using a level. We begin to plaster the brick. First, we scatter small cakes of mortar (beacons) along the wall. We align them in rows vertically and horizontally.
The distance between these cakes should be 1-1.5 meters. Then we connect them vertically with mortar. Or we use a modern method - installing steel vertical templates. We will hammer them with the end (in which the tenons) into the seams between the bricks. We align the other end to the thickness of our future plaster along a plumb line.
We will fix the first of the templates at a distance of 20-25 cm from the corner, the rest - after 130-150 cm, one after the other. Next, we make a primer: we apply the solution from the floor to the ceiling between two adjacent templates. Using them we even out the thickness of the plaster, leveling out the pits and bumps. At the same time, we “grater” with wave-like movements.
We throw the finished plaster mixture between the beacons, the layer should cover the beacon. Next, pull the layer of plaster mixture upward. We reuse the excess mortar. With this finishing, the walls of the house become not entirely smooth and even, but they can already be covered with the final layer of plaster - the covering layer.
Next, we take out the templates and cover the cracks with the solution. When the surface of the soil “sets,” we apply a covering layer approximately 2 mm thick. This is done with a trowel, on which the solution is applied. Using a trowel, the mortar is spread over the brick wall in wave-like movements, trying to press one edge of it against the wall so that the layer of plaster is the same thickness. Then we rub this layer in a circle. You need to pay special attention to the edges and corners.
They must be vertical. For this, steel planks are used, we fix them on the wall and continue to plaster, focusing on them. The final stage of wall leveling is finishing putty. It is applied with a spatula or spraying.
Types of panels
Of course, everyone chooses panels according to their individual preferences and budget. There are also very economical options, but you can’t count on durability), and there are very expensive ones, where the high price is justified by the quality.
Budget options
The cheapest options include acrylic panels with minimal weight. Their thickness starts from one centimeter. They are ideal for finishing a brick house on a light foundation. Large sizes and ease of installation are the main advantages of this material. They are usually attached to a metal profile, but installation directly on the wall without sheathing is also allowed. The material retains its color for a long time, does not burn, and is easily cut with scissors.
Fragility can be considered the main disadvantage. Thin material cannot withstand shock loads; it freezes in cold weather. The material is very soft, it bends quickly and may burst when cooled. The disadvantages include a small assortment of brick patterns.
Vinyl facade panels are made from polyvinyl chloride with various additives. They do not deform from frost, have a small coefficient of thermal expansion, and due to the bottom layer they are very durable. The top layer is decorative, it contains protection from ultraviolet rays, antistatic agents and other substances that protect against destruction and repel dirt.
They are connected to each other with locks, and attached to the wall on the profile using self-tapping screws. The brick pattern looks natural due to the different textures. Scuffs, aging, torn stones - these decoration techniques look good in exterior decoration. Each manufacturer has its own sizes. A huge selection of colors and patterns allows you to create various interesting combinations when finishing. The structure turns out to be unique; it fully corresponds to the specific style and character of its owner. The PVC facade slabs in the collection contain profiles that imitate masonry with different stones.
Polymer sand panels combine low specific gravity, strength, and ductility. They are made from a mixture of polymer and fine sand. The surface has a very natural appearance of stone. Brickwork looks very natural. Installation is quick: they are fixed to the facade with a special polymer glue. The plates are joined together by grooves and projections. There is additional fastening in the form of self-tapping screws. But the gluing plane needs to be leveled.
Flexible and lightweight polymer sand panels are suitable for finishing wooden houses. Due to this, a simple structure will turn into a massive brick building. Low cost, large selection of patterns, ease of installation - all this moves polymer sand panels into the budget category of materials.
Expensive options
Clinker tiles are able to convey the masonry of facing bricks most accurately. The torn and aged surface is made manually using compressed air or jets of water. After annealing, a glossy surface is obtained that does not fade in the sun and does not allow moisture to pass through. A large selection of colors and textures allows you to turn any design idea into reality.
The cladding is done in any style with such tiles imitating brick - it can be a strict cottage or a noble castle of the last century. The panels have small dimensions: 270−600 mm, thickness up to 12 mm. Clinker panels can last up to 50 years. Caring for them is very simple: just wash them with water from a hose.
Facade thermal panels with clinker tiles will simplify the finishing of the building during insulation. They do not require cladding; they are attached using adhesive solutions directly to the facade. The facade panels have locks, different strips, and holes for self-tapping screws to make it easier to fasten them together. If you cover the surface with varnish or some other transparent composition that provides protection, the service life of the facade will increase.
Only panels with insulation have significant weight. Because of this, their use is greatly limited:
- suitable for buildings with a wide and strong foundation designed for significant loads;
- facade thermal panels are suitable for finishing the base (only the part that does not protrude);
- not suitable for insulating buildings with a large number of floors.
Comparison of polystyrene foam and polyurethane foam panels
In the production of panels, the insulating layer can be polystyrene foam or polyurethane foam. Each of the materials has positive qualities.
Mold and moss do not grow on polyurethane foam. No structural changes are observed, even with temperature fluctuations. But the material can self-oxidize with further formation of peroxide. If the temperature increases to +80°C and higher, mechanical destruction with the release of phenol is possible. Polyurethane foam can last at least 60 years.
Expanded polystyrene is environmentally friendly for humans. It is used to fill furniture and pillows. It is not destroyed by microorganisms. Fungi do not grow on it and colonies do not develop. The structure of the material is porous. It has a relatively high percentage of moisture absorption, so it can be destroyed by negative temperatures.
Brick siding for exterior finishing: a worthy alternative to masonry
Is your desire to have a good-quality brick house not realized? Don't rush to give up your dream. Modern finishing materials can create a real miracle. Using brick siding for exterior decoration, even a dilapidated wooden structure can be turned into a modern architectural structure.
Brick-like facade panels: a good way to decorate a house without putting unnecessary stress on the walls (read more)
You just need to choose the right panels that will protect the house from winds and dampness, and also make its design presentable.
Varieties
There are a huge number of types of artificial bricks on the building materials market that are used for interior decoration of houses, and in particular, corridors, and you must first understand how they differ.
Clinker tiles
Quite often, clinker tiles are called decorative bricks. This is a type of ceramic material that has a rough or smooth surface. It is light, quite durable, has minimal thickness and a rich range of colors.
From cement
Another type of decorative brick includes cement products. This material is made manually by mixing a solution of sand, clay and water and giving it shape using formwork. This finishing material resembles ordinary brick, but unlike its counterpart, it is quite fragile and you need to be especially careful with it when laying it. But the surface of this finish turns out to be very interesting and textured.
However, when caring for cement bricks, you need to remember that you should not overly moisten this material, otherwise it may simply deteriorate; in addition, the use of any chemicals to clean it is also prohibited.
This material is environmentally friendly and does not cause allergies. Walls lined with cement bricks can “breathe” freely. The disadvantage of this coating is that when laying this material a lot of dust and debris is generated, and also that during operation it is necessary to maintain a constant air humidity of no more than 50% to maintain the integrity of the fragments.
Gypsum stone
Another type of decorative brick is gypsum stone. This is the most inexpensive of the materials presented here for finishing corridors, halls and hallways. It weighs very little, so it can even be mounted on sheets of drywall. The disadvantages of this material are its fragility and the need for fairly dry air (here, the room humidity should also not exceed 50%).
With an increased rate, bricks may simply become brittle and collapse. But modern technology has practically solved this problem. After finishing the wall, this material is coated with a special varnish with a water-repellent effect, and this procedure significantly increases the service life of gypsum bricks.
Flexible tiles
Flexible brick-like tiles allow you to decorate rooms both inside and outside. It perfectly resists changes in temperature and humidity, and has high noise insulation rates. Laying such tiles is easy, they do not crumble, they bend well, and therefore do not require a completely flat surface.
If there are columns in your corridor and you want to decorate them with brickwork, this material will be an indispensable assistant for you, as it easily goes around all corners and circles.
Panels
You can also buy entire panels that imitate brickwork from various materials: MDF, PVC, glass-vibroconcrete. This will make it easier to install this facing material, especially if you cover the entire corridor walls with it.
Read with this
- Sand-lime brick
- Facade cladding panels
- Dimensions of standard bricks
- Clinker tiles for facades: a universal facing material
- Homemade Russian stove on the street under a canopy
- Types of bricks: characteristics and applications
- Decorative brick on the wall +75 photo examples
- Dimensions and cost of PVC plastic ceiling panels
- Decorative 3D panels for walls in the interior of the house
- Bricklaying in winter
Glass magnesium sheets
This material has not yet become widely known and widespread in the decoration of walls inside a brick house. However, it has many advantages that need to be taken into account:
- The glass-magnesium sheet is very flexible and durable, which at the same time makes it a reliable and easy-to-install material; This material is fireproof and moisture-resistant at the same time, which makes it easy to use in kitchens and other rooms; Glass-magnesium sheets do not contain harmful impurities and substances. They are environmentally friendly and safe for humans.
The material has two sides: rough and smooth. The first is used as an external one if the finishing cladding is made of tiles, decorative plaster, veneer and other materials that require good adhesion to the surface. The smooth side is intended for wallpapering, painting, laminating, etc.
It can be attached in various ways, either using special glue or on a metal or wooden sheathing.
There are other less popular ways of finishing brick walls. The most important thing is that when carrying out any option, follow all the rules and take into account the individual characteristics of the premises being finished and the quality of the coatings.
Video on how to perform high-quality plastering of walls:
Properly done finishing using quality materials will last a long time.
Anyone who has built a brick house will think about how to decorate the walls.
When starting to decorate the walls in a brick house, you need to remember what factors will influence them. The outer side of the wall will be exposed to rain, snow, sun, and wind. Moisture (evaporation) is inevitable inside the house.
Brick houses have their own characteristics, and therefore it is worth taking the issue of interior decoration seriously. The main disadvantage of brick-type houses is the presence of the greenhouse effect.
Exterior wall finishing consists primarily of plastering, then painting or siding. The interior decoration of a brick house involves a much larger number of coatings.