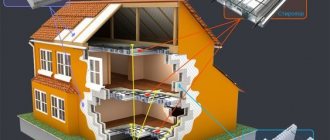
The most popular areas in low-rise housing construction and the production of prefabricated buildings are lightweight steel frames and wooden frames, as well as inexpensive SIP buildings. Due to their placement in the middle price segment, blocks and bricks have a slightly weaker position, although the most durable housing is built on the basis of these technologies, the service life of which exceeds 100-120 years. For the construction of a country house, we recommend studying aerated concrete. This material has interesting features and mostly meets modern standards and requirements. Thanks to this choice, it is possible to build a reliable and durable, and most importantly, safe and energy-efficient home for permanent residence!
What is aerated concrete
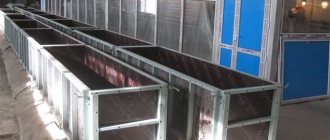
Aerated concrete block is a modern building material made from natural raw materials. The production uses cement, lime, quartz sand, water, as well as special structural additives to foam the mass and improve the characteristics of the material. Aluminum powder is most often used for this.
Depending on the manufacturer, the properties of the block, its dimensions, and technical characteristics may vary slightly. It is also necessary to pay attention to the environmental component, regulated by the quality of raw materials and production. When ordering blocks for the construction of residential buildings, it is important to require sanitary certificates.
Today on the market are materials made using two main technologies - autoclaved and non-autoclaved aerated concrete, and, accordingly, aerated concrete and gas silicate. The use of the baking stage of the block allows you to change its qualities depending on the requirements, improve strength, energy efficiency, frost resistance and other important indicators!
Advantages and main characteristics of aerated concrete
- High degree of environmental safety. Laboratory control confirms acceptable background radiation levels, which are 5-6 times lower than the established norm;
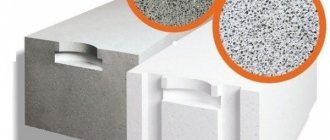
- Aerated concrete is a lightweight block of cellular concrete that has a porous structure. Inside the finished building stone there are millions of interconnected spherical closed cells that provide basic qualities - regulation of thermal conductivity and a significant reduction in heat loss;
- An aerated concrete block is a vapor-permeable material, which means that the thermos, greenhouse effect inside the finished building is eliminated. Moisture does not linger or accumulate, there is no dampness, rotting processes, or the occurrence of fungus and mold;
- Modern production puts on the market blocks of nominal strength depending on their purpose. Can be used in the construction of load-bearing walls and partitions, construction of buildings up to three floors;
- The increased dimensions of building stone indicate the possibility of speeding up the laying of walls by 2-3 times compared to other piece materials, and increasing the speed of work up to six times if the process is compared with brick laying;
- Wide architectural possibilities. Houses of any shape and size, compatible with interior and exterior decoration that meets various styles and trends;
- High manufacturability of the material, the possibility of processing - cutting and molding on site, gating, drilling, drilling;
- Light weight, which provides advantages in delivery, loading and unloading and storage compared to other materials for masonry walls of residential buildings;
- Affordable price. The cost is regulated by the manufacturer, suppliers, but also by region and seasonality. The standard price tag for aerated concrete indicates the possibility of economically assembling cottage walls, 20-40% cheaper than brick. But this advantage is taken into account only with the participation of professionals in the design, as well as in the case of a qualified estimate!
Additionally, we present some technical characteristics of aerated concrete blocks to compare them with brick, foam concrete, reinforced concrete structures, as well as technologies associated with wooden house construction:
- Volumetric weight in the range of 300-1200 kg/m3;
- Axial pressure – up to B2.5;
- Fire resistance of blocks – class A1;
- Thermal conductivity of the material is about 0.12 W/m°C;
- Frost resistance of the block is F35!
Thickness of aerated concrete wall: standards and recommendations
Indicators of thermal protection of buildings, which ensure the formation of a favorable temperature in the room and contribute to economical energy consumption, can be found in SNiP 02/23/2003. The document contains rules for objects with permanent residence and heating.
The recommended thickness of aerated concrete walls to be constructed should be calculated when designing a house. Taking into account the following criteria helps determine this parameter:
- resistance of building materials to frost, moisture, corrosion, high temperature;
- heating costs;
- protection from excessive moisture.
If you do not want to turn to specialists for a thermal calculation, you can do it yourself, focusing on average indicators. This is enough to make the house cozy and warm.
According to the recommendations of manufacturers and based on statistics, the following standards have been established for selecting the size (thickness) of aerated concrete blocks for building a house:
- When building houses for seasonal residence, the thickness of the wall with masonry made of aerated concrete blocks can start from 200 mm. But experts recommend stopping at 300 mm.
- When constructing a plinth and basement, you should choose 400 mm thick gas blocks, grade D500 or D600, class B3.5-B5.
- For inter-apartment partitions, the recommended thickness of aerated concrete is 300 mm, for interior partitions - 100-150 mm.
- The minimum thickness that a load-bearing wall based on autoclaved aerated concrete can have is 375 mm, a self-supporting wall is 300 mm. For comparison: the smallest thickness of walls made of foam blocks with equal thermal conductivity of structures should be 1.6 times greater, i.e. for load-bearing ones - 600 mm, for self-supporting ones - 480 mm.
Calculation of the optimal thickness of masonry from aerated concrete blocks
structures should be 1.6 times larger, i.e. for load-bearing ones - 600 mm, for self-supporting ones - 480 mm.
In a simplified form, the thickness of a load-bearing wall built from aerated concrete is calculated using the following formula:
T = Rreg*λ
Thermal conductivity
λ is the thermal conductivity coefficient. Each block brand has its own coefficient. The required indicator in a particular case can be selected in the table below: it shows general values according to GOST 31359-2007. It can also be found in the test reports of the building materials manufacturer.
| Brand by density | Coef. thermal conductivity in dry state, W/m*°С |
| D400 | 0,096 |
| D500 | 0,12 |
| D600 | 0,14 |
| D700 | 0,17 |
Heat Transfer Resistance
Rreg is the resistance to heat transfer possessed by aerated block walls. This parameter can be calculated by multiplying coefficient a (0.00035) by Dd (degree days of the heating period, GSOP) and adding coefficient b (1.4) to the resulting number.
These coefficients are presented in SNiP 02/23/2003. GSOP represents the difference between the outside and indoor temperatures observed during the heating season, multiplied by the length of the heating season. These values can be found in SNIP 23-01-99 and the manual “Construction Climatology”.
But it’s easier to find the desired value in the table (not for all cities):
| City | Required resistance to heat transfer, m2*°C/W |
| Moscow | 3,28 |
| Permian | 3,64 |
| Omsk | 3,82 |
| Krasnodar | 2,44 |
| Saint Petersburg | 3,23 |
| Ekaterinburg | 3,65 |
| Kazan | 3,45 |
| Krasnoyarsk | 4,84 |
| Chelyabinsk | 3,64 |
| Novosibirsk | 3,93 |
| Volgograd | 2,91 |
| Yakutsk | 5,28 |
| Sochi | 1,79 |
| Magadan | 4,33 |
| Tver | 3,31 |
| Ufa | 3,48 |
If you use the formula, it turns out that the thickness of the block for a house located in Moscow should be at least 44 cm when using D500 aerated concrete. When using D400 gas blocks, the figure is 37.5 cm.
For the northern regions, the calculated wall thicknesses are 74–77 cm. When building houses from aerated concrete in such conditions, it is recommended to build a multi-layer structure.
Wall thickness of aerated blocks and sound insulation
Due to their cellular structure, gas blocks perfectly dampen sound energy. The walls of a house made of this material provide good protection from street noise. The following sound insulation standards will help you figure out how thick an aerated concrete wall should be for comfortable silence:
- inter-apartment walls and partitions - from 52 dB;
- walls between residential premises and shops - from 55 dB;
- partitions between rooms - from 43 dB;
- partitions between the room and the bathroom - from 47 dB.
When constructing interior partitions measuring 100–150 mm, it is recommended to use D600 blocks. Covered with gypsum plaster, such structures have a sound insulation index of 43 dB - within normal limits. The 300 mm thick structures provide noise insulation of 52 dB. Interior finishing with plasterboard helps to effectively reduce noise levels.
Disadvantages of aerated concrete
- There is a serious relationship between strength and thermal conductivity. When choosing a material with high strength characteristics, it is worth understanding that this block will have increased thermal conductivity;
- Regardless of the choice of block, additional wall insulation is necessary. Although, this can hardly be called a disadvantage... it would be more correct to say that this is just a recommendation - to study thermal conductivity in time and carry out the necessary thermal calculations, since today it is important to additionally insulate a house made of any material to increase energy efficiency;
- Regardless of the reduction in the load on the foundation, you cannot save on the foundation of a residential building. This fact is due to the increased fragility of the material, which can lead to cracking in the walls if the customer decides to save significantly on the construction of the foundation part of the building;
- Mandatory exterior finishing of the house in the first year after construction. The stage of facade work cannot be postponed due to possible deterioration of the quality of the material due to the influence of natural factors;
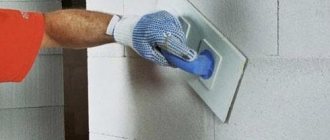
- Mandatory use of deep soil when finishing wall surfaces, as well as additional reinforcement when applying plaster compositions;
- The need for mortgages and reinforcement elements in the case of installation of equipment and furniture on walls, as well as the use of more expensive fastening elements for exterior finishing;
- The requirement to use protective elements and compositions for metal products - sleeves, reinforcements, mortgages, utilities due to the lime content in the composition of the aerated concrete block;
- Increased fragility of the material if used carelessly can lead to additional costs of up to 10% when forming blocks on site, unloading, storing and supplying materials to the masonry contour!
Is it possible to build with aerated concrete, and is it even worth using the material in the residential sector? More than! Today, up to 40% of country houses are built on the basis of block technology, one of the main directions of which is construction from aerated concrete and gas silicate. Foam concrete, shell rock, cinder block, and warm ceramics are also used. Each material has its own advantages and disadvantages, and only their clear definition and compliance with your own wishes and building standards in the region will help you decide!
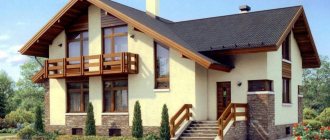
Aerated block house - advantages and disadvantages
Building a house from aerated concrete
Aerated concrete blocks, successfully competing with other building materials, have a number of advantages and, at the same time, have weaknesses. The properties of aerated concrete influence construction technology, as well as the operational characteristics of an aerated concrete building.
Let's consider the main advantages of the material:
- durability. Aerated concrete buildings can be used for more than four decades;
- margin of safety. The porous building material is resistant to mechanical stress and retains its integrity under compression and bending;
- affordable price. Due to the low cost of cellular blocks, you can significantly save on the construction of a building box;
- reduced thermal conductivity of blocks. Aerated concrete walls of a residential building retain heat indoors, reducing heating costs;
- increased vapor permeability of the material. A comfortable level of humidity is maintained in aerated concrete rooms;
- increased dimensions of gas blocks. They allow you to significantly speed up the process of constructing aerated concrete walls;
- reduced dimensional tolerances. Aerated concrete blocks do not differ in size, which eliminates the need for adjustment;
- fire resistance. Cellular concrete retains its structure and does not ignite when exposed to open fire;
- light weight. Lightweight blocks do not create increased loads on the foundation, which reduces the cost of building a foundation;
- porous surface of aerated blocks. It provides increased absorbent properties, ensuring improved contact with the plaster;
- frost resistance. Aerated concrete, protected by plaster, can be subjected to repeated freezing and subsequent thawing;
Do-it-yourself aerated concrete house - builder's advice - sound insulation. Due to the cellular structure of the aerated concrete mass, it is difficult for external noise to penetrate into the room;
- ease of processing of gas blocks. Pliable aerated concrete is easily machined.
Thanks to this set of advantages, many developers build houses with their own hands from aerated concrete. Along with the advantages of aerated blocks, there is a drawback - the ability of an unprotected cellular mass to absorb moisture. Increased humidity of aerated concrete material causes the development of mold and causes freezing.
Having studied the properties of the material, we can conclude that aerated concrete blocks are a good option for building a private house.
How to build a house from aerated concrete
The process of constructing a residential property is quite multifaceted. There are hundreds, thousands or more standard projects from various companies that are adapted to the building site and region, in connection with the personal wishes of the customer. Houses made of aerated concrete blocks can be built with or without insulation, expensive facade finishing or standard wall plaster, delivered at the stage of readiness of the main box with a closed thermal circuit, or with finishing and the introduction of turnkey communications. All parameters are determined and regulated strictly individually, and even if you choose two externally identical projects, it is unlikely that you will be able to build two completely identical houses!
The most important stage is the design and preparatory work. At the time of construction - technical expertise! The customer has the right to control the quality of work, request reports, and visit the site at his own discretion. In principle, as in the case of the construction of residential or other facilities using other technologies. Also important is a preliminary calculation and a certified estimate with the indicated stages and cost of work, list, cost and total amount for materials. Take into account additional coefficients, discuss the need and reasons for their appearance in total!
After choosing a project for a house made of aerated blocks, agreeing on the terms and amendments, as well as signing the contract and resolving financial issues, the craftsmen begin preparatory work, purchasing and delivering materials.
Preparatory work
- Visit of specialists to the site to obtain accurate data, geodesy, check the quality of soil and topography, preliminary marking of the territory, designation of entry routes and internal roads, location of warehouses and places of residence of workers;
- Clearing the area of excess vegetation, arrangement in accordance with the plan;
- Purchase of building materials, delivery to the site, organization of unloading and storage in protected places provided with safety conditions!
Foundation work stage
- Excavation work using special equipment;
- Drains, dampers, foundation cushions;
- Installation of formwork and installation of steel reinforcement frame. To install high-quality formwork, form-building systems of nominal quality without cracks and defects are selected. It is necessary to construct sections without gaps, which can contribute to the loss of cement laitance and a decrease in the performance of concrete. The strength of the structure is ensured, the formwork units and reinforcement installed inside are checked;
- Delivery of concrete mixture is ordered, which is poured into the formwork cavities. Concrete of the appropriate class, always fresh, which is indicated in the consignment note, which indicates the time of shipment and the route of the machine. The poured concrete is rolled out and vibrated for high-quality compaction and removal of air bubbles from the structure, which deteriorate the quality and characteristics of concrete;
- Maintenance of the foundation of the future structure is provided depending on the region of construction, season, and weather conditions!
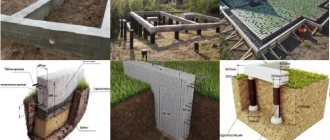
For the construction of suburban real estate from aerated concrete, a pile-grillage foundation, strip or slab foundation can be chosen. The last two positions are more often determined, since the load-bearing capacity, strength and other characteristics are more consistent with construction from blocks. The developer can offer USHP - a high-quality insulated foundation, which, however, is quite expensive!
Laying the walls of a house from aerated concrete blocks
- First of all, a leveling row is laid along the foundation, waterproofing is performed between the main masonry material of the walls and the base. It is important to ensure a qualitative limitation of capillary moisture, which can have a serious negative impact on aerated concrete blocks;
- Upon completion of the laying of the first row along the perimeter with the correct ligation of the corners, reinforcement is performed. It is necessary to improve the strength of walls, correct distribution of loads, and the perception of various external factors affecting the walls, including wind loads. For reinforcement, 12 mm steel reinforcement is used, which is placed in the grooves and then filled with an adhesive solution. Grooves for reinforcement are made manually using a wall chaser. It is necessary to remove dust before laying the reinforcement;
- Ready-made grooves make it possible not to increase the masonry joint. When laying reinforcement inside, it bends in the corners and intersects with new sections with mandatory tolerance. The adhesive filling solution is pressed in to avoid the formation of voids;
- Reinforcement is required for every third row. After laying the reinforcement and filling the grooves with glue, a thin adhesive layer is applied for the next row of aerated concrete blocks. Its average thickness is about 3 mm!
Quick assembly of walls is possible due to the increased size of aerated concrete blocks. The average size of masonry stone is 600x200x400 mm!
Disadvantages of cellular concrete
The characteristics of the material will not be complete without taking into account its shortcomings. Like any other building material, cellular concrete has its weaknesses:
- The porosity of the material reduces its strength. Aerated concrete is not used in the construction of multi-storey buildings; a mandatory procedure is to reinforce aerated silicate masonry with metal reinforcement at the level of window and door openings, as well as in the top row of blocks along the entire perimeter of the walls being built.
- Cellular concrete tolerates deformation due to bending or torsion extremely poorly. Therefore, to build walls you will need a reliable strip foundation. When using a columnar foundation, there is a high chance that such a wall will soon crack due to the slightest movement of the soil.
- Aerated concrete and gas silicate walls absorb moisture from the environment well. Therefore, external wall decoration is required. In its process, it is necessary to create a barrier to prevent moisture from entering. Gas silicate blocks are not recommended for use in rooms with high humidity, such as a bathroom.
- The process of laying on adhesive mortar is quite specific and requires certain skills and special tools. For such work it is better to hire a specialist, which, in turn, leads to higher construction costs. The use of cement mortar makes the process similar to the construction of walls made of brick or cinder block, but in this case, due to thicker seams, unique cold bridges arise, and the thermal insulation characteristics of the constructed partition are significantly reduced.
USEFUL INFORMATION: Which wallpaper is best for a children's room?
Mortgages, lintels, partitions
Structural aerated concrete is used for the construction of internal walls, and thermal insulating concrete is used for non-load-bearing partitions. Partitions can be made from the remains of a block, brick, or other materials in accordance with the design documentation and only after agreement with the customer. It is worth taking into account the possibility of constructing non-load-bearing partitions to form interior spaces in the case of an open plan. For the construction of partitions, a frame system can also be used - partitions made of OSB or plywood on a wooden frame, plasterboard partitions on a steel frame, and other solutions!
To form window openings, as well as external and internal door openings, the use of concrete lintels is mandatory. Often, reinforcements and mortgages are installed in openings to ensure high-quality installation of door frames.
Preparation
At the first stage of construction, it is impossible to do without performing preparatory work, which begins with studying the soil in the selected area. Based on the results of studies of soil parameters, freezing depth and groundwater occurrence, a foundation for construction is selected. After this, the top layer of soil is removed and markings are made in accordance with the design documentation. The necessary materials and tools are delivered to the construction site, and they move on to the next step - laying the foundation.
Foundation for a future house
The best option for a one-story and two-story building is a strip-type base. To create it, a pit is dug (along the perimeter if the house does not have a basement, or along the area of the entire building if there is a basement) and formwork is installed to shape the concrete mixture. Before pouring the solution, reinforcement is performed using steel or glass composite rods. The mixture hardens for 6–14 days, after which the formwork elements are removed. Sometimes columnar foundations are used for aerated concrete houses, but they can only support light and low buildings. If the building, on the contrary, is high (3 floors or more), you should choose a monolithic slab base - expensive, but durable. The slab foundation is usually made shallow, which makes it possible to do without heavy construction equipment. Its advantage is the absence of subsidence of individual parts of the house and the appearance of cracks on walls and ceilings.
We build walls. Laying the first row of blocks
The construction of the walls of an aerated concrete building begins with laying the plinth along the perimeter of the building and along the load-bearing structures, which will also be made of blocks. The material for the plinth is usually red brick. The technology used does not differ from the methods of laying conventional brick walls. The height of the base part depends on the level of precipitation in the region (the more often and heavily the rains, the higher the base will be) and is on average 500–1000 mm or 6–10 bricks. The process of preparing for laying the first row of gas blocks consists of the following stages, which you can get acquainted with using the video:
Video: Laying the first row
1. Using a laser level, the highest point of the base part is determined, into which the first block is laid. 2. The remaining elements of the first row are distributed to other corners of the contour. 3. A special marking cord is stretched between the blocks, which is used to guide when laying other products. 4. If the walls are long enough (8–10 meters or more), “beacons” are placed between the gas blocks at a distance of 2–3 m from each other. After the preparatory work, the first row is installed. When laying the lower elements, cement mortar is used, which increases adhesion to the base. You can simplify the work by simultaneously laying blocks on different sides of the same wall - elements.
Laying the second and subsequent rows
When laying the next rows, other solutions are used - in most cases, specialized compositions for aerated blocks are selected. The amount of displacement of vertical joints is taken equal to 1/3 of the block or 150 mm. Every second or third element of the row and every corner of the building is subject to reinforcement. The masonry is carried out sequentially. New elements are laid only after the bottom row is completely completed. Before applying the adhesive solution, the block is thoroughly cleaned of dirt and dusted - an important detail for reinforced elements. A video will help you get acquainted with the masonry process in more detail.
Video: Second and subsequent rows
Reinforcement of aerated concrete masonry
Reinforcement of the walls of a building made of aerated concrete is required to increase their resistance to soil heaving. The reinforcement process consists of cutting one longitudinal groove in the blocks - two parallel grooves are made in the outer thick gas blocks (parallelism is checked using a board). The distance from the groove to the edge of the element must be at least 60 mm.
Reinforce every 4 rows of blocks
Dust is removed from the finished recesses by placing the selected reinforcement inside - mainly steel rods with a diameter of 0.8 cm. It is advisable to install whole rods in the corners. If this does not work, the corner rod is bent. The joints of the reinforcing elements must be located in the middle of the block - the rods are not placed end-to-end, but overlapped by 100 mm. You can avoid protruding ends of the reinforcement by bending the protruding parts inside specially made additional grooves.
An example of laying reinforcement for load-bearing walls
Having laid out the rods along the grooves, perform the following actions: 1. Remove the reinforcement back. 2. Wet the recesses with water and fill them halfway with adhesive. 3. Clean the rods from dust and also moisten them to increase the degree of adhesion to the glue. 4. Embed the rods in glue.
Cover the groove with the fittings with glue
5. Remove excess adhesive solution with a spatula, leveling the layer covering the groove.
Video: Reinforcement of aerated concrete masonry
Reinforcement must be performed for the first row, and then for every fourth. However, it is not only the supporting structures that will have to be strengthened. The reinforcement should strengthen the building in the locations of doors and windows.
Jumper arrangement
To reinforce window and door blocks, U-shaped structures with one thick wall and a second thinner wall are purchased. During installation, they are turned towards the street and the room, respectively. Choosing ready-made elements simplifies the work, but increases costs.
Reinforcement of window and door openings
Window openings are reinforced using the same reinforcement that was used to strengthen the entire frame. The grooves surround windows and doors at a distance of about 300 mm. The process of laying and securing the rods is no different from similar actions when reinforcing walls. Having completed the installation of jumpers, the last stage of reinforcement is performed - filling the armored belt.
To do this, make formwork from a block 100 mm wide, lay rods in it and fill it with cement mortar. For a one-story building, the studs with which the roof will be connected are reinforced in the armored belt.
Video: Arrangement of jumpers
Interfloor ceilings
The walls are followed by the installation of interfloor ceilings, the material for which is selected in accordance with the load on the building. The structure can be made in the form of a slab, characterized by maximum strength and load-bearing capacity, good sound insulation characteristics and ease of installation. The slab is installed by a crane, increasing costs but reducing time. Sometimes monolithic and prefabricated monolithic floors are chosen for buildings made of aerated concrete. For the first option, which is considered the most expensive and is used for houses with high loads on enclosing and interfloor structures, you will need cement mortar. Prefabricated monolithic ones involve installing blocks on a pre-prepared frame of beams; they take more time, but are cheaper than most other options.
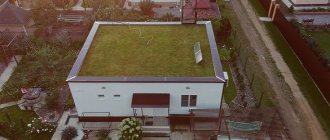
Roof installation
The installation of the roof completes the work. The stages of constructing the last element of the frame of a residential building are as follows: 1. Installation of the rafter system. 2. Installation of heat and waterproofing materials. 3. Fastening the sheathing and counter-lattice. 4. Laying roofing material.
The type of roof is selected from three possible options - single-pitch, gable and hip. The last type is a roof with 4 slopes perpendicular to each other. Shed roofs are practically not used for residential buildings - only for adjacent outbuildings such as a garage or covered terrace.
Interfloor ceilings
- Upon completion of the forcing of the walls of the first floor of the building, a reinforced belt is poured to properly distribute the load from the walls of the second floor or install the truss structure of the roof of the building. Formwork is formed, reinforcement is laid inside and concrete mixture is poured;
- The next stage could be laying reinforced concrete slabs, pouring concrete floors on site, installing lightweight warm floor systems, and forming the floor using wooden beams!
Roof construction
- After completing the construction of the walls and the installation of the ceiling, laying the reinforced belts and laying the Mauerlat, the roof truss system of the building is installed. High-quality security is important, for which emergency connections, pins, and reinforcements are used;
- The installation of the main system with sheathing is carried out, which meets the requirements of the roofing material or roof insulation system;
- To construct the structure, wooden boards, beams, timber, plywood, OSB and other materials are used. To form an insulation cake - additional insulating materials, slab or roll insulation, polyurethane foam, as well as internal lining to complete rough work in the under-roof space;
- Roofing material is being laid. There are no restrictions on choice in a block house. The customer can specify metal tiles, standard slate, onlulin, seam roofing, corrugated sheeting;
- Ridges, snow retainers, a drainage system, under-roof heating systems, and other elements and structures are installed on the roof!
Reinforcement of aerated concrete
To increase the building's resistance to forces arising from soil heaving, longitudinal reinforcement of the walls is performed. To do this, longitudinal grooves are cut into the laid row of blocks using a special device. For thick external ones, two grooves are made for two rods; for jumpers up to 200 mm thick, one thread is used. They should be at a distance of at least 6 cm from the edge of the block. When cutting two grooves, it is more convenient to maintain the distance by placing a board: one groove on one side, the second on the other.
When the grooves are ready, dust is swept out of them with a brush. Then they take 8 mm reinforcement and pre-lay it into prepared grooves. They arrange it so that there are solid rods in the corners: they are simply bent in the right place. The joints of the reinforcement should be located approximately in the middle of the block, but not in the corners of the building or at the junction of the walls.
One rod is placed on top of the other, laid side by side. The overlap should be 10-20 cm. To prevent the ends of the reinforcement from sticking out in the openings (doors and windows), small pieces can be bent by making small grooves under them.
Reinforcement of corners and junctions is made from solid rods
When everything is laid out, take out the rod, moisten the groove with water and fill it halfway with glue or concrete mortar. And it is necessary to clean and wet it, otherwise the solution will not adhere to the block material and the reinforcement will be of no use. We embed the rod into the glue, then we use a spatula along the grooves, removing excess and leveling the layer.
Such reinforcement is carried out in the first row, and then in every fourth. With regular dressing, even if the foundation settles unevenly, a house made of aerated concrete will stand normally.
But this is not all reinforcement. Above the window and door blocks, as well as in the last row of the floor, more reinforcement elements are required, but more serious, with 4 rods connected into a single system. There are special U-shaped blocks for this. They are placed as the last row under the ceiling of the second floor or under the roof slab. One side wall of the block is thick, the second is thinner. The thick wall is turned into the street, the thin wall into the room.
An example of the installation of a reinforcing belt during the construction of a house made of foam blocks
A continuous reinforcing belt is knitted from 4 reinforcement bars with a diameter of 10-12 mm. It is knitted according to the same principle as in a strip foundation (you can read it here). An example of a reinforcing frame is in the video.
The finished elements are placed into the cavity of the block and filled with M200 concrete. After the concrete reaches 50% strength, you can lay the floors or install the roof truss system.
Reinforcement of window openings of aerated concrete houses
According to the technology, if a house made of aerated concrete has a window opening wider than 1.8 meters, the penultimate row of aerated concrete blocks is additionally reinforced. To do this, two longitudinal grooves are made, which are at least 0.5 m longer than the window opening. To be on the safe side, you can make the projections larger - up to 1 meter - and reinforce them under each window opening.
The technology is similar to the wall one: two grooves into which the rod is placed are filled with glue or mortar. The last row of blocks is installed on top of the reinforcement, and subsequently the window frame is placed on top of it.
The general principles of working with foam concrete blocks are described in the following video; the principles of reinforcing window and door openings are also covered
Read about the features of finishing walls made of aerated concrete here.
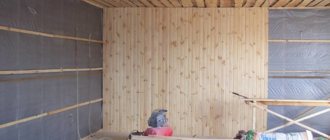
Exterior decoration
It is possible to perform facade work without insulation. But this is not the most correct decision, because by performing thermal insulation work once and investing a certain amount, you can achieve cost savings of up to 40% and even 60%, depending on the correctness of the work carried out and the heating characteristics of the house. Therefore, insulation is important. If a different decision is made, plastering the walls on the ground and then painting and finishing with textured plasters is sufficient!
- Insulation with polystyrene foam, polystyrene foam, ready-made warm facades. Installation on an adhesive base and additional plastic fasteners. It is possible to provide for the installation of plastic ties at the stage of laying the walls of the house;
- Insulating walls made of aerated concrete blocks with basalt slabs is the highest quality insulation option for increasing energy efficiency. Installation of slabs with a density of 80 kg/m3 and a thickness of 50 mm in three to four rows with cross bandaging to avoid through seams. Installation on a frame or glue with additional plastic fasteners!
Wall decoration with siding, plaster, composite elements with or without insulation is determined at the design stage through accurate calculations. If you choose clinker brick, natural or artificial stone for facade cladding, a preliminary recalculation of the foundation may be required to obtain a base for the cladding material. It is important to choose the right insulation and connect the main wall and the facing masonry!
In addition to external work, the foundation is waterproofed, insulated, a protective blind area is poured, and inputs for utility networks are arranged!
Parameters and methods of insulating aerated concrete walls
Due to the low strength characteristics of masonry made from cellular blocks, they are used for the construction of buildings with a maximum of three floors. If higher, then only if there is a load-bearing reinforced concrete frame. The floor height can reach 3.6 m, but this is mainly for offices; in residential buildings there is usually a maximum of 3.3 m.
It is impossible to say what the maximum length of an aerated concrete wall should be, since this parameter is determined by design standards and the length of the building itself, and is calculated individually. The main requirement of SNiP in this regard is that the wall must be anchored to pillars, columns or transverse structures every 6 meters.
The thickness of the walls and the option of their insulation are determined by thermal engineering calculations, which take as a basis the average winter temperature of the area, the density of the aerated concrete used and the type of material used for the external cladding.
There can be a lot of variations, so we will not go into calculations, but will simply present several popular schemes:
Interior decoration of aerated concrete house
Interior finishing work is at the customer's discretion. In more than half of the cases, such work is postponed and done independently to save money. But this increases the commissioning period, violates the conditions of maintenance of the house, and also increases the budget. A more rational solution is an integrated approach.
- Finishing on walls made of aerated concrete - leveling plaster on the mesh and ground manually or by machine;
- An additional solution is to install gypsum boards or gypsum boards on glue or a frame;
- It is possible to use decorative plaster mixtures, architectural elements, PVC panels, wooden lining, depending on the purpose of the room, personal wishes, and budget;
- Don't forget about the corners! Regardless of the correct geometry of aerated concrete blocks, construction flaws can form sharp or angled corners when they should be 90 degrees!
The finishing of ceilings and floors directly depends on the structures of the floor and foundation, respectively. More often, a wooden or slab ceiling is used, as well as laying a wooden floor on joists or a leveling screed if the house is built on a concrete slab. As for materials for decorative surface finishing, there are no restrictions for an aerated concrete house!
Kinds
Aerated concrete walls come in the following types:
- single-layer;
- multilayer.
The latter are popular. The construction of such a structure allows you to save on construction costs due to the insulating qualities of the material. But for private houses this option is not recommended, because it entails an increase in costs for design and construction work.
Single layer
The construction of such walls is a simple process.
Aerated concrete wall panels do not have an insulating layer and do not have load-bearing capabilities.
The following materials are used for their construction:
- hollow ceramic block;
- aerated concrete stone.
This wall has a number of positive qualities:
- retains heat well indoors;
- muffles extraneous sounds;
- easy and quick to install;
- convenient to use;
- saves money;
- can be put into operation upon completion of construction work.
In addition to the positive qualities, there are also negative points:
- there is a need for isolation;
- there is a high probability of a “cold bridge” forming.
To build a high-quality wall, you must observe the temperature conditions inside the room. Optimal conditions are considered to be from 5 to 25 degrees Celsius.
You can use aerated concrete to install walls and partitions, create window and door openings using U-shaped stones.
Multilayer
When constructing this design, the following materials can be used:
- wood;
- bricks;
- foam concrete;
- expanded clay concrete;
- chipboard;
- aerated stone;
- blocks from sand-lime raw materials.
In addition to these materials, the technological process involves the use of an insulating and facing layer. In this embodiment, the masonry performs load-bearing functions, taking loads from its own weight and the structures located above.
When starting to build load-bearing walls made of aerated concrete, you should perform calculations for the thickness of the optimal insulation layer, due to which the width of the load-bearing wall made of aerated concrete will increase.
By design, multi-layer walls are two- and three-layer.
The first option involves insulation using a wet or dry method. Wet installation work involves fixing insulating layers on the wall surface with an adhesive solution. Dry masonry is performed by installing thermal insulating material on a metal frame. In such cases, polystyrene sheets or mineralized wool are used.
The insulating layer is laid over the entire wall without interruption.
The advantages of two-layer wall structures are:
- thermal insulation qualities;
- wide selection of materials;
- minimizing “temperature” bridges by following the masonry process.
There are a number of negative points:
- due to insulation, the cost of the structure increases;
- installation takes a long time;
- the work involves significant labor costs;
- short operational period of thermal insulation material.
When working with a three-layer structure, the following positive aspects are highlighted:
- thermal qualities of the material;
- large selection of products;
- maximum thinness of the supporting structure;
- use of various claddings.
However, such a wall will be too expensive, it will take a lot of time to install it and the participation of experienced specialists.