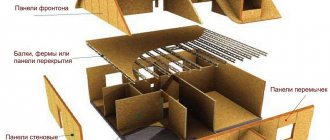
Before covering the roof with covering material, it is insulated, hydrolyzed, equipped with ventilation, and a vapor barrier. All layers of the roofing structure are laid on lathing, which can be mounted in different ways, depending on the purpose of the roof.
The layers of roofing with which it is necessary to cover the roof are called roofing pie. Each layer of the roofing pie performs its own functions and is laid in accordance with certain rules. If the installation of even one layer of the roofing pie is violated, the principle of the functional purpose of the entire roof is completely violated.
Depending on the roof structure and its purpose, the sequence, installation method and number of layers may differ slightly. In this article you will learn how to correctly lay ondulin and how to calculate the number of roofing sheets.
Ondulin coating
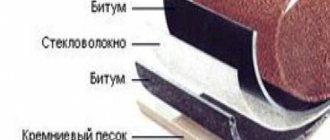
Ondulin is a roofing covering with a fibrous composition, a fairly durable material made from natural organic substances, and does not contain asbestos . An ondulin roof looks like cement slate, which is why it is sometimes called Euro slate . Like any other material, ondulin has advantages and disadvantages.
Advantages
- water resistance During manufacturing, the material is impregnated with a special water-repellent solution, which prevents water drops from penetrating into the structure of the material;
- resistance to acids and alkalis;
- frost resistance;
- hygiene and environmental safety of the material;
- ease. Asbestos-cement slate sheets of the same size have a weight four times higher than similar euro-slate sheets;
- ease of installation : it is easy to cover curved roofs, the sheets are easy to cut and lay out;
- good sound insulation ;
- durability _ Despite the service life of ondulin declared by the manufacturer to be up to 15 years, the coating can last three times longer;
- acceptable price.
Flaws
- loses color saturation quite quickly ;
- fire resistance. Considering that the material is made from organic substances, its fire resistance is very weak;
- strength. The strength of the material can also be considered a disadvantage. The strength of Euro slate directly depends on the correctness of its installation (laying angle, slope, sheathing pitch). If the installation is damaged, the strength indicator suffers first of all;
- low resistance to biological phenomena . It has been noticed that mosses and fungi often settle in poorly lit areas of the roof.
Even if there are shortcomings, ondulin roofing is still very popular, especially since the advantages of the material can ensure the quality of the coating.
What kind of material
The big advantage of ondulin, which encourages users to purchase and use it, is its environmental friendliness. This was made possible thanks to the use of unique components. For example, decking contains cellulose fibers and modified bitumen. No forests are cut down to obtain cellulose fibers. Materials used are waste from the woodworking industry. In addition, waste paper and construction waste are used. The prepared mass undergoes purification to remove unnecessary impurities from it.
Next, mineral components are added to the fibers. Their goal is to increase ductility and strength. At this stage, pigments are also added, which are responsible for obtaining the required shade. Once the mixture reaches the required consistency, it is rolled into sheets. The sheets are transported to the presses along the conveyor line. Presses are made from flat sheets into wavy ones. Purified bitumen is fed into the mass under the press. This happens at a special temperature and pressure.
In addition to pigmentation, additional coloring of ondulin sheets is performed. Painting is carried out on the front or both sides. The next step is cutting the sheets to the required sizes and packaging them for easy storage and delivery. The production technology is quite complex, but the result is a good roofing covering that can last for several decades.
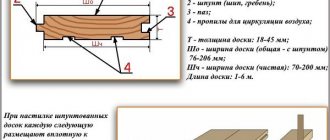
How to make a sheathing
The sheathing is the frame of the roof structure, the foundation of the roof, the installation of which requires compliance with certain rules. The sheathing for fiber ondulin is made of beams (or boards) having a cross-section from 40 mm to 60 mm . Wood beams are usually made from coniferous trees.
Before installing the sheathing, the sheathing material must be impregnated with an antiseptic .
The implementation of sheathing under euro slate is carried out in several stages:
- attaching waterproofing material to the rafters. It is mounted at overlapping joints and secured with a stapler;
- beams are attached to the overhang of the roof edge and along the end holes, forming a cornice. In this case, the board from the base of the canopy should be of a large cross-section, and the step between the beams should be smaller. The protrusion of the first board should exceed the width of the cornice;
- The remaining sheathing boards are installed parallel to the cornice. To accurately observe the parallelism and pitch of the sheathing, you can build a wooden template;
- securing the gutter holders with self-tapping screws;
- a wind board is attached no more than 4 cm from the base of the eaves board;
- attaching the ridge and components.
IMPORTANT!
The level of functional indicators of the roofing directly depends on how well the sheathing is made.
A few nuances to consider when installing the sheathing:
- Before installing the sheathing, measure the diagonals and sides of the roof using ropes attached at the corners. Their equality ensures the correct shape of the roof;
- if the length of the timber is shorter than the width of the roof, then the fastening of the boards should be done in a checkerboard pattern;
- the height of the boards at the joints of the end parts must be the same.
The pitch of the sheathing depending on the angle of the roof
If all the rules for installing the sheathing are not followed, the installation of the covering will also be disrupted, which will lead to undesirable consequences. How to lay ondulin and not make mistakes? Let's talk about this in more detail.
How to avoid mistakes
Understanding the method of producing ondulin should suggest that the material is quite soft, so there are no particular difficulties in dividing or cutting the sheet to the required size. This is also a disadvantage, because if the fixing force is exceeded, the sheet can be damaged to such an extent that it will be impossible to use it. The blows should not be strong or intense. As a result, distortions and gaps may occur through which rain or melt water can enter. The nail is driven only into the upper part of the wave. At the same time, it is easy to bend or simply break through if the lower wave does not fit tightly to the sheathing.
In most cases, the best solution for ondulin sheets will be nails. They make it possible to ensure high quality finishing flooring. Using a nail to fix the ondulin sheet makes it easier to control the applied force. If you screw in a self-tapping screw with a screwdriver, it is not always easy to calculate the required degree of immersion. The total cost of nails per project is lower than the same number of screws.
Note! It is worth choosing nails for ondulin with a length of 70 mm.
The diameter of each element should be 3.5 mm. As an alternative, the most common nails will do, but they will require the use of plastic caps.
If, nevertheless, it was decided to use self-tapping screws, then the same elements that are used for corrugated sheeting are suitable for ondulin. They are elements with a hexagonal head. Moreover, each self-tapping screw has a rubber seal, which improves the pressure and also seals the hole. You should be careful when choosing material for the sheathing. If oak, pine or acacia is used, which has a lot of knots, then there will be problems with how the nails will fit into the material. To make your task easier, you can dip the nails in solar oil. This is necessary to prevent cracks from appearing in the timber and to prevent corrosion in the fastening material. The process of correct installation of ondulin sheets is shown in the video below.
Advice! It is important to ensure that the oil used does not get on the ondulin, since it is impossible to wash the stain.
How to properly attach ondulin to the sheathing
Ondulin is not a material whose installation requires a lot of effort and skill.
Installing ondulin with your own hands is quite simple. Fastening rules:
- Before covering the roof with ondulin, you should determine the wind rose and start covering from its opposite side;
- how to install ondulin on the roof? To ensure even fastening of the ondulin sheets along the timber, before installation, you should draw a longitudinal line , which will become a guideline for laying the sheets;
- weather phenomena affect the quality of installation: ondulin is installed when the thermometer is positive, but not more than +30°C;
- when moving on the roof, you should use a ladder or special bridges;
- to facilitate sliding when cutting the blade, the hacksaw should be moistened with water or lubricated with oil;
- for even markings on sheets, it is advisable to use the edge of another sheet or a rope, and draw a line with a colored pencil (different from the color of ondulin);
- You should not stretch the ondulin sheet by more than 1 cm, otherwise, when the temperature drops, it may become deformed;
- When covering the roof, it is imperative to install ventilation, which will save the wood and layers of insulation from the formation of condensation. In this article we talked in more detail about attaching ondulin.
NOTE!
When following the rules for attaching ondulin to the sheathing, the service life of the coating increases significantly.
Ondulin is nailed in a checkerboard pattern
Often the coating loses its properties if basic installation rules are not followed. Before we tell you how to lay ondulin correctly, you need to choose the angle of the roof.
Maintenance of the finished roof
Caring for a roof covered with ondulin is not particularly difficult. To extend its service life, the coating should be regularly cleaned of dirt and debris. Over time, a change in the original color of the surface may occur. To restore an attractive appearance, the coating is painted. Following these simple care rules will allow you to achieve a long service life without loss of performance:
- In spring and autumn, a visual inspection of the coating is carried out;
- overgrown tree branches that can cause damage are cut off;
- it is necessary to clean the roof of leaves that have fallen in autumn, as they may begin to rot;
- The drainage system should be kept in full working order, as it does not allow moisture to accumulate on the roof elements.
Concluding the above, we note that the name “Ondulin,” which is somewhat unusual for a Russian person, is the name of a French company that began producing this material immediately after the end of World War II. The post-bust construction boom made the low-cost roofing product phenomenally successful, and the company greatly expanded its production capacity.
In 1994, an ondulin production line was launched in Nizhny Novgorod; the quality of the products produced there is no different from the original ones. The high performance characteristics of this material have been tested by time, and it enjoys great success in the domestic construction market.
Roof angle for ondulin
Depending on the angle of inclination of the roof, the laying pattern, the pitch of the sheathing, and the width of the overlap of the sheets along and across the sheet depend.
The slope angle determines the coating technology as follows:
When the angle of inclination is less than 10°, a continuous sheathing is constructed. The optimal material for such sheathing is plywood, OSB, boards. In this case, the ondulin is overlapped by 30 cm with a two-wave overlap along the length of the sheet.
The minimum angle of inclination of an ondulin roof is 6 degrees;
With a roof slope angle of 10-15°, the sheathing pitch should be 45 cm , the overlap width should not exceed 20 cm, and the overlap should be single-wave;
When the angle of inclination is more than 15°, the sheathing pitch should be 60 cm , the overlap width should be no more than 17 cm for a single-wave overlap.
Choice of ondulin
Ondulin Beaver tail
The dimensions of the ondulin and the height of the wave are taken into account. Sheets of small dimensions are more convenient to lay, so they are used in private homes, while large ones are installed in industrial facilities. Branded brands produce material that fully meets the stated parameters, and discrepancies in sizes indicate a fake.
Sheets of soft ondulin tiles come in the following types:
- dragon tooth;
- under brick;
- beaver tail;
- shingles;
- rectangle;
- hexagon;
- rhombus.
Manufacturers assign names to different series in order to unify the profile type and make the category more unique.
The thickness of the sheet walls should be the same in all areas, folds, and convexities. There should be no mastic stains or bitumen smudges on the surface. The color of high quality ondulin is uniform without bright or dull spots. The suitability of the material is confirmed by a quality certificate, a guarantee for the services of the manufacturer and supplier.
Thin corrugated panels are produced with a thickness of only 3 mm, so they are easy to cut if there is a shortage in a row and finish installation. On a standard slab 2.0 m long, 0.95 m wide, there are 10 wave projections, the height of which is 0.36 cm. The wave length is 20 cm, width is 9.5 mm.
When purchasing, you can complete the material with special elements for covering valleys, skates, and tongs. On sale are eaves and gable gutters, snow retainers, roof fans, and window elements.
Calculation of the roof on the roof
Ondulin consumption should be calculated at the design stage. This way you can avoid unnecessary costs. We suggest that you not do manual calculations, but use our roofing calculator.
The width and length of a standard Euroslate sheet are 95 cm and 200 cm, respectively. The area of such a sheet is 1.92 square meters. The useful area of the material is determined without overlaps and can be: 1.3 sq. m, 1.5 sq. m and 1.6 sq. m.
To calculate material consumption, the following indicators should be determined:
- useful area of covering material. Depends on the angle of inclination. The multi-slope roof shape is calculated from the total area of each slope;
- roof area. Determined by adding the areas of all slopes using mathematical formulas for figures (trapezoid, square, rectangle, triangle);
- number of sheets of material. It is determined by dividing the area of the entire roof by the usable area of one sheet of material.
CAREFULLY!
The roof area is calculated exclusively along the eaves overhang line, but not along the edge of the roof sheathing.
The correct calculation of longitudinal overlaps is of great importance, which can significantly reduce the number of trims. The top row, if possible, should be laid in full-length sheets, since its height will be reduced by the ridge element.
There are several more additions to the correct calculation of ondulin:
- when calculating, you should additionally add 10% or 15-20%, respectively, to a simple roof or a complex roof with different angles and transitions;
- additional elements (ridges, valleys, gables, aprons around chimneys and windows, junction points) require additional coating with ondulin;
- When calculating ondulin of a mixed color scheme, you should schematically depict the roof design on a reduced scale and calculate the consumption of sheets of each color separately.
Special programs for calculating the consumption of covering material greatly facilitate mathematical calculations and help more accurately calculate the amount of euro slate for roofing.
Installation stages
If the sheets weigh no more than 6 kg, they can be easily lifted onto the roof. The use of such material will ensure the creation of a fairly light roof.
The installation process itself is carried out in the following order:
- Fastening the sheets should begin from the windless side. Sheets begin to be mounted from the bottom. To do this, you need to pull the cord, nailing it to the nails so that the lower edge of the roof protrudes 6-8 cm from the wall - subsequently, drains for sedimentary moisture will be installed at this distance.
- When installing the first sheet, you need to drive in nails, starting from the second wave from the end edge of the roof, and then continue driving nails through the wave, observing a checkerboard pattern. This order is very important for creating a presentable appearance of the roof, since the nails will stand out on the roofing surface due to their large curly heads.
- The second sheet is laid overlapping (in one wave). During installation, it is necessary to strictly ensure that the sheet does not deviate from the tensioned cord, through which the horizontal arrangement of the elements is adjusted.
- After laying the first bottom row to the opposite edge of the roof, it may be necessary to saw off part of the last sheet. To do this, you can use a circular saw or a wood saw. Sawing ondulin is very easy. Sawing off the final row must be done from the inside of the roof (where the last row overlaps).
- The second row is located in relation to the first in a checkerboard pattern. For this purpose, the first sheet (of the second row) is sawn longitudinally into two parts. The second row is laid with an overlap of 10-15 cm on the first. The value may be greater in the case where the size of the roof allows for a greater overlap of one sheet onto another without loss in the amount of material.
- After completing the installation of sheets over the entire surface of the roof, you can proceed to attaching the design parts that perform protective and decorative functions. Also sold with ondulin sheets is a semicircular ridge, very convenient for fastening, equipped with flat protrusions on the sides. Its flexibility makes it possible to adapt to any angle formed by intersecting roof planes. A wind board is nailed to the end sides of the roof, to which the ondulin sheets are attached using a standard edge forceps.
Ondulin - installation instructions
When the lathing is installed in accordance with the angle of inclination, the covering should be laid in stages. Installation of ondulin step by step :
- Laying ondulin begins from the edge of the roof;
- if four sheets of ondulin were laid in the first row, then the second row will consist of three and a half sheets: the first sheet is cut in half crosswise and laid. Ondulin is laid on the roof overlapping the bottom row, the length of the overlap should be about 12 cm, and the side overlap should not be wider than one wave;
- an article on how to attach ondulin sheets to the sheathing;
- the ridge parts should be attached on the slope to the additional bars of the sheathing. The fastening is made from inside the waves of the material connecting to the beams;
- valleys (joining corners of slopes) are made from the original coating and must be attached to additional sheathing ;
- The roof gable is ensured by bending the edge of the covering sheet to the gable board. The length of the hem and the board must match;
- the roof ribs are covered with gable or ridge elements;
- the side joints that adjoin the wall, located in a vertical position to the joint, are decorated with a valley made of ondulin;
- The roof fan is installed along the waves at their junctions . The fan base should not extend beyond the top sheet;
- often a roof window is fixed to the roof, which is joined to the covering sheet, and the top sheet is overlapped;
- to avoid gaps between the ondulin sheets and additional roofing elements, use a special filler;
- installation of waterproofing and ventilation elements.
ondulin (tiles) installation instructions
Now you know in detail how to put ondulin. All stages of roofing ensure error-free installation of ondulin, regardless of what roofing design is provided. The sequence of actions ensures a good result.
Rules for laying roofing Ondulin
Instructions: installation of ondulin is carried out on a sheathing, the pitch of which is selected depending on the slope of the roof
- When laying ondulin, there is often a need to move along the coating sheets. So, in this case, you should only step on convex areas (waves) of the material and avoid grooves (depressions) between them.
- Laying ondulin should only be done at above-zero temperatures. If there is a need for urgent installation, it can be done with extreme caution at a temperature not lower than -5 degrees. At lower temperatures, roofing work with ondulin is prohibited. It is also not recommended to install ondulin coatings at high temperatures (over 30 degrees).
- As for fastening ondulin, the sheets should be fastened to the sheathing using special roofing nails. When using special nails for ondulin, the laying technology involves fastening the sheet with exactly 20 nails. Each sheet of covering should be attached in this way. This requirement is considered a warranty, and if it is not met, the coating may be destroyed under the influence of gusts of wind. For this reason, when using hired workers, it is advisable to independently control the work process and ensure that the specialists follow all the rules for laying the material.
- Before covering the roof with ondulin, it is necessary to perform lathing. The sheathing for ondulin is made of wooden beams with a cross-section of 4*6 cm. The value of the sheathing pitch is selected depending on the degree of roof slope:
- up to 10 degrees - use solid boardwalk;
- 10-15 degrees - the sheathing pitch is provided for no more than 450 mm;
- over 15 degrees - the sheathing pitch is selected to be no more than 610 mm.
Advice! The sheathing should be installed after the substrate under the ondulin has been laid in the form of the Ondutis vapor barrier lining film recommended by the manufacturer.
- According to the technique of laying ondulin roofing, it is not permissible to overlap 4 sheets at one corner. This can cause deformation of the edges of the ondulin sheets.
- As for direct work with the material, it is not at all difficult due to the light weight and flexibility of the material. Given this fact, some inexperienced installers may pull the sheet, which was crookedly fixed at the beginning, to the desired position. At first, such a sheet will look smooth, but after some time the entire roofing deck may become ripple due to such tension. How to attach ondulin correctly? First of all, during the process of fastening sheets, it is necessary to monitor the linearity of the vertical and horizontal connections of these sheets along the entire roofing surface. You should also avoid stretching the ondulin sheets. Before fixing them with nails, you need to make sure that they lie level.
Instructions: ondulin is laid in such a way that the sheets of material hang from the eaves by no more than 70 mm
- The roof overhang should be arranged in accordance with the instructions for installing ondulin. If it is made too long, it will bend, but if it is short, precipitation and various debris will penetrate under it. If you incorrectly calculate the size of the sheathing pitch, most likely, the entire installation process will fail, and in the end you will have to redo the whole work again or repair the roof ahead of time. Repairing an ondulin coating is quite complicated, because it is difficult to remove a damaged sheet without compromising its integrity. Before deviating even slightly from the instructions, you need to think again whether it is worth risking the durability of the roof and the right to its warranty just because there is no desire or time to correct a mistake made during installation.
Waterproofing and vapor barrier under ondulin
Companies producing ondulin present the material as a coating that does not require the installation of additional vapor barrier materials or waterproofing. At the same time, it is recommended to equip the roof of the room (or attic) requiring insulation with a waterproofing layer. We also recommend installing a vapor barrier membrane on the room side.
Additional waterproofing elements and ventilation devices:
- waterproofing of the roof eaves is provided by a special box, which is attached to the base of the sheet overhang;
- ventilation is provided by ventilation pipes, which, like the window, are fastened with self-tapping screws along each wave of the coating;
- to protect against insects, a ventilation comb is installed in the gap under the eaves;
- the joints of the ondulin sheets are glued with tape produced by the coating manufacturer (Onduflesh);
- the junctions of windows, valleys and other joints with the roof, cornices are also taped with adhesive tape;
Laying ondulin with your own hands: step-by-step instructions
Vapor barrier is often provided by laying a special vapor barrier material. This layer should be laid in the roofing pie.
Technical data
The effectiveness of using a particular material is determined by its qualities and properties. Among them are:
- Dimensions;
- Weight;
- Ability to withstand precipitation and ultraviolet rays.
The dimensions of the ondulin sheet are limited to 2 meters in length and 96 cm in width. The waves also have a standard, which is 36 mm. Moreover, the thickness of each sheet does not exceed 3 mm.
All this makes it possible for only one person to carry out the work, which is why this roofing material has become widespread among owners of country houses.
Thin sheets do not have much weight. It is equal to 6.5 kg. This circumstance significantly reduces the load on the rafter system, and therefore somewhat reduces the cost of roofing work. Moreover, the sheets are able to withstand 960 kg of snow on one square meter of surface. This is not the highest figure, but sufficient for the roofing material to be used in the middle zone.
It is worth adding that even water cannot add weight to the sheets. During heavy rainfall, the roof continues to retain its original weight. The secret of such durability lies in the ideal water-repellent properties of ondulin. Impregnation of the sheets not only does not allow liquid to pass through, but also prevents the base from absorbing it.
As for the effects of an aggressive environment, in this case, ondulin can be considered effective for use. The average service life of this material is not limited to 15 years guaranteed by the manufacturers. In reality, sheets can be used for more than 40 years.
But with the color scheme things are not so good. The consumer is offered only three color options:
- Red;
- Brown;
- Green.
It is very rare to find a fourth color in a modest palette. It's black. But it is very rare. The color of ondulin is not durable. After 10 years, it fades significantly, which does not affect the performance of the roofing material.