General rules for any foundation
Select a starting point.
The first side of our foundation needs to be tied to some object on our site.
Example.
Let's make sure that our foundation (house) is parallel to one of the sides of the fence. Therefore, we stretch the first string equidistant from this side of the fence to the distance we need.
Construction of a right angle (90⁰). As an example, we will consider a rectangular foundation in which all angles are as close as possible to 90⁰.
There are several ways to do this. We will look at 2 main ones. © www.gvozdem.ru
Method 1. Golden triangle rule
To construct a right angle we will use the Pythagorean theorem.
Formula
In order not to go deep into geometry, let's try to describe it more simply. So that between two segments a
and
b
to make an angle of 90⁰, you need to add the lengths of these segments and derive the root of this sum. The resulting number will be the length of our diagonal connecting our segments. It is very easy to do the calculation using a calculator.
Usually, when marking the foundation, the dimensions of the sides are taken so that when taken from the root, a whole number is obtained. Example: 3x4x5; 6x8x10.
If you have a tape measure, then in general there will be no problems if you take segments that are different from those in common use. For example: 3x3x4.24; 2x2x2.83; 4x6x7.21
If we made measurements in meters, then the values turn out to be very clear: 4m24cm; 2m83cm; 7m21cm.
Calculator
It is also worth noting that measurements can be made in any length measurement system; the main thing is to use the aspect ratio we know: 3x4x5 meters, 3x4x5 centimeters, etc. That is, even if you don’t have a tool for measuring the length, you can take, for example, a rod (the length of the rod does not matter) and measure it with it (3 slats x 4 slats x 5 slats).
Now let's see how to put this into practice.
Self-marking
When starting to build a house, the first question that always arises is how to properly mark the foundation? Usually such work is not very difficult even for beginners. The DIY house marking technique described below is suitable for any foundation, regardless of its shape and scale. Do-it-yourself foundation markings are done using several parts:
- wooden blocks;
- cords;
- square
The latter is assembled from bars that are rigidly fastened together. The optimal side of the square is one and a half meters long. That's all you need to know about how to properly mark the foundation.
Instructions for marking a rectangular foundation
Method 1. Rules of the golden triangle (i.e. Pythagoras)
Let's look at the example of building a rectangular foundation with dimensions 6x8m using the golden triangle (so-called Pythagoras).
1. Mark the first side of the foundation. This is the easiest part in constructing our rectangle. The main thing to remember. If we want our foundation (house) to be parallel to one of the sides of the fence or other object on the site or beyond, then we make the first line of our foundation equidistant from the object we have chosen. We described this procedure above. To place the first string, you can use pegs firmly fixed in the ground, but ideally, use cast-offs for this purpose. We will use it. We will make the distance between the cast-offs for this side 14 m: between the cast-offs and future corners, 3 m and 8 m under the foundation.
2. Pull the second string as perpendicular to the first as possible. In practice, it is difficult to pull it perfectly perpendicular, so in the figure we also showed it slightly deflected.
3. We fasten both strings at the intersection point. You can fasten it with a staple or tape. The main thing is to be reliable.
4. We begin to form a right angle using the Pythagorean theorem. We will build a right triangle with legs 3 by 4 meters and a hypotenuse of 5 meters. To begin with, we measure 4 meters from the intersection of the strings on the first string, and 3 meters on the second. Place marks on the lace using tape (clothespin, etc.).
5. Connect both marks with a tape measure. We fix one end of the tape measure at the 4 meter mark and lead it towards the 3 meter mark on the other string.
6. If we have a right triangle, then both marks should converge at a distance of 5 meters. In our case, the marks did not match. Therefore, in our case, we move the string to the right until the 3 m mark coincides with the 5 m division of the tape measure.
7. As a result, we got a right triangle with an angle of 90⁰ between the two strings.
8. We don’t need any more marks and they can be removed.
9. Let's start building a rectangle. We measure on both strings the lengths of the sides of our foundation to be 6 and 8 meters, respectively. We put marks on the strings.
10. Pull the third string as perpendicular to the first string as possible. We fasten both strings at the 8 m mark.
11. Pull the fourth string as perpendicular to the second string as possible. We fasten both strings at 6 meter marks.
12. We make marks on the third string 6 meters and on the fourth 8 meters.
13. To get a quadrilateral with right angles in our case, it is necessary that both marks on the third and fourth strings coincide. To do this, move both strings until the marks connect.
14. As a result, if everything was measured correctly, then we should get a regular rectangle. Let's check if it turned out by measuring the diagonals.
15. We measure the lengths of the diagonals. If they are the same, as in our case, we have a regular rectangle. The diagonals have the same length in an isosceles trapezoid. But we know one angle of 90⁰, and in an isosceles trapezoid there are no such angles.
16. Ready marking of a rectangular foundation using the Pythagorean theorem. © www.gvozdem.ru
Method 2. Web
A very simple way to make markings in the form of a rectangle with corners of 90⁰. The most important thing we need is twine that does not stretch, and the accuracy of your measurements using a tape measure.
1. Cut the pieces of twine that we will need to form the markings. In this example, we are building a foundation with sides of 6 by 8 meters. Also, to correctly construct a rectangle, we will need equal diagonals, which for a 6 by 8 meter rectangle will be equal to 10 meters (i.e. Pythagoras is described above). You also need to take a reserve length of string for fastening.
2. We connect our “web” as in the picture. We fasten the sides with diagonals in 4 places in the corners. The diagonals themselves do not need to be fastened at the intersection point.
3. Pull the first string (points 1,2). We will secure it with pegs. The main thing is that the pegs hold firmly in the ground and do not move away when our structure is pulled. This important point must be taken into account.
4. We tighten corner 3. The main condition is that string 1-3 and diagonal 2-3 do not sag and are as tight as possible. After fixing with a peg at point 3, we have an angle at point 1 of 90⁰.
5. Pull corner 4 and install the peg. We make sure that the twine at points 2-4, 3-4 and diagonal 1-4 do not sag and are as tight as possible.
6. If all conditions are met, then the result should be a rectangle with angles as close as possible to 90⁰.
How to dig a trench
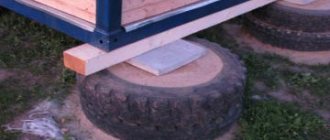
Since the strip foundation is the most common type and is most often used in independent suburban construction, we will look at how to dig a trench specifically for it. Make sure that there is about 1.5 m between the edge of the foundation and the cast-offs, otherwise the entire marking will be broken. A pit or trench must be dug so that the walls are slightly inclined, otherwise they will crumble.
While digging, you need to remove the string to avoid tripping, tearing it, or pulling out pegs. After completion of the excavation work, it is tensioned again and installed in its original place. The stakes must go into the ground at least 40 cm, otherwise a slight blow will be enough to knock them out. The board with nails for fixing the twine should be buried even further (about 60 cm). Install the boards strictly parallel to the coordinate axes or walls of the base. They must also simultaneously be in the same vertical position relative to each other.
Mark the boundaries of the trench using lime, bright paint or dry cement. After such marking, you can remove the twine and put it aside for a while. The border can be located at different distances from the cast-off. If you plan to make a basement in the house, then it is better to make the maximum possible distance of 1.5-2 m. The bottom of the trench should be as flat as possible, so do not forget to use a building level. Maintain equal width throughout.
After completing the excavation work, you can restore the cast-off, guided by additional pegs buried in the ground 2-3 m from the cast-off (mark the continuation of its lines).
It is best to start digging a trench right before pouring the foundation, when you have already prepared all the building materials. Otherwise, unexpected rain or heavy fog can heavily saturate the ground and destroy the walls of the dug hole. If, however, this could not be avoided, and excess water has penetrated the construction site, it must be removed along with the slurry. It is not recommended to spend too much time fiddling with splitting the axes, stretching out this pleasure over several months. This can have a detrimental effect on the layout of a site located on heaving soils - the pegs will simply move and you will have to start all over again.
Saving on building a house is an understandable and laudable desire, but it does not apply to some jobs. These include planning and building the foundation. Actually, even a beginner can pour a strip foundation and even make reinforcement if there are good instructions, but difficulties may arise with markings. The cost of laying out the foundation in each specific case is negotiable and depends on the geological features of the site and the design of the future house.
Marking for the foundation of the house
Marking for a columnar foundation
We make a two-tier cast-off. The lower tier is the level of the pillars.
The upper tier of cast-off is the level of the grillage.
For detailed instructions, read the article: Marking for a columnar foundation with a grillage
Marking for strip foundation
Create a rectangle for the outer contour using the so-called Pythagoras. Then we retreat by an amount equal to the width of the tape and make an internal contour.
Marking for slab foundation
The easiest way to mark. We build a rectangle according to the dimensions of the foundation using the Pythagorean theorem to find the right angle. © www.gvozdem.ru
Method 2: Stroke the selected area
This method is as simple as 5 kopecks. Select the Rectangular Marquee Tool and draw a rectangle with a dotted line. To draw a square, hold down the Shift key.
Now you need to outline the boundaries of this selected area. To do this, go to Editing - Stroke.
Then, in a new window, configure the type of stroke: specify the thickness of the frame, the desired color and mark how the stroke will be done:
- Inside - this means the frame will lie on the inside of the selected area;
- In the center - this means the frame will be divided equally into the part that runs inside the selection and the part on the outside;
- Outside - this means the frame will go around the dotted line of the selection.
Here's how it might turn out:
In the screenshot above, I deliberately did not remove the dotted line, since it will not disappear for you either. To finally get rid of it, press Ctrl+D.
- Read more about how to make a stroke in Photoshop in this article.
In this method, in order to draw a shape of the exact size, you first need to specify Style - Specified size or Specified proportions. After this, the fields will become active, where you enter the width and height values in pixels. Right-clicking on one of these fields will bring up a menu for changing units of measurement.
Method 2.1 Painting a selection
The most common way to draw a rectangle is to draw a selection frame (as described above) and simply paint it with any color. Here you have a rectangle or square.