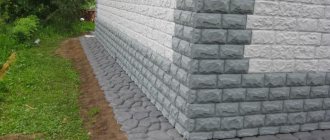
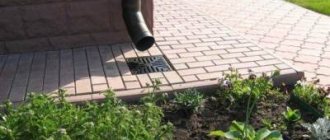
In order to prevent this destructive process for the entire house, a junction of the blind area to the foundation plinth structure is created.
Its task is to protect against damage to building structures and ensure reliable waterproofing of the connection. The assembly is made using modern building materials: damper tape and sealants made of one-component polyurethane.
What is an expansion joint?
This is a specially made expansion joint that plays a protective role and allows the blind area to withstand significant temperature fluctuations in the soil. Such protective elements are considered mandatory for installation in seismically active areas and in houses built on strip foundations.
Categories of expansion joints by type of protection:
- sedimentary, from the effects of rain and flood waters;
- temperature, from temperature surges and frost heaving;
- shrinkage, from subsidence of the structure;
- seismic.
The design of the junction unit depends on the type of soil, the climatic region of construction and the completed blind area.
Expansion joints used to be made only from bitumen-coated boards up to 20 mm wide; today, artificial materials in the form of special tapes and sealants have begun to be used.
What should this distance be?
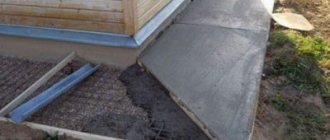
The size of the expansion joint is determined at the design stage in order to create an abutment assembly that is as reliable and durable as possible. The seam is made during the installation of the blind area before the concrete pouring stage; for this, damping material is laid along the entire perimeter to the entire depth of the concrete pie, which, according to technology, can remain there or be removed for waterproofing work.
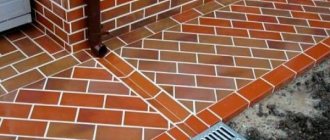
The smallest width of the seams is 6 mm, it is set by calculation and depends on the width of the final layer of the blind area; the height of the seam is equal to the height of the concrete pour. By design, the seams are made completely straight; they are allowed to intersect only at 90 degrees. Cut joints cannot create a “T” in plan.
Standard scheme for making a blind area
Standard option for constructing a concrete blind area.
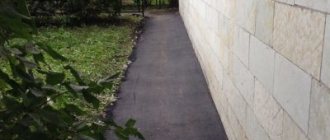
When arranging the blind area, almost the same materials are used as when arranging the basement. This is sand, gravel (to reduce the cost of materials, it is often replaced with large crushed stone or broken bricks), as well as working surface material: asphalt, concrete, cobblestones or paving slabs.
The structure of the blind area itself (or, as it is often called, “pie”) remains unchanged for decades, if not centuries. First, a cushion is made of sand, then of gravel (or of materials replacing it) and a finishing layer with expansion joints.
In order to properly arrange and ensure reliable connection of the blind area to the foundation, you need to take a very responsible approach to all stages of its arrangement. At the first stage, you need to remove the top fertile layer of soil. And although construction textbooks give figures - 15 cm on regular soil and 30 cm on heaving soil, ideally it is better to remove the soil until you get to the sandy or clay layer.
However, if the thickness of the fertile soil layer on the site is 1-1.5, or even 2 m, then performing such a task becomes problematic. Usually a depth of 50-60 cm is sufficient, but given that such a trench has to be dug along the entire perimeter of the building, the work will not be easy. However, it must be done in such a way that there are no plant roots left in the soil, since even a small root, when germinating, can break through asphalt or concrete, destroying all your efforts to create a complete blind area.
The blind area must have a slope so that water flows into the ground.
Next, a ball of sand is poured into the dug trench and compacted tightly. Sometimes, to better compact the sand, it is poured with plenty of water. Even better is to replace sand with clay, if possible, since clay is waterproof. However, clay is suitable for a pillow only if the content of sand particles in it does not exceed 10%, otherwise heaving will occur. Clay needs to be compacted even more thoroughly than sand. It is best to use a vibrating plate to compact it.
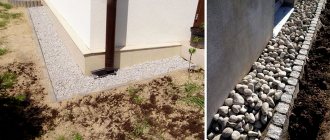
Having arranged a sand or clay cushion, they proceed to filling the trench with gravel or crushed stone. You can also use broken brick, although it is not as reliable as the listed materials. The main task of this pillow is the absorption and removal of capillary water, the accumulation of which in any case cannot be avoided.
If this is not done, then, accumulating under the waterproof canvas of the blind area, this moisture will freeze in winter and tear it. This will be especially felt in the area where the blind area adjoins the house. An important detail: if the site has high groundwater, then you need to take care in advance to protect the gravel bed from silting. To do this, it is best to separate the sand and gravel cushion with geotextiles.
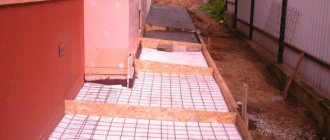
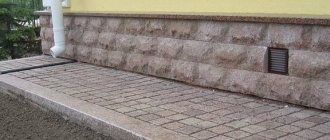
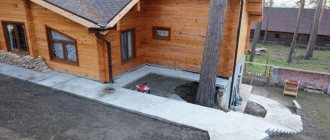
After completing the arrangement of the gravel or crushed stone layer, the perimeter of the future blind area is outlined by the installed curb stone. In the space limited on one side by the base of the building, and on the other by the curb, the blind area itself is arranged. It can be made of asphalt, concrete, brick, cobblestones or paving slabs. In the first two cases, its working surface must be reinforced.
Table of concrete composition for blind area.
At the final stage of constructing the blind area, it is imperative to install expansion joints. Such seams are needed to minimize deformation of the working surface. They are done every 1.5-2 m along the entire length of the blind area. For their installation, you can use damper tape, foamed polyethylene, but most often in private construction they use boards impregnated with resin and laid on edge with a thickness of 15-20 mm.
To arrange and seal the blind area you will need the following tools:
- bayonet shovel;
- shovel;
- vibrating plate;
- concrete mixer;
- rubberized mallet (if a blind area is made of paving slabs);
- Master OK;
- bullet urethane sealant.
Why is it important to seal the gap?
The absence of a hermetically sealed connection between the blind area and the walls leads to the formation of cracks through which water will subsequently penetrate to the foundation. It creates a damp regime that destroys the structure.
At subzero temperatures, water freezes, and as a result, the foundation will become deformed, which will create a real threat of collapse of the house or its individual structures.
Sealing such seams with special flexible materials allows you to stop the development of such negative processes. Waterproofing options are selected based on the design of the plinth and blind area, the average volume of precipitation and the maximum deformation load.
It can be:
- The use of polymer or rubber seals.
- Insertion into the seam of a gernite strand.
- Protection of the cut with a waterstop.
- Installation of profile structures made specifically for this purpose.
The most inexpensive option is considered to be the use of expansion joints made of roofing felt or foamed polyethylene, which have increased elasticity, and therefore can be easily and repeatedly compressed.
On a concrete blind area, such seams are impregnated with mastic , which, after hardening, acquires the properties of rubber. To level the mixture, use a soft spatula.
Causes of leakage
The main reason for the formation of deformations in the blind area with a violation of the tightness of the junction is the uneven settlement of the house.
In addition, leakage occurs in the following cases:
- In old structures with repeated processes of thermal expansion and contraction.
- Drawdown of the blind area due to violation of the technology for constructing the protective structure.
- Soil heaving at sub-zero temperatures.
- The thermal effect on the cement screed gives an elongation of 0.5 mm/m, due to which the concrete presses on the foundation base with a load sufficient to cause cracks to form.
How is the blind area connected to the base?
How is the protective sheet made, what needs to be done to make it airtight? These questions arise for anyone who wants to independently protect the foundation of a house from melt water or other climatic influences.
To ensure the correct connection of the protective sheet to the base, you need to take into account a few simple recommendations, namely:
- We make a drainage base regardless of the material chosen for the blind area.
- The blind area must be closely adjacent to the building.
- To seal the junction seam, it is better to use polyurethane sealants.
One technology for laying a blind area can be used for buildings of different types - technical buildings, a private house or a garage.
What tools are required for installation?
It is best if the junction unit is carried out together with the blind area device. In this case, the home craftsman will need to have a set of tools to perform concrete work. Since the concrete will not wait for anyone, it is best to prepare the tools in advance.
Most of the necessary tools and materials are standard and will not require significant investments:
- Protective clothing: suit, gloves, goggles, respirator, rubber boots.
- Construction rule, cord, pegs and level.
- Wheelbarrow for transporting solution.
- Mixer, shovels and bucket.
- Hammer.
- Boards for formwork
- Fasteners
- Damper tape or other insulator.
Types of structural elements
In order to qualitatively protect your structure from the effects of precipitation, various methods of creating appropriate structures are used:
- Concrete structure, which is a continuous monolithic layer of protection against moisture.
- Soft blind area (in this case, the element is made of a material that allows moisture to pass through to the corresponding waterproofing pad).
- A structural element made of concrete paving stones (a mixed combination of the two previous types).
In some cases, a concrete protective structure is additionally covered with asphalt, which allows for more reliable protection of the structure.
It is worth noting that previously this type of protection was often created from an ordinary soil cushion, however, due to its ineffectiveness, it was decided to abandon it.
How to close it?
The most modern option for arranging a foundation junction is the use of a damper tape, laid in the seam in the interface line along the perimeter of the house, until the cement-sand pie is installed.
If there are architectural elements in the form of columns or other protrusions along the perimeter, then it is carried out around them. The compensator is placed without breaks. If necessary, the edges of the tape are overlapped.
Algorithm for arranging an abutment unit using a damper tape:
Before starting the sticker, carefully prepare the place so that the adhesive side of the tape can be thoroughly fixed.- The base on which the tape will be laid is well dried and degreased.
- Once the sticker is finished, it is necessary to go over it with a roller to enhance the reliability of gluing and smooth out minor defects.
- The tape comes in rolls, it is unwound as needed, while removing the protective layer and attaching it to the wall.
- According to SNiP, the permissible maximum area of a disposable screed is 10 m2; if it is larger, it is divided into sections. This is consistent with the requirements for installing transverse thermal joints in blind areas every 2 m.
- The tape is placed slightly above the cement mortar pouring point by 2 cm.
- After it has set, the unnecessary part of the tape is cut off or torn off along technological cuts.
- Installation begins from the corner of the formwork of the blind area of the house. The cutting angle must be even.
- When installing, do not pull the tape.
- The thickness of the tape is applied equal throughout the entire structure.
- If the tape does not have an adhesive base, secure it with liquid nails or double-sided tape, which is more preferable, since this option will provide continuous pressure.
If the design of the blind area involves the implementation of a finishing coating and the installation of a plank, in this case it is better not to cut off the protruding part of the tape, since it will be covered by the plank.
Sealing the seam between the blind area and the base of the house with sealant, video instructions:
Sealing the gap when constructing a blind area
After the blind area has been completed using one of the available methods, it is worth starting to process the expansion joint. Simply, seal the gap between the base and the blind area. There is no need to tightly tie structures together. It is better to bind them using soft porous materials.
Work can be done according to the following scheme:
- Prime the hole running around the perimeter of the house.
- Place the prepared materials into the gap.
- Secure the material with mesh.
- Hide the seam with trim.
It is necessary to prime before work. This will prevent the structure from getting moisture into the small cracks that form during the shrinkage of the blind area during the first years.
The material for sealing the gap is selected in accordance with the future finish. But you can hide the place of work with various elements.
Causes of improper sealing
There are situations when, despite the fact that the junction unit is installed, water still penetrates to the foundation. This is primarily due to the fact that the design of the joint, the width and depth of the joint were incorrectly calculated , and therefore it is not able to compensate for the actual movement of concrete.
In this case, the thickness of the concrete layer of the blind area does not matter, since concrete reacts uniformly only to linear expansion.
The second leading factor causing cracking of concrete expansion joints is a poor choice of material for the joints themselves . Materials for abutments must be compatible with the type of concrete to which they are connected. Sutures must also withstand the environmental conditions for which they are intended.
The third, no less important factor in the operation of the junction unit is proper care of the expansion joints. Preventative maintenance extends the turnaround time for the weld, which will sooner or later have to be performed.
In order to maintain the blind area junction unit in working condition, the house owner must take the following steps:
Cleaning: Do not allow dirt or debris to get into the seam. Debris can allow moisture to penetrate expansion joints, causing them to crack.- Drying: Standing water should not be allowed to remain on expansion joints for too long.
- Weeds and plants : if it is noticed that weeds and plants are growing in the expansion joints, remove them immediately, as the roots will quickly damage the joint and become a source of moisture entering the foundation of the house.
A lot of important and useful information about the design of the blind area is presented in this section.
How to make a perimeter around a house
The implementation of this structural structure includes a whole algorithm of actions. To create reliable protection, follow these steps:
- An appropriate pit of the required dimensions is dug around the building (depending on the depth of the foundation).
- Next, crushed stone or another cushion made from the material used for the structure is laid on the ground.
- Afterwards, a layer of waterproofing is laid and fixed using the appropriate method.
- At the stage of creating the protection, a holding model is installed from wooden boards.
- Subsequently, a top layer of protective device (usually concrete) is laid on top of the waterproofing.
- The resulting seam between two separate structures must also be sealed.
- At the end, the structure being created can be additionally covered with auxiliary materials.
At first glance, there is nothing complicated in creating a blind area, but in practice, in order to create a high-quality protective structure, you must first study the method of creating the element in more detail.
Important. Regardless of what construction devices will be used, it is recommended to create this structure in dry weather, when there is no precipitation.
Create a high-quality blind area for your building
What is a blind area and why is it needed?
We are talking about a durable coating made of appropriate material. It is intended to protect the foundation of the building from precipitation, which can negatively affect the foundation of the structure. This building element is made with an appropriate slope from the building in order to reliably remove moisture from the foundation of the structure. Most often, the blind area around the house is made of asphalt or other durable material that has high moisture-resistant qualities.
To create a building element, a special technology is used, which includes separate stages of work. If you have the appropriate knowledge, as well as an auxiliary tool, you can perform this element yourself. However, in order to achieve the best result, you should seek the help of specialists, since builders are already experienced in using the appropriate technology for manufacturing a structure with a guarantee of quality and long service life.
Important. If the base, as well as the foundation of the building, is made of wood, then having a protective perimeter from moisture is a necessary step. Otherwise, the wood will be constantly exposed to moisture, which will quickly deteriorate.
In this video we will look at the blind area to the house:
If the blind area has moved away from the foundation
Scheme of the construction of a concrete blind area.
Unfortunately, this situation happens very often. Over time, buildings, like people, age. In the case of a blind area, this manifests itself in the fact that cracks and crevices appear on it. If these are small cracks, then it is necessary to widen them, and then fill them with cement-sand mortar. You can add liquid glass or glue used for finishing tiles to the solution.
If a small crack has formed between the foundation and the surface of the blind area, then the tightness of the junction between the blind area and the foundation can be restored using sealants, especially since their choice on the market of modern building materials is quite wide.
If the cracks (at the junction with the plinth or in the blind area itself) reach several centimeters, then in this case cosmetic repairs will not be enough. If this condition is typical for individual sections of the blind area, then these sections need to be broken out along the expansion joints and the underlying layer must first be restored.
When the underlying layer becomes smooth and dense, you can begin to restore the canvas. If the blind area is made of concrete or asphalt, then the edges of the old blind area must be coated with liquid bitumen so that the repaired canvas joins the old one into one whole. But if such cracks spread across the entire area of the blind area, then there is no other choice but to redo it again.
Therefore, when building a blind area, it is better not to rush and do everything right the first time. A properly made blind area will serve you faithfully for many years, protecting the foundation of your house, its foundation, from destruction.
Preparatory work, perimeter insulation: step-by-step instructions
On soils with normal moisture content, you can omit the clay and make the gravel layer smaller. In our case, the house is located in a lowland, there is a river nearby and enhanced waterproofing is needed. The connection of the blind area to the base of the house must be tight. To do this, the surface of the foundation is completely cleaned. They poured clay onto the bottom with their own hands and, using a square, immediately compacted it with an inclination away from the building. The difference in height was 2 - 3 centimeters per width. Waterproofing was laid on top, following the step-by-step instructions. You can use regular film. Vadik decided to play it safe and make it last forever. The strip of roofing felt was cut 20 centimeters larger and bent along the line adjacent to the foundation.
Insulation and waterproofing of the blind area
Now our building has reliable protection from water damage. All moisture that comes from the soil will flow down the slope of the waterproofing. The sand was poured in an even layer and compacted, maintaining the angle of inclination. The pressure strip attached to the base of the house an assembly of roofing felt on clay and geotextile laid on top of sand. The porous fabric will allow moisture to pass through and hold the gravel, preventing it from pushing through the sand. In the same way, the second layer of material was laid on the crushed stone. If the blind area is filled with concrete, then the thickness of the crushed stone layer is greater, up to the very top of the trench. To ensure good shrinkage, we poured water over everything and waited a few days.
Insulation of the blind area with foam
A blind area around the building, made with your own hands, protects the foundation
Vadik and I finished finishing the basement of his house. Before the onset of rainy autumn, you need to do the rest of the exterior work yourself. The first question he asked: what is a blind area and what are its functions?
Marking the width of the future trench around the house, I explained step-by-step instructions and the purpose of the blind area:
- the blind area protects the foundation from moisture and destruction;
- it serves as additional insulation of the building around the perimeter;
- it drains rainwater from the base and drains melting snow;
- since it is necessary, architects use it as an element of exterior design.
The blind area protects the foundation from moisture and destruction
Restoration of an old building begins with finishing the foundation and blind area. Without this, it is impossible to get rid of dampness not only in the basement, but also on the first floor. Insulating the top layer of soil around the perimeter reduces freezing of the soil near the foundation. A high-quality path around the house saves energy on heating, keeping the building warm. The work is not difficult and you can do it yourself.