Setting up a chicken coop for 10 chickens
To make a chicken coop for 10 chickens comfortable, it should include:
- sleeping place;
- nests;
- dining room;
- swimming areas;
- walking;
- ventilation;
- heating;
- lighting.
The most important aspect when building a winter house for 10 chickens is lighting and heating. Temperature conditions significantly affect the development of chickens and chicks.
During the life of the chickens, the room will become damp, so a ventilation system is installed to achieve dryness. In winter, a bedding of sawdust at least 5 cm high is poured onto the floor. This will absorb the droppings and warm the floor of the chicken coop. It also helps maintain the temperature above + 5 0C.
Material for building a chicken coop
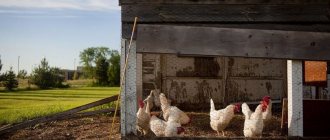
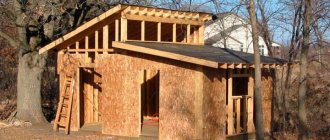
For chicken coop walls, the material chosen depends on the intended use. For a summer chicken coop, boards, plywood, and OSB are suitable. Such buildings are made according to the principle of frame house construction: a frame is assembled from timber, covered with boards or sheet material. The task of such buildings is to protect from the sun, wind and rain, and they do this very well.
For a winter chicken coop you can use the same materials as for a summer one, but the walls will have to be insulated. You can also use logs, timber, gas or foam concrete, adobe, cinder block, shell rock, sandstone, etc. Basically, any building materials. If there is material left over from the construction of a house, bathhouse, barn, it can be put to use. Only part of the material during the construction of a winter chicken coop requires mandatory insulation, while others can be done without (depending on the thickness of the wall, winter temperatures).
Boards, OSB, lining, plywood - these are the most popular materials for building a chicken coop
A chicken coop for 10-20 chickens is usually covered with inexpensive material. Most often it is roofing felt or slate, but any other material can be used. Only if you are planning a metal roof (from metal tiles, corrugated sheets), keep in mind that chickens do not like noise. During rain or hail, they may become frightened, which will affect the number of eggs or weight gain.
Insulation - mineral wool or polystyrene foam. Mineral wool is vapor-permeable, so normal humidity can be automatically maintained in the chicken coop (if the walls are also vapor-permeable). Polystyrene foam does not allow moisture to pass through, but it is cheaper and is used to build a budget poultry house. Just remember that mice love to live in such insulation (foam plastic and mineral wool). And this is a problem. To block their access to the inside of the wall, it is tightened on both sides with a fine metal mesh (cell size - the smaller the better).
There is also extruded polystyrene foam. It is much more expensive than the options listed above, but the advantage is that fungi do not grow in it, bacteria do not multiply, and insects and rodents do not like it. And one more thing - it has excellent thermal insulation characteristics and, to insulate a chicken coop, a thickness of 2-3 cm is enough (foam plastic needs more than 5 cm), so in fact, the cost of insulation will not increase very much.
Basic requirements for a chicken coop for 10 chickens
Before starting construction, a preliminary calculation is made:
- how many chickens will be needed to provide the family with the required number of eggs;
- how much space is required to keep chickens;
- how many nests;
- size and number of perches.
Based on the number of chickens, the sizes are calculated. For 10 chickens, the area of a do-it-yourself chicken coop is usually 5-6 m2, and the dimensions are 2 * 2-3 m. For 10 chickens, 3-4 nests and 2-3 roosts are built.
Posting rules:
- The chicken coop is located on the north side of the site so that the room is illuminated throughout the day.
- Construction is being carried out with reserves. The more spacious the poultry room, the more comfortable the chickens feel. This has a good effect on the egg production of the bird.
- All internal furnishings are given free access: drinking bowls, perches and nests.
- The nest site is built in the driest, shaded and warmest corner of the chicken coop.
- The chicken coop window is built on the south side. This will allow you to receive more natural sunlight and heat the room so that dampness does not accumulate.
- The winter chicken coop is equipped with a vestibule to cut off cold air.
Attention! Chickens do not lay eggs well if their immunity is weakened. One of the reasons for loss of appetite and low egg production is a sedentary lifestyle. To make the chickens move more, they build a larger room and pour food into the bedding so that the birds can walk around and look for grain.
The final stage of constructing a chicken coop for laying hens
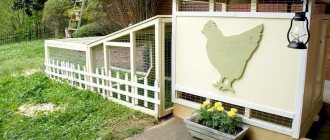
After completion of construction of the structure, finishing work is necessary. They concern little things, but are extremely important for the comfortable use of the house by the owners and the well-being of the birds. Thanks to them, a do-it-yourself chicken coop for laying hens (photos demonstrate this) will become functional and will not spoil the appearance of the local area.
Recommendations for finishing work:
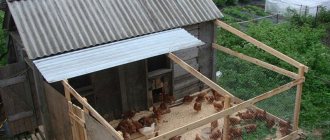
- After completing the construction of the house, cover the enclosure with mesh for walking. Do not cover the roof: if it rains, the chickens will easily hide in the poultry house or under it;
- A convenient solution would be to combine the front door with a bird hole. For it you need to make a hole at the bottom of the door; if you wish, you can cut it separately. The main thing is that the hole dimensions are at least 35x35 cm;
Convenient bird hole leading to an aviary for walking
- to form an approach to the hole, nail a board with horizontal sticks to it;
- the approach must also be mounted to the perch, which will help young birds climb onto the perch;
- In order for the egg production of chickens to increase, it is necessary to extend their daylight hours. To do this, in the spring and autumn, when the days are much shorter than in the summer, turn on a small 90 W light bulb in the morning and evening. To do this, you will need to install lighting in the chicken coop. This is easy to do with the help of a cable, and in order not to drill an additional hole, the wire can be easily passed through the pipe for ventilation;
- To prevent wood from rotting, apply a special impregnation to the surface, paint the building from the outside, and treat the inside with slaked lime to avoid the spread of parasites.
The main features of an ideal do-it-yourself chicken coop for laying hens: photos and descriptions
In summary, it is important to emphasize that various nuances may arise during construction. The situation is influenced by many factors: the availability of space on the site, the need for subsequent expansion of the poultry house, and even the climatic conditions of the area. However, a number of patterns can be identified, following which you can build a poultry house no worse than in the video of chicken coops for laying hens with your own hands, given at the end of the article. You will also be confident in the comfort of your pets.
Beautiful and functional chicken coop for 10 laying hens
A number of nuances if you decide to build a chicken coop (both at the dacha and at your place of permanent residence):
- The more spacious the birds’ home, the better. Therefore, if space on the site and building materials allow, do not make a drawing based on minimum calculations, but build with a reserve;
- make sure there is easy access to all feeders and drinkers in the room;
- all perches for chickens should be located at different heights;
- carefully choose a place for the nests of laying hens: they should be located in a dark, quiet and warm corner where the chickens will feel safe;
- there should be enough light in the room, so make sure there are windows, as well as the presence of artificial lighting sources.
Helpful advice! A sedentary lifestyle negatively affects the health of laying hens. In addition, low activity leads to decreased immunity, loss of appetite and, as a consequence, low egg production. The solution to all these problems is very simple: it is enough to add bird food not only to the feeder, but also to the laid straw or sawdust. Searching for food keeps the chickens in good shape, stimulates their appetite and makes them move.
After the completion of the main construction, finishing work is necessary, thanks to which the chicken coop can become a decoration of your yard
Types of chicken coops for 10 chickens
Before you start building a mini chicken coop with your own hands for 10 chickens, choose the type of construction:
- stationary;
- multi-tiered;
- portable.
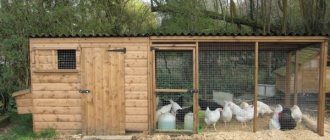
A stationary chicken coop is a permanent building designed for a certain number of chickens. It is insulated for the winter to keep the bird all year round. He is given a permanent, bright, comfortable place for chickens on his plot. The chicken coop is equipped with a permanent place for walking.
A multi-tiered chicken coop is built in cases where there are a lot of chickens, but there is not enough space to keep them. This option entails a sedentary lifestyle for the bird, which reduces its immunity. A multi-tier chicken coop is most suitable for keeping chickens for meat.
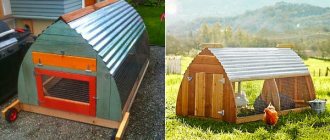
The mobile design of the chicken coop allows you to keep up to 10 chickens. The structure looks like a booth on wheels. The design is convenient because every day the chicken coop can be moved to a new walking area with fresh grass. There are several types of portable types.
An easy-to-build structure on wheels made of boards. The booth is divided into two zones: upper and lower. The upper tier is used for living chickens, the lower one is for walking.
The most reliable design is arched.
Wheelbarrow chicken coop. The simplest building. 5 chickens can easily be accommodated in this chicken coop. When transporting such a structure, one person can handle it.
Chicken coop trailer on wheels. A common model for farms that need to transport poultry over long distances.
Portable chicken coop on video:
Depending on the type of walking, there are open and closed enclosures. The closed structure is adjacent to the stationary chicken coop and is fenced on all sides with a protective mesh.
Open range allows chickens to roam freely in their designated area.
Drawings of chicken coops for 10 chickens with dimensions
The design of a winter version of a chicken coop for 10 chickens is calculated from the number of laying hens placed per 1 m² of space. Usually 3 chickens are placed per 1 m². This means that for 10 hens and 1 rooster you will need a room of 2 * 2 m. The drawing of the chicken coop includes its internal and external arrangement. The minimum size of an enclosure for walking chickens is 2*2 m.
Drawing of a winter chicken coop for 10 chickens with a vestibule with a total size of 5 * 3.75 m. The project provides for the arrangement of 4 nests and a perch for 3 poles.
Project of a stationary winter chicken coop with a pitched roof, capacity for up to 20 chickens. Walking area 2*2.25 m, vestibule 1.75*1.5 m, chicken coop 2*3.25 m.
A chicken coop with a gable roof, with an aviary for walking, with external placement of nests on both sides for convenient collection of eggs.
Stationary comfortable frame winter chicken coop with a pitched roof.
Mini chicken coop for up to 10 birds.
Making a chicken coop
But the option for winter involves the arrangement of a base, good insulation, an additional type of lighting, a forced type of ventilation, and also warming up in extreme cold.
Base and frame
Foundation
As a rule, foundations are used for poultry houses, which can be:
- Tape.
- Columnar.
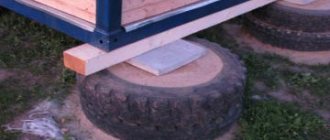
- For a very compact structure, which is a poultry house for 10 chickens, the preferred option would be a columnar base, which has a number of advantages when building a conventional chicken coop.
- Much less expenditure is required.
- Laying does not involve a long period of hardening of the concrete mixture.
- It is simpler in terms of construction.
- The design will provide floor ventilation from the outside, which increases the service life of the wood cladding.
To build such a foundation you need:
Using pegs and a cord, outline the contours of the chicken coop being built.- Remove the top soil layer to a depth of 20 cm.
- In each of the 4 corners, dig holes to a depth of 70 cm and a width of 50 cm.
- Pour gravel into the hole with a layer of 10 cm.
- On gravel, using cement mortar, erect small columns of bricks at a height of 25 cm above ground level. Each columnar row should have a pair of bricks, which are located perpendicular to those lying in the last layer.
- Leave the brickwork to dry over the next week.
- Replenish the removed soil layer between the brick pillars with gravel, which will act as excellent drainage.
Now a little about the floor.
Walls and floor
Floor installation
The sheathing, made of bars, which plays the role of the base of the floor, is sheathed on the bottom and top with boards, between which insulation material (or rather, mineral wool) is laid. This type of floor (taking into account the fact that it will necessarily be covered with a bedding up to 10 cm high from sawdust or straw) will remain warm even with a columnar base when the floor frame rises ¼ meter above the ground level.
Wall construction
They can be built from wood material and bricks. For a miniature chicken coop, bricks are rarely used (due to the extreme bulkiness of the building for such a small number of birds, the cost and complexity of brick construction). The dimensions of a chicken coop for 10 chickens are such that the walls of the poultry house are built from wooden blocks, for which the following actions are done:
- Install load-bearing wooden frame beams with a cross-section of 7 cm.
- The frame must be sheathed with OSB, chipboard slabs or clapboard, or other lumber on both sides.
- The walls must have window and door openings.
- Insulation material is laid between the sheathing.
- Carefully seal any gaps in the sheathing.
- One of the walls must be equipped with a wooden sheathing on which chicken nests can be attached (they must be placed in a special extension in the form of a box, which will be moved beyond the wall, but forming one whole with it).
Now let's talk about the roof.
Roof and ceiling
Roofing device
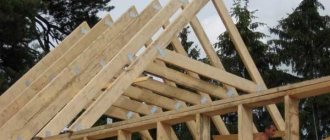
The main condition for a roof in a chicken coop is the absence of cracks, which allows precipitation to enter the room and also provokes the appearance of drafts. The most commonly used types of roofing materials are gable and single-pitch roofing materials. A pitched roof is the simplest option. To build it you need:
- Strengthen ceiling beams, which are timber with a cross-section of 5 cm.
- Cover everything from the inside with moisture-resistant plywood.
- Fill the space between the ceiling beams with thermal insulation material.
- Sheathe everything on top with roofing material.
Interestingly, the popular “night blindness” refers to the vision abilities of such birds exclusively at dusk. In good lighting, chickens demonstrate incredible visual acuity that even the most vigilant falcon can envy them.
Ceiling
The roof, lined inside with moisture-resistant plywood, resembles the ceiling in a chicken coop. In regions where winters are the coldest, you can additionally sheathe the ceiling with foam sheets.
Warm
Insulation
As a rule, to maintain a comfortable temperature of at least +14 degrees in the chicken coop in the winter, the bird’s own heat is enough. But this will be possible only if the room is insulated with high quality. Typically, the insulation process is carried out using thermal insulation materials:
Ecowool.- Mineral wool.
- Styrofoam.
The insulation material is placed in the wall frame and roof, and then sheathed on both sides using OSB boards, boards or plywood. In regions where there are strong and cold winters, window insulation is practiced using a double or even triple layer of glass.
Windows and doors
As a rule, large doors are made in the chicken coop for poultry farmers and small ones that go out to the aviary side for the birds. In certain cases, they are even combined, making a small one at the bottom of a large door, the size of which is 35*35 cm. But there are certain inconveniences. Since the door for the chickens must go into the enclosure, to get into the chicken coop the owner needs to get to the door through the platform. It is generally accepted that for ideal lighting in a chicken coop, the window area should be up to 1/3 of the floor area with a minimum of 1/10.
Ventilation
A drawing of a chicken coop for 10 chickens with dimensions provides for the arrangement of an influx of fresh air, since chickens are extremely sensitive to drafts. For this reason, constant ventilation of the chicken coop without creating harmful drafts is extremely important. As a rule, in miniature chicken coops this problem is solved when walking birds, when chickens walk outside, by opening the door and window at the same time. The chicken coop is ventilated radically and quickly, but in winter this method of ventilation is fraught with the rapid loss of heat from the room. For similar reasons, small-sized poultry houses are often equipped with simple ventilation, which consists of an exhaust pipe, which is located at the top of the room, as well as a supply pipe, which is installed opposite, 0.5 meters from the floor surface. In severe frosts, such pipes must be closed.
Arrangement
Lighting
To stimulate egg production in the autumn and winter, artificial lighting is required in the poultry house. For a miniature chicken coop with a dozen chickens, a 40-watt incandescent lamp is sufficient, which is located close to the birds’ feeding area and as far as possible from perches and nests.
Please note that bird daylight should last at least 12 hours, and to ensure maximum egg production it can increase to 17 hours.
Interior arrangement
In order for chickens to have the most comfortable life possible, the room for them must be equipped with:
- Perches.
- Feeders for various types of feed and mineral supplements.
- Drinking bowl.
- Warm bedding.
- Nests where hens can lay eggs.
Let's take a closer look at all the components for the interior arrangement.
Perches
When installing perches for bird rest, several important circumstances need to be taken into account:
- Each hen should have at least ¼ meter of personal space. And although in winter the birds usually nestle against each other, it is extremely important to maintain such proportions when designing the length of perches.
- The optimal height for placing perches is ½ meter from the floor surface, taking into account the height of the insulated bedding on the floor.
- Birds that cannot fly well require a ladder to help them reach their perches.
- To create perches, round perches or bars with a diameter of 4 cm are most suitable.
- The distance between several perches should be 35 cm, and in relation to the walls they should not be placed closer than ¼ meter.
Perches are placed in the chicken coop using different methods. They can be installed in several rows in a single horizontal line, or they can be multi-tiered. The latter are made in the form of a staircase with a large width, which is installed on the floor obliquely in relation to the top of the wall. Sometimes perches with many tiers are installed in the corner where the bars are fastened across the corner. Each new “floor”, which is located below the shortest and highest, is made using longer bars, reinforced with their ends in two walls, which forms an angle. There are also portable perches, which are made in the form of tables with pallets, above which 3 bars are fixed in one horizontal direction. Such devices for bird rest are very hygienic, because they can be easily washed and also taken out into enclosures. In small chicken coops for a dozen birds, perches placed along the walls, where there are no doors, would be ideal. There is enough space for the chickens to be placed comfortably.
Please note that with any method of perch placement, they do not need to be stacked underneath each other.
Nests
The design of a chicken coop for 10 chickens is such that a maximum of 4 nests are required, which can be located in wooden boxes, wicker baskets, as well as plastic boxes for fruits and vegetables, in plastic buckets placed on the side and trays for cats. Ideally, the bottom of the nest should help ventilate the straw bedding that will lie on it. For this purpose, the bottom of wooden boxes with ideal dimensions of 30*30*40 cm is made of mesh. Since chickens do not like to lay eggs when direct light from a lamp or window falls into the nests, and generally do not lay eggs in complete darkness, it is necessary to proceed from this circumstance when choosing a place for nests. They can be attached to a special sheathing, which will be made in advance when building the walls of the poultry house. In this regard, the special extensions in the form of boxes that were discussed are more convenient. They will provide the darkness and privacy they need without being in complete darkness due to the light coming from the coop.
Drinkers/feeders
Drinkers and feeders must be located in places that are accessible to all inhabitants of the poultry house. In addition to accessibility, they must be protected from chickens, who can scatter feed throughout the chicken coop and contaminate it. To do this, the feeders must be equipped with special visors that allow the birds to stick only their heads through, and the files must be made automatic (vacuum or nipple design). Feeders should be separate (for dry, wet food and mineral supplements).
Litter
The insulation mat must be hygienic and usually consists of the following eco-friendly materials:
- Sawdust.
- Wood shavings.
- Seine.
- Straw.
- Peat.
Bedding made from the latter material is the most preferable because it can absorb volumes of liquid waste that are 20 times its weight. The thickness of the litter (depending on the season) will be from 10 to 30 cm. Most poultry farmers replace it partially or fully every month 2 times. Other people prefer to add a new layer to the bedding on top, leaving the old one to rot, which is accompanied by heat release that is very useful in winter.
How to build a chicken coop for 10 chickens with your own hands
According to the plan for a winter chicken coop for 10 chickens, the amount of building material is calculated. Sources and tools for building a frame chicken coop:
- cement and sand for concreting the base;
- mesh with a 2*2 cm cell for fencing the enclosure;
- beams 10*10 cm and 10*5 cm for constructing the frame;
- boards 10*4 cm for cladding walls, ceilings and floors;
- expanded clay, mineral wool, polyurethane or polystyrene foam for insulating walls, ceilings and floors;
- hammer, nails, screws, screwdriver or electric drill for fixing materials;
- saw for cutting wooden elements;
- vapor barrier or roofing felt for waterproofing;
- roof cover;
- lamps for room lighting;
- electrical cable;
- hangers for feeders;
- door hinges and lock.
The process of installing a chicken coop for 10 chickens is divided into stages:
- Planning and marking of the site according to the drawing.
- Construction of the foundation.
- Construction of the frame.
- Construction of the roof.
- Insulation of the room.
- Facing.
- Installation of roofing material.
- Interior arrangement.
Advice! It is not necessary to use boards to line the chicken coop. Interior walls can be covered with plywood, chipboard or OSB. The external façade can be covered with plastic panels.
How to build a winter chicken coop for 10 chickens
According to the drawing, the area of the chicken coop for 10 chickens and the dimensions of the future building are determined. They clear the area for construction, remove debris, and make markings. In the corners, holes are made with a drill to strengthen the structure.
Reinforcement is inserted into the prepared pits and filled with cement mortar. Pillars made of brick or slate are placed on top, 40-50 cm high above the ground. Each post is covered with roofing felt for waterproofing. A base of 10*10 cm timber is knocked down along the perimeter. A wooden beam 10*5 cm along the length of the structure is placed in the center to give rigidity. Cross boards are attached across the central support to secure the subfloor.
The bottom of the base is sheathed with OSB sheets. Gravel is poured into the resulting compartments.
Polyurethane slabs are laid on top and OSB sheets are attached.
A frame is erected on the resulting foundation. Beams made of 10*10 cm timber are installed in the corners. Beams of 5*10 cm are installed in increments of 50 cm. Windows, doors and a manhole for access to the enclosure are installed. Make a base for the roof from 5*10 cm beams.
The frame is covered with chipboard or OSB.
Install a load-bearing beam and logs for a gable roof made of 5*10 cm timber. Mount gables from boards, chipboard or OSB.
The roof frame is covered with a vapor barrier or thick plastic film.
Cross boards are fastened across the frame base of the roof or chipboard is nailed.
Roofing felt is laid.
A roofing covering is installed on top.
Mineral wool or other insulation is used to fill the gaps between the beams. On the walls, ceiling, floor.
The interior upholstery of walls, ceilings and floors is made from 10*3-4 cm boards.
According to the markings for the enclosure, a frame made of timber or metal is installed on one side 30-50 cm lower than on the opposite. A mesh is attached around the perimeter. Boards are placed on the roof in increments of 50 cm. Transparent polycarbonate is attached.
How to build a summer chicken coop for 10 chickens
Building a summer chicken coop with your own hands for 10 chickens according to a ready-made drawing is not difficult. Markings are made according to the dimensions of the drawing on the selected and prepared area. A shallow ditch is made under it, 5-10 cm deep. Gravel is added, and a base of 10*10 cm timber is laid on top.
At a height of 40-60 cm from the ground, vertical beams 5*10 cm are attached to the base according to the drawing. The frame is sheathed with 10*4 cm boards. The roof is mounted and roofing material is laid. The first tier is lined with netting - this is a place for chickens to walk.
Winter option
Many people travel out of town only at the end of autumn. To keep birds, it is better for them to build a winter chicken coop with their own hands for 10 chickens.
Naturally, this is more expensive than a lightweight, portable option, but such a structure will be all-season. Birds will feel comfortable in it in any bad weather. You just need to insulate the building well.
Choosing a foundation
Almost all projects of stationary poultry houses involve the manufacture of a columnar or strip base. The screw method is used quite rarely
The first option is much cheaper - less material is used. The main thing is to “get” 1.5 m poles (they are not sold everywhere) and drive them in or drill holes in the ground with a drill.
The second option is easier to implement, but it is more expensive, because much more concrete is required. But, making the foundation in this way will reduce the cost of insulation.
With the first option, a gap of 30-50 cm is formed between the floor of the chicken coop and the ground, which can be used for walking birds. In the second case, an air cushion (10-20 cm) allows the floor to be ventilated and prevents mice from entering.
The resulting space relieves the wooden covering from excess moisture and extends its service life. This allows you to save a lot of money.
Columnar option
It is convenient because during its manufacture it is not necessary to level the ground. The process begins with clearing the future location of stones and various debris.
Then do this:
- Mark the corners of the house by driving in sticks or stakes and connecting them with twine.
- On the resulting lines (approximately every 90-100 cm), the installation locations of the piles are marked - pegs are inserted or small holes are dug. For a 3x3 m building, ideally you need 12 posts around the perimeter.
If you purchased a small quantity of these elements or were unable to purchase them, you need to mount several stone or brick supports and distribute them along each wall.
All such pillars should be cemented, otherwise dampness can affect their quality and they will simply fall apart.
After acquiring the necessary elements and fixtures, they begin laying the foundation:
- When making an agreement with drillers or a neighbor who has a mini-drilling rig, meter-long holes with a diameter of 20-25 cm are drilled at the points planned in advance for installing the pillars. If you cannot bring this unit to the site, then you need to do it the “old fashioned way” - with a shovel and a pick .
- All reinforcement bars are threaded at one end. You can do it by hand or order cutting from a turner. Select washers and nuts to match the thread.
- Posts are driven into the holes made, asbestos pipes or 3 barrels with pre-knocked bottoms are inserted so that they rise above the ground by approximately 0.4 m.
- Then 50 cm rods are fixed in the middle of the foundation elements so that the thread protrudes 10-15 cm from the hole.
They do it like this:
- If concrete pillars are used, their upper base is drilled out with a drill with a diameter 1.5 times larger than the caliber of the rod. Insert it and fill the hole with cement mortar.
- When using pipes or barrels without a bottom, pour a mixture of the following composition inside: gravel 30-35%, cement 70-65%, respectively.
If the height of the protruding part of the pipe or pillar is 0.4 m or more, it is reasonable to use the space under the floor of the chicken coop to organize the walking of birds. To do this, it is covered with a net around the perimeter and a rise or ladder is constructed so that the chickens can walk around the enclosure whenever they want.
Belt method
The columnar version has space underneath, open on all sides. When performing this, it is imperative to lay a double insulated floor.
The strip foundation, which runs in a continuous strip along the perimeter, is free from this drawback, preventing the entry of cold air into the underground space.
To do this, proceed as follows:
- Clean and mark the perimeter to a width of about 20 cm.
- Dig a trench about 25 cm deep.
- Its bottom is covered with a 10 cm layer of sand.
- The formwork is made so that it protrudes from the ground by 0.1-0.2 m.
- Lay a row of stones or bricks.
- Threaded rods are driven in so that they rise 0.3-0.4 m above the ground.
- Fill everything with cement mortar or purchased concrete.
How to make a frame
A structure is built on the basis of the selected foundation. Its peculiarity lies in the ease of assembly and high speed of construction. You can complete and install such a frame in a few hours.
Step-by-step list of works:
- Install the main supporting elements on the prepared foundation.
- Take the necessary beams, place them on tape or posts and mark the places where the threaded rods come out of the concrete.
- Drill holes in the marked places.
- Place the bars on the rods and secure them with washers and appropriate nuts.
- 7x7 cm horizontal beams are placed on the mounted elements, flush with the outer edges of the lower beam (13 cm will remain free on it).
- From the inside, risers are installed on the supporting parts and nailed to the horizontal beams, every 70-100 cm.
- They strengthen the structure with crossbars - insert them between the verticals and nail or screw them.
- The frame is connected on top with a 7×7 cm beam.
Making the floor
To prevent birds from freezing, a two-layer version with insulation in the middle is required in northern latitudes. Assembly will take about 1 day.
The design is simple:
- From below, “black-floor” boards are placed onto the supporting elements (step-by-step execution).
- A sheathing is installed on top. It is made from ordinary slats and beams (5x5 cm, 7x7 cm).
- The resulting cells are filled with any suitable heat insulator. In order to spend less on heating the room, they try to insulate the floor with waste “lying around every corner” - sawdust, straw. You can paint them in a thick layer over the rough coating. Slats are laid on top and a vapor barrier is strengthened.
- Then the main covering is installed. 25-40 mm boards are used as the main material for the floor and “subfloor”, which will not sag under the weight of living creatures and the owner. The complete diagram looks like this.
Frame option with floor
Making a roof
A 7x7 cm or 10x10 cm beam is placed on top of the frame as a mauerlat. But you don’t have to do it if you assemble the entire roof on elements that pull together the vertical risers from above.
The easiest thing is to make a pitched roof. It will be easier to make it if, when installing the frame, you foresee in advance a 0.5-0.6 m difference in height between the rear wall and the front one.
Make the back side smaller. Then all precipitation will flow back and there will be no puddles or ice near the door.
Construction of the roof:
- Perpendicular to the mauerlat of the front and rear walls, you need to nail rafters from 5x5 cm slats. They are strengthened along the length every 0.5-0.6 m.
- Ruberoid or waterproofing film is glued or stapled onto the rafters.
- A sheathing is made on top, made of 3x3 cm slats.
- Heat-insulating material is inserted into the cells.
- This “pie” is hemmed from the inside with fiberboard, chipboard, boards or plywood.
- Then any roofing material is installed (corrugated reeds, iron, roofing felt, slate).
Wall cladding and insulation
After making the roof, you need to think about ensuring the nominal temperature for the birds. This determines how the wall cladding will proceed (with or without insulation). If you plan to keep birds all year round, you need to solve the issue of insulating the walls of the shed at the very initial stage of construction.
With any temperature deviation in the microclimate of the room, the patients lose activity, become lethargic, and experience some discomfort. Their vital activity slows down, egg production and litter rates decrease. If the temperature in the house is not maintained at 10-25 degrees, the birds will become frail and may die.
For winter housing of wards, the walls should be sheathed on both sides. With the outside - boards or slabs, and the inside - ordinary plywood. It does not deform and will not peel off at 10-25 degrees, which should be maintained in the chicken coop. Instead of plywood, 5 mm plastic is sometimes used. A heat insulator is inserted between the layers of sheathing.
Internal organization
The space inside the poultry house must meet the basic requirements - to be comfortable for the chickens and the owner, so that he does not slouch while caring for them. They try to arrange nests for laying hens near one of the walls. They are low boxes with hay and straw.
Nests can be made from plywood or wooden boxes 0.3x0.3x0.4 m or slightly larger. Many poultry houses place them outside, as an extension to the main structure. With this arrangement, a double floor with a heat insulator should be made in the nests. An insulated hinged lid is mounted on top. It must close hermetically. This is convenient when cleaning the nest from bird waste products and for collecting freshly laid eggs.
Windows with a total area of at least 1 square meter are installed on one or two walls. m. For lighting in bad weather and in the evening, install a yellow electric lamp.
The ventilation outlet is located near the ceiling (often directly above the door). The supply entrance is made on the opposite wall, 0.4-0.5 m from the flooring.
For perches, shovel cuttings or 3-4 cm poles are used. For 10 individuals, only 4 m are needed.
Interior design of a chicken coop for 10 chickens
The construction of a chicken coop inside for 10 chickens is carried out according to a preliminary drawing.
Features of arranging a chicken coop for 10 chickens:
- The summer version is equipped with supply and exhaust ventilation. Exhaust ventilation is installed at the top of the wall. A supply pipe is mounted on the opposite wall at a distance of 50 cm from the floor.
- Arranging a roost. The location of the first pole from the wall is over 25 cm. The minimum height of the perch from the floor is 50 cm. A 4*5 beam with a rounded side or wooden rods with a diameter of 4 cm are used as a pole.
- Nests are made from wicker baskets, boxes or boxes. The minimum dimensions of a nest for a laying hen are: 30 cm in height and width, 40 cm in length.
Attention! The length of the perch is calculated based on 20 cm per bird. For a chicken coop for 10 chickens, the total length of the perch will be 2 m. If 2-3 perches are installed, then the total distance is divided by 2 or 3.
- Arrangement of the dining room. Feeders should be located in a place convenient for birds. The length of the feeder is calculated based on 10-15 cm per 1 chicken. They also install hanging feeders from boxes, which are placed 15 cm from the floor.
- Swimming area. Set up dust baths. Any container is filled with sand, ash and earth. Such baths improve the bird's plumage and help kill insects.
- Heating the coop is important to maintain a comfortable temperature for the hens.
- Poultry house lighting is necessary for regular production of chicken eggs. Laying hens need 16 hours of light.
The construction of the roost includes a place for chickens to sleep. The roost is the bird's main pastime. Retractable storage bins for litter are installed under it and a ladder is attached. The perch is placed at a height of 50 cm-1 m from the floor so that the bird is warm in winter. A perch of 4 poles 1 m long is designed for 10 chickens.
For 10 chickens, 4-6 nests are installed. Sawdust, hay or straw are placed inside each nest to make it convenient for the hen to hatch eggs. The nesting area is located in a shaded area of the chicken coop.
The place for feeding chickens should be 15 cm above the floor so that the feed does not mix with droppings, since in winter the height of the substrate can be 10-15 cm.
To prevent the bird from having the opportunity to fight over food, the length of the feeder should be 10-15 cm per bird. To protect the feeder from overturning, they are attached to the wall or hung on a chain from the ceiling. A drinking bowl for chickens is also installed. Birds consume a lot of liquid, so drinking bowls are placed in a convenient place for the owner to ensure easy passage. In winter, electric heating is placed under the tub of water to prevent the water from freezing.
Feeders come in the form of trays, bins and troughs. To avoid the accumulation of birds at one feeder, you can build several of them and place them in different places in the chicken coop.
After installing the ventilation system, all seams are sealed with foam to avoid drafts.
Arrangement of the chicken coop:
Interior arrangement
A comfortable living space contributes to the productive rearing of livestock and prevents the development of colds and mortality. When building a winter chicken coop with your own hands you will need:
- high-quality insulation of walls, windows and doors;
- installing a reliable ventilation system in the chicken coop;
- heating the room in winter;
- sufficient lighting;
- comfortable perches and nests, spacious feeders and drinking bowls.
Fulfillment of all conditions allows you to maintain poultry productivity at a high level even in winter.
The importance of insulation
Insulating the chicken coop will eliminate drafts, block free access to cold air, create an optimal microclimate, and prevent the development of colds. As a result of the work carried out, heating costs are reduced and production costs are reduced.
If a chicken coop for keeping 10 chickens is made of thin material, it requires mandatory insulation. Insulation is conveniently carried out using frame technology. To do this, a frame made of wooden beams is mounted on the outside or inside of the load-bearing walls.
The inner part is filled with insulation laid in several layers. For finishing, safe materials with a dense structure are used. The outside of the frame is sheathed with moisture-resistant material.
Doors and windows require special attention in the chicken coop. They often become a source of cold. As a result of drafts and hypothermia, the bird suffers from colds and egg production drops.
Meat breeds, when raised in such conditions, stop gaining weight. Eliminating cracks helps retain heat inside the room. As a result of high-quality insulation, you get a warm house for chickens that can be used in any weather.
Ventilation
High-quality insulation does not let air into the chicken coop. During the winter it is in a clogged state. In a closed room, there is increased humidity and condensation forms on the walls. As a result of prolonged waterlogging, the litter becomes rotten and mold forms on the corners.
Regular ventilation using window vents is only possible in warm and calm weather. On frosty days, such ventilation releases large volumes of cold air and provokes colds. A high-quality ventilation system will help to avoid negative consequences.
It is a necessary element of the winter version of the chicken coop: it optimizes the temperature and humidity of the air, and removes unpleasant odors outside. Poultry farmers equip winter chicken coops with a forced-air system with a fan.
For this purpose, fans with low power are used. The presence of a power regulator allows you to control air humidity taking into account weather conditions. Installation of protective grilles will provide the necessary security.
Chicken coop temperature in winter
The average standard temperature for the well-being of chickens in winter is 15 C°. Under such conditions, the level of egg production drops slightly.
A complete lack of heating leads to negative consequences. Chickens' egg production levels drop sharply.
When left in a cold room for a long time, eggs freeze. Hypothermia and inflammation of the paws occur. Colds and infectious diseases progress. On cold days, you can't do without heating the chicken coop.
The chicken coop is heated using one of the available options:
- electric heating;
- gas;
- steam;
- stove;
- air convection oven;
- infrared lamps.
Installing automated heating will make it easier to control the temperature level and reduce costs. The built-in sensor is triggered when the temperature drops to a critical level and turns on the heating. Having warmed up the room to standard values, the system automatically turns off.
Winter lighting
To maintain egg production at a high level, the chicken coop needs to be illuminated for at least 12 hours. Poultry farmers prefer infrared lamps. They provide diffused light and heat the room.
With high-quality insulation in regions with mild climates, one infrared lamp is enough to heat 10 m². Lamps are installed at a height of at least 50 cm. When placing lamps on the floor, protective metal mesh is used.
Automation of lighting contributes to significant energy savings. To regulate the level of lighting in the winter chicken coop, a photosensor is installed. It reacts to minimal changes and turns on the light when it gets dark.
Drinkers and feeders
To feed chickens you will need comfortable and functional feeders. Hopper-type feeders are effective in using. The bird easily gets food, scatters it in minimal quantities to the sides and does not trample it under its feet.
As a result, there is a large saving in feed, and the chicken coop is always clean and dry. Feeders are placed at a height of 10-15 cm from the floor level. It is better to use a separate container for each type of food.
This prevents mixing of dry food, mineral supplements and mash. Separate placement will make cleaning the chicken coop and dishes easier.
Conventional bowl and vacuum drinkers require constant attention and often become clogged. As a result, the bird drinks dirty water and walks with wet paws.
Automated chicken watering will save poultry farmers from constantly visiting the chicken coop. Nipple-type drinkers with a drip eliminator connected to a large container of clean water are easy to use. The distance between drinkers depends on the breed and is at least 20 cm.
There should be no more than four heads per drinking bowl. With this placement, the bird will be provided with fresh water in the required volume.
Perches and nests
Raising healthy livestock is impossible without proper rest. For comfortable placement, birds need perches. They are usually made from thin bars and given a rounded shape. Instead of bars, you can use ready-made cuttings.
Perches must comply with regulatory requirements. They cannot be too thin, as they will easily break under the weight of the chickens. A diameter of about 7 cm will be quite enough.
If the perch length is too short, the bird will feel some discomfort. If the floor in the chicken coop is not heated, the perches are placed at least 50 cm.
Perches are installed around the perimeter of the chicken coop in one row or multi-level structures are used. Thus, a large number of chickens can be freely accommodated in a small area. When installing multi-level perches, the size of the chickens is taken into account.
For comfortable sleep, one chicken needs a perch at least 25 cm long. The height between the crossbars should be 60 cm. When installing perches, it is necessary to consider a reliable fastening that guarantees the safety of the chickens.
When raising laying hens in a chicken coop, nests will be required. The lack of a convenient nest forces the bird to look for a secluded place for eggs in the walking area. For 2-3 hens, one nest will be enough.
Nests are made of boards or plywood. The bottom is covered with a thick layer of straw. Equipping a through hole and installing a tray automates the process of collecting eggs, guarantees cleanliness and protects them from pecking.
Methods for insulating a chicken coop
You can insulate a simple chicken coop for 10 chickens with your own hands by heating the room and insulating the walls, roof and floor.
Before wintering, the hatches are tightly closed to allow the birds to go out for a walk. Insulate doors and windows. If the chicken coop does not have a vestibule to cut off cold air, it is necessary to curtain the entrance with thick fabric.
Heating a winter chicken coop occurs in 2 ways:
- natural;
- artificial.
Natural insulation is economical, but is not recommended for winter poultry keeping in cold regions. The essence of this method is to maintain a temperature in the chicken coop above + 5 0C. This is achieved by eliminating all cracks, leaving only the ventilation open.
Insulation of walls, floors and ceilings is carried out with mineral wool, polystyrene foam or polyurethane foam with double upholstery. Sawdust, peat or straw are sprinkled on top of the floor boards. This eliminates the smell of droppings and helps maintain a warm temperature.
Important! The natural method of insulation is suitable only for the southern regions of Russia. In other places, the bird may not freeze, but egg production will drop.
Artificial heating includes the installation of heating devices. The most budget-friendly option for heating a poultry house is using a potbelly stove, which is heated with wood.
A diesel furnace runs on waste engine oil or diesel fuel.
The first two options are the most fire hazardous, since there is an open source of fire.
The second option is the use of electric convector or infrared heaters. This is a safe heating method.
Infrared heaters quickly warm up the room.
DIY construction
Different types of chicken coops are used to raise chickens. Winter chicken coops are built in the form of open and closed structures.
The open option involves the construction of a chicken coop for 10 chickens with a comfortable house for living and free access to the walking area. In closed structures, birds are allowed to walk in enclosures.
Cage housing is often used when raising poultry on an industrial scale. It is rarely practiced in private farmsteads.
In private backyards, open-type chicken coops are most often used to keep chickens. The bird feels comfortable in a permanent building at any time of the year. Comfortable perches and nests are placed here, drinking bowls and feeders are installed.
If desired, the bird goes to the walking area, where it basks in the sun and breathes fresh air. To protect the birds from snow and rain, a small canopy is installed on the walking area. It’s a good place to hide from bad weather and scorching sun rays.
If there is not enough space on the site to equip a full-fledged winter chicken coop with walking, installing a two-story structure will solve the problem. Its upper part is a full-fledged chicken coop with solid walls, perches and nests. There is a comfortable enclosure on the lower floor.
Required materials and tools
Periodic disinfection of walls, floors, ceilings and dishes helps to avoid the spread of infectious diseases and raise healthy livestock. During construction, it is necessary to use materials that are resistant to antiseptics.
Poultry can live all year round only in permanent buildings with airtight walls, thick windows and doors. If a barn or greenhouse made of polycarbonate was used as a summer chicken coop, they must be well insulated before the cold weather begins.
Capital walls are built from brick, wood, stone, or foam blocks. To build a wooden frame, you will need dry timber, racks, a board to form the rafter system, construction corners and anchor bolts.
For the outer cladding of the frame, siding, plywood, OSB, and edged boards are used. The interior decoration is made of durable, moisture-resistant materials that the bird will not be able to peck and will be damaged. These are edged boards, OSB boards, lining, plywood, chipboard.
Expanded polystyrene, mineral wool, polystyrene foam, foil materials are used as thermal insulation materials, or the room is simply plastered. When building a permanent chicken coop with your own hands, you cannot do without a jigsaw, a screwdriver, a hammer, a grinder, a level and a shovel.
Calculations and drawings
Large and small construction, including a do-it-yourself chicken coop for 10 chickens, begins with drawings.
At this stage it is necessary to think through the details. Make a detailed plan. Write a list of required building materials. Calculate the final cost of construction.
When drawing up a diagram of a chicken coop, not only the materials for the walls and roof are taken into account - the interior is also detailed. Consider convenient placement of feeders, drinkers, nests and perches.
Temporary chicken coops are relevant when breeding broiler breeds, which are purchased in the spring and raised during the warm period. Summer structures can be erected without a permanent foundation and assembled from any available materials.
Drawings of a portable chicken coop for 10 chickens are easy to make yourself, even without engineering skills. When the need for a portable chicken coop disappears, the structure is dismantled.
The construction of a winter chicken coop is economically justified when keeping poultry all year round. Low winter temperatures force chickens to stay indoors all the time and only go out for short walks when the weather is good.
When drawing up a plan for a winter chicken coop, it is necessary to provide a heating and ventilation system. Capital buildings are installed on a solid foundation that protects the structure from distortions and tilting.
To determine the permissible dimensions of the room, it is necessary to take into account the maximum load during the year, taking into account the arriving young animals. The standard load for sedentary broilers and laying hens when kept on the floor is no more than 5 birds per 1 m².
A 2x2 chicken coop is quite enough to house 10 chickens. If you keep birds in cages, you will need a much smaller room.
To calculate its size, you need the number of livestock, the dimensions of one cage and a plan for their placement. When installing cages in two rows, the occupancy of the chicken coop doubles, which is very convenient in limited areas and when raising poultry in the country.
Construction of foundation and walls
A capital chicken coop for all-season raising of chickens needs a foundation and high-quality wall insulation. A strip foundation is ideal for such buildings. Unlike a columnar structure or piles, the distance between the ground and the floor will be filled with a thick layer of concrete and will become a reliable protection against the penetration of cold air.
To build a strip foundation, a trench is dug, the depth of which is at least 50 cm. Its width depends on the thickness of the future walls with a margin of 15-20 cm. A sand cushion about 15 cm high is laid at the bottom of the trench.
Each layer of sand is thoroughly moistened and compacted using a beam or vibrating plate. Install formwork protruding 30 cm above ground level. For stronger adhesion of concrete, a reinforcing frame is used.
The formwork is filled with a ready-made mixture of cement, crushed stone and sand, taken in proportions of 3:5:1. The foundation is covered with film until completely dry.
Wooden frame
A chicken coop made using frame technology is the most economical and quickly erected option. Thanks to the multi-layer construction, the room is warm in winter and cool in hot weather. To protect the wood from fungus before starting work, it is treated with antiseptics and impregnations.
The frame is assembled from timber. To do this, install corner vertical posts and fix them using steel corners with self-tapping screws. To securely fasten the elements together, slopes made of the same material are mounted.
Then additional racks are installed. The distance between them depends on the size of the insulation. If the chicken coop is large, horizontal jumpers can be secured at the bottom, top and middle of the structure.
When constructing the frame, a hole for chickens, a doorway and windows of the optimal size are left. For the future floor and ceiling, wooden logs are laid at a distance of 50 cm.
Roof reinforcement and flooring
Wood is an excellent material for making floors. It is easy to clean and easily tolerates chemical treatment. For the floor it is better to use an edged board. It fits tightly and leaves virtually no gaps.
The boards are laid on the joists close to each other and secured with nails. To ensure that the bird feels comfortable in any weather and does not freeze its paws in severe frosts, a double sex device is practiced. To do this, a sheathing is laid on the rough flooring, then a layer of insulation and a finished floor.
The chicken coop will also need a roof. The single-pitch design is the simplest to implement. To manufacture it, install a rafter system made of timber with emphasis on the upper frame frame.
The front struts are made much larger than the rear struts. They are attached to the frame with metal corners and securely fixed with jibs. Then waterproofing is laid and covered with slate or corrugated sheets.
Tips and tricks
To make the chickens feel cozy and comfortable, wooden beams and boards are used for the chicken coop. This is a natural, environmentally friendly building material. The floor is made of double skin with insulation made of expanded clay, mineral wool or polystyrene foam.
Upon completion of construction, sawdust bedding is added to the chicken coop.
It is recommended to combine the bird hole with the front door, then the door will be insulated in one step.
Important! It is advisable to equip the summer chicken coop nests with an external door for convenient collection of eggs without entering the chicken coop.
Chickens should have free access to roosts and nests. Extra room space in winter will allow the bird to move more, which has a beneficial effect on egg production.
To prevent chickens from getting shock from the lighting after waking up, it is recommended to turn on a weak light bulb with dim light for 30 minutes. As soon as the chickens get used to the light, turn on the full lighting and turn off the dim lamp.
The chicken coop should be treated with slaked lime annually to disinfect it.
It is recommended to make the structures of perches and nests quickly dismountable, so that during disinfection all elements can be easily removed and washed.
To avoid rotting of the boards, it is necessary to treat it with waterproofing environmental products.
Attention! Mites and lice often infest bird feathers. To eliminate these parasites, you need to set up a cleaning area for your chickens. Dust baths filled with ash help combat this problem.