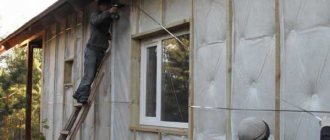
Roof arrangement - This is one of the most important stages in the renovation or construction of a private house. Improper design can cause accumulation of sediment and uneven load distribution, which in turn will lead to damage to the coating and failure of the entire structure. Roof elements laid in violation of the technology will allow moisture to pass through, and the attic space that is not insulated from the inside will allow cold air to pass through. It is not possible to fully exploit and live in such conditions throughout the year. In this article we will tell you how to properly insulate a roof from the inside, using all possible methods, and also provide practical advice from roofing professionals
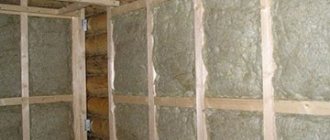
Roof insulation is a responsible process
Factors that affect the roof
Any structure that is used as housing must meet certain standards and requirements. Only if they are followed will life in the house be comfortable and peaceful . Every detail is important - the correct laying of the foundation, the construction of walls, the laying of communications and the construction of the roof. The choice of roofing depends on the weight that will put pressure on the supporting structures of the house, the time and cost of installation work. In addition, an equally important step in arranging the roof is its insulation from the inside. It will not only protect the premises from the effects of external cold air masses , but will also act as a good sound insulator.
The roof must withstand freezing temperatures and a layer of snow
In different climatic zones, roofing elements are affected by many factors. The following natural phenomena correspond to our latitudes:
- rain;
- hail;
- excessive ultraviolet radiation from the Sun;
- snow;
- strong gusts of wind;
- icing, etc.
In order to withstand these disasters, the roof structure must be well assembled and covered with sufficiently durable roofing materials.
A typical private house is a structure that usually includes a main floor (one or two) and an attic. If the latter is used for housing, it is built in the form of an attic. It has been proven that with an uninsulated roof, in the cold season, up to 15-20% of the heat from the room is lost through the ceiling. This entails the need to increase heating and, as a result, increased energy bills.
Heat is lost through an uninsulated roof
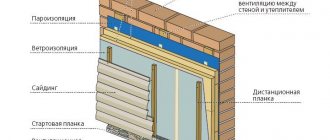
The peculiarity of the space under the roof is not only in its geometric component, but also in the method of distribution of thermal energy. In summer it is hotter here than in other rooms, and in winter, on the contrary, it is colder. To create a comfortable microclimate inside and maintain optimal temperature, experts recommend creating a multi-layer “pie” from various materials. It usually includes a waterproofing layer, vapor barrier and insulation.
Schematic representation of the roofing “pie”
Interesting to know! With large heat losses through the roof, in winter the snow cover on it begins to melt, forming a crust of ice. With minimal, even technologically advanced, holes in the roof, there is a possibility of leakage.
Choice of insulation
The modern market provides a wide range of insulation materials. Among them are mineral wool, polystyrene foam, expanded clay and others.
Most often, basalt mineral wool is used as insulation, because it has high thermal insulation properties, is easy to install, and has an affordable price. Fire safety is another advantage of mineral wool, which sets it apart from foam plastic.
Among the disadvantages of mineral wool, one can note its ability to absorb moisture. Therefore, without high-quality vapor barrier and waterproofing, over time, mineral wool may lose its high thermal insulation properties.
Foam plastic is also used for insulation. It has a noticeable advantage - moisture resistance, however, due to the high flammability of this material, it is not recommended for use on pitched roofs with wooden beams.
Other insulation materials, such as expanded clay or wood sawdust, are practically not used today due to the large weight that creates a load on the roof, difficulties in installation, and low thermal insulation properties.
Processes taking place under the roof
In order to properly insulate a house and make its roof a full-fledged protective barrier from the cold, it is necessary to choose the material wisely. Usually it is selected based on the nature of the processes occurring in the attic space. The most significant include:
- Moisture exchange is a phenomenon that arises directly from human activity (showering, cooking), breathing, body evaporation, etc. The vapors that appear in the room slowly rise upward, condensing moisture particles that are removed through the roof. When the roof is well insulated, humidity levels remain normal , and excess moisture, along with odors, is removed by properly equipped ventilation.
- Heat exchange is a process that occurs due to the difference in temperature in the living space and outside. If attic floors are not insulated, a significant portion of the heat escapes through the roof. The function of insulation is to resist this and maintain optimal temperature values inside residential premises. Thermal insulation material has a porous structure. This prevents the entry of cold masses and the loss of warm air from the rooms, which in turn eliminates the need to unnecessarily heat them.
Vapors are created in the process of life
A layer of hydro- and vapor barrier prevents the appearance of condensation , which occurs at the point of contact between warm and cold air flows (dew point). Therefore, it is laid together with a layer of insulation, helping the latter to maintain functionality and appearance. Properly organized insulation increases the service life of the structure several times and minimizes the need to carry out annual repair and restoration work.
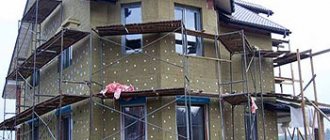
Do-it-yourself attic insulation
With the right approach to the matter, the attic turns into a full-fledged living space. Properly executed insulation helps create a favorable microclimate. During the cold season, effective heat conservation is ensured, which is directly related to saving money. And in summer, the air under the attic roof does not overheat.
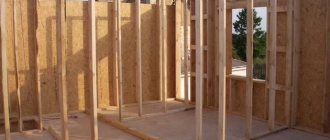
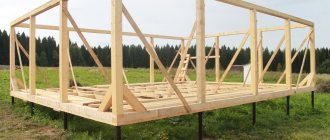
Construction of an insulated attic
If you want to do everything yourself, first familiarize yourself with the construction of an insulated attic roof:
What tools will you need?
To work, you will need insulation, waterproofing film, a construction stapler, mounting tape, vapor barrier membrane, a sharp knife, a hammer drill and a hammer.
Instructions for insulating the attic
When constructing cottages and country houses, different types of roofs are used. Each roof has design features and requirements for thermal insulation. We will focus on the main stages that need to be carried out when insulating the attic from the inside:
1. Laying waterproofing
At the initial stage, waterproofing should be laid along the rafters, from the bottom to the ridge.
2. Laying the heat insulator Then you can begin laying the heat insulator. You must know the thermal conductivity coefficient of the material. This indicator is indicated in the product certificate. Based on such information, it is necessary to decide in how many layers to lay the insulation. This point should not be neglected, since it is necessary to completely eliminate possible heat loss.
3. Laying vapor barrier membranes To protect the insulation from the negative effects of moisture, vapor barrier membranes are used. The laws of physics say that warm air rises and condenses. Therefore, there is no way to do without a vapor barrier. The panels are overlapped. The joints are sealed with mounting tape.
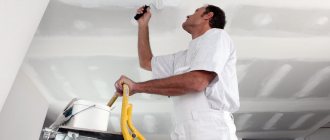
4. Finishing After this, the attic ceiling is finished. Drywall sheets, lining, and plywood are suitable for this purpose. The facing material is fastened using metal profiles or wooden blocks.
We recommend watching a video that describes in detail each stage of insulation:
Is it possible to do without insulation?
A private house is usually equipped with roofs with several slopes, which form an attic on top of the main floors. Often the attic space is converted into living space , creating additional square meters in the house. This is very important for large families. If there is no insulation of the attic or attic, as such, then living in such conditions will be physically uncomfortable and impossible, due to the lack of heat necessary for the human body.
An insulated roof saves heating costs
Any roofing material, be it iron or slate, will not be able to protect the interior space from the cold, as a specially designed heat insulator (mineral wool, polystyrene foam, etc.).
If you ignore the installation of insulation or postpone it for an indefinite period, you can soon get not only heat leakage from the house, but also problems with the rafter system . It will be covered with fungus and will gradually rot, creating the danger of destruction of the entire structure. If you insulate the roof, but incorrectly calculate the thickness of the thermal insulation, then instead of a protective function, you will get an inversely proportional one - a destructive one.
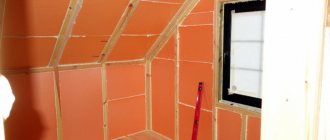
Insulation of a sloping roof
With proper organization of insulation, the temperature difference will not lead to the formation of condensation. If the thickness of the layer does not meet the required standards, then drops of condensate will appear on it in large quantities. The latter contribute to the loss of strength of the rafters and disruption of heat exchange in the rooms as a whole.
Failure to comply with construction and installation standards is fraught with consequences for human safety. When choosing insulation, you need to be guided not only by its physical and chemical characteristics, but also by the possibility of installing it yourself. If you have questions or difficulties in choosing insulation and the method of its installation, it is better to seek help or comprehensive advice from professional roofers.
Poorly designed roof leaks
What is mineral wool
With the onset of cold weather, the issue of maintaining heat indoors becomes especially relevant. The main path through which heat leaks from rooms is the roof. Thrifty owners strive to reduce fuel consumption and insulate the roof from the inside with mineral wool.
Mineral wool is deservedly considered an effective and sought-after raw material. The main properties of mineral wool are:
- affordability;
- fire resistance;
- breathability;
- no toxicity.
Release format: in slabs and rolls. In terms of strength, slabs are superior to rolls and are easier to distribute along the perimeter of the roof. Rolls are lighter in weight and cheaper than slabs.
Experts distinguish four types of mineral wool:
- Stone wool is of basalt origin. Thanks to its short fibers, it does not restore its original shape after compression; panels made from it are hard and non-prickly, and do not absorb water well. The blocks are able to withstand high mechanical loads without changing shape, therefore they are often used as insulation for flat roofs.
- Glass wool - the manufacturing technology is similar to that of glass. Long fibers give the slabs elasticity, softness and excessive looseness. Compared to stone, it is superior in thermal insulation, weight, noise absorption, hygroscopicity and price. The sheets are installed without fastenings for insulating pitched roofs, fragile buildings, and for repairing thermal insulating coatings.
- Slag wool is obtained from blast furnace waste. It is inferior to stone and glass in its ability to insulate heat, but its cost is much lower. It easily oxidizes metal surfaces, quickly absorbs moisture and is very scratchy, so its scope of application is limited to auxiliary buildings.
- Basalt – does not contain dolomite, limestone, blast furnace waste. It does not burn upon contact with fire, the fibers only slightly melt. It stores well in rolls and has very low hygroscopicity.
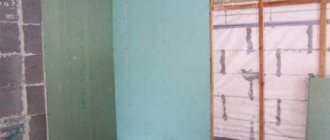
Preparing surfaces for insulation
Before carrying out thermal insulation measures, you need to clearly know what kind of structure you will have to work with . Based on its technical characteristics, a work plan is determined. The following factors are taken into account:
- geometry features (angle of inclination, width, length, etc.), shape and number of slopes;
- type of roof covering;
- type of rafter system;
- main building material of the building;
- availability of laid communications;
- the roof extends beyond the main structure.
Preparing roof surfaces
It is worth correctly calculating the necessary materials and the approximate time for their installation. When the process is visually presented, everything is weighed and scheduled, then you can cope with absolutely any task. Whether it’s the roof of a rural house or a huge country villa, the algorithm of actions is similar. To properly insulate a roof, you need to properly prepare it:
- carry out a thorough inspection of the rafters and sheathing - if damaged elements are found, they must be replaced;
- treat wooden parts with varnish or antifungal solution;
- check the integrity of communications laid in the under-roof space.
Communications under the insulation
Once the preliminary stage has been completed, you need to make sure that you have all the materials and tools necessary for insulation. If everything is in order, you can start working.
Insulation of a cold roof
A cold roof is any pitched roof whose slopes are not insulated.
In this case, the space between the slopes and the ceiling itself serves as thermal insulation.
But, since the temperature in the attic is much lower than in a heated house, heat loss is still at a fairly high level.
To avoid them, you should insulate the cold roof, namely, thermal insulation of the ceiling.
Absolutely any material that we mentioned above is suitable for this.
The technology depends on the type of overlap.
If beams serve as the load-bearing element, thermal insulation is carried out as follows:
- the structure is covered with a layer of vapor barrier, which should form a sealed contour;
- then the space between the beams is filled with any heat insulator;
- A layer of waterproofing film and flooring are laid on top of the insulation and beams.
If the floor is a solid slab, insulation can be done either in the manner described above using logs, or by pouring screed.
The principle is quite simple - polystyrene foam slabs are laid on the ceiling.
A concrete screed is poured on top of them.
As a result, the roof remains cold, but at the same time, virtually no heat leaves the room through the ceiling.
Attic insulation
Selection of tools
If you ask a professional roofer what tools you need to have to insulate the roof, he will probably answer that a knife, a hammer, a clear head and skillful hands. Essentially, this is the case, but there are subtleties and secrets that not everyone wants to divulge.
Roofing tools
The most important detail and, accordingly, the trick is choosing a knife . If you take a regular mounting knife, you will be able to work, but throughout the entire time you will suffer from unevenly cutting off pieces of insulation. Such a construction tool has a blade that is too short and is unable to cut through a thick layer of heat-insulating material. In addition to all this, a standard knife will quickly become dull on polystyrene foam or mineral wool.
If you don’t have a knife, then you can use improvised means for cutting - a hacksaw for wood or a wide kitchen bread cleaver with a lumpy sharpening.
The ideal option would be to purchase a special professional long knife . It is made taking into account the requirements placed on it - made of carbon steel with a length of 35 cm and a comfortable handle made of high-quality plastic.
Professional knife
In addition to a good cutting tool, you will definitely need a hammer, a screwdriver, self-tapping screws of different lengths, a long strong cord, reliable protective clothing, glasses to preserve your vision and a respirator.
It would also be a good idea to listen to the following recommendations:
- the place where thermal insulation materials are to be cut must be well ventilated;
- carefully protect your hands, head area and, especially, the respiratory tract with your eyes - they are most susceptible to damage from flying fibers;
- after work, immediately take a shower, thoroughly washing your hands, face and other areas of the skin;
- before cutting, make sure that the size is correct - the pieces should fit freely between the rafters, without falling out or being squeezed;
- It is advisable to cut mineral wool across the fibers - this minimizes the release of flying particles.
Cutting mineral wool
Selection and purchase of materials
The most commonly used materials for roof insulation are mineral wool and polystyrene foam; we will dwell on them in detail. If you have a simple gable roof, then insulating it is not very difficult technologically. The situation is completely different with a sloping or hipped roof. These structures have many different stops, purlins, ties and other elements that strengthen the rafter system. During insulation, you have to cut the mineral wool or foam plastic, make various folds and bends. As a result, the complexity of the work increases and the amount of waste increases.
Comparison of mineral wool and polystyrene foam
But this is not all the problems. Complex roofs will never be able to be hermetically sealed with a vapor barrier layer; there will always be places through which moist air gets into the insulation. For mineral wool this is a very unpleasant phenomenon. Experienced builders recommend insulating complex roofs with foam plastic rather than taking risks with mineral wool. Wet cotton wool not only almost completely loses its heat-saving abilities, but also accelerates the putrefactive processes of wooden structures of the rafter system.
Mineral wool
Material selection criteria
The insulation material must be suitable in all respects
Do not rush to purchase the first thermal insulator you come across, just because it looks thick, is packaged in colorful film and has an attractive price. First of all, the material must clearly meet your requirements and also meet all building codes.
| Characteristic | Explanation |
| Safety of use | Raw materials for roof insulation must be environmentally friendly and completely safe for humans. Its composition should not include toxic chemical compounds released both when heated and at normal temperatures. |
| Minimum thermal conductivity | This is one of the main conditions for products of this type. The insulating material should retain heat inside the house as efficiently as possible and not allow cold masses to pass in from outside. At the same time, it does not deform and can withstand temperature changes well. |
| Moisture resistance | Quality plays a significant role. The insulation should not absorb moisture either from the atmosphere or directly falling on it. If this characteristic is lame and the material absorbs liquid like a sponge, then it will soon lose its properties. |
| Fire safety | There are already a lot of flammable wooden elements in the roof structure. Therefore, the insulation should not support the combustion process. |
| Noise insulation | This is one of the most important characteristics. Sound absorption will contribute to quality sleep and a comfortable time in the house. If the sound insulation properties of the material are not good enough, then even light rain on the metal roof slopes will create a rumble. |
| Durability during operation | The material should not attract insects and rodents, and also be resistant to the development of microorganisms such as mold and fungi. |
| Ease of installation | If you are planning to insulate the roof of a private house with your own hands, then it is important that the raw materials are pliable and convenient for installation work. |
| Economical consumption | A factor that occupies not the last place, especially for those who have a limited budget. |
Pros and cons of mineral wool
Insulating the roof from the inside with mineral wool is an important point in finishing; it is important not to make a mistake with the insulation material. Among insulation materials, mineral wool is considered a favorite due to its numerous advantages. Pros:
- High fire resistance: the composition includes melts of silicate origin, which are not capable of igniting under the influence of high temperatures, and they are not subject to deformation.
- Resistance to chemicals: the insulation does not come into contact with various chemical reagents, ensuring safety when covering educational and research laboratories, factory floors and school chemistry classes.
- Biological resistance: not affected by mold fungi, not attractive to rodents and insects.
- Low shrinkage, preservation of the original volume, which ensures the tightness of the room and preserves the design parameters.
- Most types of mineral wool do not absorb water well.
- High permeability of water vapor: cotton wool allows water vapor to pass through well without accumulating condensation, so unpleasant odors in the room do not persist, but quickly evaporate.
- High noise insulation characteristics: not only heat loss will be reduced, but also the penetration of loud sounds from the outside.
- Ecology: no allergic reactions, safety for human health.
- Easy installation: it is not necessary to have professional construction training; insulating a roof with mineral wool from the inside with your own hands is something even a novice builder can do.
- Durability: the service life ranges from 70 years, so there is no need to change the material several years after installation.
Cheap types of mineral wool, along with their advantages, also have disadvantages:
- When working with glass wool, care is required when insulating the roof from the inside with mineral wool, since when the fibers break and get on exposed areas of human skin, pieces of insulation can cause pain.
- When glass wool fragments are inhaled, there is a risk of damage to the respiratory tract and lungs. This drawback is solved by using a respirator, gloves, goggles and a protective suit.
- Inexpensive types of mineral wool contain formaldehyde resin, which can oxidize at high temperatures and release phenol, a poisonous gas. When working with such materials, experienced craftsmen wear special clothing and a gas mask.
Types of thermal insulation material
The modern construction market offers a wide selection of insulation materials that can satisfy almost all existing customer needs. The most popular and in demand are the following types of thermal insulation:
Mineral wool
Mineral wool is a universal material that enjoys well-deserved trust among builders. It has excellent thermal conductivity and can be used to insulate not only roofs, but also walls and floors. This heat insulator can be used both inside and outside buildings. It is fireproof and can withstand air temperatures up to +700 degrees. Due to this, it is widely used in the construction of heating mains.
Laying mats with mineral wool
The term “mineral wool” includes such concepts as glass wool, slag wool and stone wool. Insulation comes in different structures and densities. To arrange the thermal insulation of an iron or slate attic, it is better to purchase raw materials with fibers located vertically.
Stone wool
The second name of the product is basalt wool . This is a type of thermal insulation material that is created on the basis of natural mountain raw materials. Stone wool is an expensive material. But its price is justified by its environmental friendliness and fairly long service life .
Basalt wool
The production of basalt products is quite expensive and involves the use of high temperatures (up to 1.5 thousand degrees). Modern methods for creating such products are based on the binding of fine particles using phenol-formaldehyde.
Glass wool
One of the subtypes of mineral wool , which has been used for many years in insulating under roof spaces. As the name implies, it is based on fine-crystalline glass particles, mainly broken glass containers and glass production waste.
Glass wool insulation
Fiberglass has proven itself excellent in insulating broken roofs. Thanks to its high-strength structure, it is noticeably different from its analogues. Glass wool fibers are several times longer than those of ordinary mineral wool.
Interesting! Glass wool is easy to cut, fits perfectly, has a budget price, and is also suitable for external and internal work.
However, despite all its advantages, this material requires a special approach in terms of safety. The finest glass fibers, getting on the skin, cause severe itching and irritation. Therefore, personal protective equipment during installation must be at the maximum level.
Ecowool
An innovative insulation material that has not yet gained as much popularity as mineral wool or polystyrene foam. Its distinctive feature is the release form - sheets or rolls. This heat insulator has a loose base , the connecting link of which is electrostatics. It is applied by spraying.
Ecowool insulation
Ecowool is made from cellulose production waste and is considered an environmentally friendly insulation material. Its main advantage is that it completely fills the required space, including even small holes and cracks. Its thermal conductivity is at the highest level and is comparable to mineral wool.
Cellulose wool
The disadvantage of the heat insulator is its naturalness. in it , and rodents and other insects feel good. To give the combustible material fire-fighting properties, it is treated with fire retardants.
Styrofoam
Everyone is familiar with foamed polymer, which has a low specific gravity and consists of miniature air bubbles. They are the main heat insulator. Polystyrene foam comes in different densities - pressed and unpressed . The one that has a structure reminiscent of a honeycomb and crumbles without effort is the unpressed type. The pressed material is much denser, cuts perfectly and does not crumble into fractions.
Foam insulation
Both types are used as insulation. Foam boards are available in different sizes and are very easily mounted to the rafter system using adhesive mortar or self-tapping screws . Reinforcing plaster is easily applied to the surface of the slabs. To insulate the attic floor, foam blocks 7-10 cm thick are used.
Important! Polystyrene foam is a “non-breathable” heat insulator, and therefore a room insulated with it needs high-quality ventilation.
Extruded polystyrene foam
This building material is also known as penoplex . It was invented in the middle of the 20th century and since then has been actively used as insulation for roofs, floors and walls of residential premises. The process of its production is very similar to the production of polystyrene foam, but differs in the high-temperature processing of raw materials. The produced material has excellent thermal conductivity, high density and strength . Due to the latter advantage, it is even used for thermal insulation of airport runways.
Sheets of extruded polystyrene foam are manufactured with a technological chamfer along the edges. This allows them to be securely fastened without gaps or visible joints.
Application of polystyrene
Penofol
An innovative solution for arranging a warm roof . Thin thermal insulation material is a layer of foam on aluminum foil. The insulation has a unique ability to reflect heat - up to 97%, and does not allow water and air to pass through. The action of such material is functionally similar to a thermos . There are samples on the market with coating thicknesses from 3 mm to 4 cm.
Working with penofol
As a rule, professional roofers combine penofol with other materials, where it plays the role of a waterproofing agent.
Polyurethane foam
Relatively new material, originally from Germany. In modern construction it is used in the form of foam and slabs . The latter are rarely chosen for ceiling insulation, since they are not very convenient to work with, and they are quite expensive. But polyurethane in liquid or foam form is an excellent option for arranging thermal insulation for roofs, walls and floors. With its help, all voids, cracks and gaps can be easily filled. If other materials need to be carefully cut to the required size, then in the case of polyurethane foam, the foam masses themselves fall in the given direction.
Treatment with polyurethane foam
The innovative product is very convenient to use for insulating slate and broken roofs.
Also, its undeniable advantage is the uselessness of arranging a layer of hydro and vapor barrier. The material has high safety indicators, as it resists flammability.
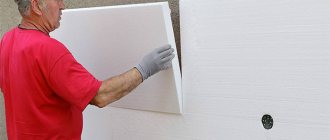
Roof insulation with foam plastic
If the wooden elements of the rafter system were not impregnated with antiseptics during roofing work, this must be done before installing the insulation. The foam will be installed completely hermetically; the condition of the wood is of great importance. It can be treated with any composition; they all cope with their tasks quite effectively. Dilute the impregnation according to the attached instructions and spray the rafters and sheathing with a spray bottle. It is advisable to go at least twice, this will eliminate any omissions. If you soaked the roof from left to right the first time, then move in the opposite direction the second time.
Impregnation for wood
Step 1. Measure the width of the rafter legs; the thickness of the foam will depend on this parameter. It must be borne in mind that the thickness of any insulation must be at least 10 cm; specific values depend on the climatic zone of the buildings. If the minimum thickness of the insulation is greater than the width of the boards, then slats should be added to them and in this way the width of the niches for the insulation should be increased. In our case, the width of the boards is more than 11 cm, this is enough for foam plastic boards 10 cm thick.
The width of the rafter legs is measured
Step 2: Bring the Styrofoam packages into the attic and unpack them.
Practical advice. If you work alone, you don't need to buy very large sheets. It is most convenient to work with foam plastic measuring 100x50 cm; you can lift and cut it without problems, without worrying that the slab will crack under its own weight while moving.
Foam packaging
Step 3. Take the dimensions of the niche into which the cut piece of foam will be inserted. There are two courses of action here.
- Remove the distance between the rafters and immediately cut off the required number of blanks . This can only be done if the distance between the rafter legs is the same throughout the entire height, and the boards are perfectly level.
- Measure each sheet of foam before cutting . This method takes a little more time, but there will be no problems when installing the foam in place. To avoid problems, it is recommended to use this method, it will save time in the long run.
The sheet is applied to the installation site
Step 4. Apply a straight edge or level to the marks and cut off the excess with a sharp construction knife. Always allow a margin of about one centimeter in width. The foam compresses easily and you can insert it into a niche without effort. But the extra length solves two problems: it reduces the number and size of cracks and simplifies the final fixation of the insulation - it does not fall out under its own weight.
Foam cutting
You need to cut the foam carefully; do not constantly pull the knife towards yourself, as this may cause hangnails and, as a result, uneven, torn edges. The blade must constantly make reciprocating movements up/down; work is only allowed with a perfectly sharp tool.
Step 5. Insert the sheet into place and secure it with self-tapping screws. There is no need to buy expensive special ones; regular ones will do. They are used only for insurance; the foam plate is held in the niche due to expansion, and then the cracks will foam further, which will increase the strength of the fixation. The length of the screws should be slightly larger than the thickness of the foam. Five screws are enough per sheet, four in the corners and one in the middle.
The length of the screws must exceed the thickness of the insulation
Using the same algorithm, fill all the niches between the rafters with foam plastic.
Fixing foam
All foam sheets are secured
Step 6. Foam the foam joints with polyurethane foam. Move the gun smoothly, try to feed the foam as deep as possible into the gap. This work requires some experience; it is important to determine the amount of foam by eye. The fact is that all the foam protruding after increasing the volume and hardening will have to be removed, and this is an unnecessary loss of time and materials. Experience will appear within just a few minutes of work; you will be able to correctly select the speed of movement of the gun and the pressing force depending on the size of the gap.
The joints are blown with polyurethane foam
In the ceiling, screws must be screwed in at a slight angle. Due to this position, they will support the weight of the foam not only with their small caps, but with their entire body.
When insulating the ceiling, screws are screwed in at an angle
Foaming joints on the ceiling
At this point, the work on installing the insulation is completed; you can nail the slats to the rafters and fix the finishing materials of the attic walls on them.
Algorithm for carrying out installation work
In order to insulate the roof from the inside with your own hands as efficiently , you need to carefully prepare - study topical articles and forums, watch training videos, consult with professionals. The work procedure itself can be divided into four stages:
- Arrangement of waterproofing. This step is usually done when covering the roof with roofing material. The waterproofing film is mounted to the rafters with slight sagging. When laying a hydrobarrier, it is important to lay it with the smooth side facing up, then seal the joints with tape. After the film covering is laid, it is fixed with counter-battens, to which the sheathing is nailed.
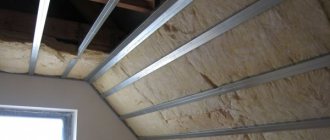
- Installation of thermal insulation. At this stage, insulation of optimal thickness is selected, cut to the required size and placed between the rafter beams. To keep the insulation in place, it is secured using small slats, rope or fishing line stretched between the rafters. To avoid the appearance of cold bridges, heat-insulating mats are placed with each row offset to the side.
- Installation of vapor barrier. This film material is placed with the smooth side towards the insulation, and the rough side towards the room. It is important to do everything clearly and not confuse the bottom with the top. Laying a vapor barrier is an important step when arranging the “pie”. Its installation is carried out using thin counter-battens or a construction stapler.
- Installation of bars and guide profiles. This stage is necessary for installing facing materials and creating a ventilation gap.
You can do the work yourself
How to insulate a roof. Step-by-step instruction
When insulating between rafters, it is important that the thermal insulation layer is continuous, without gaps in the corners, near pipes and windows. The slightest gap leads to the formation of a cold bridge. If some part of the structure is less insulated, then the temperature there is lower, and - hello, condensation.
The roof insulation pie is the basis of the basics; you cannot swap layers in it or skip any of them. How to insulate a roof from the inside, from bottom to top:
- Internal cladding (lining, OSB, etc.);
- Ventilation gap;
- Vapor barrier;
- The frame on which the insulation is mounted;
- Vapor-permeable hydro-wind protection membrane;
- Counter-lattice made of a bar of at least 45 mm (usually 50);
- Lathing;
- Roofing covering.
You should step by step consider all the layers of the roof insulation cake of a private house and the installation technology.
Inspection of structures. If the house has been standing for many years with a cold attic, and it has been decided to convert it into an attic (and this increases the living space of the house by 35-40%), then the first thing you need to do is to revise the structure. Was the roof installed well and correctly? How well are the rafters and floor beams preserved? If any parts of the structure become unusable, they are replaced and treated with fire and bioprotection. Then they measure the thickness of the rafters and the distance between them, and cut the insulation so that its width is 1.5-2 cm greater than the distance between the rafters. This way the insulation will fit tightly, without gaps. But in houses, especially old ones, there may be the most unexpected distances between the rafters, and then you have to lay out a mosaic from insulation and waterproofing film, as a user of our portal with the nickname 214457 did. The distance between the rafters on the roof of his house is 1300mm, and the width of the vapor barrier is 1600mm.
Installation of hydro-wind protection membrane. At this stage of roof insulation there are a number of subtleties on which the result of insulation will depend. Usually waterproofing is done when the roof is covered, but if the roof of a private house, installed before historical materialism, is insulated, there may not be any waterproofing. It is better to buy a modern super-diffusion membrane - it will not let water into the room, but will release steam from it.
The film is attached to the rafters without tension, with a sag of 20 mm. It will be ideal if the distance between the rafters does not exceed 1.2 m. Why you should not stretch the waterproofing: it will shrink from the cold, and if you do not leave sagging, it will tear.
The waterproofing film is fastened either with a construction stapler or with galvanized nails, always with a wide head, and rolled out horizontally from the eaves to the ridge, always leaving an overlap. And here it is important that the size of the overlap matches the slope of the roof.
- The slope exceeds 31 degrees - overlap 10 cm;
- The slope is 22-30 degrees - overlap 15 cm;
- Slope less than 21 degrees - overlap of 20 cm.
It will be great if the overlaps occur on the wooden parts of the structures: rafters, or, if they are needed, spacer bars, etc. Overlapping areas are isolated with adhesive tape.
Also: it is very important not to mix it up and not to place the film with the wrong side up when using it. Homeowners often make this mistake, although the film always indicates which side is the outside and which is the front.
Laying thermal insulation. Then the thermal insulation material, cut to size, is tightly laid between the rafters, pressing against the waterproofing and shifting each subsequent layer to the side relative to the previous one so that cold bridges do not arise.
The insulation is cut strictly 2 - 3 centimeters wider than the width of the rafter span: it should fit tightly, but not bend over.
KabykiFORUMHOUSE Member
It is better to insulate in several layers with offset. Three times 50 is better than one time 150.
The slabs are secured using thin slats or lines that are pulled between the rafters.
Installation of vapor barrier. It is best to install the vapor barrier as recommended by the film manufacturer.
The vapor barrier must not come into contact with the insulation!
The first strip of vapor barrier is at the ridge, and the subsequent strips are closer to the eaves, with an overlap, and are secured in the same way as waterproofing, only they are tensioned, there should be no sagging. The gluing areas are reinforced with a pressure strip, especially if the roof slope is less than 30°.
When installing a vapor barrier, it is extremely important to ensure a tight connection to the surfaces. At junctions with walls inside the attic, chimney pipes and other complex surfaces, glue must be used; it needs to be made “for centuries”, and adhesive tapes and adhesive tapes will not be enough for this. The staples from the stapler are additionally taped.
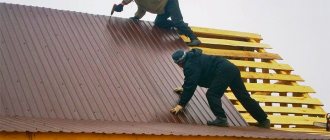
Installation of counter bars. Counter beams are nailed along the rafters to provide a longitudinal ventilation gap. Counter bars must be at least 50 mm thick. Step lathing is nailed onto them .
An insulation pie is possible with one ventilation layer, the top one, and the vapor barrier is always adjacent to the insulation.
Nowadays, more and more often, the roof is thermally insulated directly during installation: such insulation is of higher quality.
KrovellForumhose Member
If only because otherwise there will be no possibility of high-quality insulation behind the Mauerlat. And this is a very important node!
The insulation pie in this case is performed in reverse:
- Install a vapor barrier on the lower surfaces of the rafters, starting from their base to the ridge, with overlaps at the joints, gluing the joints with construction tape;
- From below, the vapor barrier film is nailed across the rafters with bars with a cross-section of 30x40 mm in increments of 30-40 cm. The finishing material will be attached to them from below, and this structure will hold the thermal insulation.
- Insulation boards are placed on the waterproofing between the rafters; the surface of the boards should be flush with the top edge of the rafters.
- Vapor-permeable waterproofing is placed on the slabs with an overlap of 15 cm.
- The next layer is the sheathing, on which the roofing material is already placed.
The main mistakes when insulating a roof
Actions that can negate all your work and expenses:
- incorrect selection of the thickness of the thermal insulation material can lead to wasting extra money or the lack of the desired result;
- ignoring ventilation will create excess moisture and condensation in the room, which will lead to damage to the coating and rafter system;
- By neglecting the steam and water barrier, you can get a negative result in the form of condensing moisture, which will be absorbed into the heat insulator, violating its properties.
Almost all private households located in most regions of the country roof insulation from the inside Therefore, such events should not be postponed “for later”. It is better to carry out thermal insulation at the construction stage of the building. Properly organized roof insulation is the key to comfortable living in the house and a noticeable reduction in energy costs.
Insulation of the roof from the inside with mineral wool - installation errors
Most often, heat leakage can occur at the joints between thermal insulation and wooden beams. This usually happens because the mineral wool does not fit tightly to the beam, leaving gaps.
The beam is also a heat bridge because it is in direct contact with the concrete slab and heats up. It is best to insulate the beam itself by covering its top, for example, with an additional layer of thermal insulation. Another weak point, although it is rare, is the knot between the ceiling and the wall. Most often, the entire roof should be insulated. Then the main problem becomes the choice of high-quality insulation and sealing of the joint. If the joint is poorly sealed and the wind blows under the roof, then cold air quickly spreads along the walls. It increases heat loss into the premises, causing drafts. When insulating a roof with mineral wool, inaccuracies most often occur due to incorrect installation, the appearance of thick seams, damage or collapse of the insulation, moisture getting on it, improper installation or lack of steam and water protection. Using insulation made from cotton wool scraps is initially doomed to failure, leading to uneven heat losses and reduced insulation efficiency in general. Another vulnerable point in insulation is the joint between the roof and the load-bearing wall.
2 662
How to properly ventilate a roof
- The area of exhaust and supply openings must be determined taking into account certain parameters, which include the volume and concentration of removed vapors, etc., which in practice is not always possible to do. Therefore, they usually use existing empirical findings. 2. The height of the ventilation gap between the base of the roof and the insulation must be at least 5 cm. It directly depends on the length and angle of inclination of the roof slopes. 3. The flow of air is organized both along the entire eaves and in local places - with the help of ventilation grilles that cut into the lining of the eaves overhang.
4. The total area of exhaust ventilation openings installed only at the highest point of the roof must be no less than the area of the supply openings for each slope. Exhaust devices are ventilation hoods for hipped roofs, ventilation ridges, roof aerators, etc. You can use both ready-made (store-bought) devices and those made by yourself.