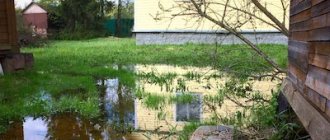
Not everyone is destined to become the owner of a personal plot on a flat, open and at the same time dry area. Areas with a high level of groundwater and the threat of flooding are not very convenient for development, but this is not a reason for grief. Installing a drainage ditch or an entire groundwater drainage system will help get rid of this problem.
Construction of a drainage ditch around the house
What is drainage and why is it needed?
Drainage is the process of drying the soil in swampy areas, removing excess water from the ground. This is also the name given to a system of pipes, trenches, and wells installed for these purposes. Why is it needed?
- The most harmless problem of excess water in a dacha is liquid constantly squelching under your feet and puddles all over the territory. This phenomenon is simply unpleasant;
- A negative impact on the harvest is a more serious problem. In permanently swampy areas, harvesting a good harvest is just as unrealistic as in dry sand;
- The proximity of groundwater does not make it possible to make a good cellar on the territory or a basement under the house;
- But the greatest danger threatens the house and other buildings on the site. During the period of autumn rains or spring melting of snow, the soil becomes saturated with moisture, and during frosts it becomes heaving and increases in volume.
Various options for the shape and design of the drainage ditch
The foundations of buildings, fences, and sidewalks are at risk of destruction; - In areas located on slopes, storm flows wash away the surface fertile soil layer. If such an area is not strengthened, then destruction will subsequently threaten the house.
Drainage systems are a reasonable engineering solution that allows you to get rid of the problem of groundwater in your garden. Typically, the territories of gardening cooperatives and villages with individual development are protected from flooding by a drainage ditch in which a pipe is laid, with the possibility of discharging the collected water to a lower place.
It is quite possible to build protective structures at your dacha with your own hands, but this must be done before landscaping begins. Drainage ditch, pipe, well, drainage system - these elements create a drainage system on the site.
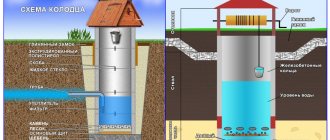
Installation of a well for drainage on the site
To strengthen them, you will need a large amount of excavation work, both with your own hands and, possibly, with the use of special equipment.
What type of drainage ditch can there be according to its design?
According to their purpose, drainage ditches are:
- main (main) - through them the main outflow of water is carried out;
- perimeter - that is, laid out along the perimeter of a site or any structure. As a rule, they can “serve” only this particular building and this particular area;
- as well as additional ones - to “help” the main ditches.
The installation of drainage ditches is a necessity on the site, because... heavy rains and floods can lead to the washing away of the fertile layer of soil and puddles under the foundation of a residential building.
Structurally, it is customary to divide all drainage ditches into:
- open type - the easiest to arrange and maintain, and therefore they are, as a rule, preferred by the owners of almost all private land plots;
- closed type - somewhat more difficult both in arrangement and in subsequent maintenance. They are preferable for draining large volumes of water, and also allow you to additionally install wells, filtering devices, etc.
It is worth considering each of these types of drainage ditches in more detail.
Types of drainage in a summer cottage
The water drainage system at the dacha is a network of pipes and channels connected to each other, which are arranged in such a way as to collect and remove excess water from buildings, yards, and gardens in the most convenient way and thereby strengthen these objects. If drainage is done correctly, then surface water will in no way harm the foundation, and the possibility of mold and fungi will disappear.
Before starting landscaping work on the site, it is necessary to determine the degree of threat of flooding, your capabilities and select the necessary and most suitable drainage system for this case.
Open or surface drainage
The easiest system for DIY work.
Design of an open drainage ditch made of granite cobblestones
Large-scale excavation work is not required here; ditches dug throughout the territory into which a storm pipe drains its water, rain flows, and excess irrigation flows off are sufficient.
Deep drainage system
A more complex option, which is needed in an area with a high level of groundwater located in the lowlands, and will also not be superfluous in clayey and loamy areas. The basis of such drainage is a drain - a pipe that is laid in a trench at a certain depth. The trench leads to a catchment well or larger diameter sewer pipe.
Vertical drainage
This structure is in the form of several wells located around the building. The water collected in them is pumped out by a pump. In order to make such a drainage system, engineering calculations and design are needed.
Scheme for installing vertical drainage wells
Beam system
Complex type of irrigation and drainage structures. Consists of pipes and wells. It is mainly built on large areas or on industrial sites.
Open drainage device
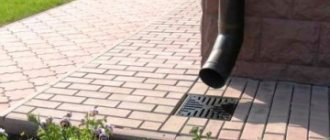
The simplest option for drainage in a dacha is open drainage systems. They are divided into two types: point and linear. Point drains are storm inlets that are fixed in the places where the drainpipe ends.
Such storm inlets are usually equipped with grates for collecting debris. A linear version of open drainage is a drainage ditch.
The simplest drainage systems are easy to make with your own hands. The art of creating engineering communications was mastered by the ancient Romans. A version of Roman drainage is still used in some farms today. Ancient engineers came up with the idea of strengthening drains with bundles of thick rods that prevented collapse.
Option for installing an open drainage ditch
It’s easy to make such a simple reinforcement with your own hands; you don’t need a pipe here, and it can last for 15 years. Stages of creating a drainage trench on the site:
- Prepare the necessary tools: a shovel, a wheelbarrow, and a pick if necessary. Of course, it is easier to dig with an excavator than with your own hands, but this is only if you need a deep trench.
- Without channels and trenches, water flows from the site randomly, but it only seems so at first glance. Of course, the streams run downhill. Therefore, the next step is to analyze the path of rain flows and determine where to collect the water. This could be a nearby pond, river, lake, stream. If nothing like this is observed nearby, you will have to build a drain well or pit with your own hands. Determining the direction of water flow is a very important point.
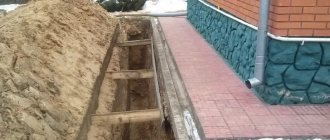
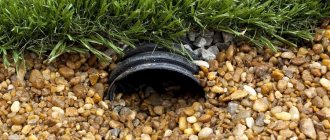
- For surface linear drainage, a pipe is not always needed. You can simply dig a ditch about a meter deep, bevel the walls at an angle of 20–30° and strengthen them. Old car tires are sometimes used to strengthen the trench. For this purpose, tires are cut into several fragments, then each fragment is cut lengthwise. These rubber parts are placed at the bottom of the trench.
- You can sprinkle crushed stone, gravel or sand on top.
- Stones laid along the bottom and walls will add decorativeness to the gutter. The upper edges can be planted with flowers or low shrubs: their roots, sprouting, will secure the edges of the trench. For the safety of residents, especially children, it is better to fence the length of the trench with a low fence (a hedge is an option).
- Such a trench must be cleared annually of fallen leaves and other debris.
Methods of strengthening
Strengthening the ditch with masonry
The design of the drainage ditch is a simple, non-durable structure. However, without any special expenses, the drain can be turned into a decoration of the estate’s landscape.
The unformed earthen walls of the drainage system are washed away by water flows and crumble, which leads to clogging and deterioration of the drainage properties of the channel. This problem is easily solved by strengthening the slopes. The choice of the most optimal method depends on the type of soil and the desired result.
- The channel gutter is lined with natural stone.
- Ornamental shrubs or wild grasses with a developed root system that reliably secure the slopes are planted along the edge of the canal.
- Strengthening drainage walls with a three-dimensional geogrid.
- Turfing the upper part of the slope: fastening the pieces of turf is done with special wooden knitting needles.
- The use of geomats consisting of three-layer plastic gratings.
- Application of gabions.
- On clay soils, good results are achieved by using geotextiles covered with a thick layer of sand or crushed stone.
- For a summer cottage, a budget option is acceptable: strengthening slopes with old sheets of slate or car tires.
In all cases, having strengthened the side walls, it is necessary to strengthen the bottom by creating a 5-10 centimeter layer of sand, crushed stone, gravel, rock or broken brick.
Closed drainage device
Closed or deep drainage is especially recommended for areas with clay or loamy soils where it is planned to plant a garden or grow fruit and vegetable crops. Also, this type of drainage is relevant in areas that are located in lowlands or have a groundwater level of less than half a meter. This type of drainage allows you to solve the following issues:
- Protection of building foundations and fences. For this purpose, the drainage level must be below the foundation level;
- Preventing flooding of basements and basements;
- Preventing soil washout and protecting plants from root rot;
- Protection from dampness, mold, fungi and harmful insects.
Many construction companies have on their staff specialists in the arrangement of closed systems for water drainage and carry out this work according to the client’s order.
Closed drainage diagram
In order to save money, if time and the ability to do something with your own hands allow, you can build drainage on your site yourself. A plastic corrugated or asbestos-cement pipe is used as a drain. The first one is easier to cut.
- Ditch preparation. There may be only one trench in a small area, but it is better to dig several grooves in the form of a herringbone, along which the water will converge to the main pipe, and along it to the drainage point.
- The plastic pipe is cut effortlessly with an ordinary knife into pieces of the required size, and holes are made in the central pipe at the joints. An asbestos-cement pipe requires more effort when cutting and connecting, but with skilled hands this problem can be solved.
- Holes are made on the surface of the pipe into which water will flow.
- The prepared parts of the pipe are laid in trenches and secured at the joints with connecting rings of the required size.
- To prevent the pipe from filling with debris along with water, all its parts are carefully wrapped in geotextiles.
- The next step is to strengthen the ditch. For this purpose, whatever is at hand is suitable: crushed stone, expanded clay, screenings, small pebbles, sand, any construction waste. There is only one task - to pass water well. The drainage trench is covered with a layer of soil on top, but do not rush to do this until the system has passed the test of time and rain. If something goes wrong, you can correct the shortcomings and only then go to sleep.
Arranging a drainage ditch: expert advice
After another heavy rain has passed, you need to take a closer look at what paths the water takes in order to leave the area. If you outline these natural routes, then in the future it will be much easier to decide where exactly to continue the trenches. In this case, water will drain much more readily. This is especially true for open drainage ditches.
Experienced builder
Marchenko S.A.
If you don’t have the necessary materials at hand, you can strengthen the walls of the ditch with improvised means. The main thing is to show your imagination. For example, trimmed car tires will do. And to make the structure even more attractive, you can line the edges of the ditch with pebbles or even plant plants in some places. Their root system will strengthen the walls of the ditch and prevent their rapid collapse. Also, the water supply must be started before filling the ditch - in the case of a closed drainage. After all, in case of failure, it will be possible to fix something right on the go, rather than tearing up a trench and looking for a problem area only after that.
Sviridov P.