Here you will learn:
- Conditions for installing water heated floors
- Types of water floors and device features
- Selection of pipes for floor heating
- Wiring diagrams
- Connection diagrams to a heat source
- Heated floor design
- Accessories
- Boiler installation
- Collector installation
- TVP Installation Guide
Water heated floors in the house have certain advantages and disadvantages. We invite you to look at them in more detail.
The advantages of water floor heating in a private house include:
- Increasing the comfort of walking on the floor in the house, especially in the cold season.
- Not only the floor, but also the air warms up in the house.
- Thanks to the heated floor, the temperature drop is not so noticeable.
- Warm floors are not very hot, so they do not dry out the air in the house.
- If necessary, you can turn off part of the heating.
- Heated concrete retains heat for a long time.
All installation systems are hidden under the floor covering, so they do not spoil the interior of a private home.
However, this system also has certain disadvantages:
- All stages of installation must be performed very efficiently, since redoing something after installation is very labor-intensive and expensive.
- Floor temperature control is slow and insignificant since the heating boiler has a small temperature range.
- Not all types of floor coverings can be laid on top of a warm water floor screed. Also, you should not cover the floor with carpets or install massive furniture, as they will contribute to overheating and cracking of the screed.
- Warm floors will take away some of the height of the room. This is worth remembering when installing doorways.
- Installation of thermostats and pumps is required.
- The system significantly increases the load on the foundation.
When deciding to install a private heated floor, it is worth analyzing all these factors. You can entrust the installation to professionals or do it yourself.
Can it be used as the only heating
A warm water floor increases the efficiency of heating a home. Is it possible to use it to heat a house without using radiators? To answer this question, it is worth considering a huge number of nuances.
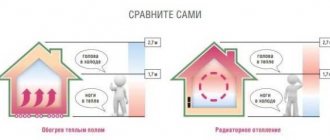
Let's decide what allows us to consider heating with heated floors the best option compared to radiators:
- Efficiency. The air heated by the radiator immediately rises and is then gradually distributed throughout the house. Warm floors allow you to evenly warm the room from the very bottom.
- Saving. At first glance, installing heating radiators is cheaper. However, in the long term, underfloor heating is much more profitable.
- Inertia. After turning off the heating boiler, the heated floor cools down much longer than the radiators.
- Comfort. For heating radiators, it is necessary to use a coolant with a temperature of 70 degrees. For a warm water floor, 45 degrees is enough. It is much safer for residents.
- Practicality. Radiators take up space in the house and very often spoil its interior. The heated floor system is completely invisible, so it is perfect for private homes decorated in any style.
With proper installation, only warm floors will be sufficient in the house. Heating a two-story private house only with a water-heated floor, without using radiators, is more difficult to implement, but with proper insulation it is quite possible.
Variety of heating systems
The heating system is responsible for creating a warm, favorable microclimate in the house. In a private home, this could be radiators or heated floors. The disadvantage of the battery is its small surface area of the device. Due to the increase in temperature, the speed of air movement increases. In addition, dust often accumulates in batteries.
But a warm floor has a large heat transfer area, which allows you to heat large volumes of air faster. The most common type of heated floor is considered to be a water floor, which is powered by a gas boiler : it heats the water, it goes through pipes and becomes a source of heat for the floor.
The entire variety of types of heated floors is divided according to the following criteria:
- according to the operating principle: infrared or convective;
- by type of boiler: it can operate on solid or diesel fuel, gas or electricity;
- by coolant: they are air, water, electricity.
Choosing the required heating system is a complex and responsible matter that should be entrusted to professionals. They can take into account all the advantages and disadvantages of heating types and the conditions of a particular home. The heating system is selected at the design stage . After all, one of the factors influencing the choice is the material from which the building is constructed. This is also important to consider.
Preparation for installation
Before installing water-heated flooring, you should prepare the materials, outline the layout of the pipes and properly prepare the base.
Leveling the surface
Installation of the floor heating system is carried out on a flat, properly prepared surface:
- All old coverings are removed and the screed is removed down to the concrete floor. If there are differences of more than two centimeters, the floor must be leveled using pouring.
- After this, the surface is cleaned of debris, dust and treated with a protective layer of primer.
- Next, you need to lay the waterproofing protection. For this purpose, construction film or special mixtures are used in apartments. If you use roofing felt or other bitumen-based insulation, you may experience a tarry odor for a long time and disturb the neighbors below.
- To avoid thermal expansion, a damper tape is laid around the perimeter of the room, which protects the wall from the concrete slab.
From above, the entire floor surface is covered with a heat-insulating layer.
Selection of insulation mats
Thermal insulation of the concrete covering when laying heated floors is of great importance for the conservation of thermal energy. Therefore, it is important to choose the right effective substrate.
When purchasing thermal insulation for a water floor heating system, the following requirements should be taken into account:
- high thermal insulation characteristics of the material;
- strength;
- fire safety;
- resistance to biological and chemical influences;
- soundproofing properties;
- moisture resistance.
Therefore, special heat-insulating mats are considered the best option for laying pipeline heating of the field.
Such products made from expanded polystyrene and polystyrene have good characteristics. The most popular are flat mats with bosses. Such a dense polystyrene foam substrate has characteristic shaped protrusions - clamps, turning into rows. This mat shape makes pipe laying much easier.
Pipe selection
The quality and material of the pipeline for a water floor is one of the main factors influencing the service life of the entire system. There are several types of pipes used when installing underfloor heating:
- metal – copper and stainless steel;
- polymer - polypropylene and cross-linked polyethylene.
Pipes of the first group have good characteristics, but are used quite rarely. This is due to the high price of the product. Basically, polymer products are installed in apartments to move liquid in a heated floor system.
Pipeline calculation
When installing a warm water floor, a step between the spiral pipes is allowed within 10-15 centimeters. To determine the length of a pipe in a circuit, the following formula is often used:
D = S/W*1.1
where D is the exact size of the pipe, S is the area covered by the contour, W is the pitch between the pipes and 1.1 is the coefficient taken for the reserve for bends.
The larger the pipe diameter, the greater the heat transfer. For heated floors, mainly products measuring 16 millimeters are used. But sometimes you can find pipes up to 25 centimeters in diameter.
Laying scheme
Before installing a floor heating system, a pipe laying plan should be determined. A water heated floor can have several design schemes:
- "Snake". Initially, the pipeline is laid around the perimeter of the room. Then there are wavy curves inside the room. Sometimes they use a variant with a double “snake”. With this arrangement, the supply and return pipes are located side by side over the entire floor area. This scheme is very simple, but there is a possibility of the formation of kinks at the bends.
- "Snail". The pipes are laid spirally around the perimeter of the room and gradually narrow towards the central part. In this case, the reverse feed is taken into account. Therefore, pipes are laid through a row. A warm floor designed according to this scheme has uniform heating and requires fewer pipes for its installation. In addition, the bends are smooth, which eliminates the possibility of kinks.
- Combined styling. This system uses the simultaneous distribution of pipes according to the “snail” and “snake” scheme. This combination is performed if distribution of heating zones in the room is required.
Water heated floor in an apartment with a “snake” pattern
In high-rise apartments, combined installation of heated floor pipes is often used. This is due to the fact that in modern apartments the rooms are often not rectangular in shape. For small rooms, a snail-shaped arrangement of pipes is recommended.
Installation of underfloor heating with liquid coolant
If you live in a country house permanently, you should take advantage of the centralized gas supply and choose water as a coolant. If a country house is used as a summer cottage, for the weekend, it is worth taking a closer look at antifreeze. It will allow you not to flush the water every time you come to the dacha.
Warm water floors in a private house are a closed circuit . It is laid out from pipes and mounted under the floor covering. Coolant water circulates through pipes that are built into the screed. The boiler heats the water, from which it passes into the main collector and enters the distribution unit. From here it is evenly distributed throughout the pipes, transferring heat to the screeds. Having lost temperature, it goes back to the boiler for the next cycle.
A heating system with liquid coolant can be open or closed circuit . The difference between them is the design of the expansion tank.
In an open circuit, the tank communicates with the environment; when heated, liquid can be added to it to compensate for its deficiency.
The closed-type design has special features, in particular the presence of a membrane tank.
The water system is installed in one of three ways:
- on the ground;
- on the base, usually a concrete slab;
- on a wooden floor.
It is quite rare to lay it on a wooden floor. Most often, it is removed, a screed is poured, and then the system is laid. A simpler option is when all elements of the system are laid on the subfloor (base) and filled with self-leveling mixtures. True, this reduces the useful volume of the floor due to an increase in its thickness. This option will not be convenient for rooms with low ceilings.
A warm wooden floor in a private house is usually installed on the ground . A warm floor on the ground is laid as follows: remove the top layer, form a cushion of up to 10 cm from sand and crushed stone, and lay a material with waterproofing properties on top. As a rule, this is roofing felt, a special membrane. A rough screed is laid over all this, and pipes and insulation are placed on it.
The easiest way is with a concrete base. It is leveled, the cracks are sealed, and the base for laying the heated floor is ready.
The system consists of the following components:
- pipes, which are usually made of polypropylene or metal-plastic;
- fasteners;
- thermal insulation materials;
- manifold and fittings with which they are connected.
A double-circuit boiler is used for heating. It also provides hot water to the home.
A water-heated floor does not heat more than 55°; usually the coolant temperature is 35-45° maximum. At the same time, the temperature of the floor surface is 26-31°: 26° in places where people are constantly present, and 31° in rooms where the stay is temporary.
The circulation pump is mounted outside the boiler or built into it. It allows you to withstand one of the requirements for a water floor: the temperature difference between the supply water and the return water should be no more than 10°.
There are a large number of options for connecting a water heated floor to a heating system. Let's look at four schemes for water heated floors in a private house.
- Direct connection diagram.
- Circuit with three-code valve.
- Scheme with a pumping and mixing unit.
- Scheme with a thermostatic kit for one loop.
In this table we will see a small comparative analysis of the advantages and disadvantages of these schemes. This will help you choose the best scheme for a particular home.
Features of installation of water heated floors
Before pouring a heated floor in a private house, it is necessary to lay high-quality waterproofing and provide protection against leaks. When installing a heated floor, you need to cover the screed with a thick layer; this is the only way to hide the pipes well . The system consists of several layers and is a three-dimensional structure.
This is what the structure of a water-heated floor in a country house looks like.
Laying heated floors is carried out in several ways:
- snake;
- double snake;
- corner snake;
- snail or spiral.
You should not do the installation of a water heated floor in a private house yourself; the risk of making a mistake is too great. It is better to leave this matter to specialists with experience working with similar systems.
Making a warm water floor with your own hands
Let's take a closer look at the work process when installing water floor heating. It includes a number of stages - preparation of the rough base, installation of the system itself, as well as pouring the screed and laying the finishing coating. In this case, a budget option for creating a heating system will be considered.
Warm floors are a serious cost item during renovation, so it is important to accurately calculate how much and what materials will be needed. To ease your labor costs, we have prepared special instructions telling you how to calculate a heated floor - water or electric. Online calculators included. And in the article “What do you need for a heated floor?” you will find a complete list of everything that may be needed during installation.
Do-it-yourself water heated floor installation
Preparing the base
Let's look at how to make a subfloor for installing a water system based on expanded clay.
Step 1. First of all, the old wooden floor is completely dismantled. Boards and joists are removed. Remnants of bricks and oversized construction debris may be left on the foundation.
Wooden floor needs to be removed
The boards have been dismantled
Lags have also been removed
Step 2. A laser level is used to determine the height of the final floor. The main reference point for the required level is the front door. The marking should be 1.5-2 cm below the threshold.
Application of laser level
The marking should be 1.5-2 cm below the threshold
Step 3. Markings are applied to the walls. The first mark marks the boundary of the screed with the installed heating pipes (the thickness of the screed should not be less than 6 cm thick). The second indicates the thickness of the expanded clay insulation (in this case, the thickness of this layer will be 10 cm).
Marking the walls
The second mark indicates the thickness of the insulation
Step 4. Along the laser level line, marks are applied to the walls along the entire perimeter according to the level of the finished floor.
Marks are applied according to the level of the finished floor
Step 5. Markings of two other levels are applied to the walls - expanded clay bedding and screed. The reference point in this case is the finished floor mark.
Marking process
Step 6. The rough concrete floor is covered with sand, which is evenly distributed over it. You can focus on the lower mark.
The floor is covered with sand
The sand is evenly distributed
Step 7. Next, the sand is compacted as much as possible and leveled. The work is performed in several approaches; there is no need to rush here.
Then the sand is compacted
Step 8. Communication pipes are protected with energyflex.
Communication pipes are protected with energyflex
Step 9. Holes in the walls left from the joists are sealed with pieces of brick and cement mortar.
Example of a sealed hole
Step 10. Waterproofing is laid on the sand layer. In this case, it is a thick polyethylene film that is factory-installed on the walls. For convenience, the film is fixed with tape.
Laying PET film
Step 11. Installation of beacons begins. For this purpose, high-density foam block cubes are used, on which metal beacons will then be installed. The cubes are placed on polyethylene at a distance of about 1 m from each other. The height of one cube is 9 cm.
Foam block cubes
Photo of foam block cubes
Step 12. Metal beacon profiles 1 cm high are installed on the cubes.
Installation of beacons
All beacons are installed
Step 13. A cube must be installed at the joints of the beacons. For proper docking, the beacons are trimmed. When docked correctly, the beacons overlap each other in the direction of the future movement of the rule.
Trimming beacons
When joining, the profiles must overlap each other in the direction of the future movement of the rule
Step 14. Beacons are set according to level. Landmark - a line on the wall indicating the height of the screed. To level them, you can use plywood pads.
Checking beacons at the construction level
Using plywood underlay
Step 15. When the beacons are level, they are fixed to the cubes using self-tapping screws.
Fixing the beacon
Step 16. The subfloor should have a slight slope (the difference is up to 5 mm for each meter of base length). If necessary, the cubes can be pressed into the sand to achieve the desired result. The operation is carried out along the entire length of the beacons.
The subfloor has a slight slope
Step 17. Additional cubes are installed between the main cubes.
Additional cubes installed
Step 18. Expanded clay is mixed with a small amount of cement mixture. This will result in a stronger floor. For a bag of expanded clay, a bucket of sand, 2 kg of cement and about 3 liters of water are used.
Expanded clay is mixed with cement mixture
Step 19. The prepared expanded clay is laid out on the base and leveled. Backfilling is done starting from the far corner of the room. There should be about 1.5 cm of free space left to the top level of the beacons.
Laying expanded clay
Photo of the expanded clay laying process
Step 20. The expanded clay layer is covered with cement mortar. The solution is leveled with a trowel over the entire surface.
Leveling the cement mortar
Step 21. The screed is aligned using the beacon rule. Ideal evenness may not be achieved. To make the beacons easy to remove from the screed, their surface is not covered.
Aligning the screed with the rule
Lighthouses are not covered with mortar
Step 22. After two days, when the screed has dried, the beacons are removed. To do this, the screws securing them are unscrewed. Wooden linings are removed along with the beacons.
Removing beacons
Beacons removed
Step 23. After this, the resulting cracks are cleared of debris and sealed with cement mortar.
Sealing recesses with cement mortar
Laying the pipe system and connecting
After preparation, the installation of the heating system itself begins.
Step 1. In this case, the existing heating system will be retained based on the gas boiler. The battery is powered by a supply circuit located on the second floor. The water leaving the radiator is directed to the return circuit, which is located in the basement. The warm floor will be connected to the second output of the battery and to the return circuit. Taps will be installed to turn off the radiator and heated floor. A circulation pump will be installed at the entrance to the return circuit.
Supply and return circuits
Connecting a heated floor
Location of taps
Circulation pump installation location
Step 2. The radiator is equipped with the necessary fittings. These are connectors and pipes. Plumbing flax and sealant are used to seal the connection.
Sealant is used to seal the connection
Let's start installing the battery outlet
Installation process
Another photo of the process
Faucet installation
Step 3. This is what the finished battery outputs will look like. One of them will be used to connect the heated floor.
Ready output from battery
Step 4. Before further installation of pipes, a damper tape is glued around the perimeter of the room (we have already written about its choice). She sticks to the walls using glue.
Gluing damper tape
Step 5. Multifoil, a special insulation material, is laid on the rough screed. Individual strips of material are fixed to each other using tape.
Laying multifoil
Step 6. A reinforcing mesh with 10x10 cm cells is placed on top of the foil. The individual pieces are overlapped by 1-2 cells. The mesh is connected to each other using wire.
Mesh pieces are connected with wire
Laying reinforcing mesh
Step 7. The pipe leading to the return line is installed and connected.
Pipe connection
Step 8. A water floor pipe with a cross-section of 20 mm is mounted to the other exit from the battery. You can put a piece of protective corrugation on the initial section of the pipe.
Connecting a water heated floor pipe
Step 9. The pipe is laid on the floor and fixed to the reinforcing mesh using plastic clamps. When laying, it is important to ensure that there are no kinks in the pipe. To form the elbows, you can use a hairdryer to heat the pipe. The distance in the circuit between adjacent pipes should be about 20 cm in this case.
Fixing the pipe with a plastic clamp
Heating the pipe with a hairdryer
Step 10. The heated floor pipe is laid in a snake pattern.
The pipe is laid in a snake
Step 11. The ends of the return pipe and heated floor are directed into metal pipes leading to the basement. Voids can be sealed with foam.
The ends of the pipes are directed into metal pipes
The voids are filled with foam
Step 12. The sections of metal mesh that rise above the floor level are fixed to the base of the floor using dowels and metal plates.
Additional mesh fixation
Step 13. Next work will be carried out in the basement. A circulation pump is being installed. It connects to the return pipe. Two taps are also installed in the system. One of them will block natural circulation. The lower valve completely closes the entrance to the return pipe.
Cranes are being installed
Step 14. The control unit is assembled and all pipes are connected. In natural circulation mode, water flows through the heated floor pipe into the return line with both taps open. If you turn off the top tap, water from the heated floor will move through an additional pipe towards the pump - this is a mode for quickly warming up the floor. If the bottom tap is closed when the pump is turned off, the heated floor will be completely turned off.
Assembling the control unit
Build process
Pipes connected
Filling the screed
The final stage of installing a water floor is pouring the screed and laying the floor covering.
Step 1. To make the screed smooth, metal beacons are installed. They are located on pieces of concrete.
Installation of beacons
Step 2. Pieces of concrete are fixed to the base using cement mortar.
Fixing pieces of concrete
Step 3. The beacons are fixed to the concrete using self-tapping screws in pre-made holes. All of them must be strictly level.
Fastening beacons with self-tapping screws
Advice! It is better to start installing the first beacons from the side of the door. This will allow you to more correctly select their height relative to the doorway.
Step 4. Concrete solution is prepared according to exact proportions.
Required proportions
Step 5. Concrete is evenly distributed over the prepared floor.
Distribution of concrete on the floor
Important! At the time of laying the screed, the floor pipes must be filled with water.
Step 6. The concrete solution is leveled along the beacons using the rule.
Leveling concrete using the rule
Step 7. The screed is dried for 28 days. The floor is covered with a finishing coating.
Drying the finished screed
Video - Installation of a water floor
Pros and cons of using water floors
Water heated floor technology in a private home has the following advantages:
- economical consumption of electricity: installing a water heated floor in a private house can significantly reduce heating costs;
- uniform heating of all rooms;
- eliminating the risk of burns;
- the possibility of using such a heating system as the only one in the entire house;
- no electromagnetic field is created;
- the air in the rooms is not dried;
- the ability to regulate the microclimate if each room has its own heating circuit;
- its maintenance is inexpensive;
- any technology can be used to cover the floor: heating the surface will not damage it and will not lead to the release of toxic substances;
- creates a comfortable stay for all residents. Warm floors are especially pleasant for young children, who spend most of their time sitting on its surface.
With water heating it is much easier to remodel.
To be fair, the disadvantages of water heated floors should also be outlined:
- installation is quite complex and is a lengthy process. For example, a concrete screed takes at least a month to dry;
- sometimes leaks occur; to eliminate them, complete dismantling of the coating is necessary;
- there is a risk of a decrease in pressure in the heating system;
- you need to install mixers to regulate the temperature;
- it is impossible to install it on the landings of a country house;
- the price of water heated floors in a private house is much higher than that of an electric system.
Types of pipes used
To install heated floors, pipes made of metal-plastic or plastic are used. Polypropylene is also considered an excellent choice: it is sealed, resistant to deformation, and has high thermal conductivity.
When choosing pipes, their technical characteristics are important. You should pay attention whether they are suitable for heating systems or only suitable for plumbing. The markings on the product will help you navigate these subtleties. The following indicators must be indicated on pipes for heating systems:
- linear expansion: up to 0.025 mm/m;
- thermal conductivity: from 0.43 W/m°C.
To calculate the number of pipes required for a particular heating system, you need to know the diameter of the pipe and the laying pitch. It is better to select pipes with a specialist who will pay attention to both quality and technical nuances.
Connecting the heating circuit
In the place where the pipes of the warm water floor will come out of the concrete screed, they must be protected using special corners or a corrugated tube.
We secure the heated floor pipes using corners
This is what the contours of a warm water floor look like when connected to a water distribution manifold.
Supply of heated floor pipes to the collector
Before connecting the pipe, it is cut perpendicularly and then connected to the collector.
Connection of pipe to collector
A collapsible connecting fitting is put on the end of the pipe.
We put fittings on the end of the pipe
The pipe is fixed to the collector with a union nut. Which is tightened with a wrench.
Trim nut for manifold
Electric heated floor installation
There are several types of heated floor installation in a private home:
- cable;
- heating mats;
- infrared film floors.
In cable heated floors, heating is carried out using a cable in a screed . For this, a single-core cable is used, which is less expensive, but more difficult to install, or a two-core cable. The latter is easier to install, since the connection is only needed on one side, while the single-core one is connected on both sides. Cable flooring is well suited for any room: the cable can be easily laid in various shapes, it is only important to determine the laying step.
Heating mats are heating wires attached to a coarse mesh . This type of electric heated floor is more convenient, since the installation step has already been calculated and the layout and fastenings have been planned. In addition, the cables in such a system are thinner, so they can be laid in tile adhesive rather than in screed. This simplifies installation and does not make the floor too high.
The installation of the mats itself is simple: the roll is rolled out onto the floor surface, then the power is connected.
Infrared film floors create a microclimate in the room by exposing furniture and interior components to infrared radiation . Next, these objects heat the air, so it does not dry out. This flooring consists of a thin film containing conductive carbon strips. Instead, there may be a continuous layer of carbon. The advantage of the system is its instant heating, but the system cools down just as quickly after switching off.
Advantages and disadvantages
The advantages of water heated floors are fully revealed only when using cheap energy sources, such as gas, coal, firewood. Heating the coolant with an electric boiler is approximately 7 times more expensive than using gas equipment.
The gigantic heat capacity of the water heated floor system is another plus. A room containing ≈ 100 kg/m2 of heated concrete cannot cool down quickly (only the top layer of screed is taken into account).
But there are also disadvantages. First of all, this is monstrous inertia. It takes time and energy to warm up such a layer of screed.
Inertia leads to the fact that temperature control of a water heated floor is very conditional. Control equipment takes temperature readings from the coolant, floor surface and air (in some thermostats). But the changes made through the thermostat appear very slowly.
Pros and cons of electric heated floors
Electric heated floors have many advantages:
- reliability and absence of leaks;
- silent operation;
- aesthetic appearance;
- duration of use of the system;
- the entire area is heated evenly;
- the system is easy to operate.
- ease of installation;
- low cost;
- do not raise the floor too high.
The disadvantages of electric heated floors are as follows:
- high energy consumption;
- weak electromagnetic radiation occurs;
- To effectively heat all rooms, electric floors are used in parallel with classic radiators.
Electric heated floors are sometimes turned on only in some rooms, for example, in which the floor is covered with tiles. In this way they increase the comfort of individual rooms.
Infrared film floors
Infrared heated floors are graphite (carbon fiber, carbon fiber) strips connected to each other by copper wire and sealed on both sides in lavsan or polyester film. The advantages of infrared thermal film include low inertia (fast heating and cooling), the ability to adjust the heating temperature, small thickness and weight, and the possibility of quick installation without “dirty-wet” stages with your own hands.
Infrared floors have fairly low energy consumption due to the high thermal conductivity of carbon, which acts as a heating element. This heated floor can be easily repaired by replacing failed strips, without requiring complete dismantling of the entire system.
In terms of safety for human health, infrared heated floors are not as harmless as they are sometimes presented. It generates weak electromagnetic radiation, like any electrical appliance, accumulates static electricity and attracts dust.
How to properly install an infrared heated floor on a concrete base
Main stages:
- Cleaning and leveling rough concrete screed.
- Laying thermal insulation (mineral wool, expanded polystyrene, polystyrene foam).
- Installation of foil heat-reflecting film (for example, Ondutis R Termo).
- Laying out and fixing strips of infrared film with double-sided tape.
- Installation of a temperature sensor and temperature regulator, connecting each strip of infrared thermal film to it, insulating contacts, checking the functionality of the system.
- Installation of a vapor barrier (for example, Ondutis SA115 film).
- Installation of plywood for laying flooring.
Features of installing heated floors in a wooden house
How to make a warm floor in a wooden private house? It is necessary to take into account the characteristics of wood and remember that in general the temperature in a wooden house should not be higher than 30°. Otherwise, the wood will dry out, crack and lose its properties.
To reduce installation costs, you should equip a warm house of any kind during construction. You can use a major overhaul.
The subfloor is insulated. For installation and connection to the heating system, we recommend inviting specialists to avoid mistakes and risks.
If an electric heated floor is installed, the cable must be in an outer metal braid. It will protect the cable from external damage, including from rodents. When connected, the electrical network must have the appropriate parameters. It is necessary to install devices to protect the system from short circuits.
If a water heated floor is installed, it is important to carefully level the base. Heating pipes are laid out in special boxes, which are made of plasterboard, wood or material that absorbs moisture. Then they are covered with boards and a heated floor covering, usually laminate, is laid on top.
Features of system operation
Water-heated floors help create comfort and warmth in the apartment. The system is completely accessible and easy to use, but still has some operational features:
- It is recommended to connect the equipment immediately with the onset of the first cold days, since complete heating of the room can take quite a long time. Setting the required temperature conditions occurs by heating the floor covering. After this, the walls warm up, and later the air in the room.
- Warm floors can be used regardless of the time of year. In summer, on cool and humid days, heating floor tiles is often necessary.
- If wood material or laminate is used as the top layer, then heating of the coolant should be carried out gradually. This will greatly increase the lifespan of the floor covering.
Water heated floors in an apartment are considered a profitable option for heating a room from an economic and practical point of view. If you follow all the rules for laying the system, you can install pipeline heating yourself. The main thing is to choose the right material and accurately calculate the selected pipe layout.
Heated floor design
When designing a heated floor system, it is important to consider the following parameters:
- height of the room. The water heated floor system raises the floor level by 100-120 mm;
- door locations. Due to the raised floor, it is necessary to either maintain the standard doorway height of 2200 m, or consider increasing it. The third way is to make a door to order based on the dimensions obtained;
- window orientation. In some cases, it will be necessary to increase the power of the system: if the windows are oriented north-northwest, on the windy side, and are larger than standard;
- how much beams and floor slabs can withstand the load. You can choose a water-based heated floor on the 2nd floor of a private house to lighten the weight of the structure.
For country houses, water floors are often chosen, which better meet the requirements of a private home.
Insulation of underfloor heating systems
How to make a heated floor in a private house so that the installation is correct and the result pleases with comfort? Using insulation, experts recommend. A heated floor system, both water and electric, transfers part of the heat to the material of the floors themselves. Such heat loss will result in additional costs. Thermal insulation, acting as a heat shield, will help prevent energy loss and save money.
The thermal insulation layer also ensures uniform heating of the room. High-quality thermal insulation must meet the following requirements:
- ensure the formation of upward heat flow;
- reduce or eliminate heat loss down to the ceiling;
- be a stable and durable material that does not collapse over time;
- have a low thermal conductivity coefficient;
- be resistant to the load from pipes filled with water and screeds on top of them;
- restore its original shape after reducing pressure during operation.
When choosing insulation, it is important to correctly determine its thickness. If it is less than necessary, heat will be lost in the downward direction. And the required thickness will allow the insulation to pay for itself within 3 years of using the heated floor if the energy source is natural gas.
When purchasing insulation, focus on the following parameters:
- advice from specialists and sellers;
- reviews on the Internet;
- material cost;
- manufacturer and its reputation.
Types of insulation for heated floors:
- Styrofoam. It is light in weight, has high vapor permeability, but is not very dense, is subject to deformation under load, ages too quickly over time, and also emits toxic gas. It is recommended to install polystyrene foam to increase strength between joists;
- expanded polystyrene. With high strength, able to withstand large mechanical loads. However, there is practically zero vapor permeability;
- cork insulation. It has a high level of compressive strength due to its special structure. The material is quite expensive, so it is usually used in rooms with an insulated base. In this case, the material consumption will be significantly lower, which will not hit the budget as much. However, the material is hygroscopic, so additional hydro- and vapor protection will be required;
- mineral wool. Produced in mats or hard slabs. Since the thermal insulation properties of mineral wool are reduced when it is crushed under weight during installation, it is recommended to combine it with decking structures that are assembled from wooden logs. The disadvantages of this material are low moisture resistance and the presence of penofol in the composition, which is harmful to human health.
The floor surface for laying thermal insulation should be as level as possible.
Conditions for installing water heated floors
If you are building your house yourself, then it will not be difficult to provide for the distribution of heated floors in the rooms. All you have to do is do everything step by step, calculate the height of the door thresholds and the rooms themselves. But it happens that everything is already installed in the purchased house or cottage, but the developer did not provide heated floors. In such a situation, installation becomes very difficult - you are either forced to dismantle the floor covering and screed, or raise the floor level, which is not permissible in all cases.
Warm floor layout
You can come up with a solution to a problem, but it will always be associated with some conventions. Let's try to dig deeper and understand the structure of the floor before giving advice.
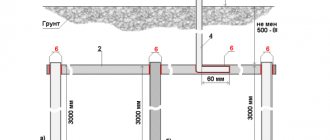
Scheme of the “pie” of a water-heated floor
The picture above clearly shows that the underfloor heating system includes several layers, each of which has its own thickness. The total thickness can reach 10-15 cm - it cannot be greatly reduced, since the heat generated can negatively affect the integrity of the floor covering. Let's talk about each layer in order.
- The base or subfloor is a concrete slab in the form of ready-made reinforced concrete products or poured over formwork or soil. This part of the floor bears the main load and pre-levels the floor in the room. Its thickness is actually not taken into account, since there is nowhere to go lower. Depending on the type of floor, under the base there may be layers of hydro- and vapor barrier, as well as a layer of extruded polystyrene foam as insulation.
Subfloor
- Next, a waterproofing layer is laid on the floor. It must be done on interfloor ceilings to eliminate the possibility of flooding of the lower floors.
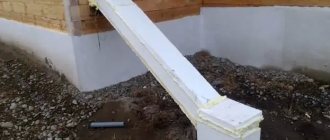
- The third layer is insulation. There are several options here - you can take polystyrene foam boards, which already have grooves for installing heated floors, you can take simple boards, or you can take foil material on a foamed polymer backing. They have many names, but the most famous is penofol. Installing a layer of insulation is mandatory, otherwise most of the heat will be spent on heating the soil and subfloor, which is completely unnecessary.
Foamed foil insulation
Interesting to know! Different insulation materials in a heated floor layer cake can occupy from 1 to 10 cm in the height of the room, depending on the material and type of floor.
- Polymer pipes are installed on top of the insulation, through which the coolant will circulate. There are many mounting systems for them, each of which also has a certain height. The material of the pipes is different - most often they use cross-linked polyethylene or metal-plastic. The second option is better, since the metal layer in the pipe prevents it from expanding much during heating, which helps to increase the service life of the screed, but the first type is easier to install.
Heat distribution plates
Another layer of screed is placed on top of the heated floor - note that a waterproofing film is laid under the mesh
- The next layer is a finishing screed, the thickness of which is recommended to be at least 8.5 cm. This ensures more uniform heating at a moderate speed, which helps preserve the finish of ceramic and other tiles that are glued to the base.
- The last layer is the floor covering. It can occupy, depending on the evenness of the finishing screed, from 8 to 20 mm. This parameter is also affected by the type of finishing material.
Laminate and heated floors in one design
So we get the minimum thickness of the insulated floor at the mentioned average 12 cm. This value can be greater - you need to look at a specific object.
Base for heated floors
If we are talking about a house with concrete floors, then the most affordable and generally accepted option is a water-heated concrete screed. The same method is used for the first (ground) floors of private cottages, if the base of the floor is on a sand cushion, which is located directly on the ground.
In houses with wooden floors, this option is not applicable. Wooden floor beams simply will not withstand the enormous weight of a concrete screed, no matter how thin it is. In this case, a lightweight version of heated floors is used, which will be discussed in a separate section.
Installing a heated floor with your own hands begins with preparing the base. The base for creating a warm floor must be flat, without protrusions and depressions. The maximum permissible difference is 5 mm. If the depth of surface defects reaches 1-2 cm, then you will have to pour and level a thin layer of granite screenings (fine crushed stone) with a grain size of up to 5 mm. You will have to lay a film over the leveling layer and walk on wooden boards when laying the thermal insulation. Otherwise, the leveling layer itself will become a source of unevenness.
How to choose a heated floor for your home
Do you need underfloor heating in all rooms or in some specific rooms? In what cases can you do without it, and when is it simply necessary?
If the flooring is tiles or porcelain stoneware, a warm floor will be simply irreplaceable. The kitchen, toilet, and bathroom need heating more than other rooms. After all, sometimes all the heating in the bathroom is a heated towel rail and hot water pipes. Warm floors will also be an excellent solution for children's rooms: children spend a lot of time playing on the floor.
Where to start choosing the type of heated floor? From determining for what purposes it is needed and in what rooms it will be installed. At the same time, keep in mind that it will not be installed everywhere in the room: in places where furniture and household appliances are located, there is no need for heating. Accordingly, this affects the amount of cable or film required.
Film flooring does not require a cement screed, but fits perfectly under carpet or parquet. The main thing is that the surface for the film floor is perfectly level. In order for the room to be heated effectively, more than 70% of the total area should be allocated to underfloor heating.
Each specific case has its own pros and cons for different types of flooring. There are 12 comparison parameters that will help determine the optimal type of heated floor for your home:
- How difficult is the installation?
- durability;
- reliability;
- suitability for repair of individual elements of the heating system;
- inertia;
- efficiency;
- Is it legal to use?
- does it make noise during operation?
- price;
- compatibility: with finishing coatings, rooms with high humidity, furniture.
You can see a comparison of these parameters in the table below.
Installation of water heated floor
The task is quite difficult, but doable. You just need to level the base first. This is a very important requirement, given that leveling will still be required and it is more effective to do this with the first layer of screed. Why?
For example, the height difference in a room is 3 cm. If you immediately lay the pipe and only then level it with a screed, it will turn out that in one corner the height of the cement mixture will be minimal - 4 cm, and in the other 7. This means that during the operation of heated floors, with They will heat 4 cm of concrete on one side and 7 cm of concrete on the other. Such an uneven load has a very detrimental effect on the entire system as a whole and leads to rapid deterioration of the floor covering.
See also: Warm floor under tiles
Therefore, the first and important step is to level the floors to the horizon level. To prepare concrete floors you will need:
- Beacon profile;
- Laser level;
- Construction square;
- 5-10 kg of gypsum;
- Primer;
- Mobile concrete mixer;
- Cement;
- PGS;
- Polypropylene fiber.
Work progress:
The floors are swept and primed. While the soil dries, beacons are set up. To do this, install a laser level in the middle of the room so that the projection of the horizontal beam is at a height of 15-20 cm from the floor. Then, using a square, measure the height from the floor to the beam in different corners of the room and, based on the results, determine the highest point. In this place, the height of the screed will be the minimum allowable - 4 cm. In other places - according to need.
To install beacons, gypsum is diluted to a thick sour cream state. Then small piles are made from the resulting mass along one wall, in increments of 60-80 cm, and a beacon profile is laid on them. By placing a square on it, level it with the horizon, placing it at the desired height. There should be 50 cm from the wall to the first beacon. Between adjacent beacons the distance varies depending on the length of the rule (guide by 1-1.3 m). Please note that the plaster sets quickly, the work is carried out “without a smoke break”.
After about 30-40 m, you can pour the screed. Cement is diluted with ASG in a ratio of 1:5. Polypropylene fiber is added at the rate of 80 g. per 100 liters of mixture. Fiber is an element of dispersed reinforcement, qualitatively increasing the strength of the coating. In addition, after hardening, the new surface will be perfectly smooth.
Pour the resulting mixture so that each subsequent portion overlaps the previous one by 10-15 cm. The screed is leveled according to the rule, with orientation along the beacons.
After filling the entire surface, time is required for the technical maturation of the cement-sand screed. Calculation is approximately the next 1 cm of thickness – 1 week.