The pergola is an invention with southern roots. Light supports for climbing plants were installed in parks, gardens or near houses. They protected from the scorching sun, maintaining life-giving coolness. Hot summers are no longer uncommon in our climate, so such structures are extremely popular in suburban construction. Read our article about how to make a pergola with your own hands.
General recommendations
The design of a pergola is very similar to a lightweight canopy or gazebo. Its characteristic features are repeating sections connected by horizontal beams. Another type of garden and park galleries, where the ceilings have an arched shape, is called berso. But often they are united by a general concept without specific distinctions.
The pergola can be free-standing or adjacent to the building. Wood, metal or combinations thereof are used for manufacturing. Since the structure is quite light and has low windage, an excessive strength resource is not required. Materials such as brick, concrete or stone are used for large structures with large spans.
Metal arched pergola
If the purpose of construction is to obtain support for climbing plants, it is not necessary to care about the aesthetic qualities of the structure. All design flaws will be smoothed out by a lush carpet of overgrown bindweed or grapes. But, of course, at the initial stage - immediately after planting - the shortcomings will be clearly visible. Therefore, we suggest using the simplest possible product. For people who have good skills in cutting, bending and welding metal, an arched pergola made from a profile pipe is suitable.
The diagram shows a model made from a profiled pipe. The product has an arched shape, and the arches (7 pieces) are evenly distributed along the longitudinal connections of the pergola; the structure has two pairs of support posts.
To create such a product you will need:
- round or square pipe with diameter (minimum size 100 mm), 14 pcs. 2500 mm long. Of these, 1.5 m will be above ground level, about 1 m is required for penetration into the ground;
- similar pipe for arcs. To obtain a radius of 1750 mm, 7 segments of approximately 5.5 m each will be required (a small margin should be allowed, about 10...20 mm, for profile deformation during bending). If you plan to make the outermost fragments of the pergola whole, the length of the segment is calculated as 2.5x2+5.5=10.5 m;
- pipes for longitudinal connections, they can be 15...50% thinner than the base ones. In this scheme, the total length of the product is 3 m, but if desired, this value can be increased to 5...12 m. Naturally, the number of racks in this case also increases - for 5 m to three pairs, for 12 - to 7 pairs.
Arched fragments are obtained using a pipe bender, after which the finished segments are assembled using longitudinal beams. Assembly is performed by welding. Next, the racks are attached and the finished structure is placed on the ground, in pre-prepared recesses for the racks. After the supports have been concreted and the concrete has reached at least 50% strength, you can paint the structure and plant climbing plants (transplant them to the pergola).
Important: to paint the pergola on which the vines of clematis, roses or grapes will rest, it is necessary to use weather-resistant and non-toxic coatings!
Below is an example of a finished arched pergola with solid arched pillars. Please note: longitudinal connections are located not only at the border of the junction of arched and straight sections. They are distributed over the entire surface of the product. This solution increases the strength of the structure and provides additional support for climbing plants.
A pergola similar in layout with longitudinal braces made of strips. Here there are fewer such connections - only three, at the upper and lower points of the arcs. To strengthen the structure, a coarse mesh made of thick wire was used.
Another design with mesh filling the space between the arches and pillars. The mesh cells are arranged diagonally, the entrance and exit from the “tunnel” are complemented by spectacular forged parts. It is interesting that in this case the racks are not concreted, but are attached to concrete buried supports using plates
You can replace the profile pipe with a reinforcing bar, as shown in the photo below. The diameter of the rod (nominal) in this case should be no less than 28...32 mm, and preferably 40 mm. The load on such a structure is limited; it is not worth increasing the size of the structure. Plus, rod racks can simply be driven into soft soil, without concreting, but the end of the rack located in the ground must be protected from corrosion by coating waterproofing.
Pergola in landscape design
An arched canopy, entwined with lush greenery, is a spectacular decoration for a personal plot or summer cottage. In combination with flowering flower beds, stylish gazebos, and openwork swings, it looks very picturesque and attractive.
With the help of a pergola, you can conditionally divide the site into zones, add it to the entrance area, a place of rest, or a gazebo with a barbecue. Under a lattice canopy, the area near the pool or children's playground will become more comfortable and protected.
Garden furniture, textiles, and lighting are used to decorate pergolas. You can arrange a small pond with a waterfall or fountain nearby.
The pergola can be designed in different styles:
- Japanese - laconic form, calm colors;
- eastern - an abundance of details, bright patterns, rich shades of green and red;
- hi-tech - “high technology”, clear geometry, predominance of metal and plastic;
- country - closeness to nature, simplicity, natural materials and colors.
You can support the pergola design concept with the surrounding landscape or, conversely, make it a bright, expressive spot against a calmer background.
Step-by-step instruction
Fixing the upper elements of the pergola
Construction technology involves performing operations in a certain order:
- digging holes for racks;
- concreting supports in the ground;
- tying pillars with crossbars, diagonals, slopes;
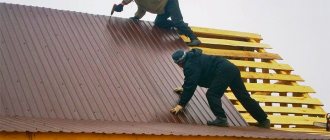
- production of arches, purlins;
- wood impregnation;
- installation and fixation of upper elements;
- finishing.
At the end, ornamental or fruit-bearing plants are planted.
Features of pergolas attached to the house
Structures can be adjacent to the side (terraces) or the end (entrance galleries). In the first case, the roof rests at one end on racks. The opposite ends stand on a purlin that is supported on the wall of a residential building. The load-bearing beam is played in the same style as the arch.
The passages to the door of the house are made in the form of a tunnel with two supporting walls. Sometimes they have a roof covering in the form of corrugated sheeting, polycarbonate, and flowers grow on the sides. The length of the corridor can be different, so that when entering the yard a person does not get caught in the rain.
Creating a metal pergola
Metal pergola
When buried in the ground, steel posts are insulated from moisture with a layer of roofing material. They wrap it around the lower parts so that the insulator protrudes 15–20 cm above the ground. Otherwise, the coating method is used, using molten resin or ready-made bitumen mastics.
Before installation, the iron is treated with a rust preventative, and after final installation it is painted. For assembly, arc or resistance welding is used. Pre-make holes in the metal if you use bolts and nuts.
Blueprints
It is easier to build pergolas from any material if you draw up a design for the structure.
The plan shows:
- arrangement of sections, step;
- width dimensions, height marks (on the section);
- cross-section of all structural elements, dimensions in axes.
The drawing is used to calculate material, hardware, and auxiliary parts. You can easily make changes to the sketch if necessary.
Choosing a pergola option
There are many types, shapes and designs of arched canopies, so when choosing you need to consider:
- size and shape;
- location on the site;
- features of materials for manufacturing;
- possibility to equip with an awning;
- will it serve as a support for plants or be used as a light canopy;
- preferred style and design.
Dimensions and shape
The structure can be very compact, designed to create shade over a bench or swing. In this case, it is made in the form of a lightweight lattice structure and mounted on supports made of timber or metal profile pipes.
On large areas, pergolas of impressive size are installed, with powerful pillars and floor beams. Brick, stone and concrete can be used for construction as materials with a high margin of safety. The shape of a pergola is usually simple - square or rectangular. This is dictated by the features of the almost transparent structure, consisting of pillars and crossbars. The ceiling can be flat, pitched or arched.
The best place
The location of the pergola must correspond to the task assigned to it. It can serve as a shelter for a recreation area, be used for zoning, or simply decorate the area as a decorative object. In any case, it is advisable to install a canopy:
- on a flat or slightly elevated place with a beautiful view;
- away from highways;
- away from cesspools, toilets, compost heaps and other sources of unpleasant odors.
If the arched structure will be added to the house, you need to pay attention to drainage from the roof during rain or melting snow. For a pergola for grapes, keep in mind that this vine loves the sun, and there should not be tall trees nearby.
Plant support
Pergolas or herbaceous plants are often planted around pergolas:
- grape;
- lemongrass;
- actinidia;
- clematis;
- honeysuckle;
- roses;
- ivy.
In temperate climates, for the winter, some plants are removed from their supports and placed on the ground nearby under cover. In the southern regions, plantings remain to winter in the open air.
A pergola can be used as a light canopy even without plants. It creates openwork partial shade, and for protection from bad weather it is equipped with a folding awning.
About the pergola
A pergola is a garden structure designed for climbing plants. It can simultaneously serve as a canopy and sun protection for a terrace or transition between buildings or parts of the garden. With its help, you can perform zoning of the site, creating a special atmosphere. In view of the universal purpose of the design we are considering, we should think about what its main purpose will be.
Here are the possible options:
- To decorate the garden and change the look of the landscape.
- As a support for climbing plants (grapes, hops, ivy, climbing roses).
- It will protect from the sun, creating shade over the terrace or over the parking lot.
- For relax. In this case, the pergola can be combined with a bench or gazebo.
- If it is necessary to hide some area of the garden from prying eyes, then zoning is performed.
Pergola canopy near the house made of grapes - dense shade even at midday
Pergola materials
Since the structure is operated outdoors, all materials must be resistant to humidity, temperature fluctuations and solar radiation. The choice of components depends on the design and size of the structure, floor loads, and architectural design.
Tree
This is the most common material for making lightweight arched canopies. It is easy to process, inexpensive, and you can assemble a pergola from it with your own hands very quickly.
For construction use:
- timber for supports with a cross section from 50x50 mm to 150x150 mm;
- board 25-50 mm thick;
- thin slats for gratings;
- galvanized fasteners.
Brick, blocks, and monolithic reinforced concrete can be used as a foundation. All wood must be treated to prevent rotting. Decorative and protective finishing is carried out using wood paints and varnishes for exterior use.
Thermowood
A type of natural material is thermowood. It is produced by holding for 48-60 hours at temperatures up to 180-210° and slight excess pressure. As a result of thermal modification, excess moisture evaporates, resin (tar) is melted, and the wood becomes compacted, acquires geometric stability, and resistance to biological and atmospheric influences.
Pergolas made of thermowood are extremely durable, their service life increases significantly. This material does not require regular treatment to prevent rotting, retains its decorative effect for many years, but is somewhat more expensive than ordinary wood.
Metal
The steel frame is strong and durable. Profile pipes are the easiest to use. They can be welded together or bolted together.
The section of the racks is selected based on the size of the pergola and the expected loads. The structure itself is light, its own weight is small, and by definition it does not experience snow loads. But climbing plants require a margin of safety, since the mass of greenery can reach several tens of kg per square meter, and the windage capacity of a structure entwined with greenery increases significantly. If the support fails, the pillars may become skewed, deformed, and even cause the pergola to collapse.
The recommended minimum cross-section of pipes for racks is 30x30 cm. The ceiling can be made of either metal or wood. To protect against corrosion, steel is periodically painted.
DIY wooden pergola
Working with metal is not accessible to everyone, so pergolas are often made of wood. Below is a drawing of the basic structure, by modifying which you can obtain various construction options.
Since it is more difficult to ensure strong connections between vertical and horizontal structural elements for a wooden building than for a metal one, a classic pergola usually has struts - corner elements that strengthen and tighten the posts with beams.
Please note: wooden pergolas almost always have straight elements; arched models are used relatively rarely.
Materials
The cross-section and type of lumber used for wooden pergolas are selected taking into account the capabilities of the craftsman and the size of the structure. So, for small buildings (2...3 m in height and no more than 5 m in length), a 100x100 mm beam for racks and the same beam or 20x100 mm board for beams and sheathing are sufficient. If you plan to build a large pergola-gazebo and landscape it with a significant mass of plants, it is necessary to increase the cross-section of the posts to 150x150 mm or 200x200 mm (you can use a round log of the same diameter). In this case, it is better to make beams from magpie boards with a width of 100...200 mm; battens can be made from 20x100 mm boards.
The optimal material is considered to be planed timber and chamber-drying boards. It is possible to use laminated veneer lumber; it is better not to use material with natural moisture - there is a high risk of its deformation and cracking during gradual drying.
It is necessary to impregnate the wood with an antiseptic and coat it with a protective agent that prevents the growth of mold, rot, and damage by pests. If possible, it is worth purchasing lumber that has already undergone antiseptic treatment in an industrial environment.
This structure is assembled using so-called carpentry joints - that is, grooves and protrusions on wooden parts.
They can be done using a regular hand saw or jigsaw; the corners of the grooves are refined with a chisel/cutter. In addition to carpentry joints, connections using self-tapping screws are also used.
In the proposed model of a wooden pergola for climbing plants there are relatively few parts, and they can be easily cut out using a template or with manual markings.
Design with arched elements. They perform a decorative role and do not bear the load from the weight of climbing plants.
- stand (support column) – 6 pcs., 3 600x100x100 mm;
- beams – 6 pcs., 2 400x90x40 mm;
- sheathing board – 16 pcs., 2 400x90x40 mm;
- struts – 14 pcs, 800x90x40 mm.
Please note: the assembly diagram shows only two pairs of racks! Using a larger number of elements, you can assemble a pergola not from two, but from three to five spans.
For the convenience of purchasing lumber for beams, sheathing and struts, a 90x40 mm board was used.
Step-by-step instruction
Operating procedure:
- marking the area using a cord and pegs. Example shown for four racks;
- preparation of lumber - cutting to the required dimensions, shaping the ends of beams and sheathing by sawing according to a template. At the upper ends of the racks, grooves are made for attaching beams; the lower ends to the depth of concreting are treated with coating waterproofing in two or three layers. The struts are adjusted to the location; there is no need to cut the ends at an angle in advance!
- installation and concreting of supports. The depth of the well should ideally be greater than the depth of soil freezing. You can find out the freezing depth for your region
. The diameter of the well should be approximately 2.5...3 times the maximum cross-section of the rack. If concreting is not possible, it is necessary to at least compact the backfill tightly, replacing all or part of the soil with crushed stone and sand. In any case, a gravel (crushed stone) cushion is placed at the bottom of the well. Before concreting (ramming), the pillars are leveled, strictly vertical; - After the concrete has gained strength (at least 50%), the pillars are connected to the beams, and the slopes are immediately installed. The connection is reinforced with self-tapping screws (confirmations);
- sheathing boards are mounted on the beams in pre-selected quarters. The diagram below shows the installation principle (beams are shown in section);
- The last stage - decorating the lower above-ground part of the racks with a decorative frame - can be skipped if desired. For framing, a twenty board is used, pre-sawn into the required fragments, fastened with self-tapping screws.
Please note: it is advisable to “recess” the heads of the screws into the wood and coat them with anti-corrosion protection or use stainless (galvanized) screws. Otherwise, constant moisture from plants will lead to rusting of fasteners and the spreading of unsightly rust stains across the surface of the wood.
Before screwing in the self-tapping screws, it is necessary to drill holes for them in the wood; the diameter of the drill is selected 1/3...1/2 less than the nominal diameter of the self-tapping screw. This will prevent the wood from cracking.
Based on this basic drawing, you can make a wooden pergola of any of the modifications presented below.
With lathing on the side. Due to the fact that the racks are connected by a lattice structure, struts are only needed from the outside
A simplified pergola-arch with lattice filling of the space between the posts and struts facing inward of the arch
Square layout. A square profile pipe lined with wood was used as racks, fastened to the base using metal plates
Design with arched elements. They perform a decorative role and do not bear the load from the weight of climbing plants.
Pergola foundation
In order for a structure to serve for a long time, the foundation must be strong and resistant to rotting. These conditions correspond to monolithic concrete columns, which are poured into wells drilled in the ground. Gravel and sand are added to the bottom for drainage. This option is well suited for metal racks. When concreting, they are immersed in the holes, and after the concrete has hardened, the pillars are ready.
On loose or wet soils, you can use cuttings of asbestos pipes or line the walls of the well with roofing material, etc. These materials will play the role of formwork and waterproofing when pouring the monolith. Foundation columns can be made of brick, blocks or rubble stone. The metal stand is placed inside and secured.
If the posts are wooden, the base should not be in contact with the ground. To prevent timber buried in the soil from rotting after 2-3 years, you can do the following:
- burn the lower part on fire;
- saturate the base of the tree with hot bitumen mastic;
- secure the posts above the ground to the finished concrete foundation.
The immersion depth of the pergola posts is calculated based on the amount of pinching, which ensures the perception of lateral load. It must be at least 1/4 of the height of the column. It is considered optimal to deepen the foundation by 0.7-1.2 m.
Materials for production
There are special requirements for the material, since the gallery is used in an open space, where it is exposed to weather factors all year round.
Materials used for manufacturing:
- natural wood;
- metal;
- brick, natural stone;
- combined options.
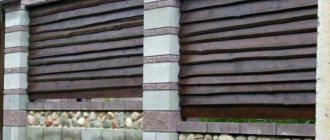
Wooden pergolas
Wooden pergola
Wood looks natural in the yard landscape and does not stand out against the background of vegetation. Such pergolas are built on areas with wooden houses, but the material also goes well with stone walls and vertical brick structures.
The wood has good strength and effectively resists not only compression, but also bending forces. The reliability and service life of a wooden pergola are increased by pre-treatment with special chemicals.
Metal pergolas
Steel is a good material for making arched roofs and support grids. Structural elements are connected by welding or bolted together. Steel bends well on bending equipment, so arches of different configurations are made from reinforcement.
Iron is destroyed by moisture and rain, which is why the parts need to be maintained regularly. Metal pergolas are painted with oil, pentaphthalic, and latex compounds to maintain their attractiveness and extend their service life.
Stone and brick
Brick arch
Such a structure cannot be purchased in a store, so they are built on the site with their own hands. Before making a pergola from small stones, a drawing is made. Additionally, you need to calculate the load and make a foundation for the supporting walls.
Brick arches are made using a special technology, which requires templates made from metal or wood, then removed after the masonry has set. Brick and natural stone look solid, work for a long period of time, and are durable.
Combination of materials
There are many combinations of classic materials from which a DIY pergola can be made.
Combination options:
- wood with metal;
- brick with iron, forging;
- stone with wood;
- stone with metal.
Forged elements are not visible in the summer, when there is a lot of greenery, but they play a decorative role in the winter when structural details are exposed.
How to make a pergola with your own hands: instructions for a summer resident
You can quickly make a light garden pergola for your favorite climbing flowers yourself. Required:
- block 50x50 mm;
- slats 40x20 and 40x10 mm;
- galvanized perforated corner for fastenings;
- galvanized wood screws.
We assemble a frame for the future pergola from a block and slats in three parts. They are like stairs. We fasten the parts using self-tapping screws and corners.
All parts are treated with impregnation. You can use wood tinting with moisture-resistant compounds. We fix the structures in the form of the letter P.
We install it vertically on the finished platform. We fasten with anchors. We decorate a wooden pergola with hanging baskets or flower pots.
In this way you can decorate paths to the garden, entrance area or porch.
What is a pergola
Arched pergola
The building consists of arched elements that are fastened together by longitudinal girders. It is attached to the house, made as a separate structure in the yard, and included as part of the terrace.
Distinctive features of the structure:
- repeating units;
- the presence of arched vaults and support pillars;
- the presence of an overlap in the form of a lattice.
An arched alley leads from the gate to the house or from the home to the garden area. Climbing roses and grapes on trellises decorate a secluded area for relaxation, add a bench and a swing.
Origin and purpose of the pergola
A pergola in the garden decorates a place of relaxation and decorates the landscape
Previously, this was the name for all the canopies placed on poles where plants climbed. The modern idea of the structure was obtained in France in the 17th-18th centuries, when the construction of walking alleys between park pavilions was popularized. In Russia, “curve roads” were built; in their design, instead of creeping plants, the crowns of bushes and trees growing nearby were tied to the side walls.
A pergola in the garden divides the area into areas, decorates a place of relaxation, and beautifies the landscape. The structure camouflages barns, warehouses, and decorates the entrance area to the courtyard.
If there is a terrace next to your home, then a one-sided arched ceiling with lattice walls will perfectly complement the area and create coolness in the heat. The building has visible side surfaces, in sections of which there are green spaces.
To design the courtyard entrance, use the option of a free-standing tunnel with opposite side trellises and an upper ceiling. There may be plants on the roof, but sometimes they are placed only on the sides to open the original design of the vault and give way to the sun's rays.
Pergola trellis
Using this simple design, you can zone the area, fence off not very attractive places and create a small vertical flower garden. To work you will need:
- timber 50x50 cm;
- board 25x15 cm;
- self-tapping screws
Instead of timber for racks, you can use a profile pipe.
We spread the boards into 50 mm wide slats.
We cover the entire tree with an antiseptic. For decorative purposes and greater resistance to rotting, lumber can be burned with a blowtorch.
If the slats are going to be painted, it is better to do this in 2 stages - before installation and after. This way we will ensure that water entering the gaps does not cause rapid rotting of the wood.
We assemble a frame of the desired size from a block. Now you need to calculate the distances between the slats of the oblique lattice and mark them with a pencil on the frame.
We first lay the slats in one direction and fasten them to the frame with self-tapping screws. You can nail it, but then the strength of the joints is much worse. There is a risk that when humidity fluctuates, the wood will dry out and the fasteners will become loose.
Now we attach the slats in the other direction. You can install them vertically or at an angle, the main thing is to maintain the angle and equal distances between the elements.
Features of pergolas attached to the house
Pergolas adjacent to the house are open summer terraces. One part of the beams rests on holders installed on the wall of the house, the second - on beams lying on support pillars. There are several ways to attach them to the wall. You can see the first one in the photo below: a support beam is nailed to the wall, and landing sockets are cut out. Additionally, the strength of the connection is ensured by the corners, which are secured on both sides.
One side of the beams rests on the pillars, the other on the wall of the building
The second method is to install special stops on the wall: steel plates of the appropriate shape.
Attaching beams to the wall
The main construction steps are similar, but have some nuances:
- Mark the locations of the posts and install them. The pillars are installed at a certain distance from the house, equal to the width (depth) of the pergola terrace. The second part of the marking is made on the wall of the house - the second ends of the auxiliary beams are installed there. Either the support beam or plates are fixed there.
- Attach two boards or support beams on top to the exposed posts.
- Place auxiliary beams on them, one side of which is attached to a support on the wall.
All. What you should get as a result is presented in the picture below.
Schematic representation of an attached pergola from above
You can see the sequence of actions during the construction of a pergola adjacent to the wall in the following video
Verandas are built using the same type, but with a roof. How - read here.
Pergola swing
This option is more difficult to manufacture, and more materials will be required. The frame must be strong to support the weight of the swing. It needs to be well strengthened, since it will have to withstand not only static, but also dynamic loads.
To make a pergola with a swing you will need:
- timber 100x100 mm;
- board 50x150 for load-bearing beams;
- slats for gratings 20x40 mm;
- bolts and screws for wood;
- waterproofing mastic;
- waterproof paint;
- concrete for the foundation.
The work is carried out in several stages:
- We dig or drill holes 70-80 cm deep.
- Add crushed stone to the bottom and compact it.
- We treat the wooden post at the base with liquid mastic and wait for it to dry.
- We level the stand into the well, fix it and pour concrete.
- We cut nests in the floor beams for cross boards.
- We lift the beams and fasten them to the posts with bolts.
- We strengthen the upper belt with braces. To do this, we cut the boards at 45° and fasten one end to the pillars and the other to the floor beams.
- We assemble the grilles from slats and install them in the side openings.
You can make a swing yourself or buy ready-made ones. For fastening, we screw a special hanger for the swing to the supporting beams, not to the cross boards, as they may not hold up. We pass the chains through the fasteners and hang the swing. We put soft pillows on the seat - and a comfortable pergola with a swing is ready. This design is a great place to relax for all those who like to swing. You can install it near a gazebo, swimming pool, barbecue area and enjoy the results of your labor in the lap of nature.
Where to install a pergola
The pergola arch is positioned taking into account the wind rose to ensure the most comfortable stay for a person inside. In Russia, the entrance to the yard is connected to an arched structure for growing grapes, so the pergola starts right from the gate.
A common arrangement of arched vaults is in the form of a gazebo-pergola, where the roof is covered with greenery, and inside there is a table with benches for breakfast, lunch, and dinner in the fresh air. Such a structure is being built not far from the house.
Selecting a location
What part of the territory to allocate for development depends on the size, shape and functions of the future structure. The best option would be to place it:
- by a pond, pool or fountain
- in the barbecue area to create shade;
- as an addition to the gazebo, terrace;
- in the middle of the garden or near trees.
The standard dimensions for manual construction are considered to be a length of 2.5 m and a width of 1.5 m. Of course, this figure may vary based on the needs of the owners.
But, before you start making a pergola, you need to remember that the structure should be placed so that the entrance group of elements runs from north to south. This trick will reduce the intensity of sunlight, leaving it at a sufficient level for normal plant growth and a comfortable stay inside.
Benefits of a pergola
A pergola is inferior to a traditional gazebo in terms of strength and reliability. However, the semi-open design is not without advantages:
- Reducing the consumption of building materials to a minimum;
- Quick assembly, which is largely due to the lack of a foundation for the structure;
- Suitable for dismantling, modernization and decoration with climbing plants;
- Ability to serve its intended purpose anywhere depending on the type of design.
And yet, before organizing a pergola, you need to understand that insects, wind and rain leak through its holes. Whether it is worth upgrading the project in the future to improve the level of comfort is something everyone decides for themselves.
Selection and methods of protecting wood
To get the right pergola, you need to choose high quality material and not make a mistake with the amount of material.
Wood is considered the most suitable option for these purposes, since plants grow much faster.
However, owners of summer cottages use combined solutions to extend the life of the building. For example, metal pipes serve as supports, and part of the pergola for landscaping is made of wood.
Users often search for:
- Pergola for grapes
- Wrought iron pergolas
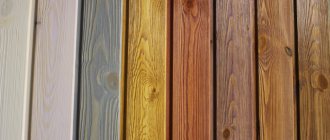
Photo: popular types of wood used in the construction of pergolas
Suitable main raw materials:
- oak,
- larch,
- pine or spruce,
- maple.
It is not recommended to use any type of fruit tree.
Instead of support pillars, timber or round logs are suitable. For the upper part of the arch, you can stock up on willow and pine boards.
Remember! The harder the wood species, the longer the service life of the structure.
In addition, raw materials must be treated with antiseptics to protect them from moisture, sudden temperature changes, insects, and fire retardants for fire safety purposes.
To give an original appearance, tree trunks can be stripped of bark, stained, varnished or painted.