Sooner or later, the time comes to make changes to the interior; perhaps there is a need to replace the doors if they are absolutely not suitable for the chosen new style. And then the question arises of how to install an interior door yourself in order to save a round sum on calling a specialist. Carrying out this event is quite accessible to anyone who knows how to work with construction tools, has carpentry skills and knows step-by-step instructions for carrying out the work.
How to install an interior door yourself
No residential building can do without interior doors. If the wooden frame in which the old door is installed is in good condition, then only the door leaf and facing panels (platbands) can be replaced. This process is much easier to complete than completely replacing the door frame along with the leaf. However, such a large-scale alteration, with the replacement of the box, is quite doable.
Tools for work
To carry out any carpentry work, you must have the following tools on hand:
- Planer for leveling end surfaces. You may need a manual one, for small, delicate work, or an electric one, if the fit is extensive enough.
- Carpenter's square - the longer, the more accurate the markings will be.
- Construction level, plumb.
- Screwdriver with a set of attachments (bits).
- An extended screwdriver - you may need both a straight blade and a curved one, so it’s better to have a set.
- One type of saw can be a hand saw or an electric circular saw.
- Tape measure, pencil.
- A miter box for correct cutting of corners when fitting wooden parts.
Miter box with hacksaw - necessary for precise fitting of wooden parts
- Construction knife.
- Hammer.
- Chisel, chisel for removing layers of wood when making grooves for hinges and locks.
A chisel or chisel will be needed to cut out grooves for hinges and locks
- Hole saw for cutting large diameter round holes.
“Crowns” or hole saws - for cutting straight, large diameter holes
- Electric drill.
In addition to tools, you will need auxiliary materials and consumables:
- Wooden wedges for door frame spacers.
- Stain and varnish, primer and paint.
- Self-tapping screws, dowels and anchor fasteners.
- Polyurethane foam.
Door drawing
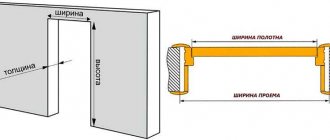
It is recommended that before starting work, draw up a drawing on which you must accurately indicate all the dimensions taken from the opening, the door frame and the door leaf. This scheme will help you quickly complete work without being distracted by measuring each part during the installation process.
Scheme-drawing of a door with its elements. It is advisable to immediately indicate all dimensions on the drawing
Expert opinion: Masalsky A.V.
Editor of the “construction” category on the Stroyday.ru portal. Specialist in engineering systems and drainage.
To obtain an accurate picture, it is necessary to measure the height and width of the installed old door, and the thickness of interior doors is usually standard and is 40 mm. Modern doors are sometimes slightly different from older models, and in this case it will be necessary to adjust the door leaf or change the entire door block.
Whatever decision is made - to replace the entire block or just the door leaf, you still need to start by removing the old door from its hinges.
Replacement of door leaf only
Removing the door leaf
Hinges installed on an interior door can have different designs, which means the door can be removed in different ways. However, all methods are not difficult.
As you know, door hinges consist of two parts, one of which is attached to the door, and the second to the door jamb. In some models, the axial rod is permanently fixed inside the element, which is mounted on the vertical post of the jamb, and in another part, installed on the door leaf, there is a hole where the rod should go. When removing a door hung on such hinges, you need to install a pry bar under its lower edge and apply a little force to lift the door. It is best if there is a second worker who will support the door in an upright position and then help remove it completely.
Knocking out the axle rod from the loop
Another type of canopy in which the axle rod is inserted from the top and passes through both parts of the hinge. In order to dismantle a door hung on such hinges, it is enough to pull out the rods installed in them, which have a kind of mushroom-shaped cap on top. Place a reliable wide screwdriver under it, and, tapping its handle, pull the pin out of the loop. You need to start the process from the bottom hinge to avoid the door tipping over, which with its weight can easily tear out part of the hinge installed on the jamb, damaging its surface. This is especially undesirable if the door frame is in good condition and will be used for a new door.
After dismantling the door from the opening, it is necessary to remove the hinges, handles, and locks.
Fitting a new door
If only the door leaf is replaced, the new door will have to be adjusted to fit the existing opening, based on the dimensions of the old one. You need to take the exact dimensions from it and transfer them to a new canvas.
It is very important to accurately fit the new canvas to the old opening.
You can do it differently - the new door is laid on a flat surface, and the old dismantled door is placed on top of it. The canvases are aligned along the top and along the vertical edge of the door on the side where the handle will be installed. If the new canvas is larger in size than the old one, it will need to be adjusted. Using a pencil, lines are drawn on it, along which an excess fragment is sawed off from the new canvas.
To make adjustments, you can use an old canvas as a sample.
It must be remembered that for an interior door there is a gap of 5 mm between the leaf and the jamb on all sides, and at the bottom you can leave a slightly larger distance - 10 ÷ 12 mm.
Next, the excess part is cut off from the new canvas. The cut must be perfectly even and smooth, and this can only be done with a sharp and precise tool, which can be a hand-held circular saw. The cut is made using a special ruler, which is designed for use with just such a cutting tool.
Cutting a new canvas along the intended lines using a metal guide
The saw is set to the required cutting height (usually with a cut of 45 mm) and the door is sawed off exactly according to the markings. If there is no special guide ruler, then you can carefully cut it with a circular saw without it, leaving an allowance of approximately 1 ÷ 2 mm - this will be necessary in order to then fine-tune the blade with an electric planer.
Installing hinges
When the new door is adjusted to size, you need to mark the places where the hinges will be attached. To carry out this process accurately, you need to put the old door on the new leaf and very accurately align them with each other. At the end of the new door, mark the areas where the hinges will be installed, focusing on the old door leaf.
Relocating the location of door hinges
In this case, marking the location of the loops is first done with a pencil, and then with a construction knife. The lines from the knife are clear, and you can easily make a selection along them when cutting out the recesses necessary for installing the hinges.
Making recesses for metal plates of door hinges
Next, the door leaf is placed on its end, so that the side on which the hinges will be inserted is on top. Using a chisel (chisel), mark the depth of the future groove. The tool is placed on the lines marked with a knife, and it is hit from above with a hammer, observing the depth to which the cutting edge goes into the wood - it should go deeper by 2 ÷ 4 mm, depending on the thickness of the metal of the hinges (this can be measured in advance with a ruler or caliper) .
It is recommended to split the area designated for sampling into several fragments for ease of wood extraction. Next, the chisel is installed at a slight angle to the end of the door, with the beveled part down. and, hitting it with a hammer, the extra layer of wood is knocked out, forming the necessary recess.
Fixing hinges with self-tapping screws
The next step is to install hinges in the prepared recesses. They must be installed so that the plane of the metal plate is flush with the surface of the door end. If the metal of the hinge rises above the surface, then the recess needs to be deepened a little. If by chance the recess turns out to be somewhat larger than necessary, then a piece of thick cardboard can be placed under the loop.
When it is achieved that the loop fits into the recess intended for it, like a “glove”, sockets are drilled directly through its holes with a thin drill, into which it will be convenient to screw self-tapping screws. Next, the hinges are tightly screwed to the door, and then the canvas is fitted into the door frame opening. This fitting will show the presence of gaps and their size, as well as how accurately, without distortions, the canvas fits into the doorway.
If you have a hand router at your disposal, you can very carefully select the grooves for the hinges (and even for the lock) using it.
Video: inserting hinges onto a door leaf using a router
Installing a Lock or Door Latch
- When the hinges fit well, you can move on to making holes for installing the lock and handle.
- The location of the castle is also marked by the old door. It is very important to measure the exact distance from the edge of the door to drill the hole. If it is not done accurately, and because of this it has to be moved, then the appearance of the door may be hopelessly spoiled.
- If a new lock is installed, its kit often includes a special stencil through which the size and exact relative position of all holes are transferred, but for control it is still necessary to take measurements.
- If an old lock is used for a new door, then all parameters can be taken from the old door.
- On the end side of the door, where the latch will come out, a hole is drilled using a chisel drill (“feather”), and on the main plane of the door this is usually done with a hole saw of the appropriate diameter.
Cutting grooves and holes for installing a door lock
- After drilling the holes, the door leaf, if necessary, is decorated in the chosen method - this can be painting or staining followed by varnishing.
- When the paint (varnish) has dried and the place for installing the lock elements is ready, first the internal mechanism with the latch is installed and screwed, and then the handles are mounted and secured.
Video: example of inserting a lock into an interior door
Installing the door in its original place
To make it easier to install the new door in place, you need to lift it from the floor to the required height and install a board (or several boards) of the appropriate thickness under it.
Hanging a new door on its hinges. It’s more convenient if you have an assistant
- Then, the loops must be carefully aligned with each other and the lubricated rods must be carefully inserted into them, first into the upper loop, then into the lower one. The rods can, if necessary, be lightly tapped from above with a hammer
- If a different type of hinge is used, the door will be hung slightly differently. It is best to do this together, since at the same time you need to get the rods of that part of the hinges that are installed on the frame into the holes located on the “reciprocal” halves screwed to the door leaf.
Find out how to make sliding doors on rollers with your own hands with step-by-step instructions from our new article.
Complete door replacement - including door frame
If during a major renovation of an apartment it turns out that it is necessary to replace not only the door, but also the door frame, then you need to start dismantling the old door set. This task can be even less difficult than replacing only the door leaf, since the purchased new door usually already fits perfectly into its frame.
How to install a door from scratch?
There are certain standards according to which interior doors, single or double leaf, are produced. True, no one has canceled the possibility of individually ordering doors for openings of a different size or shape.
| Standards for door leaf sizes and door opening sizes. | |||||||
| Door leaf size in mm. | Door opening size in mm. | ||||||
| Width | Height I | Height II | Height III | Width | Height I | Height II | Height III |
| 550 | 2000 | 2100 | 2200 | from 630 to 650 | from 2060 to 2090 | from 2160 to 2190 | from 2260 to 2290 |
| 600 | from 680 to 700 | ||||||
| 700 | from 780 to 800 | ||||||
| 800 | from 880 to 900 | ||||||
| 900 | from 980 to 1000 | ||||||
| 1200 (600+600) | from 1280 to 1300 | ||||||
| 1400 (600+800) | from 1480 to 1500 | ||||||
| 1500 (600+900) | from 1580 to 1600 | ||||||
Removing the old door and frame
Dismantling the old kit is carried out as follows:
The sequence of dismantling an interior door
- As in the first case, the door leaf is removed from the hinges.
- Next, the platbands are removed as carefully as possible.
- The last thing to dismantle is the box. To make it easier to remove the frame bars, a through cut is made approximately in the middle of one of the sides. In this case, the box structure loses tension, loses its specified dimensions, becomes deformed, and can be easily dismantled in parts.
- Provided that the box needs to be preserved in its entirety, using a chisel and a hammer, the installed wedges are knocked out of the gaps between the wall and the jamb. At the same time, the thrust stress is also weakened. If the jamb bars are secured to the wall with nails (anchors, etc.), then you should try to carefully pull them out, and if that doesn’t work, saw them with a hacksaw blade or in another way, thereby freeing the frame.
- The box is carefully loosened using a pry bar and removed from the opening.
- After dismantling the box, the opening must be cleaned of old mounting foam, if present, of dust and dirt accumulated during the operation of the door.
Manufacturing and installation of the box
When starting to assemble the box, you first need to install hinges on one of its sides; this process is carried out simultaneously with installing them on the door leaf. The hinges are attached in the same way as in the first case, which was described above. After this, they begin assembling the door frame.
Approximate installation diagram for a new door kit
The joints of the frame elements can have different connections - straight with one beam overlaying another, or butted at an angle of 45 degrees.
Door frame parts adjusted to 45 degree angles
The box is assembled according to the measurements taken, which can, for example, be taken from an old kit. Using a square to control the straightness of the corners, the elements of the box are set, marks are made if corners of 45 degrees will be cut. Then, using a miter box, the corners are sawed off, after which the box is laid out on the floor and knocked down with nails or fastened with self-tapping screws.
Arrangement of box parts “overlay”, at right angles
Prices for popular models of screwdrivers
Screwdrivers
If the elements of the box are connected to the lining at a right angle, then they can also be knocked down with nails or twisted with self-tapping screws.
In both the first and second cases, the connection must be made very carefully, since the nails may inadvertently come out in a completely undesirable place.
When the box is assembled, the hinges are screwed to it and to the door, and the lock is installed, you can go in two ways. So, you can put the door on its hinges right away, and then install it together with the frame in the doorway. Another option is to install the frame first and then hang the door.
Video: Door installation step by step, with all the details
- If the first option is chosen, then the door must be locked with a key so that it does not open. Then, carefully, without distortions, install the entire set into the opening, align it using a level both vertically in the longitudinal and transverse planes, and horizontally, carefully driving wooden wedges into the gaps between the wall and the frame for fixation.
Fixing the box in the desired position using wedges
Then, you need to fix the box to the wall using anchors, drilling through holes for them in several places, two on each side.
The holes are drilled countersunk so that the screw heads are recessed into the wood of the box. Then they can be disguised with special decorative covers, matching them to the color of the wood, or covered with a composition made from wood glue and sawdust.
The remaining cracks can be filled with polyurethane foam.
The resulting gaps must be filled with polyurethane foam, wait until the polyurethane foam expands and completely dries, after which the excess composition that protrudes from the gaps must be carefully cut off.
- In the second case, only a new box is fixed into the opening, it is also leveled, fastened with wedges and anchor elements, but at the same time it must be wedged with a wooden beam in the center - so that the vertical posts do not bend in an arc in one direction or another.
Then, the gaps are also filled with polyurethane foam and left until the composition has completely hardened. After this, the door is installed on the hinges on the frame.
Now all that remains is to carry out the final step - install the platbands.
All that remains is to carefully adjust and install the trims
The connection of the platbands at the corners of the door can also be of two types - end-to-end (used very rarely) or at an angle of 45 degrees. The correct angle on the facing panels is also cut out using a miter box, and they are precisely adjusted to each other.
Video: Several useful recommendations for installing interior doors
Prices for interior doors
Interior doors
It should be noted that you can save yourself from unnecessary problems with fitting the frame and the door to it by ordering the entire kit assembled, that is, with the hinges and lock already installed, as well as the leaf fixed in the door jamb. Before making a purchase, you need to take exact measurements from the old set, and using them you can make an individual order or purchase a ready-made model. The kit usually includes platbands of the required height and with correctly fitted connections.
Door trim
Find out an easy way to make compartment doors with your own hands from our new article.
You need to know that it is quite difficult to independently adjust all the elements of a door without proper experience, and a mistake made in this matter is sometimes very difficult to correct.
Door frame assembly.
To accurately assemble the door frame, we will assemble it directly along the door leaf. To do this, you need to assemble the elements of the box on the floor with the door leaf.
There will be 3 such elements in total. Two vertical strips and one horizontal top. Modern interior doors do not have a lower bar.
We assemble the door frame along with the leaf.
We lay the door leaf on the frame parts.
Before assembly, you need to decide on which side of the door the hinges will be installed, as well as which side of the door leaf will be the front and which the back. The design of some doors may contain glass inserts that are glossy on one side and matte on the other. Therefore, it is important to decide which side of the door will be glossy and which will be matte.
Between the door frame and its leaf you need to set gaps of 3mm and 4mm. MDF plates that come with the door leaf are suitable for this. These plates are 3mm thick and are mainly nailed with metal brackets on the top and bottom of the door leaf. These plates are installed at the factory to protect the ends of the door.
MDF plate 3mm thick.
On the side of the door handle, it is better to set the gap a little larger, about 4mm. This increased gap is necessary to compensate for the expansion of the door when it swells due to increased humidity in the room. Achieving such a gap is quite easy. To do this, you need to stick masking tape onto the MDF plate; it will give the required thickness.
Door assembly diagram.
Now we mark on the top horizontal bar the places where we will make the cuts. Then we saw and use a utility knife to remove the excess parts.
We make markings on the top strip of the door frame.
We make a cut on the top strip of the door frame using a hacksaw. For an even cut, use a miter box.
Using a utility knife or chisel, cut off some of the material from the top strip of the door frame.
This way the vertical and horizontal parts of the door frame are joined.
We reassemble the door frame together with the leaf, setting all the necessary gaps.
We install the hinges in place. They are installed at a distance of 20-25cm from the edge of the door leaf. It is convenient to use overhead loops in the form of a butterfly. Such hinges do not require special mounting cutouts.
Overhead loops.
Mark with a pencil on the door leaf and on the frame the location of the hinges.
Now you can determine the length of the vertical slats of the box. They should protrude from the bottom edge of the door leaf by 10-20mm. In an installed door, this will be the gap between the door and the floor. This gap will depend on what kind of floor covering is in place of the door threshold. If you plan to lay laminate in this place, then the gap can be chosen to be 20mm, but if there is linoleum, then it is better to make the gap smaller.
The gap between the door leaf and the floor.
We disassemble the box and saw the vertical posts of the box to the required size.
We mark on the canvas and the box where the screws for attaching the hinges will be installed. To do this, place a loop along the mark that was made earlier and use a pencil to outline the holes in the loop.
We mark the places where the screws are attached.
At this stage, you need to pay attention to which part of the loop is attached where. The loop consists of two parts. When folded, the outer and inner parts are clearly visible. The outer part is attached to the frame, and the inner part is attached to the door leaf.
In the previously marked places we drill holes for self-tapping screws. Holes should be drilled with a diameter of 1.5-2mm. If this is not done, then when tightening the screw, the part into which it is screwed may burst.
You can drill without preliminary marking directly along the loop.
After the holes for the hinges are drilled, you can begin assembling the door frame.
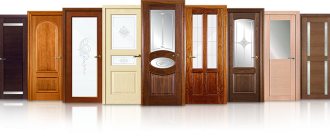
Types of interior doors
First, let's briefly talk about the features of interior doors.
Device
Until recently, the main material for the manufacture of such structures was exclusively wood. The geometric dimensions and physical properties of the boards used in this process determine the main methods of making doors.
According to the design of the product there are:
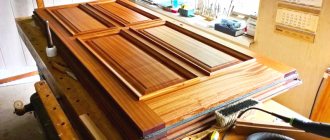
- paneled;
- panel
Paneled doors have a rather complex structure, which consists of the following elements:
- Standing drawer.
- Baguette.
- Panel.
- Lower and upper drawers.
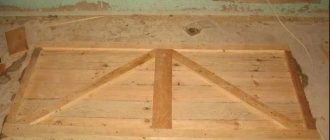
The supporting structure is made of solid boards and consists of gratings with several openings. The frame consists of vertical and horizontal elements joined together using glued tenon joints.
The openings in the frame are filled with figured panels, which are secured in different ways. This can be thin lath beads or tongue-and-groove joints. Large-width natural wood panels are made from a blank that is glued together from two boards. This eliminates the possibility of cracking of the part.
The panel door consists of:
- MDF.
- Veneer.
- Honeycomb filler.
- Wooden frame.
- Frame reinforcement elements.
Modern panel doors are made of natural wood frames covered with MDF panels. Cardboard honeycombs are most often used as filler. Such a door has a relatively low weight, with sufficient structural strength. This type of door leaf can be either solid or with glazed openings. The cost of such products is significantly lower than that of paneled ones.
Finishing material
Previously, interior doors were made exclusively from natural wood of various species. Currently, composite materials, polymers and glass are widely used in the production of door leaves. Laminated wood fiber panels are increasingly used as coatings for common types of interior doors.
Solid wood doors are mainly made from valuable wood species:
- hornbeam;
- oak;
- nut;
- teak;
- ash
Premium class samples are often made from exotic types of raw materials: rosewood, Karelian birch, red, ebony or black Coromandel wood. Such doors are usually made by specialized studios according to special orders and original designs.
By design, solid wood products can be either paneled or panel. The latter have a smooth surface with an original pattern.
To improve the appearance of products made from inexpensive types of wood, different types of coatings are often used. One of the most common technologies is veneering. The basis of the door in this case is usually inexpensive pine lumber or chipboard. Veneer made from valuable wood species is glued onto the board on both sides, which are subsequently sanded and covered with furniture varnish.
This technology is applicable in the production of both panel doors with smooth external surfaces and with embossed ones. Veneered products are environmentally friendly; natural wood and special wood glue are used for their production. When using them, it is necessary to maintain a certain temperature in the room and avoid humidity.
Polymer materials are widely used in the production of door panels. Frames assembled from relatively inexpensive pine boards are lined with polyvinyl chloride panels. For rigidity, the structure is reinforced with additional bars and covered with decorative plastic plates.
When producing polymer panels, their outer surface is given a texture that imitates wood of different species. Additionally, a film with a corresponding pattern is applied to it.
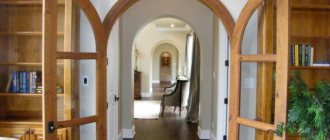
In recent years, transparent structures have become increasingly popular in interiors. In a home environment, glass doors look quite presentable. They separate rooms and at the same time expand the space. For the manufacture of such doors, impact-resistant glass with a thickness of at least 8 mm is used, which gives them sufficient strength.
To install such a canvas, canopies specially designed for this purpose are used. Given the significant weight of the products, quite high strength requirements are imposed on door frames. Glass sliding structures have gained the greatest popularity among consumers.
Installing handles, latch or lock on the door.
The door handle is most often installed exactly in the middle of the door. Since the height of the door is 2 m, the handle is placed at a height of 1 m. But for ease of use, especially for small children, the height of the handle can be reduced, for example to a height of 95 cm.
Accordingly, the lock is installed at the same height.
Installation of a mortise lock.
In order for the lock to install neatly on the door, you need to know a little trick.
We attach the lock to the door leaf as shown in the photo below. Be sure to drill holes in the door leaf before screwing in the screws.
We attach the lock to the door leaf.
Using a utility knife, cut out the laminated door covering around the lock. This action should be done carefully and slowly, pressing the knife blade well against the lock. As a result, we get a perfect cutout for the front lock bar.
Using a knife, cut along the contour of the lock.
We tear off the laminated coating.
We mark the place for installing the inside of the lock.
The photo shows the marked location for the interior of the castle.
We drill out a place for the lock.
Using a chisel, remove excess material from the door.
Now you need to mark the place for the lock handle. To do this, we place the lock on the side of the door so that the front of the door is flush with the end plane of the door. Mark with a pencil the location of the handle. Markings for the handle must be done on both sides of the door.
Mark the location for installing the handle shaft.
We drill holes according to the markings on both sides of the door. First on one side, then on the other. Under no circumstances should you drill through the door, as the drill may pull out a lot of material from the door. Therefore, we install a plywood backing in the opening for the lock to prevent the hole from breaking where the drill exits.
Drill a hole for the handle shaft.
We put the lock in place and fasten it with the screws included in the kit.
Latch insert into the door.
Installing a latch on a door is a little easier than installing a lock. First of all, we drill a hole from the end of the door with a feather drill with a diameter of 24 mm. The latch is installed in such a hole quite tightly, and the front strip of the latch completely covers the hole.
Install the door latch.
We install the latch in place and make an incision around its face plate with a stationery knife. Then we take out the latch and, using a chisel and a hammer, make a recess under the front strip of the latch.
Using a chisel, select a recess.
All that remains is to drill a hole for the handle shaft. To make such a hole, we will do the same as when inserting a lock. We place the latch on the side of the door so that its front panel is flush with the end of the door.
Mark the hole for the handle shaft.
Now use a pencil to mark the center of the hole. On the other side of the door we do the same and drill holes on both sides.
We install the latch in place and screw it to the door with self-tapping screws. Before screwing in the screws, do not forget to drill holes for them with a diameter of 1.5-2mm.
Fastening the extensions and platbands
Types of additions to interior doors.
The extensions are inserted into the landing grooves. On each of them, two extreme rough marks are marked in the plane of alignment with the wall. To accurately find the desired point, any guide is applied to the wall. The extensions are removed from the grooves. To obtain finishing marks, you need to set aside the distance from the outer end to the rough mark from the inner end. A line is drawn along the new finishing marks, along which the excess is cut off.
The resulting parts are installed in place. Wedges are placed between them and the ends of the opening, which eliminates the gap at the junction with the box. In this position, the extensions are secured with masking tape to the adjacent wall. You should try to position the extensions exactly perpendicular to the wall. You can use a square for this.
For final fixation, polyurethane foam is used. It should not fill the groove completely. The foam is applied pointwise in increments of 10-15 cm.
This will allow it to work like glue. As it expands, the foam will fill the free space and not warp the thin planks.
Related article: What to make from glass bottles: vase, lamp, candlestick, shelf and more
The upper casing is cut exactly according to the distance between the side ones. The side ones are shortened to the height of the outer end of the upper casing. The joining and correct fit of the side trims is achieved by removing the tenon above the side strips. Fixation is done with glue. To simplify future repairs, you need to glue the platband not along the groove, but along the wall. This will allow you to preserve it when updating the wall decoration.
Don't be afraid to install interior doors yourself. Exactly following the instructions and understanding a few subtle points will allow you to complete the job efficiently. The technology for installing doors with extensions is noticeably simpler than installing a slope and is within the capabilities of everyone.
The best posts
- Do-it-yourself plasterboard slopes on the balcony - nothing is impossible
- Larisa Guzeeva's ideal kitchen [interior review]
- DIY bench with cart wheels
- The very best fish cake. Gift for a man
- Modular origami: vase for beginners, assembly diagrams with video
- Features of a living room combined with a bedroom: space zoning options
- Bamboo roller blinds in the interior: advantages and disadvantages
- Master class on cross stitch with free pattern
Installing the door frame.
The interior door frame can be installed in two ways: using fastening metal plates or using self-tapping screws with a dowel. The figure below shows these 2 methods at once.
Door frame fastening diagram.
Fastening the door frame with mounting plates.
The use of fastening plates, which are used when installing drywall, is only possible if the walls have not yet been finished. It will be necessary to hollow out small recesses in the wall for the plates, which will then be covered with putty.
Fastening the door frame with mounting plates.
The plates are screwed onto the back side of the box using 3x13 self-tapping screws with a press washer.
As you can see in the picture above, the plates are attached in the places where the hinges are installed, opposite the hinges and one plate on top approximately in the middle of the box.
Fastening the door frame with self-tapping screws and dowels.
The method of fastening a door frame using a self-tapping screw with a dowel involves through-drilling the sides of the frame. But so that the heads of the screws are not visible, they are installed in certain places. Two self-tapping screws are installed under the hinges, and one self-tapping screw is installed in the place where the strike plate will be located under the door latch tongue.
To hide the screws under the hinges, you need to drill holes with a diameter of 3 mm in advance at the place where the hinges are installed, and then drill them out a little to form a small recess for the head of the screw.
Drill holes for the mounting screw.
In the place where the latch tongue will be located, we simply drill a hole with a diameter of 3 mm. There is no need to make a recess under the screw head. At this point, securing the box with a self-tapping screw will be temporary. After fixing the door frame with foam, this screw will need to be unscrewed. Then the latch striker will cut in here. In this place, one polyurethane foam is enough to fix the frame, and on the side of the hinges, where the door frame will be loaded with the weight of the door, the fastening will be reinforced with self-tapping screws.
Door frame installation.
- We install the door frame in the opening.
- Make sure that the inside of the box (towards which the door will open) is flush with the wall.
Align the door frame with the wall.
- We wedge the top strip in the door opening and check its horizontalness with a building level. You can use any scraps of boards or door frame posts as wedges.
The top bar of the box is wedged in the doorway.
- We fasten the vertical post of the door frame with self-tapping screws from the hinge side.
- We wedge the stand from the hinge side and check the level in two planes (we apply the level inside the box and on its side).
- We fasten the second pillar of the door frame with one self-tapping screw. We check it with a building level. We also make sure that the distance between the posts at the top is equal to the distance between the posts at the bottom.
- We wedge the second rack.
- We hang the door on the door frame. The hinges must first be screwed onto the door. It is convenient to hang the door open and place some kind of lining under its edge.
We install a lining under the edge of the door and hang the door on the door frame.
We hang the door on the door frame. First we screw the top hinge of the door, then the bottom one.
- We check that the door is installed correctly. An open door in any position should not budge. This indicates that the door is installed correctly.
- We close the door and install 3mm thick pads between the door leaf and the door frame pillars. We also install linings at the top of the door. At this stage, the door frame pillar, which was fastened with one self-tapping screw, may be out of place. The gap between the door leaf and the pillar may be too small or large. In this case, we move the stand to the desired position by unscrewing and tightening the screw and wedge the stand again.
- We fill the gaps between the door frame and the opening with polyurethane foam.
We use polyurethane foam.
Tools and materials
Before starting work on installing interior doors, you need to stock up on everything you need.
List of tools:
- roulette;
- level;
- pencil;
- hacksaw;
- drill;
- chisel;
- hammer;
- miter box;
- square;
- glue gun;
- jigsaw or circular saw.
List of materials:
Accessories for interior doors.
- box set;
- hidden fastenings for the box or direct hangers;
- canvas;
- additional strips;
- platbands;
- awnings;
- masking tape;
- self-tapping screws
Before purchasing interior doors, you should carefully measure all the parameters of the opening and the adjacent wall. For normal operation of interior doors, they must be installed strictly vertically flush with one side of the wall. The wall itself is very often piled up in one direction or the other. As a result, the platband does not adhere to the wall at the top or bottom. The problem is solved by installing telescopic platbands.
The same applies to additional elements. When using a box with a groove for expansion, it will be easier to correct deviations in the geometry of the wall. You should not buy a frame without a groove, even when installing interior doors into a wall opening with good geometry. The joint of the extension with the frame through a groove allows you to adjust the elements to any opening width.
Special hidden fasteners for installing the box cannot be purchased at any store, but these elements allow you to firmly fix the side strips with a certain gap and set them level. In fact, most installers get by just fine without them, using traditional fixing methods.
Related article: Niche for a plasterboard battery
Insertion of the latch response into the door frame.
This work should be performed after installing the door frame, when the foam has hardened.
- Close the door and mark the edges of the latch tab on the frame post.
We draw marks.
- Now we determine at what distance the tongue is from the edge of the box. To do this, you can use a small sheet of cardboard. We insert the cardboard into the gap between the door leaf and the frame until it rests against the latch tongue. Then we mark the edge of the door frame on the cardboard.
- Open the door, place the cardboard on the post of the box so that the mark on the cardboard coincides with the edge of the post. Mark with a pencil the place where the edge of the tongue will be located.
- We attach the mating part of the latch to the rack according to the previously applied marks. This part must be applied in reverse, as shown in the photo below.
Why extras
When choosing the type of finish, first of all look at the following characteristics:
- issue price;
- how practical;
- how it fits into the interior design concept;
- Is it possible to do it yourself?
Additional strips fully meet the above requirements:
- a set for one door with a budget option will cost only 500-600 rubles;
- easy to clean;
- serve for at least 10 years;
- fasten easily and quickly - installation can always be carried out by the owner of the premises;
- installation technology occurs without “wet” and dirty processes;
- look impressive, bringing into the interior elements of solidity and fundamentality (cheaper options) or wealth and respectability (expensive, made from natural materials);
- a huge selection of sizes, designs and types of materials from which they are made;
- serve as additional protection for the door frame from distortions;
- have high mechanical strength - it is quite difficult to damage.
Installation of door extensions.
Extensions are installed only if the wall thickness is much greater than the thickness of the door frame. If the wall thickness is 2-3 cm greater, then you can do without additional additions, but you will need telescopic platbands. They are made in the form of a corner and allow you to cover part of the wall. In addition, the door frame must be adapted for this type of platbands; it must have the necessary grooves.
Interior door installation diagram.
So, let's set the extras:
- Let's start with the top panel. We measure the doorway from the side where the extension will be installed.
We measure the doorway.
- Cut the additional strip to the required size.
- We install the extension in place and note how much it needs to be trimmed so that it is flush with the wall.
We make markings on the board.
- Cut the extension to the required size.
We're sawing more.
- We install the extension into the doorway and wedge it.
The extension is installed in the doorway and secured with wedges.
- We do the same with the side panels: measure, cut and install in the opening.
The side and top panels are installed.
- We apply foam between the doorway and the extensions. At the junction of the extension and the door frame, we apply a continuous layer of foam. Thus, when the foam expands, it will tightly press the extension to the box. In all other places, foam should be applied pointwise, in small quantities. This volume of foam will be enough to firmly glue the extensions. If you apply a lot of foam, the foam will squeeze the extensions into the inside of the opening.
We foam the space between the extension and the doorway.
Removing the old door
Of course, to replace an old product with a new one, it is necessary to dismantle the existing canvas. However, it is a mistake to assume that this procedure can be performed in any way, since damage to the opening can significantly complicate subsequent installation. Therefore, dismantling the old door is carried out consistently and carefully. So, the main stages of the process are:
- Removing the canvas;
- Removal of platbands;
- Dismantling the box.
Removing the door leaf from its hinges is done by lifting the sash after moving it to the open position. The remaining elements in the form of platbands, extensions and boxes must be dismantled depending on the principle of their fastening. When securing products with nails and screws, you must first remove them. In the case of fastening using construction adhesive, you cannot do without using a crowbar or chisel.
Installation of platbands on doors.
There are two ways to install platbands:
at an angle of 90 degrees and at an angle of 45 degrees. If you don’t have a miter saw or at least a miter box at hand, then it’s better to go with the 90-degree option.
- We apply the trim to the door frame close to the hinges. This way we determine the gap between the platband and the edge of the door frame. This gap must be maintained on all sides of the door frame.
The photo shows the gap between the casing and the edge of the door frame.
- We measure the required length of the casing. To do this, we apply a second platband or a cut from it on top of the already installed platband. At the same time, we take into account the gap from the door frame to the platband. Use a pencil to mark the required length of the casing.
Determine the length of the side casing.
- Cut the trim to the required size.
- We install the platband in place and drill one hole in it. The hole should be slightly smaller in diameter than the decorative nails.
Let's drill a hole.
- We nail the platband with one nail. We don’t nail the nail all the way in, because suddenly you will need to adjust the location of the casing, then the nail can be easily pulled out.
- We attach the second side trim, determine its length and cut it to the required size.
- We nail the second casing with a nail like the previous one.
- We attach the top trim and mark its length.
Mark the length of the upper casing.
- We cut the top trim to the required length and put it in place.
- We drill holes in the platbands and nail them with nails. We nail the top bar with three nails, and the side bars with five nails. We nail the carnations from top to bottom.
We drill holes.
- Using the same principle, we nail the trim on the other side of the door. In the place where the additional strips are installed, we align the edges of the platbands along them.
Watch the video: how to install platbands correctly.
Door leaf installation
Work is carried out after the frame is securely fastened in the passage. However, before hanging the product, it is important to increase the reliability of the structure. To do this, the remaining gaps between the frame and the wall are blown out using polyurethane foam. In this case, it is necessary to place special spacers in the box, which will avoid damage and distortion of the structure when the foam expands.
The sash is hung from the open door position. To do this, the product is lifted above the counter pin in the frame and placed on it. If necessary, the position of the door relative to the floor and walls is adjusted by tightening the fastening elements of the hinges. After this, the product is checked several times for correct placement by opening and closing.
The final stage of installation of a new interior door is the installation of platbands. After marking the decorative strip, it is cut using a circular saw or a fine-toothed hacksaw. The upper sections are cut at an acute angle of 45 degrees. After the fitting procedure, the planks are installed. To fasten them, use construction adhesive or finishing nails. It is also permissible to use self-tapping screws and then disguise them with decorative plugs to match the trim. After reading our instructions, you will now easily understand how to easily change interior doors yourself and avoid mistakes.