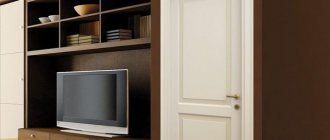
Slopes for interior doors
Trims come in a variety of sizes and shapes, but it is important to remember that the door and jamb trim should match. The ideal option is when the material from which the door leaf and jambs are made is similar to the surface of the slopes. For example, they often use a self-adhesive type of paper that matches the texture and color of the door.
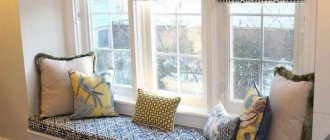
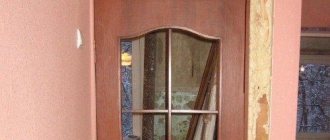
Door with wooden slopes
Varnish finish
This decorative door finish is ideal for structures made of natural wood, which have an attractive texture and interesting wood pattern. Another easy and budget option available to everyone.
We pre-prepare the surface. Everything here is the same as before painting. We use sandpaper, remove roughness and achieve a perfectly smooth surface. Then we apply varnish. The tree quickly absorbs it. Therefore, it is recommended to apply the finishing material in 2-3 layers.
To simplify the work, it is advisable to remove the door and lay it horizontally. We remove the fittings, close the glass and other decorative inserts.
What are the options for slopes: material, installation
The slope is that part of the opening that is not occupied by the door frame. In fact, this is an untreated surface that does not represent a serious flaw, but does not have an aesthetic appearance. To make the door group more complete and harmonious, various materials are fastened or installed on the slopes.
Depending on the intended operating conditions, use:
- plaster;
- overhead panels;
- self-adhesive film;
- tree.
Each method has a number of its own disadvantages and advantages, which will be mentioned later. At the same time, they also take into account how often the surface will be subject to mechanical loads - this will help to select the appropriate material.
The installation of slopes itself occurs in two ways:
- Glue. It uses glue or other special solutions. In this case, the surface for the material must be ideal.
- Frame. A simple method in terms of wall alignment. Installation begins with the construction of a metal or wooden frame onto which the selected material is attached.
The quick method is the frame method, since the adhesive method involves previous processing of the wall. In addition, this option is easy to dismantle and provides additional heat and sound insulation.
The glue method is demanding both on the quality and evenness of the wall, and on the skill of the craftsman. Glue and other solutions can stain the door leaf. For this reason, film is a necessary element during the work process.
Unprepared doorway
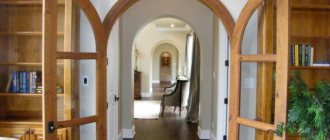
How to make a door arch with your own hands
Decorating with an arch is an interesting option. An important plus is that the arch helps to visually expand the space and fill it with some airiness.
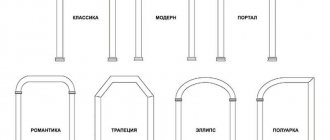
Before starting work, having decided which design is more suitable:
- For rooms with high ceilings. The angle of the arch corresponds to ½ the width of the open opening.
- For rooms with low ceilings. The radius of the arch should be more than ½ the width of the opening. This solution visually raises the ceilings by expanding the arch.
The first stage is the development of the project: the type, height and style of the arch.
The second step is the installation of a metal profile under the arch in the doorway. The latter is pre-prepared - sanded, degreased, and primed. The most suitable profile is U-shaped: it will give rigidity to the structure. To work with it you will need special metal scissors and a hole punch.
The arch itself is constructed from ceiling-type plasterboard - this material is more flexible and bends better into the shape of an arch. Moreover, it is not as thick as a standard one, but it is not inferior in strength. Work with drywall according to the instructions:
- If the width of the arch does not exceed 25 cm, cuts are made on one side of the plasterboard sheet, also retreating 1 cm.
- These cuts are then slightly cracked by gently bending the drywall. It is important to act carefully here, without focusing on force, otherwise the structure will easily crack.
Another way to bend drywall is using a special spiked roller. To do this, the sheet is first thoroughly moistened and then treated with a spiked tool. Then the structure bends pliably - it is given the appearance in accordance with the cardboard template. But before direct installation, such treated drywall is dried for at least 10 hours.
Plastered slopes
The classic design option involves a simple plastered opening, sometimes painted to match the color of the interior. Provided the work is done correctly, this option will have a long service life and will not present surprises in the form of mold or mildew.
Plastered slopes
In order for interior doors to acquire such slopes, use the following algorithm:
- Preparation. The door must be protected from possible damage. Thick film is suitable for these purposes.
- Level the opening as much as possible. Remove protrusions and protruding bricks; it is recommended to smooth out sharp chips or parts.
- Prime. For this stage, a special deep penetration primer with an antifungal effect is used. This will prevent mold from appearing in the future.
- Secure the guides. Metal profiles are used for these purposes. Depending on the desired shape of the opening, they can be fastened either strictly parallel to each other (straight slope) or with a slight difference (oblique slope).
- Alignment. For this you will need special solutions. It is recommended to add a primer with an antifungal effect to them. The starting solution was applied with a spatula to the entire surface, leveling it according to the level of the guides.
- Final alignment. After the initial leveling is completed, a primer and finishing putty are applied. In this case, all irregularities that arise during the process are leveled out.
After everything is ready, you can safely attach the material to the wall.
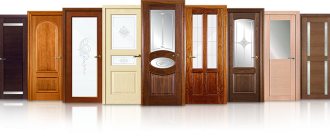
Door upholstery with laminate: pros and cons
A creative approach to updating a door is popular among people who like to do everything themselves. It's not just about saving money. There are many additional advantages:
- Possibility of exclusive design. A person will give the door the look he wants, and not what is offered in the store.
- Attaching a laminated board is not difficult to do yourself without the use of expensive tools.
- It will take a maximum of a day to finish one side of the sash.
- Laminated boards are designed for laying on the floor. This means that it has wear resistance and strength. The finish will be resistant to scratches and dents.
- High-quality laminate retains its original color throughout its entire service life.
- There is also no way around this without economic benefits. The costs will be three times less when compared with finishing with a special overlay made of laminated MDF.
On the street, due to prolonged exposure to moisture and temperature changes, the laminated board disappears
The downside is the impossibility of finishing from the street side. Laminate flooring will quickly disappear from exposure to natural factors.
Using self-adhesive film
A simple and least expensive finishing method is to use self-adhesive film. This is a special type of finish, installing which you do not need to use adhesives. If you don’t have time for finishing, self-adhesive film will do. In addition, the self-adhesive type of film is also purchased for financial reasons. It will allow you to save some money on finishing work.
Due to the wide selection of colors and patterns, you can choose a self-adhesive version of the film that suits your interior. The advantage of this material is its plasticity and ease of use.
Before using self-adhesive film, it is recommended to prime the wall with a mixture of PVA and water (proportion 1:8), but any other film that ensures smoothness will do.
During the gluing process, constantly level the surface so that there are no air bubbles or folds on the self-adhesive film. Otherwise, it will not be possible to install the self-adhesive material properly. In this case, the door itself will look unpresentable.
Overlay panels for slopes
Plastering the wall is a self-sufficient way to decorate a doorway, as well as a necessary step before attaching materials with glue.
Plastic slopes
This method is widely used, since it only requires fairly smooth walls. Speaking about the adhesive method, it is worth mentioning that the choice of material must be taken seriously.
So, for example, it is important to recall that the use of wallpaper, tiles or laminate implies different adhesive compositions. The surface must be flat so that as much of the overlay panels as possible are adjacent to it.
There are two methods for fastening: adhesive and frame.
Frame means creating a frame from beams or metal profiles onto which the selected material is attached. This method has several advantages:
- easy to install;
- quickly dismantled;
- it is possible to create additional sound and heat insulation;
- fast in time;
- the surface does not have to be perfectly flat.
A properly installed frame will strengthen the door structure and also help hide wiring or pipes without installing them in the walls.
Before starting work, make sure you have everything you need. In particular, to preserve aesthetic characteristics, the door leaf is covered with a protective shell. More often it is a thick film.
The procedure itself is simple:
- Alignment of the wall. Remove debris and obstructive parts.
- A frame is created. Based on the required shape, the appropriate material is selected.
- Fastening. At this stage, the material - MDF, wood, plastic, laminate - is attached to the finished structure.
The adhesive method involves applying a solution to the slab and attaching it to the required location.
The door is at risk and requires additional protection.
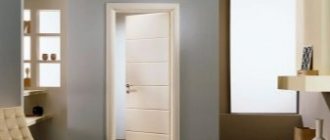
How you can decorate doorways: methods and photos
The presence of a huge amount of building materials for finishing doorways (also jambs) provides a person with space for experimentation. At the same time, the result will be unique: it cannot be compared with simple factory designs.
Advice
You can use your imagination and work with your hands to transform the canvas yourself.
Decorative building materials can be divided into two groups:
- standard - wallpaper, veneer, MDF, plastic, paint, fabric;
- non-standard - decorative stone, mosaic.
After repairs, pieces of standard building materials remain. They are good for finishing. Below are the most popular products that will help your interior door sparkle with new colors.
PVC panels
The main advantages of plastic panels are ease of installation and subsequent maintenance. Cladding instructions:
- Preparing the base. Clean the surface from dirt. Dry well. If you decide to line the doorway at the same time, then wash it thoroughly and sand it too.
- Preparation of panels. They can be fixed in continuous strips or cut into separate pieces for easier installation. Make sure the cuts are even. Otherwise it will be difficult to match them to each other.
- Installation. Perform with glue or construction staples. When installing the panels, you need to carefully place them together and avoid distortions.
Attention
You can complete the cladding along the edges of the panels with plastic strips. Check ease of opening/closing. The finishing should not interfere with the operation of the panel.
Ecological veneer
Eco-veneer is a modern material with unique properties. It protects the door from moisture, insects, mold, and dust. Creates a unique atmosphere in the room, filling it with a light woody aroma and cleanliness.
Installation involves covering the door leaf with eco-veneer in compliance with the rules. The surface is being prepared. Level the base: apply putty with a spatula. Dry the layer and clean it to perfect smoothness. Then follow the instructions:
- Lay out the material on the canvas so that the door is completely closed and there are no gaps.
- Heat the iron to a temperature of 50–60 degrees and run it over the pieces of eco-veneer. Leave for about 10 minutes, but do not allow any scorching.
- After finishing the pasting, sand the surface with sandpaper (number 3). Move the sandpaper along the grain to avoid scratches and unevenness.
- Remove excess eco-veneer so that the door does not harm the floor and upper part of the opening during operation.
- Then apply three layers of varnish to further protect the surface from moisture penetration. For the first layer use furniture nitro varnish, for the second and third - the same composition, but diluted with a solvent (1:1).
Important
During veneering you need to use a press. Its absence leads to peeling, even to the final deterioration of the material. If you don't have anything suitable at hand, you can use a sandbag.
Laminate
This material continues to be in high demand when finishing various rooms. It is suitable for cladding interior doors made of wood, MDF or metal. The class of the laminate does not matter, but its thickness is important. It is better to take 6–7 mm strips.
Stages of work:
- For convenience, it is better to remove the canvas from the loops and lay it on a flat platform. Clean the surface from dirt and grease. Apply a layer of primer and let it dry thoroughly.
- Walk over the surface with sandpaper. The base should be perfectly smooth.
- Take measurements and transfer them to the laminate planks. Cut off the excess with a grinder.
- Secure the strips to the canvas with self-tapping screws. Hats should not stick out.
- Having finished the work, install decorative corners that will cover the edges of the laminate on all sides. Cover the open heads of the screws with buttons (their color should match the appearance of the planks).
Advice
Metal doors must be insulated from direct contact with laminated cladding. Otherwise, during operation, condensation will accumulate inside the cladding and the surface will deteriorate. Insulation involves covering the entire surface with foil penofol. The base is first degreased and primed.
Coating with enamel (enamel) or paint
The use of paints and varnishes is a budget finish. Fantasy is appropriate here. For example, you can cladding in several basic colors or add original patterns.
Painting technology:
- Remove the canvas and place it on stools or trestles. The supports must be stable and level.
- Remove old paintwork and sand the base. Fill existing cracks with putty. Prime the surface and let it dry. If there are glass inserts, you need to cover them with masking tape.
- Apply paint or enamel with a roller, brush or sprayer, which helps to apply an even layer.
- Let the paint dry. Check for accuracy. If necessary, apply another layer.
- Finish the decoration by applying a protective varnish layer. You can draw patterns and use decorative stickers.
Attention
Don't forget about ventilation of the room. It is better for the owner of a private house to take the canvas out into the fresh air. The use of personal protective equipment will minimize the negative impact of varnish compositions.
MDF
The process of covering door leaves with MDF panels does not require certain skills and knowledge:
- Initially, remove all fittings from the canvas, mark the material for handles and locks.
- Cut out the marked areas.
- Degrease the surface and prime it.
- Then secure the panels with screws designed for MDF.
- Decorate the edges with decorative corners and install the fittings in place.
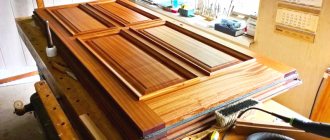
Wooden slopes
Whatever style the door is made in, wood will highlight its beauty. To secure such material, you will only need a frame method.
The algorithm itself is similar to the installation of panels, but at the final stage a primer is used not for walls, but for wood. This will protect the wood from fungus and mold. For reliability, the slopes are treated with varnish.
The disadvantages of this material are its sensitivity to temperature changes. Wooden slopes are installed in rooms where there are no sudden changes in degrees or humidity.
Alternative methods for designing door slopes
How to make original slopes on interior doors is a fairly popular question. However, only three classic materials for decoration are often considered, although in fact there are many more of them.
Decorative stone slopes
The decorative brick option stands out. Not every craftsman has the necessary installation experience, but if the surface is uneven and has objects protruding from the wall that cannot be removed, then the specificity of decorative brick will come in handy more than ever: it easily changes the shape of the reverse side. Due to this, it can be customized to suit any requirements.
The door can be beneficial if you choose the right matte tiles in natural tones. There is a point to remember: the door leaf should not be combined with glossy or bright tiles. This option will look out of place even in the brightest apartment.
Whatever method you choose, remember that film is a mandatory element, since it is what will protect the door from scratches and other defects.
Voted over 177 times, average rating 4.8
Comments
Unfortunately, there are no comments or reviews yet, but you can leave your...
Add a comment Cancel reply
We recommend reading
Slopes, Miscellaneous Upgrading door slopes and finishing them with laminate with your own hands Installation of entrance doors cannot be considered completely finished if...
Slopes, Miscellaneous Technological process of facing door slopes with ceramic tiles When the apartment is being renovated or the doors are just being changed, the finishing ...
Slopes, Miscellaneous Features of painting door slopes: equipment for work When doors are replaced in old apartments and new ones are installed, ...
Slopes, Miscellaneous What to do if installing a door caused the plaster to collapse and damage the slope? A beautifully designed doorway becomes an interior decoration. ...
How to trim a door jamb with plastic
Typically, this technique is used after installing plastic window or interior doors. Then the whole block looks like one whole. The process of finishing with plastic is practically no different from installing laminate. The only difference is the mounting step of the plastic panels. Since plastic is inferior in strength to laminate, it needs to be attached in smaller increments.
Plastic panels, like MDF slopes for entrance doors, are the most practical finishing option. They are not afraid of moisture, are easy to clean, and do not change their presentation. And their price in comparison with other materials is competitive.
If the surface of the jambs is sufficiently smooth, then the jamb can be finished with self-adhesive wallpaper or decorative film.