Currently, there is no need to prepare the floor screed mixture yourself. An assortment of them can be purchased at various building materials stores. In addition, they have a huge range of applications, be it leveling the floor, hiding underfloor heating, communication systems and much more. Installation work, due to the fact that a dry screed mixture is used, is carried out with a reduced time frame. But it is very important to know how to choose the right mixture for the job, based on the stated requirements.
Rating of the best building mixtures for floor screed
| Photo | Name | Rating | Price | |
| #1 | Holcim M300 | ⭐ 100 / 10027 — votes | Find out the price | |
| #2 | Weber Vetonit 6000 | ⭐ 99 / 1009 — votes | Find out the price | |
| #3 | Bolars | ⭐ 98 / 100 | Find out the price | |
| #4 | Paladium Palafloor-307 | ⭐ 96 / 1003 — votes | Find out the price | |
| #5 | Vilis M-300 | ⭐ 96 / 100 | Find out the price | |
| #6 | Rusean M-300 | ⭐ 95 / 1001 - voice | Find out the price | |
| #7 | NOVAMIX M-300 | ⭐ 95 / 1002 — votes | Find out the price | |
| #8 | Stone Flower M-300 | ⭐ 95 / 100 | Find out the price | |
| #9 | Titan M300 | ⭐ 93 / 1002 — votes | Find out the price | |
| #10 | Axton | ⭐ 93 / 1003 — votes | Find out the price | |
| #11 | KNAUF Tribon | ⭐ 92 / 1003 — votes | Find out the price | |
| #12 | Ceresit CN 173 | ⭐ 92 / 1008 — votes | Find out the price | |
| #13 | Eunice Horizon | ⭐ 91 / 1007 — votes | Find out the price | |
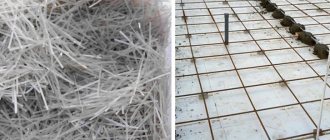
| #14 | Perfecta (fibre layer) | ⭐ 90 / 1004 — votes | Find out the price |
Which floor screeds would you choose and which ones would you recommend?
Take the survey
Dry screed laying technology
Installation of dry screed is carried out according to the standard algorithm:
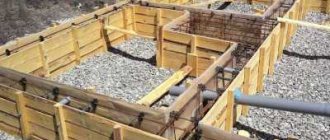
- Preparation of the base - it must be strong and level; if necessary, the old coating is dismantled down to the floor slabs; this may also be required to lower the starting level. There should be no irregularities left on the base, either bulges or depressions. The bumps are knocked down, and the holes are sealed with any quickly hardening mixture and leveled, construction debris and dust are removed. Large cracks on the wooden base are sealed, loose areas are replaced or strengthened, and they are also cleaned of dirt, ideally with a vacuum cleaner in both cases.
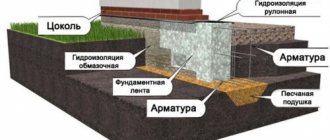
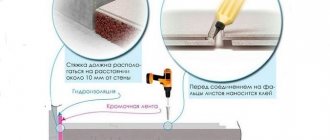
- Waterproofing – the concrete is covered with a polyethylene film of at least 200 microns or a special substrate. If it is necessary to connect the pieces, they are laid with an overlap (10 - 15 cm), the joints are sealed with tape, the insulation should extend onto the wall (10 - 15 cm). If the base is wooden, construction bitumen paper is laid using the same principle.
- Damper tape - purchased or cut from insulation, glued to the wall (on liquid nails).
- Backfilling - depending on the available equipment, you can maintain the level using a laser level or a water level. The beacons are set according to the level (galvanized profiles for drywall are considered convenient) in the usual way. Unlike conventional screed, they are removed from dry screed as the areas are filled. Remaining in the mass, they will worsen the parameters of the floor. The filler is poured in excess, the layer is leveled as usual, and, if necessary, compacted with a plaster float.
- Rough coating - it is most convenient to use a special gypsum fiber board with mounting grooves; the sheets are laid, glued with PVA (tiled and similar) and additionally fixed with self-tapping screws (the caps are recessed). The second row is laid with a bandage (250 mm indentation), it is not recommended to make a joint in the doorway, this will be a weak point of the coating.
- Trimming - remove the protruding parts of the film and compensation tape.
The average thickness of the dry screed layer varies from 30 to 40 mm; if it is necessary to increase the thickness to 60 mm, the rough coating is reinforced with a second layer of slabs. Dry screed provides a reliable, durable coating that can withstand dispersed loads of up to a ton per 1 m², and a point load of 360 - 400 kg. The popularity of this method is explained by the characteristics of the resulting base.
- Reduced load - the dry option is much lighter, when the weight of the screed is critical, for example, on wooden joists, or when there are doubts about the quality of slab floors, a dry screed is preferable.
- Reduced thermal conductivity - a screed with expanded clay filler 30 mm thick has a thermal conductivity of about 0.12 W/(m*C).
- Sound insulation - with a thickness of 30 mm, dry screed dampens up to 40 dB of noise.
In addition, dry screed is attractive due to its ease of installation, speed and the absence of wet and dirty processes; concrete mixers, mixers, heavy containers with mortar and other “delights” of pouring are eliminated. The limitation for dry backfill is the slope of the surface; it is also not designed for heavy partitions, only light frame ones. Although a dry screed is “afraid” of moisture, and if the coating is poured, it will have to be dismantled, when using moisture-resistant gypsum plasterboard, this danger can be avoided. In rooms with high humidity (bathroom, kitchen), ceramic tiles are used as the finishing layer. If the technology for preparing the base and masonry is followed, the coating becomes airtight.
In order to reduce the cost of dry screed as much as possible, forum member dusha82 decided to turn the rough coating into a finishing coating, saving on finishing.
dusha82 Member FORUMHOUSE
As I decided, I will make the floor using dry screed technology - loose screed, but with some finishing touches. I chose this floor for several reasons:
- I don’t want lags - they will creak.
- Filling is difficult.
- Self-leveling flooring is expensive.
Loose flooring is simple, quick and relatively inexpensive. Now about the finishing touches: the dry screed itself is leveling and the subfloor, but I need (to save money) to have a finishing coating right away, so instead of gypsum fiber sheets, I decided to take plywood, then coated with varnish, which will work for the first time. I chose two sheets of 8 mm each - I think it’s more difficult to mill a thicker one for a rebate. But one problem arose in the process - when I poured expanded clay and put one piece of plywood on it for testing, it turned out that all the “rustle” of the expanded clay could be heard. Fortunately, I had polyethylene foam at hand, the sound stopped after I laid it under the plywood.
Mixtures for floor screed: composition
All screed mixtures can be divided into three groups according to their composition:
- Cement. Solutions of this group are ideal for any work. In this group the filler is sand. For quick drying and greater strength, plasticizers are added to the solution, which determine which screed to take: if they are large (>0.6 mm) then for rough leveling, if medium-sized (~ 0.6 mm) then for finishing, and if the smallest ones - then you need to take self-leveling compounds.
Example of cement-based mixtures - Plaster. Gypsum-based solutions are great in cases where you need to slightly level the wall. Such solutions are distinguished by their plasticity, lack of shrinkage, and quick drying. Well suited due to its hypoallergenic properties. Gypsum offers good heat-storing properties. True, there is one “but” - such material does not withstand moisture and quickly deteriorates from it.
Example of gypsum mixtures - Dry screeds. They are made on the basis of expanded clay or polystyrene. They combine well with any base, do not cause subsidence, and most importantly, you can work with such screeds immediately after applying them, which is why they are used for rough leveling.
Example of dry mixtures
Expert opinion: Afanasyev E.V.
Chief editor of the Stroyday.ru project. Engineer.
Already know how to properly make a floor screed? I have already prepared detailed instructions for screeding the floor, I advise you to read it!
Mistakes when choosing and making screeds
As with any other issue related to construction, the market offers such a huge range of products that it is not difficult to make mistakes when choosing the best floor design. The most common errors are listed below.
- Wrong choice of screed type (a product for outdoor use is purchased for indoor use or vice versa).
- Using a finishing fill instead of a rough fill or vice versa.
- Ignoring the degree of water resistance and permissible load specified by the manufacturer.
- The guideline is only on cost, according to the principle the more expensive the better, without taking into account individual characteristics.
When pouring, a number of mistakes can be made, which ultimately will greatly affect the quality of the finished solution.
- Wrong choice of layer thickness. There are three possible mistakes that can be made in this matter. The first is that the thickness to which the floor needs to be leveled exceeds the maximum layer thickness for the selected mixture. The second is the formation of a layer that is too thin, which may subsequently crack. Third, when calculating the thickness, changes in it due to the use of reinforcement, laying of a thermal insulation layer or other factors that directly affect the fill layer up or down are not taken into account. As a result, there will either be an overconsumption of the mixture, or the dried version will not be of sufficient quality.
- Bringing the rough filling indoors to the floor level in the entrance. In some cases, a guideline of one level may be reasonable, for example, if it is necessary to ensure comfortable movement for a wheelchair or stroller. But even then it is necessary to reduce it by the size of the finishing layer, which will be done later. In other cases, such orientation will only lead to additional costs and increased operating time.
- Insufficient cleaning of the base. Applying a screed mixture to a surface that has not been treated with an industrial vacuum cleaner and soil leads to a decrease in the quality of the finished floor due to the ingress of dust and debris.
- Incorrectly installed beacons can also cause skew and deformation of the floor, as well as reduce its strength.
- Incorrect consistency of the solution and violation of the technology for its preparation, including stirring by hand instead of using a special mixer, can ruin the result of using even the best product.
- Failure to use a porous damper tape when pouring near walls is fraught with the formation of cracks due to heating and subsequent cooling of the solution. The tape compensates for thermal expansion and prevents cracks from appearing.
- Moistening an already filled surface can result in the formation of voids, unevenness and bubbles. In order to retain moisture inside the floor until all the necessary chemical processes occurring in it are completed, it is necessary to cover the floor with a durable film that will create a greenhouse effect without harming its top layer.
A little trick from the builders. If there are any communications under the screed, then in order to record their exact location, they need to be sketched or photographed before pouring. This will greatly simplify life in the event of leaks or malfunctions and the associated need to dismantle part of the floor.
Pay attention to the choice of material for work, not forgetting about new products on the market, read the instructions, do not deviate from technology - and let the result of the repair bring only joy!
Criteria for choosing a mixture for floor screed
Everyone is looking for a good dry mix for floor screed. And many people immediately pay attention to their packaging. It usually shows a level of quality and high strength.
Based on the set of rules SP 29.13330.2011, all floor screeds can be classified according to several indicators:
- adhesive and compressive strength;
- frost resistance (indicated by the letter F and a two-digit number);
- thickness;
- concrete class (denoted by the letter M and a three-digit number).
Of all the mixtures containing cement and sand, the M300 mixture . Although its full strength is not achieved immediately, but over time, you can walk within a couple of days after application. The three-digit number indicates the pressure exerted on the material.
Important! The number 500 is the maximum possible compression pressure (kg/cm3).
Features of choice
The choice in stores is huge, but everyone wants to get an answer to the question of which floor screed mixture is best. Here you should adhere to certain criteria before making a purchase. Any mixture will be suitable for a specific floor subfloor. This is where its properties will manifest themselves with maximum efficiency. At the same time, ready-made mixtures for floor screed have their own requirements for maximum thickness during pouring. The thickness will be affected by the evenness of the floor, the presence of communications, and the installation of additional systems, such as heated floors.
When there are additional and significant loads on the floor itself, then the screed should be prepared based on these parameters. That is, a dry cement mixture is selected for a specific screed. Each solution option will take a certain time to gain strength, which should be taken into account. For example, cement mixtures gain strength much more than gypsum mixtures. So after completing the work they should be given a specific time to harden.
When installing a heated floor, there are restrictions on the choice of solution for the floor. Dry cement mixtures for floor screed must be selected individually. Not all of them tolerate such a foundation. The packaging with the mixture will answer the question. The main thing is that there is compatibility between them.
If the compatibility of communications, mixture, and floor covering is violated, no decent result will be achieved. Thermal conductivity will decrease, cracks and other defects may appear. It is especially important here to pay attention to a specific room, which has its own characteristics. They should also be taken into account when choosing a ready-made dry screed.
For each building mixture, accompanying components must also be purchased. For concrete surfaces, primers are useful to increase the level of adhesion. Waterproofing primer is suitable for bathrooms and toilets. A primer is also necessary when linoleum, carpet or other soft material is used as a floor covering. In all other cases, there is no need to prime the surface.
Certain dry mixtures can be used when working in cold weather. This will be indicated on the packaging. You can also purchase special antifreeze additives that allow you to obtain this result.
Experts advise performing work using various mixtures, that is, combining them with each other. For example, use semi-dry cement mixtures to level the surface, and anhydrite levelers to smooth the base. But each layer must be completely dry before you can move on to the next one.
Preparing the mixture
If the mixture was purchased ready-made, then there are usually no problems with it. All you need to do is follow the manufacturer’s recommendations, which are on the packaging or in the instructions for use. You just need to thoroughly knead the entire mixture with a construction mixer until it reaches a homogeneous consistency, reminiscent of sour cream.
If you wish, you can not take the ready-made mixture, but make it yourself. For example, to obtain M300 you need to take part of the M400 cement mixture and mix it with two parts of sifted clean sand.
Preparing the mixture is a simple matter
Calculation of the volume of mortar for screed
To determine the volume of materials, you need to know how much solution is required. Then, using the required proportions for the screed, it will be possible to calculate the approximate amount of sand and cement. To calculate the solution, you need to know the area over which we will pour the solution and the thickness of the layer.
It’s easy to calculate the fill area: multiply the length of the room in meters by its width. We get the area. You should already know the maximum and minimum screed layer. By the degree of evenness of the base, you can determine approximately the average thickness. If we multiply the found area by the thickness of the screed, we get the required volume of solution.
Another table with the proportions of mortar for floor screed
Let's look at an example. The room is 2.8 m by 3.4 m, the screed thickness is 6 cm. We find the pouring area - 2.8 * 3.4 = 9.52 m². To get the cubic meters of concrete that we need, we need to convert 6 cm into meters. To do this, divide 6 cm by 100. We get 0.06 m. Now we multiply the pouring area by this figure: 9.52 * 0.06 = 0.5712 m3. That is, for a room area of 9.5 square meters with a screed thickness of 6 cm, approximately 0.6 cubic meters of solution will be required. With such a volume, you will definitely have to mix the floor screed solution yourself. No concrete plant will deliver less than a cubic meter of solution.
If you need to fill the screed in several rooms at once, you can first calculate the area of all the rooms for pouring, then multiply by the thickness of the screed. This option is possible if there are no large differences in height between different rooms. If in one room the screed is 6 cm, in another 9 cm, it is better to calculate the volume for each room separately, and then add the results.
How much mixture do you need?
In addition to the issue of manufacturing and application, you need to think about the consumption of the mixture. As a rule, this data is indicated on the packaging, but since each has its own conditions, it is necessary to carry out calculations. But before that, you need to measure the area of the floor that needs to be filled with this screed. The calculation will look like this:
- a layer 1 cm thick will require the use of 22 kg of mixture per square meter of room area;
- the optimal layer of screed is 3 cm, which means that 22*3=66 kg of mixture must be spent per square meter of area.
Important! It happens that there are large differences in the floor in a room; they must be leveled.
When choosing a mixture, you can always simply use a calculator to accurately calculate the required amount of mixture - everyone has a calculator.
Important! If a warm floor is installed, then a layer of 40 mm or more is needed.
You need to correctly calculate the amount of mixture before using it.
Calculator for calculating the amount of mixture for floor screed
Go to calculations
No. 1. Pros and cons of dry mixes for screed
How was floor screed done before? Three to four parts of sand were added to one part of M400 cement. All that remained was to dilute the resulting mixture with water and pour it on the floor. A more advanced method involves adding plasticizers and fiber to improve the characteristics of the mixture. Many people still use this technology, even despite its many disadvantages. Not only is it heavy and dusty, but you will also have to mix a huge amount of mortar, so it will be difficult to do without a concrete mixer. A problem may also arise with the purchase of 100-300 kg of sand, since most sellers sell it at least per ton. These are not all the difficulties faced by those who want to save on screeds and do everything themselves.
You can overpay a little and buy a dry mixture for floor screed. In it, all the components are already dosed in accordance with the optimal proportions, and all you have to do is add the specified amount of water, mix the mixture using a drill with a special attachment and arrange the screed. Saves time, nerves and effort.
The main advantages of dry mixes for screed include::
- ease of preparation. The manufacturer did the most difficult and important part of the work for you - mixed all the components in the correct proportion;
- ease of mixing . After you have added the amount of water specified by the manufacturer, all that remains is to mix everything with a construction mixer or drill with the appropriate attachment. No special equipment, no concrete mixers - everything is simple and accessible;
- Almost anyone can perform screeding using dry mixtures - no special professional skills are required for this, and all the basic steps and tips, as a rule, are outlined even in the instructions on the packaging;
- transporting bags of dry mix (usually weighing 25 kg) is much more convenient than large bags of cement, buckets or truckloads of sand;
- the consumption of screed prepared from a dry mixture is less , which means the load on the floors will be lower. It is possible to achieve a reduction in consumption per 1 m2 thanks to the precise dosage of all components and the introduction of additional substances;
- it is difficult to arrange a regular screed with a thickness of less than 30 mm, since during the drying process such a base can become covered with cracks and collapse. In the case of dry mixtures, you can get a screed with a thickness of only 5 mm , and in its basic properties it will not be inferior to its classic counterpart. The reason is mentioned in the previous paragraph;
- the hardening time is shorter than that of classic screeds, since the composition includes special modifying substances that accelerate this process;
- a huge selection of ready-made compositions , so you can choose the most suitable solution for dry and wet rooms, and also find a screed that will dry record-breakingly quickly or have self-leveling properties.
The disadvantages usually include cost and the inability to control the components used by the manufacturer. As for the price, it is not that high, especially if you take into account all the numerous amenities. The quality of raw materials is becoming more and more difficult, so it is better to buy products from trusted brands that have been working in this field for decades. , for example, has been operating since 1995 in the market of St. Petersburg and the region, producing and selling dry mixes for screeds under the Polygran brand; the assortment can be found on the page https://ltsr.ru/stroitelnye_smesi/tsementno_peschanaya_styazhka_pola/. Over the years, the company has established itself as a reliable manufacturer and seller who does not pursue excessive profits, and therefore offers customers reasonable prices for all products.
How to apply mixtures
The key to success is careful preparation for pouring. To do all this, the surface must first be thoroughly cleaned of debris. Then you need to make sure there are no cracks.
After this, beacons should be placed. It will be clear from them when and how many cm of the mixture layer will be needed. They are placed around the perimeter in different places. When installing beating cords, the potential installer understands how much mixture will need to be installed.
Interesting! Lighthouse slats are much more convenient than bars when it comes to reinforced flooring. Half a day after applying the composition, you can work with the equipment.
Next is laying the mixture. It occurs in the form of breaking into sections with further processing of each of them. The solution is poured between the beacons until the level of the mixture reaches the desired level. Work begins from the far corner and moves closer to the front door.
If there are gaps, then the solution is simply added to them, without spreading it over the entire area where the mixture has already been poured. It turns out that the residues are discarded, and the screed is leveled. If you do everything correctly, then there will be less chance of touching the emerging floor.
You can walk on the flooded floor within a few hours. If tubercles are found, they are cut off immediately.
The longer the floor takes to dry, the more difficult it will be to remove defects.
Towards the end of the work, when the formed floor has already acquired sufficient strength, the surface is grouted. But this is not the end of the work. After grouting, you need a little more than a week (to be more precise, 10 days) to moisten the screed. As a rule, this is done with a spray gun, but it can also be done with a roller. Why should this be done? This is the only way to achieve uniform drying of the cement used to screed the floor.
Important! Do not open windows, creating drafts. This will cause the solution to lose its natural moisture.
The load should be increasing. First you need to lay wooden slats and walk cleanly on them. Over time, you can increase the load - walk one at a time, then remove them completely. The result can be seen after a certain period of time - usually two weeks.
Important! The first thing to be checked is the color. It will show how evenly the composition has been distributed and dried. The second is the presence of gaps that need to be closed quickly, while the mixture is still suitable for processing.
In general, if we talk about pouring or screeding a floor, we can say that it is not so much complicated as it is labor-intensive. But if you follow all the tips, requests and recommendations, the manufacturer’s style and the technical process, then nothing will stop you from making your own floor screed.
You may be interested in knowing which external wall insulation to choose .
Proportions of a classic DSP screed
The classic mortar for floor screed, as already mentioned, is cement with sand diluted with water. The proportion (the amount of sand per unit of cement) depends on the required strength of the screed and the brand of cement used. To make the floor surface durable, use expensive Portland cement grade M400 and higher.
Proportions of mortar for floor screed for M150, M200 and M300 when using different grades of cement
For screeding floors in utility rooms, you can also use the cheaper M300. It will cost a little more, but there will be savings. It is better not to use such cement for the foundation of a house or apartment under modern coatings. The rework will require significantly more savings on cement.
Beginners in the construction business think that if you take more cement, there will be a stronger screed. But no. For strength, the correct ratio of all components is important, and an excessive amount of cement can cause a decrease in strength. If you want a stronger screed, use high-quality cement and accurately measure the proportions. By the way, you shouldn’t take more water either. This will increase the fluidity of the solution, but will increase the number of shrinkage cracks. So once again: in order to get strong and reliable concrete, you need to strictly observe the proportions.
Which sand to take
It is better to take river sand, washed, of at least two fractions: coarse and medium. Why river? Because it has sharp edges, and this reduces the likelihood that it will settle into the lower layers. This is understandable. Why washed? It contains minimal dust. The less dust, the higher the strength of the solution. Sand is also needed in different sizes so that the strength of the solution is normal.
To screed the floor you need sand: washed river sand, two fractions (not fine)
If you are going to lay an expensive coating on the floor with high requirements for the strength of the base (parquet, parquet or engineered boards, vinyl tiles), it is better to take this kind of sand. There will be fewer problems.
Kneading sequence
When making a floor screed solution, first mix the dry ingredients - cement and sand. When mixing manually (in a trough), there is not much difference between what to throw in first - cement or sand. If you use a concrete mixer, immediately add sand and spin it for a couple of minutes without cement. Then, gradually, usually with shovels, cement is added. After each portion, wait until it is more or less evenly distributed, then add the next one. After adding the entire amount of binder, mix until a uniformly colored mixture is obtained.
You choose how to prepare the solution yourself: order it at the factory/workshop, mix it yourself
When the dry ingredients are mixed until a homogeneous gray mass is obtained, add water little by little. It is calculated based on the amount of cement. Usually 0.45-0.55 parts of water are taken for 1 part of cement. Why don't they indicate exactly? Because the amount of water depends on the moisture content of the sand. It is advisable to pour a minimum amount of water: this way there will be fewer cracks when drying.
Ready-made mortar or sand-cement mixture
Those who have at least once mixed DSP or concrete on their own are more often inclined to buy ready-made concrete. And not a mixture of sand and cement in bags, but concrete from a concrete mixer. Yes, it costs more money, but it requires much less time and effort. Another advantage of this solution: filling without cold seams. This means fewer cracks and problems in the future. The next plus is that concrete mixers can deliver the solution to the desired floor. Imagine that you have to move a couple of tons of sand and cement. Even if there is a freight elevator, it is not easy. It can also be costly if you pay helpers. Climbing stairs “on your shoulders” is generally a problem.
So that you do not care about the proportions of cement and sand, you can buy ready-made mixture in bags
What are the advantages of buying ready-made sand-cement mixture in bags? The fact is that the proportion is kept exactly, sand is used in several fractions and in the right quantities. That is, the screed is guaranteed to have the required strength. The downside is the price. You can buy the same amount of cement and sand for a much smaller amount. This is if you don’t bother with sand fractions. If you take care of this, the savings will become smaller: not all factions are cheap.
TOP 14 best floor screeds
Perfecta (fibre layer)
Perfekta (fibre layer)
Our rating begins with a model of floor screed, which has been evaluated more than once on the positive side. It dries quite quickly - it takes two to three hours to dry for 1 cm of layer. Consumption – 17 kg per square, which is considered a small indicator.
The consistency of the finished screed solution resembles thick kefir. The composition is not self-leveling, so it is better to work with a flat floor, the thickness of which is 5-12 cm.
This dry mixture will be a good option for heated floors. It will come in handy not only when filling a water heating circuit, but also when building an electric version.
Important! The manufacturer’s main condition is that the layer thickness should be more than 2 or even 3 cm, which will provide strength and resistance to loads.
According to Perfekt's recommendations, the floor covering becomes functional a week after installation. Ceramic can be used the next day.
pros
- high-quality reinforcement;
- the shortest time for laying the coating;
- resistance to temperature changes, frost, heat.
Minuses
- wait a long time before installing flooring (exception is ceramic tiles).
Perfecta (fibre layer)
Eunice Horizon
Eunice Horizon
Eunice Horizon is a dry screed that is successfully used by domestic buyers when screeding a floor or installing a “warm” variation of it. There is increased resistance to moisture, which is important when laying on a wet base.
Important! Laying on a wet base will not cause the Eunice Horizon screed to swell or crack.
The process of filling the floor with Eunice Horizon mixture is quite simple. At the same time, interestingly, the consumption of the mixture per square meter is quite profitable - 19 kg/m2 with a layer thickness of only 10 mm.
The dry mixture can be used in two ways:
- floor screed (layer thickness is 5-10 mm);
- preparing a new foundation (if the person who bought the mixture has a new building or needs to carry out a major renovation of the apartment).
One of the advantages for which this screed is used is the ability to walk on the new floor after just a few hours, although final drying takes longer - about a week. It is also worth noting the smoothness of the surface formed by the screed, as well as how smooth the floor becomes after applying the mixture.
Although this mixture is more expensive than cheaper options, it will provide exactly what many people need - a high-quality floor screed.
pros
- quick drying;
- low consumption;
- wide scope of application.
Minuses
- final drying takes a long time.
Eunice Horizon
Ceresit CN 173
Ceresit CN 173
This model from Ceresit is perfect for floor screed if you prepare the working solution correctly and use it in the future.
The use of this mixture will be beneficial when organizing electric or water heated floors. The reason for this is the lack of shrinkage and rapid leveling of the floor after installing the “warm floor” system.
This mixture model can be used not only for floor screeding, but also for major repairs. In any case, the coating will harden within 6 hours, and strength appears the very next day after application. This is what distinguishes CN 173 from ordinary sand concrete.
pros
- low price;
- high strength;
- fast initial drying.
Minuses
- there are difficulties in working with this mixture;
- proportions must be carefully observed.
Ceresit CN 173
KNAUF Tribon
KNAUF Tribon
Next up is a mixture from the famous company Knauf. It is immediately worth noting that it can be used in two situations:
- screed (it is laid on top of old wood or any other covering);
- pouring (new floor or “warm floor” system).
It is noted that for the water version of the circuit it is necessary to use a larger amount of solution obtained from this mixture. The thickness formed when screeding the floor does not exceed 60 mm. Consumption with this model from Knauf is 17 kg per 1 m2 with a layer thickness of 10 mm.
In terms of overall strength, this model is superior to most sand-concrete options. The floor dries quite quickly (the floor can be walked on after just six hours, but it gains the necessary strength after a day). The fluidity of this model is quite high, so it will be easier for him to distribute.
A separate advantage was the availability of the necessary European certificates of conformity - there is no doubt about the quality of the mixture.
pros
- dries quite quickly;
- gives an even, durable layer;
- easy to work.
Minuses
- very demanding in preparing the foundation;
- You can’t skimp on primer;
- high price.
KNAUF Tribon
Axton
Axton
One of the options for leveling the floor is Axton products. It is perfect not only for dry, but also for wet rooms.
The mixture is quite popular among other competitors not only because of the speed of drying of the coating and the increase in strength, but also because the coating does not shrink and does not crack.
Important! The minimum floor thickness is 10 mm, the maximum is 80 mm.
The consumption of dry mixture per 1 m2, depending on the thickness of the layer (up to 1.5 cm), can be up to 30 kg (approximate weight of one bag). If the thickness is 2 cm, then you will need 40 kg of the mixture. It turns out the following: for a screed of 150 m2 you need to purchase 150 bags of 30 kg each.
The composition, interestingly, is suitable not only for indoor spaces, but also for outdoor ones. This is justified not only by protection from heat, but also from noise.
pros
- easy leveling;
- good moisture resistant qualities;
- good noise and heat insulation;
- economical consumption;
- small fractions of stones.
Minuses
- it will be possible to make a layer that is not too thick;
- Equipment cannot be installed in sub-zero temperatures.
Axton
Titan M300
Titan M300
This brand of sand concrete was included in the rating for a reason. It attracts with its price - it stands out sharply among other dry mixes on the construction market in the Russian Federation. It can not only be used to screed an existing coating or underfloor heating system, but also to fill a new one. The resulting screed, by the way, stands out for its high strength.
The packaging of this model is quite convenient, and preparing a solution based on this dry mixture is quite simple.
It will take about two hours for the floor to harden after applying the solution, which will allow you to quickly level the floor if necessary. There will be no shrinkage, which is important.
The composition of Titan M300 is as follows:
- Portland cement;
- granotsev (fraction – up to 5 mm);
- sifted river sand (fraction - about 3 mm);
Due to its composition, this model of sand concrete does not create shrinkage during hardening. An affordable price and good data have caused the appearance of counterfeits, so a potential buyer needs to look closely at the product, because there is a chance of being defective.
pros
- fast hardening;
- wide scope of application;
- low strength.
Minuses
- there is a chance of getting married.
Titan M300
Stone Flower M-300
Stone Flower M-300
Next is another domestic model of dry screed. It has everything you need for a high-quality screed or pouring of the floor. It is easy to fill and level it to a level or based on beacons. It is worth noting that this domestic brand levels well and hardens quickly.
Important! The consumption per 1 m2 of this model is not too high - 20-25 kg with a layer thickness of 10 mm.
The “Stone Flower” mixture can be used when installing a water-heated floor, which is important in winter. Preparation of the solution becomes much simpler, which makes it easier to install a “warm floor”.
This model is distinguished by its resistance to low temperatures, which allows the dry mixture to be used not only inside, but also outside of a house or apartment.
In general, this model offers a high density of the solution, good strength indicators, and ease of working with the mixture. This is all a potential buyer needs.
pros
- high quality screed;
- wide scope of application;
- resistance to temperature changes.
Minuses
- takes a long time to dry.
Stone Flower M-300
NOVAMIX M-300
NOVAMIX M-300
One of the good options for dry screeds can be this model from Novamix, formed by mixing M500 cement and sand.
You can use it to screed the floor, being confident in the quality result. And it will, because with such a mixture there will be no shrinkage if the proportions of the components when preparing the solution were observed. But not only screed can be made using this model of dry mixture - you can also use it for the initial filling of floors. The mixture hardens within two hours, and during this period of time the surface can be leveled to the maximum.
With a solution made on the basis of this mixture, you don’t have to worry about pouring or screeding the floor - it will be durable in any case and will not have a water film.
Important! This model is also suitable for outdoor work, as it has high resistance to weather conditions, including frost.
pros
- dries quickly;
- the material is inexpensive;
- high quality screed;
- frost resistance.
Minuses
- Care is required when maintaining proportions.
NOVAMIX M-300
Rusean M-300
Rusean M-300
Among dry sand concrete mixtures, Rusean M-300 is one of the most popular on the market and has proven itself to be particularly durable - it is used for screeding in rooms where a large load on the floor is planned. Preparation of the finished solution requires high precision - a lack of water will not allow the surface to be fully leveled, and its excess will reduce the strength and, when drying, can lead to the formation of cracks.
Judging by the reviews, Rusean M-300 dries quite slowly - it takes about two days to be able to safely walk on the screed. Further work (laying flooring) should be carried out only after complete drying, which occurs 7-10 days after pouring. For one square meter 10 mm thick, about 22 kg of dry sand concrete is consumed. It is often used when installing “warm” floors, since the high density of the solution (2.1 t/m²) allows you to make a thin rough screed of 10-15 mm, which, nevertheless, will be a fairly durable coating.
pros
- low price;
- wide scope of application;
- frost resistance;
- large layer thickness.
Minuses
- you will have to wait a long time until strength is gained;
- large fraction of stones;
- high consumption.
You might be interested in knowing what damper tape is .
Rusean M-300
Vilis M-300
Vilis M-300
This sand concrete is one of the options for pouring a floor from scratch. The high-strength floor that appears as a result of pouring the ready-made mortar is based on the composition of Vilis - in addition to M400 concrete, it contains coarse sand.
It is worth noting that full operation of the finished solution is possible only if it is prepared correctly. As it dries, the screed applied to the floor acquires the required strength. The material itself does not shrink, which is important when leveling the floor in any room. High plasticity can also be distinguished.
Important! This mixture is also used when installing “warm floors”.
What’s interesting is that Vilis can be used not only inside a house/apartment, but also outside. This is due to its high resistance to cold, as well as wear resistance. In other words, the mixture will not crack or crumble.
As a result, it is possible to save money, but obtain a high-quality dry mixture from which the floor screed solution will be made.
pros
- high strength;
- wide scope of application;
- resistance to frost and wear;
- plastic.
Minuses
- takes a long time to dry.
Vilis M-300
Paladium Palafloor-307
Paladium Palafloor-307
A dry mix from Paladium could be a rather interesting option. Its not-so-great popularity may surprise a potential buyer by the presence of something that all previous models could not provide.
Made from cement and foam glass, this dry mixture can offer excellent noise and heat insulation. With it you can forget not only about the cold, but also about the noise from your neighbors.
This model deserves attention for other reasons. For example, the composition. It turned out to be environmentally friendly enough to use the mixture for floor screeding in places where there are always a lot of people or there is a child.
The thickness range turned out to be quite large - from 0.2 cm to 3 cm. This makes it quite easy to approach the issue of screed. Since the mass of the mixture will be small, it can be used to restore housing that is in “dire condition.” Also, this mixture will surprise many with the fairly high quality of the screed and the ease of working with it.
The model could not get a higher place for two reasons: high price and long drying time (two days).
pros
- retains heat well;
- reduces background noise;
- environmental friendliness of the composition;
- high quality screed:
- wide range of thickness.
Minuses
- high price;
- long drying.
Paladium Palafloor-307
Bolars
Bolars
“Bronze” is awarded to the Bolars fast-hardening floor screed. It is recommended for use not only when screeding, but also when pouring a new floor. All construction work is carried out only at positive temperatures, and the coating can be used even at sub-zero temperatures. The layer dries quite quickly - on average you need to wait five hours before you can walk on the screed.
Important! Finishing is carried out after at least three days. Maximum - in two weeks.
This model offers not only high screed strength, but also resistance to moisture and sudden temperature changes.
This model has one “but” - not all bases can be leveled with one layer, and the layer itself will not be too thick.
pros
- resistance to temperature changes, moisture and frost;
- high screed strength;
- easy to apply;
- dries quickly.
Minuses
- You can only make a thin layer.
Bolars floor screed
Weber Vetonit 6000
Weber Vetonit 6000
This model is ideal for basic and any other type of floor leveling. The fairly high quality and versatility of the composition only further confirm the ideality of this model of dry screed. Many other things can be said about this model: it dries quickly (three hours on average), makes the floor very durable, and does not create shrinkage, peeling or cracks.
Important! The manufacturer recommends making a layer of a certain thickness in the range of 10-250 mm.
Floor coverings can be laid 15 hours after the solution has been spilled over the entire floor. You can also use it to screed “warm floors”, water or electric – it doesn’t matter.
pros
- ease of preparation;
- wide range of mortar layer thicknesses;
- quick drying (average three hours);
- high strength.
Minuses
- not detected.
Weber Vetonit 6000
Holcim M300
Holcim M300
This mixture is successfully used not only for a home or apartment, but also outdoors. With its help, you can make garden paths or screed a “warm floor” system, no matter whether it is electric or water.
To prepare the solution, Portland cement and coarse sand are used. The quality of the components is very high, as many builders working in new buildings have seen. What is important to them is the quality of the raw materials and what their composition is.
Interesting! When hardened, this solution acquires a bluish tint.
If you prepare the solution correctly, you can not only ensure a high-quality floor covering, but also make the surface as smooth as possible.
Judging by numerous reviews from ordinary people and professionals, this model of dry mix can claim the title of “ideal dry mix for floors.”
pros
- versatility;
- wide range of thicknesses;
- quick drying;
- high strength.
Minuses
- not detected.
Holcim M300
Options for cement mixtures
Depending on the work performed, all available cement mixtures are divided into groups of sorts:
- Preparatory activities. Expanded clay with the appropriate fraction and stone chips are selected as filler. This is necessary if you need to fill a large layer of screed (the base of the floor may have a significant difference in height in the room). Subsequently, after completing the base layer of approximately 50 mm, the finishing fill is performed.
- The finishing fill includes a variety of plasticizers and fine fillers. The resulting surface is not only smooth, but also free of cracks. After complete drying, it is ready for laying any type of flooring.
- Compositions that can self-level after pouring. Here the contents contain special components of small size, not exceeding 0.3 mm. And such requirements apply not only to the binding elements of all components, but also to any fillers. During the pouring of such a mixture of screed, it is independently distributed around the perimeter and levels all the required places. The base turns out to be very smooth. It will ultimately correspond completely to the horizontal surface, which allows you to immediately apply any type of floor covering.
- Many people are interested in the question of what dry screed mixture is applicable if there is a heated floor. This is where a special version of the solution stands out, applicable not only for electric floor heating, but also for water floor heating. In this case, the ductility of all components is significantly increased. While heating the floor, the solution remains the same and all components prevent it from cracking. Thermal conductivity also increases, which allows the heat energy to be transferred with the best efficiency to the room itself where everything is equipped.
Voting: the best floor screeds
Which floor screeds would you choose and which ones would you recommend?
Holcim M300
39.13% ( 27 )
Weber Vetonit 6000
13.04% ( 9 )
Bolars
0.00% ( 0 )
Paladium Palafloor-307
4.35% ( 3 )
Vilis M-300
0.00% ( 0 )
Rusean M-300
1.45% ( 1 )
NOVAMIX M-300
2.90% ( 2 )
Stone Flower M-300
0.00% ( 0 )
Titan M300
2.90% ( 2 )
Axton
4.35% ( 3 )
KNAUF Tribon
4.35% ( 3 )
Ceresit CN 173
11.59% ( 8 )
Eunice Horizon
10.14% ( 7 )
Classic dry screed
Dry screed refers to a multi-component system and a method of creating a floor covering without wet processes. The floor pie consists of several layers, each of which performs specific functions.
Waterproofing is most often a thick polyethylene film, but depending on the type of base, it can be specialized membranes, bitumen, or built-up insulation. The last two types are relevant on slab foundations when it comes to first floor floors with an unheated basement or directly on the ground.
Compensation (damper) tape is a gasket between the wall and the base with which the filler layer will be in contact. Commercially available varieties are made of polyethylene foam and may have an adhesive strip for ease of installation and an oilcloth “skirt” that goes down onto the rough coating. Replacement finished insulation is cut out from substrates such as Isolon and other foam materials with a thickness of 5 - 10 mm. The width of the tape should be greater than the expected thickness of the screed layer; the excess will be cut off. When finishing, the tape will be covered with a plinth mounted on the wall.
The filler is an even, compacted layer of dry backfill made of small composite materials: expanded clay and screenings, perlite (coarse expanded sand), slag, slag pumice, etc. Expanded clay of different fractions is most often used.
Rough coating - sheet materials laid on top of the backfill; they become the basis for finishing. This can be DSP, chipboard, OSB and the like, but the most popular are GVL and GVLV, in ready-made dry screed systems the sheets already have a mounting groove.