0
5469
06.12.2014
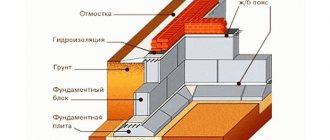
Basement is the lower part of the external wall of a house, built on a foundation and designed to protect the walls from the destructive effects of moisture. A house without a basement is at risk of mold infestation and rotting, may lose its ability to resist cold weather and increase heat transfer between the interior and the street.
One of the indisputable conditions is the strength of the base, because it bears the entire weight of the walls of the house. That is why the materials used must be of high quality, characterized by frost resistance, low moisture resistance and pressure resistance.
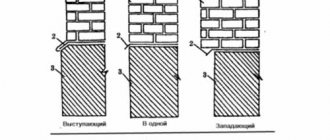
There are three plinth options used in construction:
- Outgoing – goes beyond the wall.
This option is justified in two cases - it is part of the building design (esthetically it is more advantageous) or there is a need for enhanced insulation of the basement floor. It must be equipped with a slope or groove for water drainage. Outgoing cap sample - Standing flush against a wall is an unpopular option today due to the lack of useful qualities.
- Recessed 6 cm into the wall of the house is the most optimal when building a house.
It has a number of advantages: savings during construction, protection of the junction of the plinth and the wall, which ensures the safety of the waterproofing layer, and the absence of an indispensable condition for ensuring the discharge of water. Recessed plinth example
DIY brickwork: tools, order and features
Now that you have an idea of how to lay bricks with your own hands, you need to talk about the procedure as well as some technical nuances.
Sample list of tools for bricklaying
Let's start with the tool. You will need:
- mason's trowels - apply and level the mortar onto the bricks;
- concrete mixer or container for mixing mortar;
- mortar shovel - for kneading and periodic mixing;
- two or three buckets for the solution;
- plumb line - check the verticality of walls and corners,
- building level - to check the horizontality of the row of masonry;
- cord-mooring - for beating rows;
- jointing (for molding seams);
- hammer-pick for breaking incomplete bricks (halves, 3/4 and checks - 1/4);
- The rule is a flat metal or wooden strip to check the plane of the wall.
Next we will talk about the features of the technology. First: it is advisable to soak the brick before use. This is especially true in hot, dry weather. Then it will “pull” less moisture from the solution. If there is not enough moisture, the cement will not be able to gain the required strength, which will affect the strength of the building.
First, two corners are driven out, then they are connected with several rows of brickwork
Second: the corners are driven out first. First the first two. They are connected with 2-3 rows of bricks according to the chosen masonry pattern. Then the third corner is kicked out. The second and third are also connected in several full rows. Afterwards the fourth corner is placed and the perimeter is closed. This is how walls should be built, going around them around the perimeter, and not pushing walls out one by one. This is one of the most common mistakes.
Third: there are two row control technologies. The first is that nails are inserted into the seams of the corners, to which strings are tied. It needs to be pulled so that it marks the top edge of the brick, and also limits the outer (and, if necessary, inner) surface of the wall.
Procedure for attaching the mooring cord
The second way is to use wooden or metal orders. This is a flat strip or corner on which marks are applied every 77 mm - marks on wood or cuts on metal. They mark the required row thickness: brick height + seam. They are installed using flat mounting brackets that are inserted into the seam. If necessary, they are then simply removed and rearranged higher.
There is another way - a mason's corner. It has a slot on one side, into which there is a solution at an angle.
Breaking out a row using a mason's corner
The disadvantage of this method is the same as just using a nail in the seam: the height of the row must be controlled “manually” when drawing out the corners. If you lack experience (and where can you get it if you are doing bricklaying with your own hands for the first time), this is difficult. Having (having done it yourself) everything is easier.
Fourth: preparation of incomplete bricks. As you have seen, when laying, they use halves, three-quarter bricks and checks - 1/4 parts. To ensure that the work does not slow down, it is necessary to prepare them before starting masonry. This is done using a hammer-pick. When preparing, high precision in size is required, otherwise the dressing will go wrong. To make it easier to control the length, marks of the appropriate length are made on the handle. By placing the pen on the brick, marks are made on both sides of the spoon. Then, placing a pickaxe blade on the mark, they hit the reverse side with a hammer, making notches. Having made notches on both spoons, they break the brick with a strong blow of the pick.
Types of socles
This is determined by the location of the front wall of the plinth in relation to the façade:
- speaker This option is used when it is necessary to increase the load-bearing capacity of the base. In this case, the element is extended two to three centimeters beyond the wall plane. There is a drawback - you will have to take measures to remove rain moisture flowing down the building;
- sinking. The façade wall hangs over the basement. It is best to use this option when durable building materials that do not require additional finishing were used to make the base;
- in one plane. The base part and the wall are in the same plane. This method is rarely used and mainly on outbuildings of secondary importance. The finishing layer is made of one material.
There are no specific requirements for the height of the basement - everything is determined by the presence of the basement and the foundation itself.
Types of base
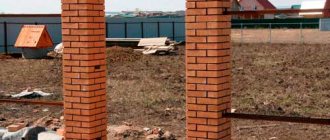
Every third house with a brick base was built with their own hands, the percentage is even higher if we take into account only the strip type of foundation.
The construction of a brick plinth is divided into several types:
- smooth. When placing a building in one plane, it is important to maintain the same thickness of the walls of the base and living space. In order to improve the aesthetic appearance, decorative borders or cornices are used; they will visually help separate the ground floor from the housing;
The base is a transition from the foundation directly to the structure itself
- speaker It has an impressive appearance and clearly distinguishes the features of the foundation from the residential building. Flashings are always installed on top of the plinth structure. It is important to decide on the thickness of the walls; only after calculating the width do they determine the amount of brick and mortar, then they begin to make the foundation;
- sinking. Brick is prone to destruction from exposure to atmospheric phenomena; to prevent this negative phenomenon, a sinking type of base is used. It is more often used in rainy regions. Here the base is somewhat thinner than the main walls.
Step-by-step instructions for laying a plinth
Step 1. Calculate the required amount depending on the width and height of the masonry. Take the approximate quantity data from the table.
How many bricks are needed for 1 m3 of base.
Dimensions of bricks Quantity, seam parameters are not taken into account Quantity including seams
Standard size
512 394
One and a half brick size
378 302
Double size
242 200
If you are working with bricks of non-standard sizes, you will have to independently calculate the volume of the base and divide it by the volume of one brick. The calculations are not complicated; there is no need to describe them.
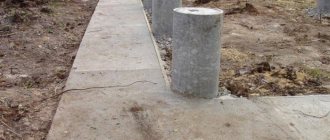
Foundation plinth
Step 2. Check the horizontalness of the foundation strip. If the foundation was made by responsible builders, then the deviation from the horizontal at the corners of the structure will not exceed two centimeters; such a spread can be easily eliminated without additional operations during the preparation of the base of the first row of the plinth. You need to check the horizontalness of the foundation using a water or laser level. Are there significant deviations found? You'll have to straighten the tape.
- Secure level slats at the corners of the foundation in a vertical position. The sizes are arbitrary, there is no need to take long ones.
- Beat off a horizontal line on one of them, transfer the value of the horizontal line to the second staff.
- Pull the rope according to the marks, do not allow it to sag. Measure the distance between the rope and the foundation plane along the entire length of the tape. This way you can estimate the approximate amount of work and calculate the amount of materials.
- If the unevenness exceeds 2 centimeters, you will have to prepare a concrete mixture; the spread is smaller - you can use ordinary cement-sand mortar. One condition - during the manufacture of the material, increase the amount of cement, it should be at least three parts to one part of sand.
- Place the finished solution on the surface of the foundation tape and level it along the stretched rope. The work can be done by eye; in the future, the bricks of the base will be installed according to the level and all flaws will be eliminated.
- It will take at least two weeks to harden. If the weather is very hot and dry, then the solution should be moistened generously with water at least three times a day.
Do not rush to start laying the plinth right away; strictly adhere to the recommended technology.
Step 3. Place two layers of roofing felt on a flat strip to waterproof the bricks
This is very important, without waterproofing the base will quickly collapse
Roofing felt insulation
Step 4. You need to start laying by laying two corners. The technology depends on how many bricks are in a row in width. You can lay corners from one, one and a half, two, two and a half and three bricks. If you do not have experience in producing such work, then practice. First lay the bricks without mortar, then work with mortar. The movements should become automatic; during training, constantly use control tools. Be sure to bandage, alternate spoon and butt rows. Now that you have experience, place the corners directly on the foundation strip. The height of the corners is 5–7 bricks. To begin with, the height is enough, so it is easier to control the correctness of the masonry and timely correct possible deviations in the position of the base.
Chain ligation system for laying the plinth
Step 5. At the height of the first row of each corner, drive in nails and pull the rope. Make sure that the rope lies exactly on the edges of the bricks. At this point, the preparatory work on laying the corners of the plinth is completed; start working on the straight sections.
Basement brickwork
Brick plinth laying
Laying the plinth
Leveled brick of the basement row
Further work on the base is no different from work on the wall; the rows are constantly being bandaged. If you use clinker bricks for external surfaces, use them only on the visible side.
Types of base
During the construction of the basement, it is allowed to use bricks that have already been used previously. It is worth noting that this material must be durable. This will ensure the durability of the entire structure as a whole. Thus, two main tasks are solved:
- costs for new brick are reduced;
- Solid material of high quality is used.
Next, it’s worth talking about plinths, when the process of finishing the walls has already been completed, and it itself is insulated
This note is of particular importance, since during the work the relative position of structural parts may change. There are three main types of plinth made of brick that can be filled
Thus, it is worth highlighting the following varieties:
- protruding relative to the walls;
- sinking;
- located flush with the wall.
As for the first type of base, this design provides for a protective drain. This is due to the fact that such a structure is highly exposed to precipitation. Therefore, masonry requires the use of only high-quality materials. This type of construction, as well as the one that involves placing a brick plinth at the same level with the wall, is used quite rarely today.
Before laying begins, the corners should be set correctly.
Recessed masonry is used for load-bearing surfaces made of gas silicate blocks. This foundation prevents rain from getting into the joint under the wall. It will go underground, and the waterproofing layer will be provided with reliable protection from external influences. There is also an opportunity to save money that will be spent on construction. It should be noted that when building a house, the base becomes sinking only after insulation with foam plastic and plastering of the walls.
Base size calculations
Determining the width of the basement requires studying the building design and construction material. For example, for foam concrete size 600*300*200 the wall thickness will be 30 cm (with insulation 38 cm). If the brick is used as a decorative finish, then the wall on top of the foam concrete will be expanded to 60 cm.
As for the height of the basement floor, it is considered to be the most reliable height setting, focusing on the maximum amount of snow over several decades. This calculation will protect the walls from moisture and increase the reliability of the constructed housing. But, as a rule, the height is set on half the first floor of the building. This standard applies to houses with a basement. Design experts say that the high plinth gives the building a light appearance.
Recommendations for choosing bricks for the plinth
As mentioned above, our recommendations do not apply to residential buildings; they should be built only according to the project, and in it all the requirements and parameters of the bricks are indicated. Let's consider cases of choosing a brick for a plinth only for non-residential buildings and outbuildings. What characteristics should you use to select materials?
Frost resistance
Frost resistance of bricks
Bricks, depending on the brand and manufacturing technology, have this indicator from F15 to F100 or more. This means that the material can withstand 25–100 freeze/thaw cycles at maximum humidity. And moisture permeability ranges from 2% to 12%. State standards regulate the minimum period of natural wear and tear of buildings; it is equal to 50 years. If an F50 brick is dipped into water fifty times and then exposed to frost, it will lose approximately 30% of its original strength, which is considered a critical value. But the basement brick will never become completely wet; it is always plastered or protected with other coatings. In practice, F50 brand brick lasts much more than fifty freeze/thaw cycles.
Frost resistance - the number of freezing and thawing cycles during which the stone will retain its original strength
Why do bricks lose strength during freezing/unfreezing and what does this depend on? During freezing, water increases in volume by about 10%, and the forces of ice are so great that no known building material can withstand them. The more water there is in the brick, the more microcrystals of ice there are in the brick, the faster the destruction occurs.
Thickened ceramic brick 250*120*88 mm, M-150, F 50
Strength
Determined according to GOST 530-2007, the grade of brick for laying load-bearing walls must be at least M125; with a safety margin, designers recommend using grade M150 brick for plinths.
Bricks made from many materials and using various technologies are suitable for these indicators, but some of them cannot be used in conditions of high humidity.
How bricks are made
Let's look at one example. Mark M100 means that the brick can withstand a load per square centimeter of at least 100 kg and no more than 125 kg. The surface area of a standard brick is 25 cm×12 cm = 300 cm2. One brick of the M100 brand is designed for a load of at least 30 tons.
Solid brick M100
We have provided the calculation so that you can more clearly imagine what forces different brands of bricks can withstand. Of course, these values provide that the load is evenly distributed over the entire surface (bed), in practice this rarely happens due to the presence of air pockets in the masonry.
Brick sides
What types of bricks can be used for the plinth?
| Name | Brief performance indicators |
Ceramic solid | Water absorption ≤ 12%, strength ≥ M100, frost resistance no less than F50. Used most often, universal application. The front surface must be protected from the negative effects of precipitation. |
Ceramic hollow | Water absorption ≤ 16%, strength ≥ M150, frost resistance no less than F50. used for plinths of light buildings without reinforced concrete floor slabs. The outer surface must be plastered with cement-sand mortar or lined with durable materials. Afraid of mechanical damage. |
Clinker | Water absorption ≤ 5%, strength ≥ M250, frost resistance no less than F100. It surpasses ceramic samples in all technical parameters. When laying a plinth, it is recommended to use two or more bricks wide as the outer face row. The surface of the base of this option does not need to be additionally finished with various building materials. The disadvantage of clinker bricks is their high cost. |
Now, having an idea of the requirements for the plinth and the technical parameters of the bricks, you can consciously select specific materials and begin laying the element.
Base
Usually the base of the house is laid out of the same brick from which the foundation was made. Sometimes it is possible to use sand-lime brick for the base of the foundation, but this is not recommended. You can line the walls and base with brick, then you need to take this into account when laying the foundation and expand it by about 12 cm - this is the standard thickness of facing bricks.
The brick for facing the foundation is a special facing or clinker brick. Which brick is better for the plinth, everyone decides for himself; both of these options are durable and have all the properties of building bricks, and look beautiful. The cladding can be connected to the walls in different ways; see how to do this in the video.
Features of the brickwork of the plinth
It is important to be careful about the step-by-step execution of work and to do everything in the established order. This will make it possible to obtain a high-quality structure
The corners of the building are set: bricks are placed along the width of the planned structure
It is important to use a level to ensure the angles are positioned accurately. Once the position is established using a level, the bricks do not move. Then measure the sides and diagonals of the surface: they should be equal
This makes it possible to establish the correctness of the placement of the bricks. The maximum error can be 2 cm. Correct installation of corners affects the strength of the house.
There are a number of nuances when laying bricks
Brickwork during the construction of different stages of the building has its own subtleties:
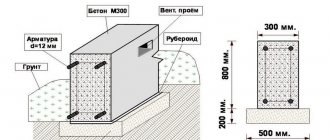
- The brick for the plinth is placed on a solution of cement and sand: in it, one part of cement corresponds to three parts of sand.
- The thickness of the basement structure is determined by the material that will be used for insulation. When using foam plastic, the thickness should not be more than 38 cm.
- Usually the masonry is made in 2 bricks, this technique is optimal. Don’t forget about the thickness of the planned walls. It is not recommended to lay out the base thicker than the walls. Then water can accumulate at the junction of the base and walls, which will lead to accelerated destruction of the room.
- When laying out, you can use different bricks. The choice depends on the installation. Either a whole brick or its halves can be used. When laying, it is recommended not to forget about the ventilation holes; they should be at a distance of 2 meters from each other.
- It is recommended to reinforce the masonry every 2-4 rows; for this purpose, a 5*5 cm mesh is used.
- In relation to the walls, the base can be flush or recessed. It is better to prefer the second option, this will prevent moisture from entering from the walls.
Preparation of the solution
The amount of cement composition depends on the bricklaying technology. The builders made calculations for 1 cubic meter:
- 1 block will require 0.221 m3;
- 1.5 bricks - 0.234 m3;
- 2 bricks - 0.245 m3.
You can use online programs to calculate building materials.
Masonry involves the use of cement grades M300, M400, M500. The sand chosen is purified river sand of the middle fraction. Additionally, lime is used. Adding clay will make the solution more elastic.
The consistency of the cement mortar should be uniform and plastic. Large ingredients such as shell rock and gravel are excluded.
Before adding, the sand is sifted through a sieve.
Carrying out masonry with additional insulation of the structure allows you to use a standard version of the mortar without impurities. The composition for the foundation of the house is made with fillers.
Achieving a uniform consistency of the cement mortar is done with a construction mixer using a drill attachment.
The proportions of the components of cement, sand and water depend on the brand of brick. Correction for soil moisture is being considered.
Cement ratio table
Brick plinth laying technology
Laying bricks on the surface of the foundation must be carried out taking into account certain rules, which will ensure the high quality of the created structure.
Preparing the necessary materials
Laying bricks on the plinth
You need to prepare the mortar immediately before performing the main work. It must be used within 3 hours as it quickly hardens and loses its properties. The preparation of cement-sand mortar can be done in a concrete mixer or done manually.
Take a basin of a suitable size and fill it with sand and cement (4:1), using a special mortar shovel. After mixing the dry ingredients, add water and 2-3 drops of liquid soap (this will give the solution additional plasticity). All ingredients are thoroughly mixed to obtain a mixture with a homogeneous consistency.
Experts recommend pre-soaking the brick in plain water for 15 minutes. Laying such material will be much easier and will allow you to easily eliminate minor defects that appear during work. After pre-soaking the material, seams are obtained that will be much stronger than usual. This is achieved by the absence of penetration of capillary moisture from the solution into the masonry.
Brick laying technology
For high-quality bricklaying, use the following instructions:
Types of bricklaying
- First, the corners are set, which should be at the same level. A cord is stretched between them for laying the next bricks.
- The solution for the bottom row is applied directly to the roofing material, spread with a trowel so that it does not reach the edges by 2-3 cm.
- The thickness of the seam is usually 12 mm, and with reinforcement it reaches 16 mm (metal mesh is used).
- The corner is formed from two bricks laid at right angles. For reliable fixation, use a construction hammer.
- Excess solution is removed with a trowel. It is applied to the side faces of red brick to form vertical seams.
- The position of each brick is checked using a level and plumb line.
- All masonry elements are carefully pressed to the surface, which ensures the reliability of the created structure.
- The bricks at the corners are laid several rows higher, which allows a cord to be pulled between them to form the entire masonry.
- During work, the quality of masonry corners is checked with a square, level and plumb line.
Acceptable errors:
- in the vertical plane up to 10 mm;
- in horizontal – 5 mm.
If small defects are detected, they can be eliminated by varying the thickness of the seam. But if the differences in level are large, it is impossible to get rid of them in this way
Therefore, in the process of laying each row, it is necessary to pay due attention to each brick. Particular care must be taken in forming corners, which affect the quality of the entire structure.
Related video: How to lay bricks correctly
https://youtube.com/watch?v=sGE2TKsrNjs
Selection of questions
- Mikhail, Lipetsk — What discs should I use for cutting metal?
- Ivan, Moscow - What is the GOST for rolled sheet steel?
- Maxim, Tver - Which racks for storing rolled metal products are better?
- Vladimir, Novosibirsk — What does ultrasonic processing of metals without the use of abrasives mean?
- Valery, Moscow - How to forge a knife from a bearing with your own hands?
- Stanislav, Voronezh — What equipment is used for the production of galvanized steel air ducts?
Calculation of the number of bricks
At the work planning stage, it is important to correctly calculate the amount of bricks. Many factors influence the quantity: length, thickness and height of the wall, complexity of the shape of the structure, the presence of decorative inserts. The dimensions of the base and determining the need for building materials are always calculated in advance; construction costs depend on them, and the purchase of bricks is one of the largest expense items.
The thickness and height of the building should be calculated taking into account the dimensions of the building blocks. Additionally, the thickness of the seams between the rows is taken into account; it is mainly 10±2 mm. According to SNiP 3.03.01-87, the thickness should be 12 mm, but an error of -2 or +3 mm is allowed; in practice, 10 mm is the optimal indicator for calculations. If reinforced material is laid, the seam size can reach 16 mm.
For ease of calculation, it is recommended to determine the thickness of one row with seams and reinforcing mesh, approximately 260x130x75 mm.
The thickness can not only be a multiple of the size of the brick, but halves are also often used: half a brick, one and a half, two and a half bricks. There is always a seam between several blocks. If the wall is made of 2.5 bricks, then the total width will be: 250 + 250 + 120 + 20 = 640 mm, where 250 mm is the length of the whole block, 120 mm is the size of half the element and 20 mm is the thickness of two seams. Laying a base with 1 brick for the first time is the best option, since it does not require any calculations, but is used exclusively for lightly loaded buildings.
It is worth considering that bricks can be one and a half and double. The only difference is the height of the block: standard - 65 mm, one-and-a-half - 88 mm, double - 138 mm.
When determining the quantity, a footnote is always made for the stock. It is recommended to buy 5-15% more than the calculated quantity; more precisely, the percentage of the reserve is determined based on the skills of the builder.
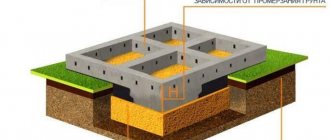
The basement is the above-ground part of the building and is located above the foundation
Operating conditions determine the approach
The technology for laying a brick plinth, as a rule, involves the use of one of the five types of clinker presented (see description in the text).
If we talk about the operating conditions of the brick, they are extremely harsh:
- firstly, the brick must be very strong - it will have to support the entire building;
- secondly, the brick must have good frost resistance, because it directly forms the outer wall of the building;
- thirdly, the brick should not allow moisture to pass through and not be subject to changes under the influence of moisture.
Clinker brick
All these conditions are fully satisfied by clinker bricks, which have:
- strength - from M75 to M500 (silicate is much inferior here, but acid-resistant is ahead - more than M500);
- frost resistance - from F50 to F100 (in this indicator, fireclay and acid-resistant are much inferior);
- average density (kg per cubic meter) – 1900 – 2100;
- porosity (%) – 5;
- thermal conductivity coefficient (W per meter) – 1.16.
The next choice is to find the type of clinker brick.
There are five of them mass produced:
- A – facing;
- B – construction;
- C – single;
- D – one and a half;
- E – double.
Thus, the most optimal choice is considered to be one-and-a-half clinker bricks with a strength of M400 and frost resistance no worse than F50.
Requirements
In addition, additional requirements are imposed on bricks, taking into account operating conditions:
- it should not have chips or signs of deformation;
- its dimensions must exactly correspond to the standards;
- the brick should not have any claims from an environmental point of view;
- Cement mortar will be used as a binding material, so it must have good adhesion to the mortar.
Articles on the topic
How to make a roof on a brick house - varieties, strengthening, instructions, advice from masons
Insulating a house made of sand-lime brick - stages of work, instructions, advice from masons
How to brick a window opening - options, instructions, advice from masons
Mosaic with bricks - preparation, masonry features, instructions, advice from masons
Waterproofing a brick plinth - horizontal, vertical, instructions, advice from masons
How to install a door in a brick house - options, installation, instructions, advice from masons
Brick partitions - preparation, construction, instructions, advice from masons
Brick foundation - step-by-step instructions, pros, cons, instructions, advice from masons
Reviews ()
Characteristics of the main types of material
At the moment, the industry produces three main types of general construction bricks. Let's consider which of them is most suitable for laying a plinth.
Silicate brick
Sand-lime brick.
- The production technology of these products is such that their final price is low. The main disadvantage of the material is that it does not tolerate operation at high humidity. This happens because its basis is lime and sand, produced using the pressing method.
- With prolonged exposure to moisture, the elements of silicate masonry absorb it, swell, gradually lose strength and then collapse.
- Based on this, making a base from such a material is the least acceptable. The instructions advise using sand-lime bricks in this case only in dry climates and when protecting such plinth masonry with reliable waterproofing.
Clay analogues
Red clay brick.
- Unlike its silicate counterpart, ceramic brick is not pressed, but fired. Therefore, this material is more suitable for installing building plinths, because has a higher level of strength, moisture resistance and frost resistance.
- However, it also absorbs water well.
- Based on this, before laying a plinth made of a brick of this type, select its brand. For example, M-150 products can withstand approximately 50/60 thaw/freeze cycles. If the climate in your region is humid and rainy, it is best to choose the M-250 brand.
Clinker material
Clinker ceramic block.
Another type of ceramic building material is clinker brick. It is this that has the best characteristics for making bases with your own hands. Such products are made from special types of clay, which are fired at very high temperatures.
If you knock on a brick, it will make a thin ringing sound.
- The material is not afraid of moisture.
- Has a high level of frost resistance.
- Has excellent load-bearing capacity.
- It is characterized by increased strength.
- The brick sizes are standard. This gives the masonry neatness and reduces the labor intensity of the work.
- The material has excellent adhesion to the masonry mixture. This prevents the formation of cracks and crevices through which cold and water can penetrate.
How to lay a brick plinth correctly?
The construction of a brick plinth differs little, regardless of the thickness of the wall and the number of rows.
Step-by-step instructions on how to lay a brick plinth:
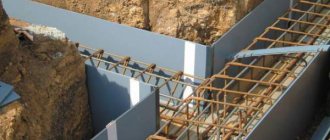
- The foundation is treated with bitumen mastic.
- The base is waterproofed by laying roofing material and treating the side surfaces with penetrating compounds. The rolled material is laid with an overlap of 10 cm, the waterproofing should protrude beyond the foundation by 3-4 cm.
After placing the mesh, brick laying begins - Final check of the correct location of the angles and plane.
- Prepare a working solution of grade M100 (M75-M125).
- The solution is laid on the foundation to a thickness of up to 2 cm, and a 4 mm wire with a cell size of 4 cm is inserted inside.
- Laying the first row is carried out; work should begin from the corners.
- After the first layer, check the level of the plane to adjust the thickness of the seam.
- When laying subsequent rows, bandaging is performed; the pattern is selected individually, most often occurring after 1-3 rows.
- Reinforcing mesh is laid every 4 rows.
- In the last layer of the plinth, holes may be required for laying the floor with the installation of rails or channels.
- Insulation of a brick basement from the inside or outside with extruded polystyrene foam.
- Covering the base with decorative stone, plaster or ceramic tiles.
During masonry, a plumb line and level are periodically used to monitor the correctness of the work.
1 brick
Laying a base of 1 brick is used for lightly loaded structures: garages, agricultural buildings, workshops, etc.
If you do everything yourself, you can simplify the task a little and lay the bricks one next to the other
The installation procedure is carried out according to a single system, but it is important to adhere to the basic rules:
- during the laying process, the seams of one row and another should not be allowed to coincide;
- the wall must be reinforced to prevent cracks from appearing;
- It is recommended to cover the brick base with cladding.
In 2 bricks
Laying a plinth with 2 bricks differs only in the technique:
- dressing is performed infrequently, once every 2-3 rows is enough;
- It is better to perform reinforcement once every 2-3 rows;
- acceptable brick displacement in each row is 25%, ideal is 50% of the brick width.
Work progress
Before starting work, it is necessary to develop discipline for laying bricks.
First choice - masonry scheme
The most common masonry schemes are two chain ligations of corners:
- a – one brick thick;
- b – one and a half bricks thick.
Scheme for laying a brick plinth using ligation of corners.
The diagram also shows the dimensions of the bricks:
- 1 – three-four;
- 2 – half;
- 3 – four.
Second choice - masonry relative to the wall
Here we have three options:
1 – protruding plinth – the wall of the plinth protrudes forward, outward;
The instructions also determine the order of laying relative to the main wall of the building (see description in the text)
- 2 – sinking – the base goes back, inward;
- 3 – base and main wall on the same plane; Note that in the diagram the letters indicate: a – waterproofing;
- b – wall.
Places where it is intended to use moisture-resistant materials must be equipped with waterproofing layers. When it comes to plinths, there should be two such layers - using one is one of the most common mistakes when building a brick plinth.
The diagram shows two options - correct and incorrect:
on the left - the correct application of waterproofing - two layers, on top and bottom of the foundation plinth;
The cost of laying a brick plinth is also determined by the correct use of waterproofing - it is mandatory to use two layers - on top and bottom of the plinth
on the right - only one layer is used on top.
Work progress
When the installation of the primary strip foundation has been completed, we proceed to laying the bricks:
- first, the bottom layer of basement waterproofing is laid;
- then, the angles are set - the most important stage that determines the success of the entire work; to do this: lay out the brick without mortar along the width of the base;
- to control surfaces we use a level and plumb line;
- we check that both diagonals and all four corners are identical - maximum deviations should not be more than 2 cm.
Insulation of basement brickwork
Laying bricks must be accompanied by insulation.
The most commonly used insulation scheme is:
- A – plaster on the facade of the building;
- B – brick plinth;
- C – adhesive layer for insulation;
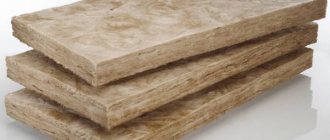
- D – insulation in the form of slabs of mineral wool or expanded polystyrene;
The answer to the question of how much it costs to lay a brick plinth depends not only on the type of brick and work with it - given the strict need for insulation, the cost includes many more materials (see description in the text)
- E – strengthening solution;
- F – fiberglass mesh;
- G – again a solution for strengthening;
- H – primer;
- I – finishing plaster on the facade.