Cellar with concrete walls: instructions
The first step is to make preparations , namely to decide on building materials, the location and dimensions of the cellar. We decided to choose a project made from bulk expanded clay concrete, since this option copes well with maintaining a constant temperature, and moisture will not penetrate into such a room. As for the depth, in our case the optimal indicator will be 3 meters.
Important point ! When constructing yourself and choosing a location for a cellar, you should choose elevated areas . This way you can avoid the risk of the pit being flooded with groundwater in the spring.
Let's move on to digging a pit. For greater comfort when descending into the cellar, a hole should be dug rectangular . The walls and floor of the underground structure should be thoroughly compacted! A gravel or crushed stone backfill is created on the floor, which is then filled with a clay solution.
If your site is located in a low-lying area and there is a risk of the pit being flooded, then you should use a concrete mortar instead of clay. In this case, before pouring it will be necessary to lay a steel mesh.
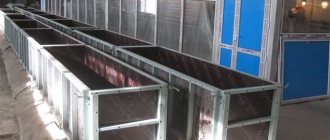
The construction of walls can be carried out in a variety of ways, it all depends on the material used. Alternatively, you can arrange concrete walls. For this purpose, formwork with longitudinal reinforcement is placed in the pit, after which it is filled with concrete. The formwork is dismantled after a few days.
Another good option is to build walls from expanded clay concrete or reinforced concrete blocks. The process of laying the material is identical to brickwork. Even at the planning stage, it is worth considering places for organizing ventilation and doorways for greater comfort in the operation of the cellar.
After the walls comes the creation of the ceiling. To do this, again, formwork is created from chipboard, which is laid on top of the supports.
The formwork contains a reinforcing mesh, which is then filled with concrete.
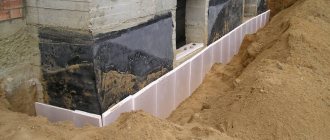
Waterproofing will allow you to forget about the moisture inside the pit ! In our case, this is coating waterproofing using bitumen mastic, which will be applied both on the outside and on the inside of the walls. On top of the ceiling, directly on the mastic, a layer of roofing material is laid, which will act as an additional waterproofing of the cellar.
The final stage of building a cellar with your own hands will be backfilling the pit and concrete floor with earth.
Advice ! When backfilling the floor and pit, make sure that there are no sharp objects or stones left in the ground that could damage the roofing felt layer, thereby compromising the waterproofing of the room.
In the end, all that remains is to improve the storage, namely, carry out electrical installations, install a ladder and a door, and also place inside special places for storing vegetables and racks for preparations and cans.
Types of cellars
According to the method of arrangement, the cellar can be divided into three types:
- recessed;
- semi-recessed;
- ground.
Based on their location relative to the house:
- underground;
- wall;
- separate cellar.
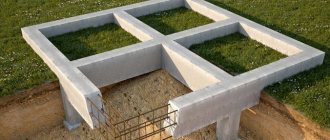
A free-standing structure is usually built into a natural hill. If the personal plot is located on a plain, the cellar is partially or completely dug into the ground, artificially creating a mound above it.
The building must be equipped with a vestibule. This requirement is due to the fact that cold air can damage the safety of provisions. Protection from drafts is also necessary. In the cellar, supplies are arranged in accordance with storage temperature, according to the principle: the lower the shelf, the colder.
Important! A good location for a home cellar would be shaded areas. It is recommended to place the entrance door facing the north or northeast side. This technique will help avoid overheating of the room from the scorching sun in summer.
For a standard family of four, 7 square meters of storage will be sufficient. The cellar can be larger. It all depends on the needs and financial capabilities of the owner.
Deep cellar
Buried structures include structures that are completely below the surface of the earth.
If a buried structure is built under the floor of a house, it is a basement. A typical project includes:
- waterproofed walls and floor;
- shelves and racks;
- ventilation vents;
- stairs;
- Luke.
The interfloor ceiling of the basement must have increased strength, therefore, most often, it is concreted. The entrance to the storage can be arranged both from inside the house and from outside. In the second case, a recessed platform with a staircase is additionally equipped. The walls are made of brick, cinder block or wood. But monolithic poured structures are quite acceptable. This arrangement method is the most common.
A free-standing deep cellar is built as a separate building. The design scheme is quite simple. A pit is being prepared on the site, about two meters deep. Then the floor is drained and the walls covered with waterproofing are installed. The ceiling is made of fairly light materials: beams covered with a mixture of clay and straw. The thickness of such a shelter is 40-50 cm. The floor is protected by a layer of clay up to 15 cm high. A drainage system 50 cm thick must be installed along the perimeter of the cellar. The design of a cellar with a cellar is the most complex design. This structure consists of underground and above-ground parts. The recessed part is used directly as storage for products. The above-ground part (house) can be used to store household equipment. A cellar equipped in this way very well protects the basement from precipitation and temperature changes.
Semi-buried cellar
The semi-buried cellar design can be built on both flat and hilly terrain. The basement part is deepened into the ground by 75-150 cm. The walls are laid from brick, cinder block or concrete. The ceiling is covered with beams and filled with clay coating, on top of which a waterproofing layer of roofing felt is laid. The surface of the semi-buried structure is covered with earth. This allows you to maintain approximately the same temperature in the cellar both in winter and summer.
Above ground cellar
An above-ground food storage structure is erected in cases of high groundwater. The entire structure must be above the ground surface, or with a slight depression of up to 50 cm.
The most important task when constructing this type of structure is to achieve the effect of a thermos. Most often, a layer of earth up to 1 meter high is poured on top of the cellar. The height of a cellar built above the ground is usually 2 meters.
Important! The facade of the above-ground cellar is carefully insulated so that the temperature inside the storage always remains the same.
An interesting type of ground basement is a glacier. A special feature of its construction is that it is 40-50 cm deep into the ground for storing ice. Hence the name. It is very important to provide high-quality ventilation in the glacier.
Wine cellar
A wine cellar is usually built in the basement of a house. The area of such storage can be 7-10 square meters. A very important condition is compliance with temperature and humidity conditions. The temperature in the wine cellar should be between 12-16 degrees. Humidity should be maintained at 70%.
Such a cellar should be located away from workshops and garages to avoid exposure to vibration. An equally important condition is the cladding. All materials must be safe and environmentally friendly, and must not emit odors. The walls must be carefully covered with thermal insulation materials. The space is equipped with shelves with cutouts for bottles or kegs. The best material for building walls is brick, and for filling the floor - sand.
Brick cellar: work order
If desired, a cellar for a country house can be built from brick. To create such a building with your own hands, you can follow the following procedure.
After the final determination of the location for the cellar, taking into account the previously stated recommendations, you can immediately proceed to digging a pit of the required dimensions. In our example, the hole will be 2 by 2 meters.
After thoroughly compacting the floor and walls, we proceed to pouring the concrete floor slab followed by waterproofing.
For the construction of the walls, bricks were used with the thickness of the masonry in one row.
During masonry work, you should constantly check the evenness of the walls using a level and a plumb line !
After the walls we move on to the ceiling. For this purpose, wooden logs, pre-impregnated with an antiseptic composition , are installed along the walls. A flooring is laid on them, on top of which a 25-30 centimeter layer of sawdust is placed.
A wooden hatch will act as a door inside. Don’t forget to insulate it with polystyrene foam so that the jars with the preparations do not freeze in winter.
The final structure in a homemade cellar with brick walls will be a wooden gable roof, on one side of which there will be an entrance door with a hole for ventilation.
It makes sense to dig a small ditch along the perimeter of the above-ground part of the cellar, into which water from the roof will subsequently drain during rain.
As for ventilation, in our case we used a pair of pipes with a diameter of half a meter. One was placed 20 centimeters from the ceiling diagonally, the second was placed at the same distance from the floor.
General device
The basement room, located below the zero level, is a type of building foundation buried in the soil. A basement is a special room whose floor is below ground level. The difference is more than 50% of the height of the room. To fully fulfill its functional purpose, placement of engineering systems, and warehouse storage, the height of the basement is taken in the range from 1.9 to 2.3 meters. If the developer plans to equip a bathhouse, sauna, or gym, then the height should correspond to the level of the living rooms.
The basement is an ideal place for a technical room or cellar
Traditionally, basements are used for storing country crops, food, and conservation. This possibility is due to the fact that the soil provides a stable temperature regime at a depth of about 2 meters from zero. The temperature is:
- in the spring-summer period - no more than 10 degrees Celsius;
- in the autumn and winter months - about 5 degrees Celsius.
If there is frost on the basement walls in winter, this indicates the need for additional insulation of the surface.
If the height of the basement is less than 2 meters, then it is characterized as a technical underground. The developed structure of basement buildings, including several tiers, is typical for multi-story buildings. This ensures increased stability of such a structure and allows for more efficient use of additional space.
Red brick cellar
The creation of such a cellar, as in the case of other varieties, begins with digging a pit no more than 3.5 meters deep. As a result, we should get two rooms: a staircase and a vestibule.
After digging the pit, we carefully compact the steps of the stairs, the floor and walls of the room.
We are pouring concrete for the floor. After it hardens, you can proceed to laying brick walls.
It is important to emphasize that laying walls can only begin after the concrete has set and gained about 70 percent of its rigidity!
Rolled metal is placed on top of the finished walls, which will serve as a kind of basis for the future ceiling.
The formwork is placed directly on the metal frame and the concrete mixture is poured.
After the concrete has completely hardened, you can proceed to the construction of the above-ground part of the cellar using red brick. At the end the roof is installed.
Interior arrangement of the basement
Wine cellar with stone walls
The basement of the house is finished in accordance with its purpose. For a garage and workshop, plastered walls are sufficient. This is not suitable for a living room, kitchen or office.
For covering the basement, materials are selected taking into account the style of the entire building. Lots of possibilities:
- Decorative plaster of any kind - structural, mosaic.
- Wallpapering – even vinyl wallpaper is allowed, since forced ventilation eliminates excess moisture from the basement;
- Lining or wooden siding - give the room coziness. However, in a room without windows they create the impression of excessive massiveness: it is recommended to combine the finishing with plastered fragments.
- Plastic lining is an option, rather, for the kitchen and bathroom, where high resistance to changes in humidity is required.
- Clinker, facing tiles are an interesting option in loft and techno style. They go perfectly with the primary purpose of the room.
The floors are made of chipboard, plywood, boards, linoleum and laminate are allowed. Often a “warm floor” system is installed here, which makes it possible to use even modular parquet for flooring.
It is very important to arrange sufficient lighting. You need to use fluorescent lamps. It is worth combining hidden and open sources to create lighting differences - it looks more natural.
Do-it-yourself storage in the country
Before proceeding with the construction of the cellar, it is necessary to prepare in advance all the necessary drawings, draw up at least a preliminary work plan and calculate the amount of building materials. During planning, it is important to consider that the finished storage must meet the following requirements:
- The room must have good ventilation;
- It is important to keep the inside cool;
- The underground part must have an autonomous power supply system;
- It is necessary to take measures to protect preparations and vegetables from mice;
- The temperature regime in the basement should not be too harsh.
Processing the outside of the cellar walls
The outer part of the cellar walls must be covered with waterproofing. Most often, these are bitumen mastics or built-up roll material (for example, roofing felt) for underground parts of the foundation and waterproofing plaster on the visible part of the base. The latter allows for the preliminary application of penetrating waterproofing or the subsequent application of sanitizing compounds.
The problem of excessive moisture in basements must be solved comprehensively, since moisture accumulates in building structures and destroys them. Waterproofing is carried out both with conventional materials (roofing felt, bitumen) and with special plasters. Owners of dry basements can choose general-purpose cement plasters for leveling. Sanitating compounds can dry out structures and accelerate the evaporation of condensate. The type of plaster is selected based on specific conditions.
Reconstruction of a cellar at the dacha
The first step is to remove everything from the underground covering, after which you can move on to cleaning the deciduous and earthen layers, followed by disassembling the knurling. It would be more correct if the listed work began to be carried out from the edge to the center!
The next step is to dismantle the old masonry walls with beams.
Construction of the foundation. For this purpose, a pit is dug in which formwork is created. In order to remain relatively warm inside the cellar, the thickness of the walls should be at least one brick thick. In our case, the height of the foundation reached 150 millimeters.
Before pouring the concrete mixture, reinforcement with a diameter of 16 millimeters is laid in the formwork in 3 rows. Each row of reinforcement is welded together using metal strips . Only after this can the structure be filled with cement. The formwork is dismantled after a few days.
You can avoid problems with grounding a private house if you weld a figure-eight rod to the reinforcement in advance, even at the stage of installing the foundation!
Claks of brick walls. The first or, as it is also called, the zero row of bricks is laid directly on top of the concrete surface of the foundation with a poke. In the center above it there is a strip of steel metal, on which the embedded parts are fixed. Thanks to this solution, reliable and high-quality grounding is achieved.
All subsequent rows are laid in half a brick, while steel strips should be placed after each row. This will provide the basement walls with greater strength. There is no need to connect the strips together!
When building basement walls with your own hands, it is important to ensure that during construction there are no voids or gaps between the materials. Otherwise, rodents may enter the cellar through them in the future.
When the height of one meter is reached when laying the walls, you can proceed to arranging fresh ventilation; in our case, sewer pipes were used for this.
You can organize waterproofing of basement walls using sheets of roofing felt.
Creating a ceiling and top trim. Only after laying 21 rows of bricks can the upper part be tied using metal elements. To do this, a sheet of roofing material is laid on top of the last layer of brick, which is then covered with earth. In our example, two profiles from I-beam No. 12 were used for strapping, which was sawn in the middle. A section of rail was used as a beam.
The next step is to carefully secure the ladder!
Pouring a 100 mm reinforced concrete floor begins with the installation of formwork and installation of reinforcement. Afterwards the structure is filled with concrete.
At the end of the construction work in the cellar, the screed made of the finest crushed stone is filled with cement, the floor is insulated using a 5-centimeter layer of polystyrene foam, and a hatch is placed.
Electrical supply and finishing work are being carried out, during which it will be enough to simply whitewash the surfaces of the walls.
When carrying out finishing work, do not forget to place the canopy over the ventilation pipes!
Construction of a cellar
Before proceeding directly to the construction of the storage facility, it is necessary to select a location for the construction of the cellar. The location for the construction of a food storage may well be an area with a hill where atmospheric moisture cannot enter and accumulate. If groundwater is high, it is necessary to build an above-ground cellar.
To determine the groundwater level, it is recommended to drill a well with a depth of more than 2.5 m. If the groundwater is located above 1 measure, the basement cannot be deepened.
Advice! It is recommended to equip a semi-buried building with a groundwater height of 1.5 m.
The construction of the cellar is carried out in stages:
- Preparing the pit.
- Laying a drainage cushion made of gravel, expanded clay, crushed stone, sand.
- Laying a waterproofing layer.
- Reinforcement and concreting of the floor.
- Preparation of formwork for the construction of walls.
- Installation of fittings.
- Concreting walls.
- Vibrator compaction.
- External waterproofing.
- Internal waterproofing.
- Plastering ceilings and walls, cladding.
- Arrangement of space with racks and shelves.
- Ventilation equipment.
- Ceiling arrangement.
Basic principles when laying a cellar
Laying the foundation
When laying the foundation for a cellar in the basement, you must follow the following recommendations:
- The size of the pit around the perimeter must be increased by 30-40 cm from the actual dimensions.
- The minimum foundation depth is 30cm.
- The perimeter is strengthened with formwork to prevent the soil from collapsing.
- Posts 10 cm high are installed in the corners.
After installing the foundation, they proceed to waterproofing and pouring the floor with concrete. Waterproofing is achieved using a layer of crushed stone, gravel or construction waste. For greater effect, dry mixtures are poured with heated bitumen. Sheets of roofing material are laid on top. On top of the waterproofing layer, the basement cellar floor is covered with sand.
Walling
If the site has wet soil, the cellar walls are mounted from reinforced concrete grade 350. The most suitable replacement for concrete is brickwork or stone. But the use of these building materials is recommended on dry soils. Basement wall installation steps:
- Installation of formwork.
- Installation of reinforcing mesh.
- Layer-by-layer pouring of concrete with careful compaction.
- The top of the reinforcement sheet is attached to the ceiling.
- After thorough and lengthy drying, the formwork can be disassembled. Dismantling should be done after 4 weeks.
Arrangement of the vestibule
In front of the storage room there is a vestibule with two doors. The air that accumulates in the vestibule acts as thermal insulation. Thanks to it, the necessary microclimate is created in the storage facility. When creating a cellar layout, you need to carefully consider the number of steps in the staircase. The width of each tread is at least 200mm. A well-designed space will provide access and accessibility to any shelf and storage rack.
Ceiling
The basement ceiling is made using permanent formwork. Concrete grade 250 is used as the main material. Stages of installation of the ceiling:
- A transverse frame is made from wooden beams.
- A reinforcing mesh with 20cm cells is laid on top of the frame.
- The wall fittings are connected to the ceiling fittings using tying wire.
- The formwork is being constructed.
- Pouring concrete occurs in several stages. Each layer must be thoroughly compacted and allowed to dry.
Complete hardening of the ceiling fill occurs after 3 weeks.
Waterproofing
The basement requires careful waterproofing. The installation of a moisture-protective layer in the cellar is carried out using mastic and bitumen liquid mixtures.
Sheets of roofing material are fused over the walls, which are carefully connected to the floor covering, additionally coating the seams with mastic. External walls and ceilings are protected with polystyrene foam boards. The ceiling is insulated with a double layer of roofing felt. A layer of crushed stone and sand is poured on top. Then, geotextiles are laid. The final covering is a land rampart. Soil is a natural thermal insulator. To strengthen the earthen embankment, it is necessary to plant ground cover plants with a developed root system.
Waterproofing a cellar in a garage
Cellar ventilation
Without constant air exchange, products will not be stored indoors. Therefore, a very important step in arranging a cellar is the installation of a ventilation system. Principle of ventilation arrangement:
- The exhaust pipe is fixed. It must be fixed in the highest place under the ceiling.
- The supply pipe must be placed slightly higher than the floor covering.
- The ends of the pipes are brought out.
- The resulting vents in the walls between the pipes must be insulated with polyurethane foam.
- Moisture canopies and a mesh to prevent rodents and insects are hung on the outer ends of the pipes.
Ventilation vents can be made of concrete. Using formwork, mount the pipe and insulate it with mastic and roofing felt.
Facade decoration
The facade of the external cellar must meet increased requirements for the durability of the material. In addition, the door must fit tightly to prevent drafts.
A cozy cellar mound fits perfectly into the landscape of any personal plot. By laying out a beautiful path to the basement and lining the façade of the vault with natural stone, an ordinary cellar will turn into the most beautiful part of the site.
Cellar in the house
Cozy cellar under the terrace
How to convert a basement into a cellar with your own hands?
If there is a basement inside your country house, then if necessary, you can easily convert it into a cellar with your own hands - you just need to place racks inside for storing vegetables, and also install a wooden partition to divide the basement space. At the same time, the cellar will require a ladder, fans and lighting.
The stairs leading to the basement should remain comfortable and without steep steps!
If in winter the temperature in the basement dropped below zero, then additional wall insulation . Before this, it makes sense to apply slaked lime or an antifungal composition to the surfaces of the walls. Foam plastic, glass insulation or rolled roofing felt will work as a thermal insulation material. The insulation itself is covered with sheets of fiberboard or plywood.
In addition to the walls, in the basement there may be a need for floor insulation , which is implemented through plastic film and timber laid on top. If necessary, you can fill the floor with bitumen, create a 5-6 cm flooring of sawdust, covered with wood on top.
How to insulate a basement?
The basement of a private house can easily accommodate a garage or a room for leisure activities. The space under the building will be comfortable if you additionally take care of insulation:
- Between the basement and the basement, insulation is carried out internally. It can also help remove excess moisture. Otherwise, equipment and communications may be damaged. Condensation will minimize the use of insulation material.
- Ventilation in the technical underground goes well with external insulation. The communications layer can be located in close proximity to the material. Thanks to this, it is possible to obtain the necessary level of protection. However, even builders consider the installation process labor-intensive.
- If there is a workshop in the basement of the garage, then it is most effective to use a combined insulation option. It contains not only a waterproofing layer, but also a thermal layer.
The underground equipment is selected by analyzing the following factors:
- humidity level;
- heating system;
- For a basement in a private house, the presence of a drainage layer is also important;
- purpose of use.
How to build a cellar in a country house?
An ordinary cellar is made in the form of a simple pit with concrete walls, on top of which a roof is placed. It is recommended to build such a structure on an elevated place , so that during periods of abundant water, groundwater does not reach the underground room.
Work order
- Preparation of drawings. In our case, the depth of the basement will be 1.0-1.2 meters, dimensions - 1.5-2.0 meters.
- Digging a pit in the case of a separately located cellar.
- The bottom of the pit is filled with a 5-7 cm layer of crushed stone or pebbles, a steel mesh and formwork are installed, after which cement is poured.
- After the concrete has hardened, you can proceed to laying brick walls.
- Along the perimeter of the basement, on top of the walls, 50 by 50 millimeter bars are laid. A hatch is installed, insulated with ordinary polystyrene foam.
A cellar is a very popular structure in a suburban area. In a cellar built in accordance with the rules and equipped with ventilation, it is very convenient to store vegetables grown in your own garden: for a long period they do not lose their taste and retain the maximum amount of vitamins. The cellar is also suitable for storing preserves and pickles.
Content
- Cellar on the site - choose the right place
- Digging a pit and laying the foundation
- Materials for the cellar - we build walls and ceiling video
- Hood in the cellar video
- Waterproofing video
- Thermal insulation
- Cellar in the house
- Other types of cellars
- semi-recessed
- ground
- How to do electrical wiring
- Antiseptic treatment
Cellar on the site - choose the right place
To build a cellar, you will need to dig a pit about 2-3 m deep, the optimal cellar area is about 8 square meters. m. To avoid problems with the flow of melt or groundwater into the cellar, it is advisable to choose the highest place for its construction. Of course, this is important if the cellar is built separately, and not as a basement for a permanent building.
Before starting construction, it is necessary to determine the depth of groundwater - even if the water rises to the maximum level, it should not flood the cellar. Typically, the height of groundwater does not exceed a two-meter level, which is quite enough for construction. Depending on the composition of the soil, the option of flooring and waterproofing is selected.
The best time to build a cellar is summer, when groundwater drops to its minimum height.
Digging a pit and laying the foundation
The construction of a cellar on a summer cottage begins with marking the dimensions of the structure on the selected site. Then the top layer of soil is removed and they begin to dig a pit, calculating its depth taking into account the groundwater level. If the soil is dry, the dimensions of the pit must correspond to the size of the structure - all work will be done from the inside, but if the soil is wet - the pit will be dug in a large size - waterproofing work will have to be done from the outside of the cellar walls. The steepness of the pit slopes depends on the type of soil.
The pit is allowed to stand for a while to make sure that water does not seep through its walls. Places where water appears are sealed with clay tampons, digging a ditch 0.5 m deep, trampling it with greasy crumpled clay, and compacting it tightly.
In order to form the base of the structure, the bottom is leveled and compacted, covered with a 15 cm layer of sand, then gravel and rich clay. This is necessary if groundwater lies at shallow depths. Next, a layer of concrete with a thickness of 5 to 10 cm is poured. After hardening, the concrete is poured with melted bitumen, lined with strips of roofing material, and again concreted with a layer of 10-15 cm.
To construct the foundation, rubble stone or crushed stone filled with sand-cement mortar is used. The dimensions of the foundation must exceed the external dimensions of the cellar by 0.15-0.2 m on each side.
Materials for the cellar - we build walls and ceilings
A wide variety of materials are used for the construction of walls:
- concrete
- rubble stone
- Red brick
- wood
- asbestos cement sheets.
The thickness of the walls is planned depending on the material:
- concrete - 15 cm
- brick - 12 - 25 cm - depending on the type of masonry
- bottle - up to 25 cm.
For casting the walls, concrete grades 50 or 100 are used; it will also be necessary to construct formwork from boards around the perimeter of the cellar.
For the construction of stone walls, granite, sandstone or dolomite pieces of rough processing are used. The stones are selected and laid so that the seams have a minimum thickness - this will reduce cement consumption and reduce the threat of subsidence of the masonry.
When constructing walls from brick and rubble, the seams are bandaged. If you plan to plaster the surface of the walls, then laying in a waste area is allowed, i.e. the solution may not reach the surface of the walls by 1 - 1.2 cm.
To cover the cellar, use any available and sufficiently durable materials. The simplest option is to use wooden poles, bars, boards, and slabs. They are treated with an antiseptic, laid down and covered with any heat insulator (30 cm layer). The ceilings are smeared with clay and covered with soil or slag. Using flammable peat or sawdust as backfill, cover them with at least a 2 cm layer of soil or sand.
If reinforced concrete slabs are used as the floor, you will need to seal the joints with cement mortar. Next, the slabs are filled with molten bitumen and roofing material is laid on it. Slag wool can be used as insulation.
If a cellar is built above the cellar, then its door should face north so that it is less heated by the sun. The walls are made of any material, the roof is made of materials with low thermal conductivity.
A hatch with an insulated lid is installed in the ceiling.
Hood in the cellar
Room ventilation is an extremely important point; the quality of food storage depends on its proper organization. To ventilate permanent structures, two ventilation pipes are installed: a supply pipe, installed in the lower part of the cellar, at a height of about 0.5 m above the floor level; an exhaust pipe, built in the upper part, under the ceiling.
Pipes can be ceramic, metal, asbestos-cement, or plank. Install them in different corners of the room - this will eliminate the possibility of fresh air being sucked in. Additional ventilation will be provided through gaps in the doors and hatch.
To create a sustainable process for providing fresh air, the exhaust pipe must be raised above the ridge of the cellar roof. The exhaust pipe should be insulated or made double. The cross-section of the pipe is calculated depending on the size of the cellar, for example, for a room of 8 square meters. m you will need an exhaust pipe with a cross section of 12X12 cm. The pipes are equipped with dampers and valves - this will make it possible to regulate the speed of air movement. It is enough to equip some types of cellars with a grate in the entrance hatch.
The effectiveness of the exhaust system can be checked by observing how the smoke moves in the room. A signal that the level of ventilation is insufficient will be the appearance of mold, dampness, unpleasant, musty air, and the appearance of condensation on the ceiling.
To make ventilation more convenient, it is better to make the internal doors of the cellar lattice. To absorb excess moisture, boxes with substances that actively absorb moisture, for example, salt or quicklime, are placed inside the cellar.
Waterproofing
When starting to install waterproofing, you should understand that the process itself is less complicated and time-consuming than correcting mistakes made during its implementation. Therefore, all work should be performed carefully and efficiently. The construction of a waterproofing system makes sense only if:
- correctly chosen design solution for the cellar
- use of quality materials
- performing work according to all rules.
When the groundwater level is high, it is recommended to carry out anti-pressure waterproofing. It will also be required if there is a threat of hydrostatic pressure on the walls from melt or rain accumulated in the space between the walls of the cellar and pit, i.e. stagnant waters. This applies to cases where the cellar is built on dense clay soils.
To make the base of the cellar and walls waterproof, double-sided plastering of brick and concrete walls is used with a solution consisting of 2 parts water and 1 part cement. Next, install a layer of anti-pressure waterproofing made of roofing felt or roofing felt, in 3-4 layers, and press it with a protective wall to protect it from damage. The protective wall is constructed of red brick, the space behind it on the pit side is equipped with a clay castle, which will extend the service life of the waterproofing layer.
If, during work, groundwater accumulates in the pit, then it will be necessary to take measures to drain it - the construction of a drainage system - a ditch at the bottom of the pit leading to a drainage well.
Waterproofing of walls is carried out using coating, pasting or mixed waterproofing, which involves the use of mastics and rolled materials simultaneously.
In order to ensure the drainage of storm water from the cellar, a drainage system is constructed, which is a ditch approximately 0.5 m deep.
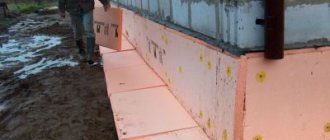
Thermal insulation
To obtain optimal temperature indicators inside the cellar in summer and winter, the ceiling and walls are insulated with mineral wool, polystyrene foam or styrofoam insulating film. When choosing a material, you should consider what the surfaces to which the heat insulator will be attached are made of. For example, it is very easy to attach polystyrene foam to a brick wall, while mineral wool or film will require the installation of beacons.
Cellar in the house
If you decide to build a cellar in a house, or rather, under a house, then it is better to plan its placement under non-residential rooms, preferably under unheated ones. The ideal place to place it would be a veranda - the temperature there is lower than in the house, and it will also be easier to install a ventilation system. If the only possible option is to place the cellar under a heated room, then you will need to thermally insulate its ceiling; you can install a five-centimeter layer of polystyrene foam into the vault screed. You will also need to consider the best option for installing high-quality ventilation - otherwise, ensuring high-quality storage of products is unlikely to be possible.
Other types of cellars
Depending on the device, cellars can be:
- buried
- semi-recessed
- ground.
semi-buried cellar
We discussed the construction of a buried cellar above; it is preferred in areas where groundwater lies at a sufficient depth. If the area is low-lying, then a more appropriate option would be to build a semi-buried cellar. A pit for it will need a depth of only 0.7 - 0.9 m, the dimensions of the pit should be significantly larger than the dimensions of the cellar itself - they should allow the installation of external heat and waterproofing. To avoid unnecessary damage to the soil, the pit is dug manually. If water-bearing veins are discovered, they should be carefully sealed with clay to a depth of 0.15 m.
For the construction of walls, brickwork or concrete slabs are used. Wall plastering is done with the addition of waterproofing material Aquatron, which provides: high-quality adhesion to a brick or concrete surface, water resistance, frost resistance, and easy application.
Waterproofing can be replaced with a clay castle 30 cm thick. You need to waterproof the entire surface of the foundation and outside walls. To construct the ceiling, a slab is used; after laying it, it is treated with a clay solution, and after drying, it is covered with soil.
above ground cellar
There are different types of above-ground cellars; their differences are determined by the location and construction method. A wall-mounted type of above-ground cellar is attached to one of the walls of the house. It is usually constructed from brick or monolithic concrete. Brickwork is done using one brick per sand-cement mixture. The cellar walls on both sides are plastered with cement mortar. Then the outside is waterproofed with bitumen coating in 2 layers.
Before constructing the floor, the soil inside the cellar is carefully leveled, a layer of concrete about 15 cm is poured. After the concrete has completely hardened, a floor is laid, the thickness of which should be at least 5 cm.
How to do electrical wiring
For comfortable use, you will need to consider the lighting method. Since there will be no daylight access to the cellar, you will have to use a flashlight when visiting it. It would be more convenient to install electric lighting. It is best to use a copper wire with rubber insulation and braided wire. Electrical wiring is carried out externally. You cannot install sockets in the cellar. All electric lamps must be equipped with protective glass reinforced caps. Switches are installed outside, at the entrance to the cellar.
Antiseptic treatment
To prevent the cellar from becoming a haven for fungi and mold in winter, you should treat the walls, shelves, and drawers with antiseptic preparations even before you start loading vegetables into it. If it is undesirable to resort to the use of chemicals, you can treat all surfaces with slaked lime.
The next type is a cellar with embankment, which is distinguished by the fact that during the construction process its outer walls are embanked with soil. This helps maintain stable temperature and humidity inside it.
Author: Sergey and Svetlana Khudentsov
10
Types of ready-made solutions
Barrel cellar
To create such a solution, high-quality fiberglass is used. The cellar in the form of a barrel is an absolutely sealed structure, and therefore it can be placed in any place and soil. The operational period of the finished product reaches 50 years. Design features ensure a constant internal temperature, which allows you to store vegetables and food inside without any danger. To place it on your own site, you just need to dig a hole, place a cellar inside and fill the barrel back.
Ready-made models
Similar to the previous model, many conventional ready-made cellars are designed to last 50 years. As a rule, they are made from seamless plastic. Together with them, the kit usually contains: fresh air ventilation, a steel staircase, an exhaust hood, a built-in light source, etc. To install such a product with your own hands, you just need to dig a pit of the required dimensions, place the device inside and fill the structure back so that only a rectangular hatch is visible above the ground.
Basement base
The base of the semi-basement is the foundation, it bears the load of the walls and the mass of the building structure. Depending on the groundwater level, the foundation of the building located under the building can be:
- monolithic, in the form of a solid concrete slab. It is used for closely spaced aquifers. The base, up to 25 cm thick, must be reinforced with a rigid spatial frame made of steel rods with a diameter of 12 mm and be joined to the walls with a high degree of tightness;
- tape type up to 30 cm thick, which is used for deep aquifers. The base of the basement for this foundation is not a power structure, since it is not combined into a single power circuit with the foundation strip and walls. The width of the strip base must exceed the thickness of the supporting walls by no less than 5 cm.
A reliable basement foundation absorbs the load from the mass of the structure, the reaction of the soil, and provides the necessary service life of the building.