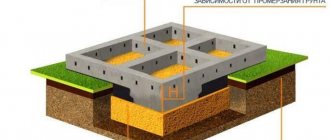
Main types of basements
A basement under the house is an undoubted convenience. It increases the area that can be used for various needs. The ground floor houses:
- storerooms;
- cellar;
- Technical buildings;
- garage;
- sauna, bathhouse, swimming pool;
- Gym;
- workshop;
- billiard room;
- rest rooms.
Many specialized objects can be placed in the basement.
Depending on the purpose, a certain temperature and humidity regime must be maintained in the basement and ventilation must be provided.
For example, in a billiard room or workshop you need to provide heating, but in a cellar this is not at all necessary.
In a pantry, the ceiling can be at a height of 1.8 meters, while in a billiard room or recreation room the recommended value is at least 2.3-2.5 meters.
Access to the pantry or cellar is provided through a hatch or a narrow staircase with a door. Swing or overhead gates are installed in the garage.
The basement floor mark can be:
- below the base of the foundation;
- above her;
- on the same level.
In this video you will learn more about the foundation: Deepening an existing or new basement below the base of the foundation is not recommended unless an assessment of the condition of the structures, engineering surveys, and a preliminary calculation of the foundation for strength and stability have been carried out. Otherwise, this may lead to a decrease in the bearing capacity of the soil, uneven settlement and the appearance of cracks. Sometimes the consequences become catastrophic.
Important. Before building a foundation with a basement, you need to consider options for using the premises and draw up a plan for laying communications. This will help avoid cost overruns on remodeling and remodeling in the future.
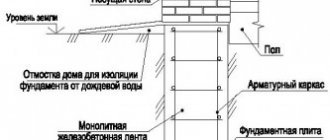
Features of the foundation structure
The basement walls serve as the foundation for the entire house. They transfer the vertical load from the structure to the soil. In addition, the structure is subject to lateral pressure, which increases with depth.
To compensate for shear forces, it is recommended to widen the base of the foundation. All calculations are carried out according to the methodology described in SNiP 2.02.01-83, 2.09.03-8 “Manual for the design of buildings and structures”.
Ready-made projects are usually designed for specific soil conditions in the construction area. If the geological parameters differ, the calculated soil resistance is increased by a safety factor. Then the structures will have reserve strength.
The main characteristic that determines the depth of the foundation and the possibility of building a basement under the house is the height of the groundwater. It is installed during engineering and geological studies of the site. It is not recommended to bring the floor of basement rooms close to the boundary of underground moisture. The minimum distance from the groundwater level must be at least 0.5 meters.
Important. When the groundwater level is high, the feasibility of building a basement is highly questionable. No amount of waterproofing, even the highest quality and most modern, can save an underground structure from leaks. The real solution here is to install a coffered cellar.
The construction of a foundation for a house with a basement differs from the usual one in a number of features. To be done:
- more extensive excavation work;
- drainage device to remove soil moisture;
- more thorough waterproofing of surfaces;
- insulation of walls and floors;
- interior design of premises;
- installation of a ventilation system, if provided - heating.
The construction of this structure has a number of features.
For convenient access to the basement, a staircase with a door or hatch is installed. If a boiler, boiler or other complex equipment is located in the room, provisions are made for their safe operation and the possibility of repair.
The ground floor is covered with reinforced concrete slabs or wooden beams with a ceiling lining. You can install heated floors at the ceiling level.
Features of a recessed monolithic slab
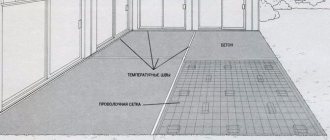
In general, this type of foundation belongs to the category of shallow foundations - that is, the slab is poured almost on the surface of the soil. And only when the slab foundation and the ground floor form a single whole can it be buried even to the entire height of the walls. The thickness of such a slab should be at least 20 cm, although the surface version may have half the thickness.
The fewer joints, the higher the tightness
Theoretically, the walls of the basement floor, in contact with the ground, built not on a strip foundation, but on a slab foundation, can be laid out of brick. But it is much more reliable when they are also made in a monolithic manner. And the point here is not even in strength, but in the tightness of the enclosing structures.
With a monolithic version of the construction of the walls of recessed rooms, the result is something reminiscent of a concrete pool bowl. This type of foundation is called: a monolithic foundation slab for the basement floor. It is also convenient because the surface of the slab will serve as an excellent base for installing a floor (see Floor in the basement: how to make it).
Ground floor on a slab foundation
Brick is preferred when there is no time to wait for concrete to gain strength. In this case, the weakest points are the joints between the base and the base of the walls, as well as the masonry seams themselves.
No matter how you seal them, over time moisture finds its way, and it is in these places. Therefore, designers often give preference to the monolithic method of constructing the walls of a basement or ground floor.
Alternative to brick and concrete
An alternative option is the prefabricated monolithic method, in which the construction of walls is carried out using perforated UDB blocks. They serve as permanent formwork: when using them, not only the construction time of walls is reduced, but also the amount of concrete spent on pouring is reduced.
Note! Thus, you can get away from the shortcomings of both the monolith and the brickwork. In terms of strength, prefabricated monolithic walls are in no way inferior to monolithic ones due to the fact that the internal masonry channels are filled with concrete and vertically reinforced with installed reinforcing bars, as shown in the photo below.
Walls made of UDB blocks
So:
- When constructing monolithic or prefabricated monolithic walls, it is much easier for the basement floor to ensure airtightness, since there will be no joints between the walls and the floor. This is most relevant in situations where groundwater is quite close. All that remains is to figure out how the slab foundation for the basement is constructed, for which you will be presented with a video in this article.
- It is unlikely, of course, that the owner will carry out its installation with his own hands, since here the amount of work for a whole team is carried out in several stages. And pouring a slab is a continuous process that needs to be completed in one day, and labor is worth its weight in gold.
- Note that concrete workers must be guided by design documentation, and not just “valuable instructions.” But in order to understand whether violations are allowed when constructing the foundation, the customer, who is the owner of the future home, must at least have an understanding of the technology.
You need to carry out control right away - because later, when the house is already put into operation, it will be too late to correct anything.
Types of basement foundations
When building houses, the most common structures are:
- tape;
- slab;
- pile
To arrange a foundation for a basement, the first two types are most often used, in which the structures immediately combine the functions of the foundation of the house and the walls of the room, and in slab ones - the floor of the basement.
You can dig a small basement or cellar in a house on a pile foundation. The main thing is to step back from the supports a certain distance so as not to weaken the thickness of the soil and protect the base from skewing and collapsing.
Strip foundations are made of monolithic concrete of a grade not lower than M200 or prefabricated elements - blocks, vertical panels, brick, stone.
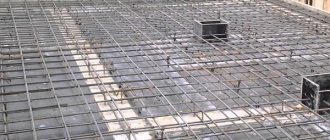
Slabs are assembled from individual elements or poured on site. For working rods, reinforcement of class A400, A500 is used, for structural rods - A240.
Stage 4: finishing and communications
At this stage, before backfilling, it is necessary to complete the installation of external communications. You can now begin finishing the interior of the cellar and installing the electrical wiring.
We install air ducts. The hood is made of two plastic pipes with a diameter of 150 mm, with plugs installed at the ends (check valves)
The junction of the plastic pipe and the monolithic ceiling is heavily sealed with moisture-resistant sealant
We install the air supply from the same materials. Check with the manufacturer about the possibility of using the pipe in the ground and what pressure it can withstand. We also seal the joint with the wall. The corner element is necessary to direct the pipe in the desired direction
We install the inflow pipe, make a slope of 5-10% for each meter and sprinkle it with earth to prevent displacement. We lay a drainage pipe parallel to the supply pipe
Foundation construction technology
The construction of the foundation of a house includes preparatory, excavation, construction and finishing work, and laying communications.
Reliability of basement operation largely depends on high-quality excavation work, water disposal and drainage systems, hydro- and thermal insulation, and ventilation.
Excavation
The pit is dug manually or using an excavator. The lower mark should be at the level of the base, taking into account the sand and gravel backfill of 20-30 cm and the concrete slab or floor - 10-20 cm. To prevent surface water from filling the hole, work must be carried out as quickly as possible.
Drainage
Simultaneously with excavation work, drainage is arranged. Perforated pipes are laid around the perimeter of the house to collect soil water. They are looped and placed at an angle to the collector, from where the accumulated wastewater is pumped out or sent to the sewer.
A storm drain, a rain and melt water collection system laid along the blind area, will protect you from surface moisture.
Read more: installation of basement drainage.
Don't forget about drainage
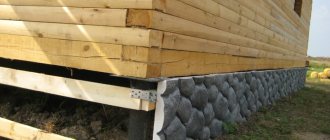
Waterproofing
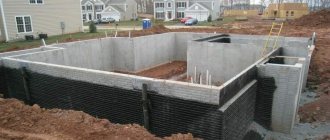
Prefabricated elements are mounted on the prepared base, masonry is made of bricks or blocks, or a monolithic foundation is arranged for a house with a basement. The surfaces of structures are insulated from moisture. Use any of the methods that are economically feasible in specific conditions to create a protective barrier:
- coating waterproofing;
- roll;
- welded;
- sprayed;
- penetrating;
- membrane;
- screen
All gaps and cracks must be carefully sealed to prevent possible leaks due to accidental runoff or rising groundwater.
Read more: waterproofing the basement from groundwater.
Thermal insulation
Insulation of external surfaces and floors is carried out with materials that do not rot and are not afraid of moisture. The most common are polystyrene foam or polystyrene foam; they have the necessary characteristics and are convenient to use. Thermal insulation boards are simply glued to the surface of the walls or placed under the screed.
A good heat-protective effect is obtained using:
- plasters with polystyrene foam or vermiculite;
- spraying polyurethane foam;
- thermal panels.
Important. Insulating the basement, plinth and blind area reduces energy losses for heating the house, reduces the forces of frost heaving, and extends the service life of structures.
Ventilation
Normal air exchange is one of the factors for maintaining an optimal microclimate in the basement. Without proper ventilation, condensation collects on the surfaces of walls and ceilings, provoking the development of mold. In addition, radon gas accumulates in buried rooms, which is harmful to human health.
To remove polluted air and bring in fresh air, install a natural, forced or combined ventilation system in the basement. To do this, exhaust ducts are laid, turbines or fans are installed.
The type of system and technical equipment are selected taking into account the required parameters and air volume. For small rooms, ventilation with natural circulation of air masses is sufficient; large areas require more powerful devices. They are equipped with purifiers, heaters or coolers to create the required microclimate.
Interior decoration
To decorate the basement, it is recommended to use materials that are not afraid of moisture. Wooden elements must be treated to prevent rotting.
Silicate moisture-resistant emulsions are chosen for painting. Slaked lime has proven itself well. It has high vapor permeability and bactericidal properties.
Don't forget about interior decoration
The walls are plastered with cement-sand mortar: it dries quickly and is not afraid of high humidity.
For interior decoration use:
- decorative brick;
- ceramic tiles;
- plastic panels;
- drywall;
- wooden vangon, planken.
With high-quality hydro-, thermal insulation and ventilation and low groundwater level, the risk of damage to expensive finishing materials is negligible.
Construction of a monolithic cellar
To create a concrete cellar with your own hands, you will need certain tools, materials, and knowledge. Required materials: cement, sand, crushed stone (gravel), steel reinforcement, plywood or formwork boards, binding wire, waterproofing materials, pipes for drainage and ventilation. Tools: everything for working with concrete, excavation work.
Designation of building dimensions
The dimensions of a concrete basement depend on its purpose and the owners’ plans for the premises. Standard dimensions are 2 by 4 meters. Much depends on where you plan to build the basement, the characteristics of the area, and the possibility of arranging a room of the desired size.
Selection of possible depth
The depth of the basement directly depends on the level of groundwater. To find out, they first carry out exploratory drilling to a depth of 3 meters, insert a wooden strip and leave it for several hours. If the lath is dry, groundwater goes much deeper.
The level of burial depends on the type of basement - whether it will be above ground or underground, and the possibility of making ceilings of optimal height. If groundwater lies high and close to the room, there is no need to build a basement at all - this decision can lead to useless waste.
Technical preparation for construction
Before filling the cellar with concrete, it is necessary to choose the right location and determine the level of groundwater. You cannot build a cellar near the foot of hills, as rainwater will flow down and flood the structure. It is best to build a cellar on the top of a hill (if it is a separate room).
The depth of groundwater is determined as follows: drill a hole 3 meters deep with an ordinary garden drill (if the soil is complex and with stones, it is better to use special equipment). According to the standard, there should be at least 50 centimeters from the wet soil to the bottom point of the cellar. The cellar is usually made at a depth of a maximum of 2-2.5 meters, so drilling 3 meters is usually sufficient.
The presence of water can be determined with a borehole depth gauge or a regular rod (as described above). All technical work is carried out in the wettest time of the year (autumn or spring).
Pit development
Before pouring a concrete cellar with your own hands, you need to carry out excavation work. First, the area is thoroughly cleared, the top layer of soil and turf are removed, and the boundaries of the pit are marked with pegs and a cord. The main part of the soil is dug with an excavator; a third of the volume can be cut out with a bayonet shovel.
Wet soils are dug with a drainage system in place: a concrete pit or well 50-80 centimeters deep below the pit level is made separately from the pit, and the water is removed with a drainage pump. The bottom and walls of the pit are leveled, leveled very evenly, then crushed stone is filled in and compacted several times.
Drainage for a modest investment
Drainage is a necessary measure to eliminate the risk of flooding. To successfully deal with backwater, you can create a network of trenches. Special pipes (drains) are installed, which are laid around the perimeter of the room and insulated with layers of geotextile and gravel. These will be coarse filters that will prevent the pipes from becoming clogged with sand.
The drains are placed at a slope so that the water flows away by gravity. The pipes are connected to a common pipeline that goes into a storage well (in this case, a pump is used that pumps water out of the well as it fills) or a pit or ravine.
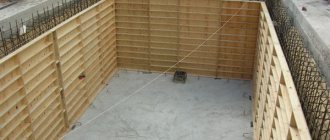
Formwork assembly
To pour the concrete floor, formwork is installed from panel boards 3-4 centimeters thick and 25 centimeters wide, which, after dismantling, can be taken to create a wooden floor frame.
How the work is carried out:
- Cutting boards to required sizes.
- Assembling panels around the perimeter of the base.
- Installation of the reinforcement frame along the wooden contour, connection of the reinforcement with the steel frame of the stairs to the cellar (if poured).
- Hammering pegs vertically to secure the boards.
- Installation of spacers in the formwork for rigidity.
- Installation of pipes in the frame to create a ventilation system.
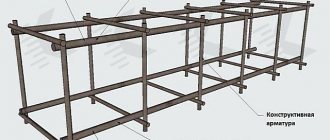
Reinforcement
The reinforcement frame is installed around the entire perimeter of the pit and in the walls, which makes it possible to make the floor reliable and strong, not afraid of heaving, and the walls able to withstand the roof and soil pressure. The reinforcement uses corrugated steel rods with a cross-section of 8-10 millimeters, which are laid in a grid format. The elements are knitted with special wire. The frame must be raised above the floor using special clamps or pieces of brick.
Base
Before pouring the concrete cellar with your own hands, you need to make a high-quality foundation. The bottom and walls must be perfectly flat, without loose soil. A layer of sand and gravel (10 centimeters each) is poured onto the bottom; if the soil is wet, another 10 centimeters of fatty clay must be laid on top. Each layer of the pillow is carefully compacted.
A layer of waterproofing is laid on top - you can use polyethylene film or roofing felt. Wet soil requires multi-layer waterproofing. They lay the floor and go onto the walls of the pit. Then the floor is poured with a concrete solution in a layer of 13-15 centimeters. Filling is carried out without interruptions, with uniform distribution of the layer and compaction with a deep vibrator or bayonet.
8 hours after pouring, excess moisture from the screed will evaporate, the layer can be rubbed and sanded to obtain a smooth surface. Further work should be continued only after 28 days.
Walling
After the floor has hardened and gained strength, you can begin building the walls. First, they make formwork for the walls (partially removable or simply removable). If the structure is partially removable, build one wall (the surface of the pit acts as the second) - a simpler option, but it requires more material consumption and is not always suitable. Removable formwork is made in the format of a double-sided box with two walls connected firmly to one another.
Formwork for walls can be made from moisture-resistant plywood, edged boards, OSB boards, etc. The inside of the structure can be lined with polyethylene. The thickness of the cellar walls is usually up to 15 centimeters. A reinforcement frame is mounted between the walls of the shields - from vertical ties and horizontal jumpers located in the corners. The elements are connected with knitting wire.
The walls are poured in layers up to 25 centimeters thick, with the obligatory compaction of the mixture with a bayonet or vibrator. If the vibrator is powerful, you can fill it in layers of 60 centimeters. After each layer of concrete is poured, anchor loops are placed in it to tie the frames together. This is how the walls are built to the required length.
After 6-7 days, the formwork can be dismantled. Concrete requires proper care - spraying with water, protection from ultraviolet radiation. After 28 days the walls are ready.
Roof
The roof is poured in the same way as the walls. First, install the bottom of the formwork, supporting it with reliable racks on the floor. Along the perimeter of the cellar, boards are installed on edge, which extend beyond the edges of the walls by 10 centimeters. If the roof should be vaulted, lintels of the desired shape are installed across it. The jumpers are tied to the perimeter box and supported with posts in the center and along the edges.
A continuous plank sheathing is installed on top of the crossbars, covering it with roofing felt. Two ventilation ducts from sewer pipes with a diameter of 110 centimeters are also installed here. One pipe should reach the floor, the second with its edge reaching the roof.
Now the reinforcement frame is mounted - if the roof is vaulted, the rods are bent at the desired angle with a special tool. If the roof is flat, the reinforcement is laid out in the same way as on the base. The ends of the reinforcement are connected to the ends of the rods left when pouring the walls. It is necessary to ensure that the entire frame is embedded in the thickness of the concrete. Afterwards, the external formwork panels are installed and the roof is poured.
Filling is carried out as usual. If the roof is pitched, the vibrator cannot be used. Concrete can be bayoneted, then it needs to be smoothed with a trowel and cared for during the drying process. The ceiling can also be made from a reinforced concrete slab, which will save time and effort, but you will have to use special equipment to deliver it.
Waterproofing
After the concrete has hardened, the roof must be covered with a layer of waterproofing to reliably protect it from precipitation. Here it is better to choose roofing material. And on top you can install a layer of thermal insulation - turf and soil, in addition to rigid polystyrene foam. If you are concreting a basement in a private house, you can refuse these activities.
A concrete cellar is the best solution for those who need to create a high-quality and reliable place to store food and more. Provided that the technology and work rules are followed, it is quite possible to create a high-quality concrete cellar with your own hands.
Preparing for the construction of a foundation with a basement
Preparatory work is carried out at the construction site:
- Clear the area, remove trees and bushes in the construction area.
- The top layer of soil 30 cm thick is cut off for reclamation and transferred to composting.
- Move existing communications to a safe location.
- Pre-level the area.
- They mark out the plan of the house on the ground, break out the axes and install cast-offs.
- A drainage system is installed to protect against water entering the pit.
Transport of cargo and earth-moving equipment is organized to the construction site. Fence the site where excavation work is being carried out. Determine consumption and purchase materials. Store them in a convenient and accessible place.
Temporary power grids will be needed to illuminate the construction site. They provide shelters for workers - cabins, trailers, and bathrooms.
Construction of a foundation for a basement: stages of work
Having the skill of a builder, you can build a foundation with your own hands for a house, cottage or garage with a basement. Step-by-step instructions will help with this.
Construction stages include:
- Marking the basement plan with pegs and cord according to the project or drawing. Mark the first point and measure the length of one of the sides with a tape measure. To find out the position of the remaining vertices, use a theodolite, a square or the Egyptian triangle rule.
- Displaying cast-offs. A board is fixed perpendicularly to two pegs or bars and driven into the ground at the corners in pairs - one on each of the intersecting sides. Fix the position of the axes with nails and tighten the cord.
- Digging a pit. Dig a hole for the foundation and basement, taking into account the thickness of the wall. The depth is equal to the design plus the height of the bedding and floor 30-50 cm.
- Construction of a crushed stone-sand cushion. Inert material is poured into the bottom of the pit in layers of 10 cm, compacted with a tamper, and the sand is spilled with water.
- Installation of formwork under a monolithic slab or tape. If the base is made of prefabricated elements, install foundation pads or FBS. In small basements, the walls are made of small blocks or bricks, not forgetting about reinforcement. Sleeves are installed in the places where communications pass.
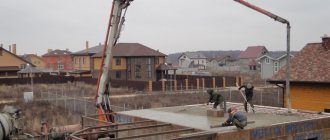
- Reinforcing cages are placed in the formwork and filled with M200-M400 concrete. The mixture is compacted using vibrators or tampers.
After hardening, the panels are removed, water and thermal insulation work is carried out, and a drainage system is installed. Perform backfilling.
Advantages and disadvantages of concrete cellars
Before building a concrete cellar with your own hands, you need to consider its pros and cons. The advantages of the design are:
- the design is able to withstand heavy loads, as well as seasonal changes;
- relatively low cost;
- long service life (about 20 years);
- simplicity and high speed of constructing a concrete room with your own hands (no team of workers or expensive equipment is required);
- resistance to negative temperatures, chemicals, mechanical damage;
- environmental safety of concrete (natural materials are used for production);
- not susceptible to damage by rodents;
- reliable protection of interiors from groundwater flooding, especially if the structure is monolithic;
- minimal maintenance costs for a concrete cellar;
- Possibility of installation at any depth.
But such a design also has certain disadvantages: concrete has high thermal conductivity and can also crack during shrinkage.