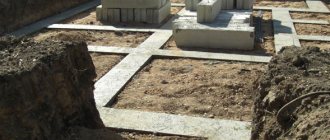
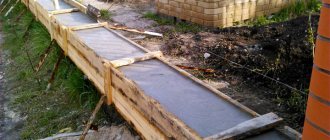
Before you start building walls, you need to make a foundation for them. In this case, it is a strip foundation, which was previously leveled with brickwork.
1. First of all, you need to clear the foundation of debris.
2. To level out unevenness on the foundation, it is necessary to prepare a thin solution. A solution is made from a mixture of sand and cement grade M 400.
3. Then uneven areas should be leveled.
4. Before starting work on the construction of walls, it is necessary to install waterproofing. To do this, take roofing felt and cut it to the required size.
5. It is convenient to cut roofing felt by one person using nylon thread and brick.
6. To do this, lay the roofing material on a flat surface, and on top of it a nylon thread tied to the brick.
7. The next step is to bend the roofing material to the desired size, in our case in half.
8. Take the free end of the thread in your hand.
9. We step on the roofing felt and try to pull the thread through the folded edge of the roofing felt, thereby cutting it.
10. After we have cut the required amount of waterproofing, we lay it on the foundation.
11. To prevent the waterproofing from being blown away by the wind, it is pressed down with cinder blocks.
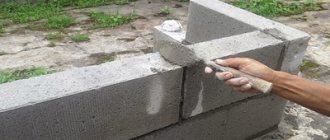
12. We begin laying the walls by placing the corners.
13. After the corners are set and the diagonals are checked, we begin laying the wall.
14. Lay the mortar under the block.
15. To fasten the blocks together, you need to apply the solution to the end of the block.
16. Place the block in its place, while pressing it against the adjacent block.
17. To ensure that the walls are even, we lay the masonry under a mooring cord, which is attached to a bracket made from electrode wire No. 3 by bending it in half.
18. We stretch the mooring cord over the entire length of the wall, securing the brackets with bricks on the corner blocks.
19. In this case, the thread of the mooring cord should be tightly stretched. We apply tension to such an extent that the bracket is at the limit of being pulled out from under the brick.
20. The consistency of the mortar for laying blocks should not be liquid. To save mortar, we lay the bed only along the area of contact between the block and the working surface.
21. When laying the block, the mortar will fill only the necessary parts of the contact.
22. We install the next block in its place. Since the solution is not liquid, the block will be above the level of the mooring cord.
23. Then the block must be seated using a pick to the level of the mooring cord. When the block shrinks, excess cement-sand mortar is squeezed out of the seam.
24. Remove excess mortar using a trowel.
25. In this way we carry out masonry block by block until the required structure is erected.
As a result, we get a reliable structure that can later be used as a shed.
How to lay a cinder block on a foundation, the complete work process.
Such popular materials as gas blocks and foam blocks have long been used in the construction market. But cinder block remains a fairly popular material. It is rarely used for building a house, but in the construction of small buildings and garages it is simply irreplaceable.
how to properly lay a cinder block on a foundation
This can be explained by the fact that the block itself is not very expensive, and if you know the masonry technology, it will not be difficult to build structures from it. Then you won’t have to spend money on specialists whose services cost a lot of money.
Glue solution
The adhesive solution for aerated concrete masonry is prepared from a factory-made dry mixture. The mixture contains high-quality Portland cement, plasticizers, and heat-insulating additives. The thermal conductivity of hardened adhesive is comparable to that of gas and foam blocks , therefore, when using an adhesive composition, a wall made of blocks turns out to be almost monolithic.
Main characteristics and advantages of the adhesive composition:
- Easy to prepare - just dilute with water according to the instructions;
- high thermal conductivity without the introduction of additives;
- masonry joint thickness 2-3 mm;
- excellent adhesion to aerated block ;
- material life time up to 3 hours;
- rapid strength gain and “open layer” time.
Laying aerated blocks with glue is much simpler and less labor-intensive than with cement-sand mortar. The availability of the “open layer” time, when the block can be moved, ranges from 10 to 18 minutes for different manufacturers. This is quite enough to check the masonry with a building level and adjust the position of the block.
The construction market offers several dozen dry mixtures for cellular concrete from different manufacturers. One of the high-quality alternatives is the masonry-adhesive composition for laying aerated concrete blocks Kesto Eco-Blok produced by KIILTO or any other mixture with similar properties.
TOP 5 best manufacturers of adhesive mixtures in Russia and their products:
- VOLMA - " VOLMA - Frost-resistant block"
- KNAUF - " Knauf-Perlfix "
- HENKEL – Ceresit CT 21
- BAUMIT - Baumit winter
- AEROC - AEROC Winter.
It is not difficult to prepare assembly adhesive for blocks: you need to dilute the dry mixture with the required amount of water and stir until a homogeneous composition is obtained using a construction mixer or a mixer attachment on a drill. The ratio of water and dry material is indicated on the packaging and is 0.2-0.3 liters per 1 kg.
Preparatory work before laying cinder block
According to the advice of experts, it is better to lay cinder blocks on a foundation whose width is 40-50 centimeters larger, or the minimum should correspond to the width of the block. Since the cinder block contains compounds that do not tolerate contact with moisture well, the foundation base must be insulated and leveled.
If your structure will be higher than your chest, then you need to take care of the presence of scaffolding, because the block is not only larger than bricks, but also heavier. In this case, without scaffolding, it will be difficult for you to lift the blocks and build a wall from them.
As in any construction, you cannot do without properly selected high-quality tools; you will need the following:
- Construction, preferably laser or water level;
- Saw, both circular and hacksaw;
- Hammer;
- Order, trowel.
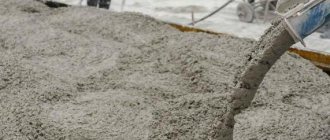
The solution plays an important role; it is very important that it is mixed correctly. To lay a cinder block, it must consist of 4 parts: sand, cement, red clay, water. All components must be mixed in equal parts, it must be plastic and not crack.
Preparation of the solution
For the installation of concrete blocks, both cement and adhesive compositions are used.
Mortar of cement and sand
For a high-quality solution of concrete blocks, you need high-level cement, not lower than M 400. You will need homogeneous sand, without lumps of clay. Large inclusions need to be removed.
There is an ideal ratio of mortar for laying concrete blocks with the following proportions of sand and cement:
- 1 tsp cement;
- 3 hours of sand.
Water is added at the rate of 0.7 to cement.
The required plasticity is obtained by taking into account how wet the sand is and adjusting the mass with additives.
The solution is prepared in small portions, stirring constantly so that the mixture does not separate or set.
Gas silicate glue
Universal composition, suitable for use when laying any block products. It has a high level of adhesion, which allows you to make a seam of minimal thickness - no more than three millimeters.
To make your own glue, you will need a ready-made dry mixture, water, a plastic container and an electric drill. The composition must be stirred until completely homogeneous at low speed. It is important to maintain the given proportions. The batch size will determine the speed of your work. When laying it, it will become clear what it should be like so that the batch of glue goes into use and does not have time to harden.
How to lay a cinder block on a foundation yourself
The laying begins from the corners, it needs to be done as efficiently as possible, it is how well the coals are kicked out that will determine the further laying of the cinder block. To do this, you need to use an order, a flat metal rectangular corner, or a wooden corner can also be used if the first one is not available.
At first, the work is no different from brickwork; mortar is applied to the corner on both sides with a trowel, slightly leveled, and two blocks are placed on top at right angles. Then the mortar is placed on top of the cinder blocks, the third block is laid, and so on, adhering to the rules for bandaging the seams. After this, you need to check the evenness of the walls with a level, as well as with a vertical plumb line. In case of unevenness, you can slightly tap the uneven places with a trowel until the solution has cooled down, then there will be no difficulty in leveling them. The remaining coals must be removed using the same method.
Nails are driven into the seam of the lower and upper cinder blocks, then a fishing line is stretched between them. This guideline serves for laying the first row of blocks along the entire perimeter; the plane of each block must be checked with a building level. All blocks must be laid out in the same plane.
Very often the last block in the plane is larger than needed, so it needs to be sawed down. To do this, you can use a regular saw, cinder blocks are very easy to cut, but you need to use a respirator, because a cinder block releases a lot of saw when cutting.
After filling the seams of the blocks with mortar, removing all excess with a trowel, you need to begin forcing the next row, as shown in the photo above.
At a right angle to the cinder block placed in the first row, lay the second row, then the third using the dressing rules. Based on the resulting sample of the first row, the second is laid, while controlling the correctness of the laying of the blocks both in the vertical and horizontal planes. The cut blocks in the masonry should be at the maximum distance from each other, for maximum binding; it will be very good if they are located in different corners of the building.
When laying cinder blocks, it is the first two rows that play the main role in construction, so there is no need to rush with them.
Further work will go faster; horizontal and vertical lines can be checked every 3-5 laid blocks, depending on your experience.
Block laying
Step-by-step instructions for laying concrete blocks with your own hands:
- Future corners are marked and the cord is pulled out. This is necessary for even laying.
- A layer of mortar is applied to the waterproofing material, with a block on top. It is pressed firmly to the base.
- The jointing is being carried out. It depends on the final finishing.
- Adjacent blocks are stacked similarly. Don't forget to control the styling. It should be smooth at all stages.
- The second row is laid in the same way.
- The third row can be laid using adhesive foam. It is applied with a pistol in 2 rows.
- All walls are built up simultaneously to provide reinforcement at the same level.
- Every five rows it is necessary to strengthen the walls: grooves are made along the perimeter, reinforcement or mesh is laid in them. Some blocks have special niches.
- The roof puts a serious load on the walls. To distribute it evenly, you need an armored belt after laying all the rows. It is made on site using wooden formwork, frame and concrete. Strength is gained under the film within 7 days.
- The masonry can be considered complete and the façade cladding can begin.
These were general tips. The technique of laying various blocks has its own characteristics. Let's take popular varieties as an example.
Expanded clay concrete blocks
They consist of a concrete mixture and foamed clay (expanded clay). The voids allow for reinforcement.
- We waterproof the foundation using rolled roofing felt: we fix it on a cement screed.
- We start laying from the corner and move along the perimeter.
- We determine the horizontalness of the masonry using a level. It is important that the beginning and end of the row coincide.
- The system is of a ridge type; there will be no through gaps, so vertical joints are not filled with mortar. The horizontal seam is no more than ten centimeters.
- Build all the walls at the same time: load-bearing and internal.
- Installation can be done either with ordinary concrete mixture or with adhesive cement.
Advice: make the height of non-load-bearing walls 2 cm less than load-bearing ones. This way you will reduce the load on the partitions from the floors. The gap created by the difference in height can be easily filled with polyurethane foam.
Aerated concrete blocks
Also called gas silicate. They are characterized by high porosity, which leads to gradual decompression of the material. In the future, cracks will appear and the structure will begin to collapse. There is a way to avoid these troubles by providing reliable waterproofing and preliminary reinforcement of the walls.
When you finish laying the perimeter, take a break for 12 hours.
Laying is easy due to the light weight and size of the blocks.
- Concrete blocks of this quality are laid using glue or cement. If you are installing on cement, make the seam 6–10 mm; if you are installing on cement, make no more than 3 mm.
- Start laying with a level foundation with mandatory waterproofing.
- Make a solution of concrete blocks in a ratio of 4:1 (sand and cement).
- The bottom of the block needs to be wetted. Otherwise, moisture from the solution may transfer into the aerated concrete and the wall will not be strong.
- Masonry is made from the highest part of the foundation. To determine it, use a level or level.
- It is important to align the bottom row of blocks horizontally.
- All blocks can then be planted on glue.
- The fourth rows must be reinforced with metal or fiberglass reinforcement with a diameter of 8 mm.
To finish aerated concrete walls, use ready-made gypsum plaster. The vapor permeability of gypsum will protect concrete blocks from destruction.
Foam concrete blocks
Blocks provide a smooth surface, this is their advantage. Allows you to save on leveling materials.
- Lay a solution of sand and cement on the surface of the foundation in a layer of about 2 cm, and on top - a waterproofing layer (bicrost, roofing felt). Then you can lay out the first row.
- Watch out for the formation of voids in the seams, they are unacceptable. A notched spatula will help to distribute the glue evenly. The seams must be filled.
- If cement mortar is used when installing blocks, it is necessary to wet the blocks with water. The reason is the porosity of the material.
- To improve the operation of the blocks, plasticizers are added to the solution.
Advice: make the height of non-load-bearing walls 2 cm less than load-bearing ones. This way you will reduce the load on the partitions from the floors. The gap created by the difference in height can be easily filled with polyurethane foam.
Cellular blocks
- Level the base, wait until the foundation gains strength, and begin laying.
- Use glue as a mounting compound. For the first layer - cement-sand mortar. To enhance the plasticity of the mixture, liquid soap or a plasticizer is added.
- Laying begins from the corners, observing the direction: a row in one direction, the other in the opposite direction.
- After installing the corner elements, the walls begin to be erected.
How to lay cinder block?
If you build from blocks with your own hands, the costs will be minimal. Moreover, this is not difficult to do. It doesn’t matter what type of building is planned - a house, an outbuilding, a bathhouse, a garage. If you learn how to lay cinder blocks correctly and approach this process responsibly, then the future building can last for decades.
Types of masonry
There are several types of cinder block:
Typically, a hollow block is used for walls. In this case, the load on the foundation will be less. The weight of one hollow block can reach 23 kg, and a solid one - 28 kg . Therefore, the latter is not used in the construction of walls. A solid block is used when constructing a foundation (but not in the case of building a building made of cinder blocks), when constructing basement floors, load-bearing structures and columns.
There are also several types of masonry:
- in one stone;
- one and a half stones;
- into the floor of a stone (spoon method);
- two stones.
The method should be chosen based on the type of future construction. But you need to remember that the thicker the wall, the warmer the building will be . If you plan to build a small outbuilding, for example, a barn, then in this case you can use the half-stone method. Half blocks are perfect for this.
Mortar for laying cinder blocks
Masonry mortar has different proportions. Usually, they proceed from what type of building is planned to be erected. You can buy a ready-made dry solution in the store, to which you just need to add water and stir. But in this case, the price of masonry increases.
Therefore, more often the solution is prepared independently. The simplest and most standard solution for laying cinder blocks is prepared in the following proportions:
- 3 parts sand;
- 1 part dry cement;
- water.
It should be noted that water must be added so that the solution becomes viscous and does not spread much when laying the cinder block. also add a plasticizer to the solution . It increases frost resistance, reduces porosity and increases the density of the solution.
After adding the plasticizer, the solution will have the following properties:
- stickiness;
- plastic;
- uniformity;
- frost resistance;
- self-sealing;
- strength;
- moisture resistance.
When preparing the solution, it is also necessary to take into account the weight of the future structure. The solution must withstand all loads. The mixture must be mixed in a concrete mixer, which will ensure greater homogeneity and quality of the solution.
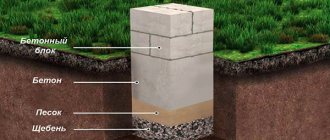
Foundation for laying cinder blocks
You need to know how to place a block on a foundation. After all, this is the very initial stage of work.
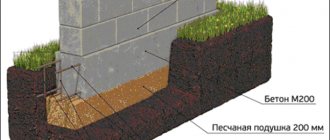
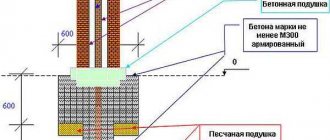
Usually the foundation for a cinder block building is made monolithic. As a result, it should be so that the foundation rises above the ground level by about 0.7 meters.
The thickness of the foundation should be equal to the thickness of one cinder block or slightly more. Before laying the cinder block, the foundation must be waterproofed from the wall , after which you can proceed to the laying process. But you need to understand that the base must be level for the successful laying of the first row of blocks, otherwise the entire construction process will be in vain.
Required Tools
For proper masonry you need to acquire the following tools:
- construction trowel;
- building level;
- cord for aligning rows. You can use a regular clothesline or fishing line;
- hammer;
- plumb line;
- order;
- masonry template;
- circular saw or hacksaw.
Laying cinder blocks with your own hands, step-by-step instructions
In principle, the process of laying blocks is similar to bricklaying, with the exception that the block is larger than the brick in size, so the laying is carried out several times faster.
How to lay blocks yourself, step-by-step instructions:
- the mixture is prepared in a concrete mixer;
- the mortar is placed on the foundation, and the thickness of the mortar should not exceed 1.5 cm, otherwise the thermal insulation of the masonry will be damaged;
- the mixture is leveled and a cinder block is laid along a pre-tensioned cord;
- level the cinder block by tapping the back of the trowel into the required place on the cinder block;
- immediately remove excess mortar from the cracks, which was squeezed out under the weight of the cinder block;
- When laying the next row, a floor block is placed in the corners. To get it, you can saw a whole cinder block in half using a grinder or a hacksaw.
After the row is laid, it must be carefully leveled again using a string and a building level. Subsequent rows are laid in exactly the same way as the first.
You will notice that the process of laying blocks is practically no different from laying foam blocks, which can also be done with your own hands. The masonry is the same due to the fact that both materials have almost the same dimensions.
Wall reinforcement
In order to increase the strength of walls, distribute the load and reduce the risk of cracks, reinforcement is used.
The following materials can be used for reinforcement:
- reinforcing mesh (reinforced mesh) for masonry. Usually this is a mesh with a cell of 50x50 mm. It is placed between the rows;
- reinforcement or reinforcement cage.
The first row of masonry must be reinforced. Every fourth row of the wall is also reinforced. In addition, door and window openings must be reinforced.
Work process
Wall markings
Any work begins with the need to clean the base from debris and dust. If we are talking about the first floor, then you should remove it on the foundation, and if you are laying the second and higher floors, then we will start with the ceiling. All you need to do is sweep the walls with a broom. As was previously done when laying out the foundation, now it is necessary to correctly break the corners of the building so that they turn out straight everywhere, because this will be the last moment when it will be possible to correct everything, since otherwise errors in geometry will crawl out onto the ceiling and roof. The best option to solve the problem would be to call a surveyor who will cut right angles with an accuracy of 0.3 cm, but this will cost several thousand rubles, and usually such a master is called only to break down a building or to overly long houses.
Small houses can be demolished without outside help. To do this, you will need a roll of rope and a construction tape, preferably made of metal. The technology is quite simple - place the blocks dry and take measurements of the diagonals of the resulting rectangle. The accuracy will be within 0.3-0.5 cm. You should take into account the fact that a metal tape measure does not stretch, but a thread or fabric tape measure will stretch, and quite a lot. If you do not plan to do cladding, then you can extend the block or brick beyond the vertical border of the plinth to approximately 1/3 of the brick/block. BUT try not to abuse this, especially if the buildings are higher than 1 floor. When the main corners of the building are exposed, it will be possible to simultaneously expose additional ones, if any. At the same time, it will be possible to put up partitions, especially if there are no columns, so that they can be laid at the same time as the outer walls.
Laying blocks with your own hands in the first row
Before starting the laying of the first row, it is necessary to check all the vertical type marks on the foundation, because the first row is the most important stage. If you do not level the base with mortar or there are large differences, then there is a high probability that the walls will crack. The check is carried out with a regular spirit level or a laser level, which was set during marking. If deviations from the horizontal are up to a maximum of 2 cm, then you can level out the unevenness with a solution. If it is more, then it is better to fill the belt with reinforcement and make sure that the horizontal level of the concrete is normal. The first row should be laid on roofing felt, cut the roll in half and laid directly on the foundation. This is done in order to cut off capillary moisture from the blind area and the ground.
In seismic areas where the standard value is higher than 6, such waterproofing is prohibited! During a seismic wave of a lateral type, a building can be moved from its foundation and completely collapse. For this reason, waterproofing is made from mortar if roofing felt cannot be installed. So, before starting masonry, check the base again for debris and wet the base. The mortar is placed on the first corner stone and the second on the opposite corner with the holes down, and you also need to carefully monitor the height of the masonry. Be sure to check the side edges and ends of the blocks by level so that everything is only vertical.
When all the blocks stand exactly horizontally and vertically, you should stretch a cord between them and align them along it. Now, in the same way, make a perpendicular wall - this technology is called “bringing corners.” While you are making the second and third corners, on the first floor the solution will have time to lose its mobility, and the block will lie tightly. Once this has happened, you can begin laying the first row further. If we are talking about a seismic region, laying in a wasteland is prohibited. We are talking about work when only horizontal rows are placed on the mortar, and the vertical rows are not filled with mortar. Thus, masons often try to save time, and then plasterers will have to tinker a lot and seal the cracks.
For this reason, apply two portions of mortar on the end side of the next block where the block on the foundation/slab will be laid out and carefully place the block, almost touching the thread. With a light tap of a pick or trowel, the block should be tapped to the first block and then aligned with the thread so that the block touches it slightly. When everything is finished, check the side edge for verticality. We do the same for the rest of the wall.
Wall laying and mesh reinforcement
The second and all other rows will hardly differ from the masonry of the first row, but the main difference will be that the corners, in addition to the level, will need to be checked with a plumb line. The more rows, the greater the accuracy of the plumb lines, because the level has quite large errors. Typically, plumb lines are bought in stores in the form of metal weights, to which you must attach a rope yourself.
To mark the load, you should make a conical hat in order to know exactly the point where it will look. For masonry and plastering, it is best to use Armenian plumb lines rather than store-bought ones. It was invented by builders to do work accurately and quickly, and not be distracted by anyone.
Yes, to lay aerated concrete and other blocks with your own hands, you will need an Armenian plumb line, which is shaped like a spinning top, and not a thin nylon thread is inserted into it, but a thick rope. At the second end of the rope there should be a pipe where the rope is threaded in the middle. Inside the hole, the rope will pass with force, and behind the pipe it will be tied with a knot. It will be the same size as the plumb line.
To measure, you can easily measure the required length of rope, and attach the end of the tube to the block, and release the plumb line down. A light touch will indicate verticality, and other deviations can be easily noticed and corrected in time. It is unlikely that you will be able to buy such a plumb line, but you can make it yourself. In addition, it would not be superfluous to lay a mesh for “resistance from vandals,” because in most crime reports you can often see cases of theft from stores in a tree without signals, where the store was broken into by breaking the wall.
Banding masonry in a block wall
As a rule, external walls are placed in a block, and internal ones in half. Bandaging of the partitions should be at least 30% of the block in the run. It is unlikely that we will be able to come up with something new here. External walls can be bandaged in different ways.
Lintels in a block wall
In a block wall above the opening of windows and doors, it is necessary to install lintels, and in load-bearing external walls, a depth of embedding into the wall of 0.2 meters is allowed, and with an opening width of more than 1.5 meters, at least 0.25 meters is allowed, for other cases the optimal figure is 0.35 meters. You can pour all the concrete, but it is inconvenient and time-consuming. To implement it, you will need to install formwork, reinforce it with a spatial frame and fill it. In this case, the laying will be suspended. If you do everything yourself, then you can use this method - although it is the most labor-intensive, it is also the cheapest, and nothing will stick out from the wall.
Ready-made lintels are heavy and are placed in several pieces per row to match the thickness of the wall. This method is much faster, but it will be difficult for 1-2 people to do it while standing on scaffolding. During private construction, reinforcement and a corner are most often used as a lintel. In partitions, you can use 1-1.2 cm reinforcement, 4 pieces each, which will be embedded in the masonry, and pull up the board from below, and then spread it with a stand, and apply mortar through the rods. When the cement becomes less mobile, the blocks can be laid. But for external walls, which are much thicker than partitions, corners are used. To do this, cut it to size and weld the reinforcement together through the strip in several places. Next, prime the metal to prevent rust and install it on the block. Apply the solution to the shelves and install the blocks with the holes facing up. This will be the most expensive method, but very reliable and fast.
Template for laying cinder blocks
Professionals usually lay cinder block without any tools. But if a beginner is doing the laying, you need to have on hand a template for laying cinder blocks , which you can make with your own hands. Such a template can be made from available materials, for example, from wooden boards.
The size of the template is calculated based on the size of the cinder block. After all, the dimensions of one cinder block can vary, especially if the material was made at home. The height of the template should be 1-1.5 cm, based on the thickness of the seam .
Price category
Before laying cinder block walls, you need to find out the price for the work. Builders usually charge 20 rubles for laying one cinder block . Based on this, you can find out how much it will cost to build the required building, knowing its dimensions. Of course, it is better to lay cinder blocks yourself, and you can save a lot. In this case, the costs will only be for the material itself.
Price for 1 piece of cinder block:
To determine how much material will be used for construction, you need to know the dimensions of the future building, as well as the dimensions of the cinder block itself, which are 390x190x188 mm. It can be seen that the dimensions are quite large, so the construction speed increases significantly compared to ordinary brick .
Which solution for aerated concrete is better to choose?
To determine what solution is needed for laying aerated concrete blocks, let’s turn to the “Technological map”. The TTK establishes the criteria that the mounting solution must meet. Let’s compare how much the glue and cement-sand mixture meet these criteria:
| Indicator name | Normative value | Value for glue | Value for DSP |
| Water holding capacity | at least 95% | 95…97% | 90…93% |
| Compressive strength | not less than 5 MPa | up to 11 MPa | up to 8 MPa |
| Consumption per 1 m3 of blocks | up to 25 kg | 15-25 kg | 30-40 kg |
| Frost resistance | not lower than F50 | F35…F100 | F50…F150 |
| Working thickness | not standardized | 1-5 mm | 6-10 mm |
| Open Layer Time | up to 20 min | 15-20 min | 3-10 min |
| Life time of the solution | at least 1.5 hours | up to 2.5 hours | 1-2 hours |
| Working temperature | -15…+25 °С | -20…+30 °С | +5 …+25 °С |
Laying an aerated concrete block on a cement mortar does not have any advantages over the use of adhesive compositions and, at the same time, reduces the heat-protective and strength characteristics of an aerated concrete wall. Using special adhesive for aerated concrete is the best choice in terms of quality, price and ease of use.
Useful tips from professionals
The evenness of the masonry along the cord and the building level should be checked as often as possible to avoid curvature of the walls and rows in the future.
If the walls are not planned to be finished with anything in the future, then the seams between the rows should have an attractive appearance. To do this, you can use a small rounded stick, which you need to slightly press the seams after each laid row, while the solution has not yet hardened.
When marking blocks, you must use colored crayons . They are best seen on cinder blocks, compared to, for example, a regular pencil.
To increase plasticity, you can add a little detergent to the solution .
It is necessary to mix exactly as much solution as will be used at one time. Otherwise, unused mortar may harden and will not be suitable for construction.
It is advisable to plaster the outer walls, because cinder block is afraid of moisture . In this case, the plaster will protect the material. But since the plaster is poorly applied to the cinder block and can fall off over time, it is necessary to use a reinforced mesh. Internal walls can be covered with plasterboard.