As an advertisement
For the construction of large objects for various purposes, as well as the construction of small private houses and renovation of apartments, PENOPLEX® slabs of various brands are widely used today.
Thermal insulation capabilities are determined, first of all, by the heat-shielding ability, which is quantitatively expressed by the thermal conductivity coefficient. The smaller it is, i.e., the worse the material conducts heat, the better it retains it in the insulated room. Among modern insulation materials, this indicator is the lowest for PENOPLEX® thermal insulation boards made of extruded polystyrene foam. The thermal conductivity coefficient of this material does not exceed 0.034 W/m∙K. Other most common insulation materials have a higher thermal conductivity coefficient. For mineral wool, it ranges from 0.037 to 0.055 W/m∙K, for foam plastic (more precisely, non-pressed polystyrene foam) - 0.036–0.059 W/m∙K.
Thermal protection using PENOPLEX® is not only effective from the point of view of thermal engineering, but also reliable in design. The edge of the plates is L-shaped, which ensures their tight joining and the creation of a continuous heat-protective contour without voids. This is not possible for structures with mineral wool, which settles over time, forming cold bridges.
PENOPLEX® also surpasses its closest competitors in strength. Its compressive strength at 10% deformation is at least 15 t/m2, and the strongest slabs, which are used in the construction of airfields, can withstand loads of up to 70 tons per m2. For the most durable mineral wool insulation, this figure will not be higher than 7 t/m2, for polystyrene foam - up to 15 t/m2.
An important advantage of PENOPLEX® is zero water absorption. Water conducts heat well, and insulation that can absorb moisture loses its heat-protective properties over time. This happens with fibrous mineral wool and granular foam.
In addition, PENOPLEX® does not pose any harm to human health; the material is certified with a high degree of environmental safety. The raw material for its production is general-purpose polystyrene of the same grades that are used to make food and medical packaging, as well as children's toys. In the production of PENOPLEX® boards, no plastic processing waste is used; the material does not contain components harmful to health, such as soot, dust, slag, phenol-formaldehyde resins, and small fibers. The latter create many problems in the process of insulating a house with mineral wool - they irritate the skin, eyes, and upper respiratory tract. Therefore, when working with mineral wool insulation, it is necessary to wear safety glasses, gloves and a respirator. When installing PENOPLEX®, such precautions are not needed; moreover, it is convenient for cutting and does not require complex tools - it can be cut with a regular construction knife.
During operation, PENOPLEX® thermal insulation will never be a breeding ground for fungus, mold and other unwanted microorganisms. The biostability of the material has been proven through special tests in mycological centers. And in the laboratories of the Research Institute of Building Physics, tests were carried out that made it possible to determine its minimum service life - 50 years.
All brands of PENOPLEX® thermal insulation have these advantages, including three brands offered by the manufacturer for use in individual housing construction:
— PENOPLEX COMFORT®
— PENOPLEX®WALL
— PENOPLEX FOUNDATION®.
Each of them has its own area of application, partly reflected in the name.
Features of the heat insulator
The production of penoplex for wall insulation includes the following technological operations:
- Granules of the material are loaded into an extruder, where they are heated to 130-140°C;
- Foaming agents – porophores – are added to the portion;
- The thickened mass is squeezed out of the extruder onto a conveyor belt, after which it is cut into dimensional slabs;
The mixture of semi-finished penoplex for external wall insulation consists not only of polystyrene foam and foaming agents - it also contains antioxidants designed to prevent thermal oxidation during processing and damage to the integrity of the insulation during operation, fire retardants to increase fire resistance, as well as antistatic, light-stabilizing and modifying additives that protect thermal insulation material from the influence of external factors.
The main positive parameters of the material:
- Low moisture absorption of expanded polystyrene is the main advantage;
- The minimum coefficient of thermal conductivity, which allows, when calculating the thickness, to choose thin slabs;
- High vapor permeability of penoplex: a 20 mm thick slab replaces one layer of roofing material, but at the same time also insulates the working surface;
- High compressive strength and other mechanical loads. The extrusion method in the production of thermal insulation allows the cells of the material to be evenly distributed, improving the quality of density and strength;
- Easy and quick installation of insulation due to its low weight and good density;
- Long service life of extruded foam – up to 50 years;
- Excellent sound insulation and minimal chemical activity.
Features of penoplex
Penoplex size range:
- Slab length – from 120 to 240 cm;
- Slab width – 60 cm;
- Thickness – from 2.0 to 12.0 cm.
Disadvantages of extruded foam:
- Flammability of groups G3-G4, formation of toxic smoke during fire;
- Polymer additives in the composition of the material can evaporate toxic substances when exposed to sunlight. Therefore, the optimal use of penoplex is external, for example, insulation of brickwork;
- Petroleum products and some organic substances can deform penoplex, the thickness of which can be any. These are substances such as: formaldehyde and formalin, acetone and methyl ethyl ketone; liquids containing ethyl, benzene components, polyester resins, synthetic paints and fuels and lubricants.
Performance characteristics of penoplex
Thermal conductivity properties determine the quality of insulation with penoplex. The higher the thermal conductivity coefficient, the fewer centimeters the layer of insulating material will be. Laying the insulator from the inside or outside depends on the characteristics of vapor permeability and strength (density). You can compare the parameters of popular materials for insulating floors and other surfaces by studying the data in the table:
Comparison of thermal insulators
From the table it is clear that foam plastic thermal insulation has an average thermal conductivity value, which is slightly less than that of polyurethane foam, mastics and roll materials. But you can choose penoplex only because the layer of such liquid insulation does not have joints and seams, like slab insulation, no matter how many layers are applied to the surface.
What should be the thickness of penoplex?
Penoplex slabs
The variety of standard sizes of polystyrene slabs causes some difficulty in determining the thickness of the heat-insulating layer. In general, this parameter is influenced by many factors:
- Thermal conductivity of the material from which the walls of the house are built.
- Thickness of building structures and floors.
- Climatic features of the region.
- Purpose of house construction.
- Height of the insulated area.
As a rule, slabs with a thickness of 40-50 mm are used for roofing. This value is sufficient to retain heat inside the building, and the load on the rafter system will be minimized. Penoplex for insulating walls outside a block house must be at least 100 mm. On an individual basis, this indicator can be changed up or down.
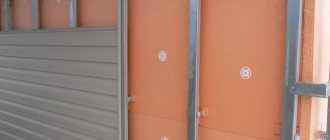
Principles and rules for façade insulation with Penoplex
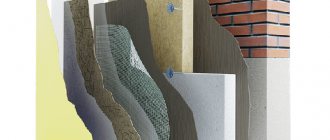
When insulating walls with penoplex, the technology provides for subsequent finishing with plaster. It performs two functions: decorative and protective. The mounting diagram for extruded polystyrene foam is as follows:
- The outer surface of the wall of a structure.
- A layer of special glue designed to fix the panels.
- Sheets of a given thickness.
- The outer layer of fiberglass mesh is thick with glue.
- Decorative coating.
Gluing panels is also characterized by some features. They need to be fixed not only with adhesive, but also with mechanical fasteners - dowels. In order to properly insulate houses with penoplex, any external corners are reinforced with special metal elements that protect the material from possible mechanical damage.
If there is glue at the joints between the sheets, it must be removed. The connecting seams should be offset, which increases the adhesion of the insulating material. When applying a decorative layer, all work should be completed in one approach. However, its thickness should not exceed the thickness of the slabs.
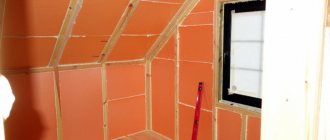
Insulation of walls from the inside with penoplex
Insulating walls with penoplex from the inside is rarely done, since the material practically does not allow steam to pass through. But with the right approach, its installation becomes possible. In an apartment, this procedure is carried out only if there is no thermal insulation layer outside the building. The thickness of the penoplex will not be large. The work is carried out in the following sequence:
- Cleaning the base from dust and dirt. To insulate the walls from the inside of the room, they need to be leveled. There should be no cracks or crevices in them.
- To prevent condensation from collecting on the walls of the apartment, they are covered with a vapor barrier membrane before installing the penoplex. It should extend to the edges of the walls and floor. It can be secured using construction tape.
- Preparation of glue. To attach the internal insulation, you should use a composition intended specifically for such work. When stirring, there should be no lumps left in the mixture. It must be applied both to the slabs of material and to the base.
- Laying slabs. Insulation of walls from the inside with expanded polystyrene is carried out end-to-end. The seams between the rows should be offset. If there are gaps between the plates, they should be sealed.
- Additional fixation with dowels.
- Organization of the reinforcing layer using fiberglass mesh and adhesive solution.
After insulation from the inside of the room has been completed, you need to wait at least 20 days before finishing.
Required materials
To insulate the outside of a house with penoplex, you need to select the necessary consumables. In this case, the work will go smoothly. For insulation you need:
- Penoplex boards. Their number is calculated depending on the area of the base, as well as adding a 10% margin for cutting.
- Primer liquid. It improves the adhesion of sheets to the base. The type of substance depends on the material used to make the walls: for brick surfaces , plastered surfaces made of gas silicate blocks, a deep penetration primer (300 ml/sq.m.) is suitable, and for concrete surfaces, Concrete Contact containing quartz sand (400 ml/sq.m.).
- To insulate external walls with penoplex, a starting profile is required. It is needed for proper fastening of the first row of slabs. The element is installed around the perimeter of the entire building. Included with it are spacer washers that allow you to correct minor unevenness in the base. The number of profiles is calculated depending on the length of the walls, and fasteners - 1-2 per joint. To fasten the supporting elements, dowels are used, the distance between which is 30 cm.
- To insulate walls with extruded polystyrene foam, you need special glue. The average material consumption at the first stage is 5 kg/sq.m. An additional layer will be required to secure the layer of reinforcing mesh. In general, it will take up to 10 kg/sq.m. material.
- Dowels are “fungi”. They can be hammered or screwed. It is better to choose products with a thermal head or a plastic expansion nail. For each square meter of area you will need 6 elements.
- Reinforcing mesh. It is better to purchase fiberglass-based material. For finishing you will need up to 1.1 sq.m/sq.m.
For the decorative plaster layer, materials with different textures are used, so the consumption is calculated after external insulation.
Required thickness parameter
To insulate the outside of the house with penoplex with your own hands, you need to choose the appropriate thickness of the product. Here you should pay attention to the climate zone. When purchasing penoplex, insulation is carried out taking into account the fact that the insulating cake must provide a total heat transfer resistance of no less than that established in building codes and regulations.
For the calculation, the thermal conductivity coefficient of the insulation is additionally required. To find out the thickness of penoplex , you can use the following formula: P (thickness, m) = R (heat transfer resistance, which can be taken from official SNiP sources) * k (thermal conductivity index).
What is penoplex
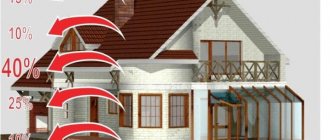
Heat loss through the walls of a building can range from ¼ to 1/3 of the total. Increasing thermal resistance due to the inclusion of special coatings in the design of external walls makes it possible to reduce its thickness and reduce the consumption of other building materials.
Wall insulation is necessary not only to prevent heat from escaping from the house in the cold season, but also to excessive heating of the room in the summer, so the correct choice of a heat insulator determines the financial costs not only during construction, but also during operation (heating, air conditioning).
Differences from other options
In the name of this insulation, you should pay attention to the word “extruded”, since a different production technology distinguishes it from ordinary polystyrene.
The molten polymer is passed under high pressure through small nozzles, resulting in a dense foam board with a thickness of 20 to 100 mm as a result of solidification.
The technical characteristics of various brands of penoplex are presented in the summary table:
Application and installation
Due to its excellent technical characteristics, penoplex is used for insulation of all parts of residential buildings. In addition, there is a special type of insulation intended for road construction and insulation. This is penoplex 45. There are other types on sale, the names of which coincide with the part of the house suitable for insulation:
- penoplex foundation - insulates the basement floors or the foundation of a building. Protects against freezing and is not afraid of the mechanical impact of frozen soil;
- wall - suitable for insulating vertical surfaces both outside and inside the house;
- roofing - laid under roofing material, and is also often chosen for thermal insulation of attics;
- universal - this material has universal functions, therefore it performs its assigned functions well on any part of the structure.
In addition, the ceiling and floor are insulated with penoplex. The main thing is to choose the right material thickness.
Penoplex insulation
In the warm season, few owners think about the fact that it should be warm and cozy in winter.
Insulation of a house or apartment outside and inside is most important. Because it is not only warm, but also helps to enhance sound insulation and save money. Insulating walls with penoplex is the most common method for creating a cozy room.
This material has many positive aspects, but negative aspects are not excluded. Easy and quick installation, practically free of debris and dust - in a short time you can save money on payments and heat in the house.
Features and Specifications
Penoplex boards are similar in properties to polystyrene foam, but have a number of advantages. The main thing is their high strength and density of the material. Of course, some still prefer older methods to insulate walls. For example, brick. It is worth mentioning that penoplex with a thickness of 20 mm replaces a brick wall, for which this figure is 370 mm. And if you compare slabs with a thickness of 50 mm, the superiority will be even greater: they correspond to brickwork of 925 mm.
Three types of material under consideration can be distinguished:
- "Penoplex 31". Due to its poor resistance to compression, this type is mainly used for insulating various pipes.
- "Penoplex 35". The most popular type, due to the presence of a special substance that increases the material’s resistance to combustion. It is well suited for thermal insulation of building envelopes and foundations.
- "Penoplex 45". Compared to other options, this one is the most durable and can withstand high loads. In addition to building houses, Penoplex 45 is often used to create roads. This solution prevents swelling of the road surface when freezing, this is especially important when operating runways. Presented in a narrower range (40–150 mm).
In addition to this classification, there is another division of penoplex. The name of the insulation indicates the scope of its application, which makes the choice easier.
"Penoplex Comfort"
The most versatile insulation. Suitable for foundations, walls and roofs. Insulation of this category is especially in demand for thermal insulation of balconies and loggias. The main disadvantage of the material is its high flammability; it is not allowed to be used in places where there may be open fire. Its main parameters correspond to insulation of category “31”.
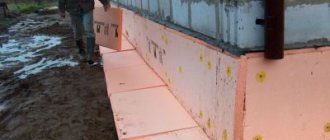
"Penoplex Foundation" (series "F")
It is used for insulation of underground buildings, foundations of any buildings, as well as the basement of the house. It combines many excellent characteristics: minimal water absorption (especially important in areas with shallow groundwater), resistance to heavy loads (does not sag for a long time, more than 50 years). "Penoplex F" is also used for improving garden paths on a sand-cement base.
If our ancestors who built cities had such wonderful material at their disposal, they would have been lucky enough to build houses that were insured against their subsequent subsidence. Cracks would not appear in the walls of buildings, and the foundation would not collapse under the influence of soil waters.
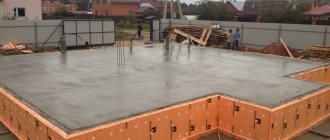
When arranging and protecting the base with penoplex foam of the “F” series, it would be useful to take care of strengthening the floor screed of the house. It is important to highlight two points here:
- Strengthening the screed with reinforcement.
- Using Penoplex Foundation sheets at the stage of pouring the screed. The size of the sheets will dictate the area of the house: the larger the material, the fewer joining seams, and therefore the fewer “cold bridges” through which heat will escape from the house. The concrete floor obtained in this way will provide increased comfort. It will have low thermal conductivity thanks to penoplex, which means it will retain heat inside the house.
The blind area of the house can also be protected using Penoplex Foundation. It’s better to spend money once than to watch with tears in your eyes how your home is destroyed by heavy rains.
"Penoplex Roofing" (series "K")
Technical characteristics are the same as those of Penoplex Foundation, only the compressive strength coefficient is lower (material density is 28–33 kg per m3). However, the roof does not experience the same loads as the foundation. Due to its low density, the material does not weigh down the rafter system.
"Penoplex Wall" (series "C")
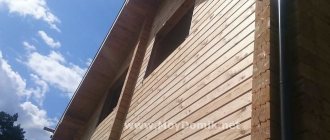
This option can withstand the load from plaster, putty, and lining well. Thanks to the use of such material, heating costs can be reduced. "Penoplex Wall" is perfect for external cladding of houses made of aerated concrete.
"Penoplex Geo"
This material is highly popular among industrial organizations. It is ideal for floors under cement-sand screed. The thickness of the slabs varies from 20 to 100 mm.
The table shows the main types of insulation and its characteristics:
| Material properties | Penoplex 31 | Penoplex 35 | Penoplex 45 |
| Density | 25-30 | 28-38 | 38-45 |
| Water absorption for 30 days (%) | 0,4 | 0,4 | 0,4 |
| Fire resistance | G4 | G3 | G4 |
| Thermal conductivity | 0,031 | 0,31 | 0,031 |
| Heat capacity | 1,65 | 1,53 | 1,53 |
| Vapor permeability coefficient | 0,018 | 0,015 | 0,015 |
| Durability (years) | More than 50 | More than 50 | More than 50 |
| Slab dimensions (mm) | |||
| Length | 1200 | 2400 | 2400 |
| Width | 600 | 600 | 600 |
| Thickness | From 20 to 100 | From 20 to 100 | From 20 to 100 |
After studying the basic parameters and properties of foam boards, you can determine its other characteristics and operating conditions. The main technical characteristics of penoplex include:
- Low water absorption (0.4% when in contact with a humid environment for 24 hours, or 0.5% when in water for about 1 month). Water can penetrate only in places where the penoplex itself is damaged, which is formed during installation.
- Low thermal conductivity (coefficient is 0.03 W/ (m*K)). It is provided due to its cellular structure and lack of water absorption.
- Low vapor permeability of the material (0.007–0.008).
- Durability (more than 50 years) - not susceptible to fungus and rot, but this is only provided that there were no violations of technology during the installation of the slabs.
Application and types of penoplex
Considering that penoplex has a number of advantages, its scope of application is quite extensive. EPS serves as an excellent insulation material both indoors and outdoors. It is perfect for apartments, houses, cottages and other buildings. Penoplex can be used to insulate roofs, attics, and balconies, in any climatic region without the use of an additional moisture-proof layer. Since the material practically does not absorb water, it is quite possible to use it in an environment with high humidity. At the same time, its thermal conductivity remains almost unchanged. EPS sheets of various thicknesses are available for sale, and depending on the specific requirements, you can always choose the best option.
In addition to a variety of sizes, extruded polystyrene foam is available in several types depending on density and application. Let's look at each type:
- Penoplex Wall. The old name is Penoplex 31 with flame retardants . This material has a density of 25-32 kg/m³ and is intended for effective insulation of external and internal walls, partitions, and plinths. These slabs are also used in the construction of buildings when constructing walls using “well masonry”. Compared to traditional brick walls, such walls are much thinner, but are not inferior to them either in reliability or in the ability to retain heat. In case of insulation of external walls with penoplex, a plaster system can be made on top of the insulation using a mesh, or it can be lined with any façade cladding material (siding, tiles, lining).
- Penoplex Foundation. The old name is Penoplex 35 without fire retardant . This material has a density of 29-33 kg/m³ and has high thermal insulation characteristics, a minimum coefficient of water absorption and resistance to chemical and biological destructive factors. Its water-repellent ability allows it to be used as a waterproofing coating. Penoplex Foundation is a rigid slab with a stepped edge, used in the construction of basements, foundations, and insulation of septic tanks. The slabs are very durable and can withstand significant loads. Therefore, they can also be used as a basis for garden paths, plinths, and floors.
- Penoplex Roofing. The old name is Penoplex 35. This material has a density of 28-33 kg/m³ and well insulates the building from cold air, has minimal water absorption, the ability to insulate noise well, and has a long service life. The slabs have a standard size of 600x1200 mm, but if necessary they can be easily cut with any available tool. And the light weight of the slabs allows them to be used without reinforcing roof structures. The stepped edge located along the perimeter acts as an additional guarantee that “cold bridges” will not form at the joints of the slabs. This type of penoplex can be used to insulate any type of roof. However, more often this insulation is used for insulating flat roofs, as well as for insulating the attic space of a ventilated roof.
- Penoplex Comfort. The old name is Penoplex 31C. This material has a density of 25-35 kg/m³ and has an extremely low thermal conductivity coefficient, high hydrophobicity, and excellent ability to insulate noise. It does not rot and is not a favorable environment for the settlement of insects, mold and fungi. Penoplex Comfort is produced in the form of slabs measuring 600x1200 mm, which have a step-shaped edge along the perimeter. It serves as an additional guarantee of accurate installation. Being a kind of universal, this insulation is simply ideal for thermal insulation of a private house. They can be used to insulate floors, foundations, basements, roofs and walls.
This material has a density of 35-47 kg/m³ and is used as insulation for road surfaces, in particular runways, to prevent them from frost heaving of the soil and destruction of the top layer of the road surface. It is also widely used for insulating roofs in use, on which there are pedestrian areas and various areas, including parking lots.
Penoplex 45.
Technology of insulating facade walls with Penoplex
To properly insulate the facade with penoplex, compliance with the installation technology is required. The necessary tools are pre-selected and the base is prepared.
Preparatory stage
According to the technology of penoplex insulation, the preparation stage is the first, and this procedure concerns not only the surface of the wall, but also the insulator itself.
Marking the zero line and setting the starting profile
Before insulating walls with penoplex, you need to mark the location of the lowest row of sheets. For this, a laser or water level is used. The material must be attached so that it is 30 cm below the floor level of the first floor. This way you can avoid the appearance of dampness in the room. The markings are carried out in such a way that there are no even minimal errors that could lead to significant distortion of the slabs in the upper part of the wall.
The starting profile is attached along the perimeter of the building (below the highest point of the building foundation). The clamps are mounted every 30-50 cm. At the points of contact with the base, the elements must fit tightly to it. If there are even small gaps, they can be eliminated using spacer washers. To connect adjacent profile elements on a straight wall, special fasteners are used. In addition, there must be a gap of 3 mm between them.
Preparing and cutting penoplex boards
The insulation of the wall is carried out after adjusting the foam boards. At the corners, the sheets are mounted with a toothed lock. To do this, the fragments through the row are shifted outward at a distance slightly greater than the thickness of the material. All pieces that border the profile should not be narrower than 20 cm.
In the area of window and door openings, you need to use elements cut in the shape of the letter “L”. In this case, it is important to leave an allowance inward for proper joining with the slope insulation. For cutting slabs, heated wire (nichrome), a hacksaw with fine teeth, and a stationery knife are used.
Preparation of adhesive composition and installation of insulation boards
To insulate walls with penoplex from the outside, special glue is used, which is prepared immediately before starting work. Preparation of the mixture and fastening of the material is carried out according to the following instructions:
- The glue must be mixed in accordance with the proportions and in the sequence indicated on the package. The first stage lasts 5 minutes, after which the composition should stand for 10 minutes. Next, it is kneaded again for 5 minutes. The product must be used within 2 hours. The glue must be used at a temperature of at least +5 degrees.
- Glue is applied along the perimeter of the slabs in a strip of 10 cm. The maximum layer thickness is 2.5 cm. The sheet must be filled to 40% of the entire area.
- The first row is laid on the starting profile so that the edge of the material rests tightly against the limiting edge and does not extend beyond it.
- After applying the glue, each fragment is pressed tightly to the base. Excess mixture is removed immediately. In this case, you need to constantly monitor the horizontal and vertical levels. You can adjust the position of the plates by tapping with a grater.
- 3 days after laying the panels, they are additionally secured with “fungi” dowels.
Since when using penoplex to insulate walls, gaps may remain between the slabs, which are filled with polyurethane foam-based polyurethane foam.
Creation of a reinforced protective plaster layer
After installing the insulation, it is covered with plaster reinforced with fiberglass reinforcing mesh. Its specific density is 140-160 g/m2. The insulated facade is plastered with the same compound on which the slabs were attached, but its consistency should be more liquid.
Strips of mesh, 30 cm wide and 1 m long, must be fastened starting from the corners and slopes. Next, an adhesive composition is applied to it. The layer thickness is 0.2 cm. After this, a metal corner is mounted. The mesh must be completely hidden in the plaster. There is no need to make the stripes too long. Adjacent elements must be overlapped by up to 10 cm.
After the solution has hardened, it is grouted. Next, a leveling layer of adhesive plaster is applied. Its thickness is 4-5 mm. After hardening, the surface is thoroughly rubbed.
Decorative finishing
When insulating walls from the outside with penoplex with siding, you will have to make wooden or metal sheathing. It is attached directly to the insulation using dowels or long screws. The sheathing must be fixed firmly, but the insulation must not be allowed to crumple. Sometimes another method of forming a frame is used: fixing the brackets to the base before laying the insulation. It is on them that the sheathing will be fixed.
There must be a ventilation gap 2 cm wide between the siding and the penoplex. In this case, there is no need to use a vapor barrier. Another finishing method is decorative plaster.
Technology of work execution
Experts recommend performing actions in the following order:
- Surface preparation. At this stage, it is necessary to remove the old decorative covering (wallpaper or other facing materials) from the wall. After removal, the surface is cleaned of dust and dirt and checked for unevenness. If depressions or cracks are found, they must be sealed with putty. Surfaces on which condensation has formed over time are often affected by fungus or mold. To eliminate the problem, the walls are treated with special antiseptic compounds. Next, a primer is applied to the wall. After it dries, you can proceed to the next stage.
- A special waterproofing film is attached to the wall. Penoplex does not absorb moisture, so this step can be skipped. This is an optional condition, but it is better to be safe.
- The slabs are cut to the required sizes. For this you will need: a ruler, a square, a knife.
- Prepare an adhesive solution, which is selected in accordance with the recommendations of the heat insulator manufacturer. Mix according to the instructions on the package.
Applying glue to the slab - The glue is applied to the slabs and to the wall. It is first recommended to attach the thermal insulation elements to the wall to check the geometry, after which they are glued.
- Next, additional fastening is provided with plastic dowels. This step can be skipped, but it will provide greater reliability.
- Check the tightness of the connection in the areas of window and door openings. Fill the seams between the slabs with sealant. If problem areas with large distances are found, you can use polyurethane foam for filling.
- Vapor barrier. Just like waterproofing, it is not necessary for penoplex, but it will help avoid unexpected troubles.
After this, the interior decoration of the premises begins. There are several options here. You can apply plaster over the penoplex layer. Drywall is used as a more reliable protection. For wall fencing, a thickness of 12.5 mm in one layer will be sufficient. Next, the drywall can be plastered or wallpapered.
The method of insulation from the room side is somewhat similar to the wet facade technology. Proper thermal insulation with penoplex will provide comfortable living conditions and reduce heat losses of the building.
How to calculate the thickness of penoplex for high-quality insulation?
Before you start calculating the thickness of the foam sheet, you need to know what material the walls of the house are made of. Any material has its own thermal conductivity properties, so each wall requires its own thickness of insulating material.
What thickness of penoplex should I choose for wall insulation? Formula for calculating the thickness of penoplex :
P (design thickness, m) = R (heat transfer resistance) * k (0.028 W/(m2*°C).
Example of insulation calculation
Methods for attaching penoplex to the wall, the most optimal method
To install penoplex sheets as insulation for aerated concrete and other types of walls, several fastening methods are used:
- EPS is attached with special glue or mastic;
- Use of special polyurethane foam;
- Fastening penoplex using dowels.
Each option has its own characteristics. Experienced builders use several methods simultaneously to better fix penoplex . For example, the use of glue, and additional fixation on top with dowels.
Subject to the recommendations and requirements for the use of each method, the strength of the insulation is guaranteed, which can withstand the additional protective layer of finishing.
Fastening with dowels
Fastening with polyurethane foam
Using extruded polystyrene foam for external insulation
As mentioned above, insulating the walls of a building with Penoplex from the outside is possible provided that a ventilated façade is installed.
Preparatory work
First, the surface to be insulated must be prepared. To do this, it is cleaned, dirt and debris are removed. If there are cracks on the outside of the base, they must be plastered. Then the surface is primed.
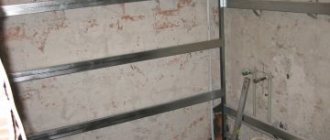
Setting up a profile
After preparing the surface, you need to install the plinth profiles. This will subsequently help to glue the insulation evenly. The profiles are mounted using dowel nails. They should fit very tightly to the base. The width of the profile must be made the same as the width of the Penoplex slabs.
Installation of insulation
The slabs of extruded polystyrene foam are secured using glue, which is applied either to the entire surface of the insulation, or along its edges and in the center. Penoplex is placed on the profile and, using gentle pressure, is aligned horizontally and vertically. Laying is done from bottom to top in a checkerboard pattern.
The gaps between the plates are filled with small pieces of insulation. It is better not to use polyurethane foam, since when it expands, the slabs may crack. Additionally, the insulation is secured with dowels in the center and on all sides so that the fasteners simultaneously hold adjacent slabs.
After installing Penoplex, the space between the profile and the base is filled with construction foam.
Insulation of external walls with penoplex with siding
Carrying out work on insulating external walls must follow certain rules:
- First. Preliminary preparatory work with the surface must be carried out ; the wall must be free of flaws and treated with antifungal agents;
- The second step is the installation of the base profile on which the penoplex will be installed . These manipulations are necessary for an even layer of future insulation, this will provide additional protection from harmful factors.
- The next step is to install the foam boards so that there is a gap of 2 millimeters between the sheets.
- After installing the penoplex boards, they must be secured; for this, special dowels or an adhesive mixture are used , which is used to pre-treat the wall surface and the foam sheets.
- The last stage is decorative processing or finishing of the facade with siding.
Penoplex for siding
Fill the joints with polyurethane foam
Insulation of external walls using penoplex is possible due to the lightness of the material and installation work. After completion of the repair, subject to technical nuances, you will receive additional insulation and insulation from many unpleasant external factors. Good luck with the renovation.
Insulation of walls outside and inside – which is better?
There are several options for insulating the walls of a private house:
- Interior finishing with insulation;
- external installation of penoplex.
If you look from a practical point of view, external insulation of walls is much more convenient and effective. In addition, it becomes possible to additionally decorate the facade of the house with an unusual material, such as mosaic or decorative plaster.
Due to penoplex, the walls of the house are additionally leveled, saving finishing material . The only obstacle to external wall insulation may be a ban on facade repairs in apartment buildings.
Comparison of insulation methods
But don’t despair, because there is always the opportunity to insulate the walls from the inside. Interior wall decoration with penoplex can be done in any season.
IMPORTANT!
When insulating door or window openings, use only solid pieces of polystyrene foam; this will provide better thermal insulation.
When using penoplex, installation work is simplified and you can do it yourself. Whatever finishing method you choose, it is necessary to carry out cleaning work on the walls where the foam sheets will be located. Then the surface is treated with special moisture control agents and antifungal solutions.
Chips, cracks and other damage formed in the walls are repaired. Penoplex is installed only on a well-dried surface using a special adhesive composition, and then additionally attached to the wall with mushroom dowels.
The sheets must be fastened with a slight offset, and the gaps between them are sealed with polyurethane foam or construction tape . After installing the penoplex, you can begin design work on the facade.
NOTE!
By the way, if you are looking for a contractor to insulate facades, I recommend it. The site has a job calculator, a large portfolio and other information. Go to kronotech.ru!
Package
Slab thickness (mm) Slab width (mm) Slab length (mm)
Number of slabs per package (pcs.) Package volume (cub.m.)
| 20 | 585 | 1185 | 20 | 0,2780 |
| 30 | 585 | 1185 | 13 | 0,2704 |
| 40 | 585 | 1185 | 9 | 0,2493 |
| 50 | 585 | 1185 | 7 | 0,2429 |
| 100 | 585 | 1185 | 4 | 0,2772 |
You can find the addresses of our regional distributors and construction stores in Moscow, St. Petersburg, Novosibirsk, Perm, Khabarovsk and other Russian cities where you can purchase PENOPLEX COMFORT® boards in the “Where to Buy” section of the website by selecting any locality from the list , or by contacting the sales department of our company.
Advantages Modern PENOPLEX® insulation based on extruded polystyrene foam helps solve several problems at once. 6 rules for choosing insulation High thermal protection Insulation must provide high HEAT PROTECTION! Safety The insulation must be SAFE! Environmental friendliness Insulation must be environmentally friendly! High strength The insulation must be DURABLE! Zero water absorption The insulation MUST BE MOISTURE RESISTANT! Durability The insulation must be durable! CertificatesDocuments confirming our competence
DocumentsDetailed information on the product and instructionsDeclaration of conformity PENOPLEX COMFORT, FOUNDATION, PITCHED ROOF.pdf0.9 mb0.4 mbTechnical sheet PENOPLEX COMFORT.PDF
Advantages and disadvantages
The positive features of insulation are manifested at all stages of use of this material:
- Lightweight slabs are easy to prepare and process and do not require special knowledge and skills to operate.
- They are attached in different ways and do not require additional layers of vapor and waterproofing.
- Excellent thermal insulation qualities allow you to save on other building materials.
- Durability and strength in any climate tests.
- Safety and environmental friendliness.
The disadvantages of the new generation material include:
- Susceptibility to attacks by rodents , which is typical for all types of insulation.
- Emission of acrid smoke when decomposed by open fire.
- Does not withstand combination with kerosene , gasoline or diesel fuel.
- Insufficient sound insulation compared to materials intended for this purpose.
- High prices for various types of penoplex, comparable to expensive mineral wool.
Sooner or later, the owner of any home wonders how to keep the heat inside the house in the winter, but at the same time prevent the heat from penetrating into the summer. Thermal insulation materials will come to the rescue. There is a huge selection available to buyers.
Today we will look at extruded polystyrene foam, or as it is also called penoplex. How to choose this material for facade insulation and what must be taken into account?
Advantages and disadvantages of wall insulation with liquid foam
What made this method of insulating houses, industrial buildings and outbuildings attractive and popular were the undoubted advantages of liquid foam:
- The fine-cell texture of the foam plastic, which perfectly conducts steam, actively passes moisture from the walls out through its entire volume, making them dry and counteracting the accumulation of condensation and the development of accompanying fungal mold. This property classifies the material as “breathable”, and this is of particular value for any, and especially wooden, walls.
The fire safety of cast foam is quite high and its flammability is not lower than group G-2. The material does not support combustion, and given the organic composition of the insulation, this phenomenon can be considered unique. In an open flame, the hardened foam is charred and loses its bulk, evaporating without forming molten drops, soot and toxic gases.
Penoizol tolerates changes in air humidity and temperature perfectly, without changing its internal structure and at the same time having rare durability. Studies have determined the service life of this insulation at 60-80 years.
Like all insulation materials, cast foam has excellent soundproofing properties. A layer of Penoizol 5-7 cm thick reduces mid-frequency airborne noise by 3 times, and structural noise by two times.
The cost of liquid foam is low and quite affordable. Using this material, you can save at the stage of building a house, but more significant savings can be obtained on heating during its operation, since this insulation has better thermal insulation characteristics.
A significant advantage of liquid thermal insulation is that there is no need for thorough surface preparation. This circumstance significantly reduces construction costs. If a special machine is used at the site for the production of Penoizol, it will be enough to provide only access to electricity and water for its operation.
Like any other thermal insulation, wall insulation with liquid foam has its disadvantages:
- Compared to extruded foam, Penoizol has low mechanical strength.
When water comes into contact with the insulation for a long time, it is able to absorb a certain amount of it, which worsens the thermal insulation properties of the coating. However, Penoizol can quickly evaporate accumulated moisture due to its capillary structure.
During the polymerization process, liquid foam releases a small amount of formaldehyde and water fumes into the air, but after this process is completed and moisture is removed for 2-3 weeks, the presence of harmful substances does not exceed their maximum permissible concentration.
In the case of injecting liquid insulation not into solid concrete or brick walls, but into frame walls, due to the problem of creating significant pressure in such structures, the injected foam plastic has an unpleasant property - shrinkage of the insulation during its polymerization and drying, amounting to up to 1%.
Many of these shortcomings can be eliminated. Thermal insulation made of liquid foam is protected by sheathing from climatic factors and mechanical damage. In frame walls it is reinforced, this eliminates the shrinkage of Penoizol for the entire period of its operation, and also makes it possible to obtain a monolithic coating reinforced throughout the entire volume with fibers.
Cost of material and installation work
Penoplex itself has a fairly high price, so before preparing for its installation, you need to find out its cost in the region where you live.
- On average, the price of penoplex 50 mm thick is approximately $5 per 1 m².
- Modified material with improved qualities, including the addition of fire retardants, has a price of 7 ÷ 8 $ per 1 m².
- The work of craftsmen to insulate the walls of a house from the inside will cost an average of $9 ÷ $10 per 1 m².
- Attaching penoplex to the facade of the house will cost about 13 ÷ 15 $ per 1 m², since the work is more complex due to the fact that part of it will have to be carried out at height.
Having become familiar with the basic technological methods of using penoplex as wall insulation, having specified the price level for the insulation itself and the necessary consumables and installation work, each home owner will be able to assess his capabilities and decide whether to do everything himself or invite a specialist .
Having information about typical mistakes that are often made when installing penoplex, you can exercise control over his specialist - alas, among them there are many “leftists”.
In fact, the work is simple and quite accessible to do it yourself; all the necessary tools are available. But, naturally, if you need to insulate the walls of an apartment located above the first floor, then you should not show unnecessary “heroism” - it is better to turn to professionals who have special equipment for performing installation work at height.
And in conclusion, another video about the use of penoplex for insulating a balcony.
Calculation
For a wall with a thickness of 1.5 bricks, five-centimeter insulation is suitable.
As an example, you can take a Moscow wall with a thickness of 1.5 bricks, which will be 0.38 m. The thermal resistance of such masonry is 0.76 m² × ° C / W (thermal conductivity coefficient of brick 0.5 W/m²×°C, 0.38:0.5=0.76). The remaining resistance value (3.14-0.76=2.38 m²×°C/W) is provided by insulation and finishing materials. If we multiply the thermal conductivity of penoplex by 0.028 W/m²×°C, we get the required thickness of 6.6 cm. Taking into account external plaster and interior decoration, it is permissible to choose slabs 5 cm thick.
The practice of performing work has shown that when using standard sheets of extruded polystyrene foam, the insulation layer on average is made of the following thickness:
- for internal insulation of premises, slabs with an end face of up to 4 cm are sufficient;
- for external arrangement in a temperate climate, set 5 cm;
- in cold zones 10 cm and conditions of the far north 15 - 20 cm. For more information on calculating the thickness of insulation for walls, see this video:
Sheets whose thickness is less than the calculated value should not be applied in 2 layers; it is better to insulate on both sides of the wall.
Before working with this material, we recommend that you familiarize yourself with the technology of wall insulation with penoplex.