Practical advantages of homemade structures
Do-it-yourself concrete mixers from a barrel have a number of significant advantages for owners:
- Craftsmen can independently adjust the proper volume for a homemade unit.
- Construction does not require special materials or tools. It is enough to be proficient in welding and a grinder, as well as prepare a low-power motor.
- There is no need to invest significant financial resources in purchasing a new model. A concrete mixer, built from scrap materials, will mix the components of the cement mortar no worse than a production unit.
Another advantage is the availability of ready-made projects, drawings, and diagrams for assembling a structure on various web resources and pages of practical construction magazines.
Drawings and design of simple concrete mixers
Simple models of electric or mechanical concrete mixers can be easily made at home from ready-made metal containers by selecting the desired size. Use 2-3 bucket pots, flasks and fuel barrels. More complex designs are equipped with self-welded drums. You can select the desired design and its drawings from a large range of devices with manual and electric drive.
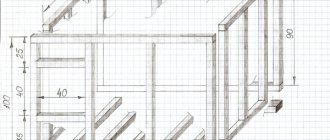
Drawing of a handmade homemade concrete mixer made from a barrel.
Requirements for homemade concrete mixers
An optimally designed structure should have a reliable frame and strong fasteners designed to hold the main barrel. In addition, a homemade concrete mixer must meet the following requirements:
- Strength.
- Sustainability. When rotating the main barrel, the structure should not fall at the most unexpected moment. During the construction of the mixer, it is better to use a level to regulate the location of the frame posts.
- The height of the vent for placing the composite components should not be too high or too high. Most often, the barrel is mounted with the ability to rotate not only around its axis, but also along the “down-up” path. To give the rotating structure proper stability, stoppers are additionally made to limit unnecessary movements.
- The strength of the barrel itself, resistance to moisture and mechanical damage. Gravel is often added to the solution, which can damage thin-walled materials upon impact.
The motor and electrical wiring are securely covered behind a special shield, into which water, concrete mortar, and small pebbles cannot enter.
The internal surfaces of the protective shield are coated with an anti-corrosion compound and an antipyretic agent.
Self-production
A factory-made or home-made concrete mixer consists of three main components: a tub in which the solution is mixed, a frame for attaching the components, and a drive - manual or electric (in some cases, motors from a moped or scooter are used).
In the video, a homemade tub for combined mixing of the solution is installed on a T-16 tractor:
Tub for solution
Firstly, you need to think about its size, given that it will be loaded at 30-40%. This is no longer possible, as the solution will splash out and mix poorly.
Secondly, attention should be paid to the shape - it should be pear-shaped. From above, so that water and solution do not splash out, from below, so that concrete particles do not get clogged in the corners between the wall and the bottom
An almost finished tub is a plastic barrel of the required size - in addition to the fact that it fits the shape, its weight will be an additional advantage.
Alternatively, a concrete mixer can be made from a washing machine - if you have an old Soviet round “washing machine” lying around in the attic, then remove the laundry tank, which is specially designed to allow liquid to spin inside it. The bottom is strengthened, the top is narrowed and the tank is ready.
If there is nothing suitable, then a pear for a concrete mixer can be made from a steel sheet with a cross-section of 2-3 mm. For the bottom, you should take thicker metal - about 5 mm - it will bear the main load from the drive.
With a diameter of 500 mm and a height of 400, a compact tub is obtained, in which, however, 30 liters of solution can be prepared at a time.
The following drawings will tell you more about the design:
You can make a high-quality pear for a concrete mixer without using blades. In the diagram shown, instead of them, mortar dividers made of 16 mm reinforcing rod are welded inside the container, which further strengthen the structure. This design is an excellent mixer for wood concrete.
Attachment to the shaft occurs through a hub from a car wheel, which is welded or screwed to the bottom. If there are no car parts lying around in the garage, then the fasteners will have to be made manually according to the drawing.
Support frame
There can be a variety of variations in its design - there is complete freedom of action, the main rule of its manufacture is that it securely holds all components and provides free access for loading and unloading concrete.
The main differences in engineering lie in the method of pouring the finished solution, for which the tub itself is made movable, or the entire frame is designed in a certain way.
For a tub made of steel sheet, the optimal frame is one that allows it to tilt. The container itself is connected to the gearbox drive (15), to which the force comes from the engine (17) through the coupling (16).
All this is mounted on a subframe (18) and rotated on a hinge (14). For different types of solutions, the working slope of the tub can be adjusted, for which an eye (22) is welded to the subframe, through which a sector (10) passes, held in the desired position by a pin (23).
The sector needs at least three basic provisions:
50% slope – for heavy solutions.
A slope of 30% is for light mixtures (for example, plaster).
Horizontal position to rinse the container.
Electric motor and gearbox
These parts are rarely purchased separately - it’s easiest to use what you have on hand. The electric motor is suitable from a washing machine, the electrical circuit is from there, and the gearboxes are assembled from bicycle wheels, belt or chain drives. The closest thing to the factory design is a flywheel welded to the bottom, which spins from the “native” Benedix car starter mounted on the shaft.
All calculations are made based on the following considerations:
- The engine power is selected according to the ratio of 20 watts per liter of solution.
- The number of revolutions produced by the gearbox for the tub should be in the range of 30-50 per minute. A smaller amount will increase the mixing time, and a larger amount will splash the solution or generally cause centrifugal forces, due to which mixing will not occur.
What can the structure be assembled from?
The optimal concrete mixer that meets all requirements can be built from the following materials:
- Metal barrel.
- An old washing machine (namely, a drum).
- Metal cans for storing and transporting liquids.
- Tanks from faulty water heating devices (Titanium).
All these items are used to mount a high-quality container for mixing cement or concrete mortar. The most popular and optimal way is to make a concrete mixer with your own hands from a 200 liter barrel.
Basic principles of operation of mortar mixers
According to the principle of operation, a self-made concrete mixer is no different from its industrial counterparts - the differences will only be in the materials used and dimensions. In addition, repairing a concrete mixer with your own hands will be easier, since you know the self-made mechanism inside and out.
Based on the volume of planned work and available components, the finished device can mix concrete in a concrete mixer using a forced method, gravity or a combination. The latter is used most often due to the ease of manufacture of the device and the high quality of its work.
Forced mixing of the solution
A construction mixer or drill with a special attachment works on this principle: a whisk is lowered into the solution and rotates to mix its components. But such tools are more suitable for gypsum plasters - sand and cement, especially with the addition of crushed stone, have much more weight, so in the best case, you simply won’t get a high-quality mixture, and in the worst case, making the solution yourself can burn out the drill motor or its gearbox.
To prepare concrete, a slightly modified design is used - a shaft passes through the center of the container, on which blades are mounted, mixing the components of the mixture. Frame mixers that break up lumps of mortar, turning it into a homogeneous mixture, also show good results. Some builders are convinced that only such an arbolite mixer can prepare an arbolite mortar with high quality.
Advantages and disadvantages
This method shows excellent results in production, but before using it at home, you should weigh the pros and cons of the design.
There is only one advantage - such a concrete mixer will produce the most homogeneous solution in the shortest time.
This device has many more disadvantages:
- Complexity of design. It is necessary to ensure the tightness of the place where the shaft passes through the mixing container. This determines how often the bearing, which is usually installed in this location, will need to be replaced. It is also necessary to reduce the “dead zones” that are located near the walls of the container - the blades or frame should rotate freely, but at the same time pass close enough to the surface so as not to leave unmixed parts of the solution there.
- Need quality parts. The concrete solution is quite heavy in itself, and adding crushed stone or other inclusions to it requires additional capacity from the concrete mixer. As a result, in order to get a good concrete mixer, you need to remember or master the basics of strength materials.
- The design is not designed for preparing a solution containing medium and large fractions of crushed stone or expanded clay - they will simply get stuck between the blades and walls.
- High energy consumption. Again, everything depends on the density and weight of the concrete in which the blades will rotate. For the same reason, a homemade forced-action concrete mixer must have a motor - if you try to rotate the shaft manually, you can just as well use shovels.
If the quality of the solution and the speed of its mixing are more important, then a forced concrete mixer with your own hands can be made according to the following schemes.
Parts and device
The design consists of the following components:
- Bearing frame. Its implementation is individual in each case.
- Kneading drum with smooth inner walls.
- Working shaft. Frames or blades are attached to it to mix the solution.
- Electric motor.
- Reduction gear.
- Clutch. Transmits force from the gearbox to the shaft. Can act as a fuse when jammed.
- Hatch for pouring out the prepared solution.
- Lever for opening the hatch (or turning the drum).
Self-assembled forced-action concrete mixers require special attention to the method by which the prepared solution will be unloaded. This is a hatch in the bottom of the mixing container or a device for completely turning it over so that the finished mixture pours out through the loading compartment. It is advisable to decide in advance which method is more suitable.
Visually a forced concrete mixer in the video:
Gravity mixing
When using this method, the container itself rotates, into which the components of the solution are poured. Mixing occurs due to the constant pouring of sand and cement from top to bottom. The most difficult thing in this design is to ensure that the lid is tightly closed so that water does not leak through it.
The most important advantage of the design is its simplicity. Such a do-it-yourself mortar mixer can be made from an ordinary can; even an unnecessary and leaky one will do. You cannot drink water from it, so the hole can be sealed by any means, and the neck rarely deteriorates and still provides the necessary tightness.
Such devices can also be used during construction in places where there is no electricity - such a homemade concrete mixer, made with your own hands, does not necessarily have to be equipped with an electric drive, although its presence will greatly simplify the work.
Working on the same principle, but more common, is a homemade concrete mixer made from a barrel. It’s easier to find a container for it, it’s more spacious and allows you to mix the solution more thoroughly. As practice has shown, the solution is better mixed in a barrel secured in opposite corners.
Parts and device
The following components are used:
- Iron barrel of suitable size. Some craftsmen also use plastic containers for these purposes.
- Frame. There are no restrictions here - there is complete scope for imagination. The main thing is that it is convenient to pour out your prepared solution.
- A shaft on which the container is supported, capable of supporting the weight of a barrel of cement.
- Bearings.
- Pen. The longer it is, the easier it is to rotate the shaft.
- Handle.
- Cover for draining the finished solution.
- Clamps that hold the lid to the neck.
- Seals.
- Hinges for opening the lid.
How a self-made concrete mixer from a barrel works is clearly shown in the following video:
Combined concrete mixers
The most common devices - the solution is mixed due to gravitational influence, plus the breaking of lumps with blades or pins welded to the barrel body. Suitable for making wood concrete with your own hands. They require more time to prepare the solution than forced mixers, but have an extensive list of advantages:
- The design is as simple as possible, reliable and unpretentious in operation.
- Less force is created on the shaft rotating the barrel, which allows the use of less powerful electric motors than for forced mixing. The result is significantly less wear and tear on components.
- There is no need to seal any joints - the solution is mixed inside the barrel, and all the components of the mechanism are outside.
- It is possible to mix solutions with any size fractions of crushed stone, expanded clay and other fillers.
The simplest combined manual concrete mixer made with your own hands from an iron barrel is the same manual concrete mixer, but with blades or combs welded on the inside. If necessary, an electric motor can be connected to it.
Metal barrel
Instructions on how to make a concrete mixer with your own hands from a 200 liter barrel can be found on web portals and You Tube channels, where experienced craftsmen present video tutorials on making structures of this type.
Old barrels are great for building concrete mixers. They are ideal in shape, size, and have sufficient strength.
To obtain a high-quality design, all internal surfaces are coated with an anti-corrosion compound, as well as additionally with several layers of paint.
How to assemble a concrete mixer - Prorab, Skiff, Kraton, Elitech, etc.
Hi all! Since I work as a sales consultant in a tool store, naturally my responsibilities include not only consulting, but also assembling various equipment. And in this article I decided to give instructions on how to assemble a concrete mixer.
This refers to a factory-made device, which the buyer purchases in disassembled form. Therefore, if you came across this article looking for information on how to make a concrete mixer with your own hands, then I’m sorry, we’re talking about something else here. And in general, a new full-fledged concrete mixer will now cost 8-9 thousand rubles, which is not that expensive when compared with the rest of the cost of construction or repairs. Is it worth the bother of assembling it from scrap materials?
By the way, I recommend purchasing a concrete mixer here. This is the All Tools store. They have a large selection, reasonable prices, and free delivery to the point of delivery in your city. A 220 volt store works approximately the same way. To view their offer, click here.
More than 40 types of concrete mixers in one place. Click to view
So, I will show the assembly using the Skiff concrete mixer as an example, but the same unit is also sold under the brands Prorab, Kraton, Elitech, Caliber and many others. The truth may differ in color. And, if the design is slightly different than in our example, then the assembly will still be approximately the same. In our case, it is 160 liters, but the assembly process for mixers of other sizes is similar. This model is one of the most common among Chinese devices.
Let's move on directly to the assembly process. Unpack the box and lay out all the parts before your eyes. In order to assemble the concrete mixer from our example, you will need one open-end wrench for 12, 14, two for 17 and possibly one for 22. You will also need a Phillips screwdriver. We will not go into details about where the bolts go. Everything is simple here: if the bolt fits, then install it.
First you need to take the triangular shaped rear support and put the wheels on it, securing them with the included washers and cotter pins.
Now we take the frame and connect it to the support indicated above, on which the wheels are already put on. The frame is the same on both sides, so it makes no difference which side this support is attached to. True, on some concrete roads there may still be a difference. If your frame is asymmetrical, then the triangular support should be mounted on the side where the engine will be mounted.
Now we attach the second support to the opposite edge of the frame.
Next, we install and fasten the lower part of the drum along with the support attached to it onto the assembled base. It's better to do it together. If you are alone and not confident in your abilities, then you can separate the support and drum by installing them separately. For this you will need a 22mm wrench. The ends of the support are different, so the one where the engine will be mounted (the side with the drive sprocket) is placed on the side of the wheels.
Now you need to attach the inner blades to the bottom of the drum.
Next, take the upper part of the drum and fix the rubber seal on it as shown in the figure. If your kit comes with sealant instead of a sealant, then apply it to the lower part.
Place the upper part of the drum on the lower part and screw it on. The installation must be done so that the arrows glued to both parts look at each other. If there are no arrows, then we place them so that the inner blades, with their mounting holes, reach the holes on the top. When installing, it is necessary that the mounting bolts holding the sealing rubber fall into their threaded mounting holes. After installation, tighten these bolts with a screwdriver.
Now we screw the inner blades to the top of the drum.
Next, we attach the tilt angle clamp.
Then we install the “steering wheel”. We find a “coin” in the fastener and throw it into the recess for the spring.
Now insert the spring.
Holding the spring, we attach the “steering wheel” to the mounting holes and thread the bolt included in the kit. We screw two 17mm nuts onto this bolt, and without tightening them to the end, we lock them. Not fully tightening is necessary so that the “steering wheel” can freely deviate to change the tilt of the drum and return to its original position under the action of the spring.
Don’t forget to tighten the spring by tightening the bolt intended for this so that the “steering wheel” itself can remain with its protrusions in the slots of the clamp.
Now let's start installing the engine. If you already have it inside the assembled case, then everything is simple. We put it on the existing spindle with a pulley and fasten it using the supplied bolts and a special plate.
If the engine housing is disassembled and it itself comes separately, then we do the following.
First, we attach the corresponding part of the body to the frame of the concrete mixer.
Then we put on and screw the pulley.
Next, we fasten, without tightening, the engine support.
Now we attach the engine to the support.
We put a belt on the pulleys and lower the support together with the engine down, tensioning the belt, after which we tighten the engine support fastening.
Now we attach the power wires to the button located on the second part of the case.
Well, at the end we connect both parts of the body to each other.
That's all. I hope that now you can easily assemble the concrete mixer. You may also be interested in other articles on my website - you are welcome to read them)). See you on other pages!
Old washing machine
A self-made concrete mixer from a washing machine is used quite successfully in practice. Over the past two decades, home appliance manufacturers have used fairly durable materials as machine drums.
They only require additional treatment with an anti-corrosion compound and periodic inspections for the appearance of rust on the inner surface.
Electric motor assembly
To make a concrete mixer with an electric motor, a single-phase motor is suitable.
If you have motors from old washing machines at home, you can use them as an electric motor for a concrete mixer. The average rotation speed should be 20 - 30 rpm.
The engine from gasoline motorcycles will also work. It will be convenient because it is not dependent on electricity.
The shaft must rotate through bearings. The solution is used in a maximum of 7 buckets.
Be smart, consider your own preferences, and you will achieve the desired result and ease of use.
Cans for storing liquids
To make a high-quality concrete mixer, cans with a volume of 100 and 200 liters are useful. Before starting independent work, the containers must be cleared of contents, fired, and coated with an anti-corrosion compound.
The lids with locks are cut off, and the upper contours are scalded to give the proper shape to the mouth.
Note!
Do-it-yourself compressor: selection of materials and tools for assembly at home + step-by-step instructions for making and assembling yourselfHomemade products for the garage with your own hands: options for products for arranging a garage, detailed diagrams and drawings for creating with your own hands
Do-it-yourself press - design features, choice of manufacturing materials. Step-by-step instructions for making it yourself + simple diagrams and drawings
Materials and tools for work
For optimal independent work you will need the following set of materials and tools:
- Welding.
- Bulgarian.
- Construction pencil.
- Roulette.
- Level.
- Motor.
You will also need sheet metal and fittings for mounting a rotating belt (a metal ring that rotates the barrel around its axis). It is necessary to prepare special anti-corrosion compounds for coating surfaces and paint, brushes.
It is better to carry out pre-treatment work using personal protective equipment, so you should take care of them as well (mask or respirator, gloves, thick glasses).
Step-by-step instructions on how to make a concrete mixer and ready-made drawings for making various models can be found on web resources and in the practical construction magazine.
Note!
- Do-it-yourself winch: classification, manufacturing materials, description of work stages + instructions for DIY construction
Do-it-yourself clamp - step-by-step production and description of options for using a clamp
DIY knife | A step-by-step description of how and from what materials to make a homemade knife
How to make a high-performance concrete mixer?
If large-scale construction work is ahead, you will need a concrete mixer with a large capacity and at the same time highly reliable.
In this case, there is also no need to buy an industrial model, since a completely comparable analogue can be made independently; in extreme cases, you need to involve a friend or hire a craftsman to perform certain operations.
You need to immediately prepare for the fact that you cannot do without the use of welding, and first of all, it will be required for the manufacture of a container, which should be completely welded from metal.
Structurally, this tank consists of three parts: the bottom, the middle part and the tapering neck. Considering that it is planned to produce quite large volumes of concrete in such containers, increased demands are placed on the quality of welds.
Therefore, in the absence of proper qualifications, it is best for a home master to turn to a specialist. Additionally, inside the pear-shaped tank you need to attach 2 ( or 4
) blades.
The next stage is the manufacture of a frame, a bed, on which the tank will subsequently be installed. As is already clear, the reliability of this design also places high demands on strength and reliability.
Therefore, a metal corner of at least 75×75 mm should be used for it, but the total operating weight of the device when loaded must be taken into account.
It is imperative to take care of additional frame stiffening ribs, which guarantee the stability of the concrete mixer during operation and prevent it from tipping over. It would also be useful to install a counterweight for the same purpose.
Next, the assembly of the concrete mixer begins:
- a container is attached to the frame and a shaft is installed;
- the gearbox is mounted and the motor for the concrete mixer is connected to it via a pulley;
- after this, a test run is performed, during which it is necessary to check the operation of all elements and, if any shortcomings are identified, promptly eliminate them. The main evidence of proper operation is the absence of characteristic ringing or hissing sounds and grinding.
To assemble such a model, more effort will be required, but its reliability, and, most importantly, performance, will be significantly higher than other home-made samples.
Step-by-step production of a concrete mixer
Work on creating your own unit for mixing cement or concrete mortar is carried out in an open area or in a workshop, using protective equipment (welding mask, grinders, thick gloves, respirator).
The entire construction process is divided into several successive stages:
- Preparation of the drawing.
- Mounting frame racks.
- Installation of the barrel.
- Assembly and installation of the protective shield.
Strict adherence to the required rules and the prepared drawing allows you to produce a high-quality concrete mixer for your own needs.
Preparation of drawings
The selected container must be displayed to scale on paper. All calculations and dimensions must be transferred to the plan diagram. The location of the frame stand, the barrel itself and additional fittings (mounts, rotating mechanisms, motor with a protective shield) are also displayed there.
If you lack artistic skills, you can always use ready-made plans for various models of concrete mixers.
Note!
DIY vices: simple and reliable homemade vices from A to Z (190 photos)Do-it-yourself vibrating table - selection of materials, components and assemblies for a vibrating table with a step-by-step manufacturing description
- Do-it-yourself grain crusher - operating principle, types and features of creating a device for processing grain crops
Assembling frame racks
It is from this moment that the construction of any model of concrete mixer begins. The frame is made of metal pipes, angles or profile pipes. Welding is used for fastening.
Instructions on how to assemble a durable and high-quality frame with your own hands:
- Pipes or metal corners are cut using a grinder according to the measurement results obtained.
- Four racks and crossbars are welded.
- Fasteners for the rotating barrel are welded on the side posts towards the central point.
Check the stability of the welded frame and the strength of the fastenings. Sometimes there are models of support posts made in the form of a tripod with transverse crossbars on several tiers.
Assembling a rotating container
The selected container is subjected to a series of transformations. Instructions on how to make a concrete mixer with your own hands:
- Wash and clean the barrel or other container thoroughly. If this is a barrel of gas or other flammable liquids, all residues should be drained and the container should be fired.
- Make markings on the surface of metal containers using a construction pencil or marker.
- The direction of the cut lines, the location of the fasteners and the ring rotating the barrel are noted.
- Using a grinder, cut off the upper part of the prepared container.
- To narrow the entry point, the upper part is cut into strips with a grinder, excess material is removed, and the metal strips are welded back. In this way, a narrower mouth of the concrete mixer is formed. A similar technique is used to limit in practice the precipitation of solution during rotation of the barrel. Additionally, you can weld a small ledge or side along the contour of the vent.
A ring in the form of a metal strip is mounted on the outer surface of the barrel, which is driven by a motor. A kind of belt allows the container to rotate around its axis. Install the barrel on the frame using welding for fastening.
Instructions: homemade concrete mixer with a washing machine engine
There are two types of concrete mixers:
- Mechanical. The container is driven by force. This is almost the same as mixing concrete in a regular container. How much effort and time will it take you to work with a manual drive? Therefore, it is better to go with the next option.
- Electric. The tank is driven by an electric motor.
The manufacturing technology of a concrete mixer is quite simple. But before you get started, think about whether you can connect the engine yourself? If the answer is yes, then prepare everything you need.
Accessories
- A 200-liter barrel from an old washing machine (preferably top-loading). This volume is enough to mix the optimal amount of concrete for work.
- Electric motor (power 200 W).
- Pulley, drive belt, washing machine switch.
- To make the base you need a metal corner measuring 50x50.
- Wheels. Two wheels can be taken from an old stroller, wheelbarrow, or cart.
- As an axis you will need a strong metal rod of 4.5 cm.
- Gearbox.
- Fittings.
- Metal strip.
- Ball bearings.
- The wire.
- Washers and bolts.
Tools
- Bulgarian.
- Hacksaw for metal.
- Drill.
- Soldering iron.
- Welding with electrodes.
Why is it profitable to make a concrete mixer from an old washing machine? Because the tank of the machine is quite suitable for mixing the solution, its drain hole can be closed. The motors of old washing machines are quite durable and reliable.
The integrated use of all elements protects the engine from foreign objects during operation. This will save you from having to do protection.
Step-by-step execution of work
Before you start, you can prepare drawings to help you assemble the structure. One of the drawings is shown below:
Make a frame (base)
This is an important point, since the entire structure will rest on the frame. The base must be strong and stable.
- From the prepared 50x50 corners, cut two pieces of 60 cm and four pieces of 80 cm. A piece of 60 cm serves as the basis for the support triangle, pieces of 80 cm are its edges. Fold and weld the triangles. Place them opposite each other.
- Now weld two 50 cm corners to the edges of the triangles. This creates a stable structure.
- Two nuts need to be welded to the tops of the triangles. The diameter of their hole must be larger than a pipe with a diameter of 30 mm. Then this pipe needs to be pulled through the holes of the nuts and the ends are pressed in. The pipe should rotate freely, but not jump out of place.
- Make the top part. Take two corners 1.4 m long and three 40 cm long. Place those 1.4 meters long opposite each other. Place the rest crosswise at an equal distance, like a ladder. Weld the parts together.
- Weld the bases of the finished structure to the movable pipe. It must be placed across the pipe in the center.
Frame
Attach the wheels to the base of the frame with reinforcement.
Now it's the tank's turn. Remove the activator from the tank and close the drain hole. Install a shaft or axle of the appropriate size in place of the activator. Make homemade blades from a strip of metal that will mix concrete. They can be further tightened using pliers. Weld the blades onto a metal strip and attach them to the shaft.
To install a large barrel with your own hands, place it on the ladder of the frame. Make sure that most of it is in contact with the corner. Weld the barrel to the base for a secure installation. In this case, the bottom of the tank should face the tops of the triangles.
Motor connection
The motor is connected to the back of the tank. To do this, drill two holes in the corners. You will also notice holes on the motor body, attach them to the corners and secure with bolts and nuts.
To prevent the engine from breaking due to bad weather, make a casing from a car inner tube. Provide holes on the sides to prevent overheating.
All that remains is to connect the motor to the mains voltage and check the operation of the homemade concrete mixer. The convenience of this design is that the ladder tilts like a swing. Therefore, the prepared solution can be easily poured by tilting the tank.
Knowing how to make a concrete mixer from improvised materials, you can save a lot and acquire your own equipment. Act consistently and everything will work out.
Installation of the motor and protective block
The protective box is made from sheet iron. Before starting work, be sure to take measurements of the motor and prepare a plan drawing. The inner surface of the box is coated with an anti-corrosion coating and an antipyretic solution. Additionally, you can apply several layers of paint.
Small sides or stops are welded along the internal surfaces. With their help, the motor is securely fixed to the walls of the protective panel so as not to damage the device during rotation of the barrel.
Exit the network cable through a specially prepared hole. The finished structure can be coated with paint and successfully operated.
If necessary, the master always has the opportunity to watch a video on how to build a concrete mixer with his own hands. Experienced craftsmen are happy to share their own tricks and secrets of carrying out construction work.
DIY electric concrete mixer from a barrel and a washing machine engine
This concrete mixer is gear type. To make this model you needed:
- galvanized steel barrel 180 liters (diameter 560 mm, height 720 mm);
- washing machine motor - 180 W, 1450 rpm;
- flywheel and starter gear from Moskvich 412;
- two pulleys from a washing machine with a diameter of 300 mm and 60 mm;
- wheels from a garden cart;
- scrap metal for the frame.
Gears, wheels - everything is old, everything was in the garage
This is also not new
First of all, we clean everything from rust, treat it with a rust converter and cover it with primer.
Processing details
We make a frame from pipes and channels. We strengthen the corners of the frame by welding metal plates. Everything must be tough and reliable. We are making a serious crossbar: a barrel of solution will “hang” on it, and everything will vibrate and spin.
The frame is the basis of the structure. The pipes are almost new))
We weld the pins and the seat for the transmission gears. We remove rust, treat it with a rust converter, and prime it.
Treated frame
We fasten the wheels from the cart. They have wide treads and they have justified themselves: it is not difficult to drag a concrete mixer even just across the site.
Wheels attached
We also make structures from pipes for support and installation of all the “filling”.
Two more triangular structures
We also attach them to the frame
The second is for greater stability
We begin to assemble the drive. First we place the large gear on the previously welded pin.
We put a big gear
We install an assembly in the seat - a small gear connected to a wheel for a belt drive.
Large gear transmission
We attach the engine to the plate welded in advance.
Suspending the engine
We hang it so that the two wheels of the belt drive are at the same level. It is also necessary to ensure normal belt tension.
Motor installed
All that remains is to attach the barrel. We make a hole in the center for a large pulley and drill a hole for fasteners. Let's put it in place.
We make holes in the bottom of the barrel. When installing, do not forget about the rubber seals
This is how it looks on the frame
Another perspective
Pass closer
Only the electrical part remains. We connect the cable through a starter with a button.
We connect the cable through a starter with a button
Several photos of the main components. Maybe someone needs to take a closer look.
Gear and barrel mount
Mounting the motor on a plate dampens most vibrations
From a different angle
The second transfer option is from a car disk
The barrel is 200 liters, its edges were cut, bent and welded, forming the usual “pear”.
They made a “pear” from a barrel
The car disk was bolted to the bottom (with rubber gaskets). It was selected so that a recess was formed for the belt drive. A hub was pre-attached to the disk.
For belt drive
Blades were welded inside the barrel to mix the solution more efficiently.
Blades inside
All this equipment was attached to the frame.
The barrel and the disk for the belt drive were installed on the frame
Where the plate is welded is the place for the engine. We set it so that the belt runs smoothly. Power was supplied through a toggle switch, and a timer from the washing machine from which the motor was removed was turned on in series.
Back view. Motor under a sheet of metal
In general, the rotation speed turned out to be 35-40 rpm. Should be enough.
The whole show looks like this
Side view