Do-it-yourself gable roof installation
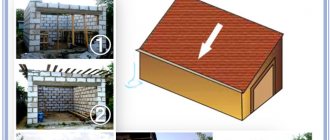
Building a country house involves considerable expenses. Therefore, many people are looking for options to reduce the cost of this process through the use of modern materials and technologies. Currently, frame buildings with gable roofs have become very popular. This happens largely for the reason that even a person with minimal knowledge of construction can carry out such a design with appropriate preliminary preparation.
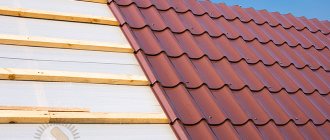
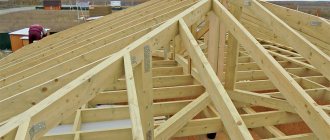
A gable roof is formed by triangular trusses connected to each other by a longitudinal upper beam (ridge girder) and sheathing
However, constructing a roof is a crucial moment that requires serious consideration. You need to calculate:
- correct angle of inclination;
- rafter length;
- the distance between them;
- methods of connecting various parts to each other.
Without experience in performing such work, you should not take on complex structures, but you can easily build a small house with a simple gable roof with your own hands.
Degrees, percentages and ratios
A roof slope of 8° corresponds to a value of 1:7 - this is the minimum value that can be when installing corrugated sheeting. And after completing all the work, it is necessary to carefully check the roof for ventilation. However, when determining the angle, roofers talk not only about degrees, but also about percentages and even coefficients. All this is the same thing, the only difference is for design documents and when ordering materials. We have prepared a table for you that will help you figure out what's what:
Now let's understand the construction terms. So:
- Flat roofs are those whose slope angle does not exceed 5°.
- Sloping - those that are usually more than 20°. Naturally, pitched roofs are more waterproof, and therefore more popular in private construction.
- Roofs with a slight angle of inclination - up to 25°. Here you can already equip attic spaces, but without windows.
- Steep - those that have a slope of more than 40°. Steep ones allow you to arrange a good residential attic, which is never superfluous.
- Large is the roof slope that falls between 45-60°.
- But today the ideal roof slope angle is 38-45°.
So, the minimum angle of inclination of a corrugated roof is 8°. Here is a detailed video master class on how such roofs are built:
If you need to build a roof with an even smaller slope, then the profiled sheet should be narrower at the bottom of the roofing cake - like a ceiling. The design principle is changing.
Design features of gable roofs
Such a roof consists of two inclined planes located at a certain angle. Along the end walls there are pediments, which are a vertical continuation of the walls. In shape they are isosceles or arbitrary triangles if the slopes are arranged at different angles to the horizontal. In the case of a gable sloping roof, the gables are shaped like trapezoids.
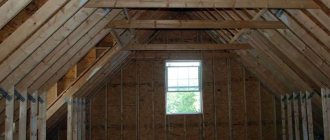
When building a roof, a rafter system is created, which is the supporting element of the roofing pie. The rafter system can be made in the form of hanging rafters if there are no permanent partitions inside the building box. If they are available, a deck frame is installed when the span is supported by three or more points.
Depending on the configuration of the building, a gable roof can be erected according to different schemes
How to make a gable roof yourself
Depending on the design of the rafter system, its main elements may be different, but the main details are present in all options:
- The rafters are the main load-bearing element of the structure onto which the roofing material is mounted through the sheathing.
- The ridge girder, also called the center beam, combines all the rafter legs into a single whole and evenly distributes the load on the mauerlat.
- Rack - used in deck structures as additional support for a permanent internal partition.
- The bench is a horizontal beam on which the racks rest, serving to evenly distribute the loads on the mauerlat.
- Mauerlat is a support beam between the walls and the upper structure of the building, intended for fastening rafters.
- Sheathing is a flooring made of boards 25 millimeters thick for attaching the finishing roof covering.
Regardless of the type of rafter system, it always contains several basic elements
Roof design
In the process of designing a rafter system, it is necessary to optimally place all frame elements to ensure uniform roof load over its entire area. The main types of load are:
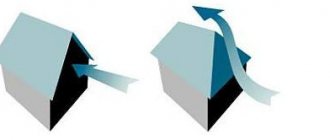
- Snow - occurs under the influence of a layer of snow that lingers on the roof. At high rates for the construction region, the angle of inclination of the roof is increased so that the snow falls off as it accumulates.
- Wind - associated with the force of the wind. In open, windy places it is higher. A means of counteracting wind loads is to reduce the angle of the roof.
Thus, it is necessary to find the optimal combination of these indicators with simultaneous exposure to wind and snow. Data on specific loads for the construction region can be found on the Internet.
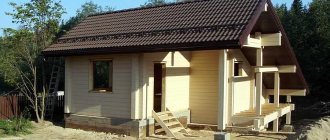
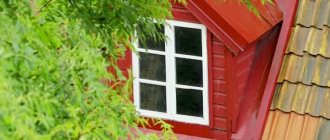
Gable roofs with a simple design give the house an elegant and festive look.
Photo gallery: projects of houses with gable roofs
The gable roof allows you to arrange a small attic room on the second floor
The angle of inclination of the gable roof is selected based on the intensity of the winds and the average snow load in the construction area
Despite the simplicity of the design, a gable roof can be a central element of the overall design of the building
Roof slope angles do not have to be the same
Calculation of gable roof parameters
Determining the main characteristics of the roof is necessary already at the foundation design stage to calculate the impact of the total weight of the building on the supporting foundation.
Area calculation
With a symmetrical gable roof, it is enough to determine the area of one slope and double the result.
The height of the roof depends on the selected slope angle. Usually it is in the range of 30–45 degrees. In the first case, the height will be half the distance from the projection of the ridge to the axis of the Mauerlat. Using the Pythagorean theorem and carrying out calculations, we find that the length of the slope for a building 10x9 m will be equal to 5.05 meters. The area of the slope is defined as 5.05 x 10 = 50.5 square meters. And the total roof area will be 50.5 x 2 = 101 m2.
In cases where a gable roof has an unbalanced roof, i.e. the ridge axis is shifted from the building axis, the area of each slope separately is calculated using the same method and the results are summed up.
However, this calculation does not take into account the area of the roof overhangs. They are usually 0.5–0.6 meters. For one slope, the overhang area will be 0.5 x 5.05 x 2 + 0.5 x 10 = 4.1 + 5 = 9.1 m2.
The total roof area will be 101 + 9.1 x 2 = 119.2 m2.
Most calculations of rafters are made according to the Pythagorean theorem, reducing the structure to a set of rigid figures - triangles
Calculation of rafter cross-section
The cross-sectional size of the rafters depends on several factors:
- the magnitude of the load on them;
- type of materials used for rafters: logs, timber - homogeneous or glued;
- rafter leg lengths;
- wood species;
- distances between the axes of the rafter legs.
All these parameters have been calculated for a long time, and to determine the cross-section of the rafter legs, you can use the data below.
Table: rafter section size
| Length of rafter legs (m) | Rafter pitch (cm) | Section size of rafter legs (mm) |
| Until 3 | 120 | 80x100 |
| Until 3 | 180 | 90x100 |
| Up to 4 | 100 | 80x160 |
| Up to 4 | 140 | 80x180 |
| Up to 4 | 180 | 90x180 |
| Until 6 | 100 | 80x200 |
| Until 6 | 140 | 100x200 |
As the installation pitch of the rafters increases, the load on each of them increases, which leads to the need to increase the cross-section.
Common dimensions of the main parts of the rafter system:
- Mauerlat - the cross-section can be 100x100, 100x150, 150x50 millimeters;
The Mauerlat is used to attach the rafter legs to the wall of the building - rafter leg and tie - 100x100 or 100x200 millimeters, but sizes 50x100 and 50x150 are often used, depending on the parameters of the structure and roof;
- purlins and struts - 50x150 or 50x200 millimeters depending on the selected leg width;
- racks - 100x100 or 100x150;
- bench - the same dimensions depending on the parameters of the rack;
- sheathing boards - 25x100 or 25x150 millimeters, depending on the characteristics of the roofing finish.
Determining the angle of inclination
The angle of inclination of the roof slope is determined by the requirements of its finishing coating:
- For roofing made of soft materials it should be in the range of 5–20°.
- It is preferable to use materials such as corrugated sheets, slate, metal tiles or ondulin on slopes of 20–45°.
Corrugated roofing requires a roof slope greater than 20 degrees
One of the reasons for reducing the angle of inclination is the desire to make the attic or attic space as large as possible. This intention is also the reason for installing a sloping roof.
Calculation of the distance between rafters
This parameter depends on the type of finishing coating, or rather, its weight. For the heaviest material, the distance should be minimal, from 80 centimeters. In the case of using a soft roof that is light in weight, the distance can be increased to 150 centimeters. The number of rafters and translations is calculated as follows:
- The length of the building (10 meters) must be divided by the distance between the rafters, presumably 120 centimeters: 1000 / 120 = 8.3 (pieces). We add 1 to the result obtained, it turns out 9.3.
- Since the number of rafters cannot be fractional, the result is rounded to the nearest whole number - 9.
- The distance between the rafters is finally set: 1000 / 9 = 111 centimeters.
With this distance, all rafters will be equidistant, and the load from the roof will be distributed evenly.
The length of the rafters is calculated using the Pythagorean theorem, as already shown above.
The influence of various factors on the choice of inclination angle
The degree of roof slope is influenced by the design of the entire house. In addition, it also depends on the roofing material. The climatic conditions of a given region are also of some importance. For example, if construction is carried out in an area with frequent rain and snowfall, the minimum roof slope is recommended as 45-60 degrees. In this way, the load of snow cover on the roof structure is reduced: snow masses simply cannot accumulate there, sliding down under their own weight.
If the area is characterized by strong winds, then the best option in this case would be a low-slope roof with a low windage. Usually we are talking about angles of 9-20 degrees. As for the universal indicator, it is somewhere between the two indicated parameters, and corresponds to 20-45 degrees. This slope angle allows for a wide selection of roofing materials.
Do-it-yourself gable roof installation
Work on the installation of the rafter system begins with the installation of the Mauerlat.
Mounting the load-bearing device on the wall
Mauerlat is made from high-strength wood - oak, larch, etc. If such materials are not available, pine can be used.
The timber comes in standard lengths - 4 or 6 meters. Therefore, connecting several parts along the length is inevitable. It is made with cutting of the connected ends “half-tree”, for example, for a beam with a cross-section of 150x150 millimeters, a sample of size 75x150 with a length of 300 mm is made. The ends are overlapped. Fastening is carried out with two or four M12 or M14 screws with the installation of large diameter washers. Using the same principle, the beams are connected at the corners. The finished structure is a regular rectangle, which is installed on the upper plane of the wall along the perimeter.
Two beams are spliced using a sample of wood on each of them. They are then bolted together
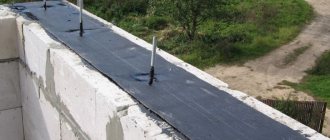
The technology for installing the Mauerlat provides for its placement strictly along the axis of the wall or offset in any direction. In this case, you cannot place the support beam closer than 5 centimeters from the edge. To increase the service life of the Mauerlat, it should be installed with waterproofing along the wall surface. Most often, roofing felt is used for this.
Methods for attaching the Mauerlat to the wall
- Installation on anchor bolts. An ideal option for monolithic walls. Threaded rods are embedded in the wall when it is cast.
- Wood dowels. They are nailed into a drilled hole. For this type of fixation, additional metal fasteners are used.
- Forged staples. They are used with pre-installed wood embedded parts.
- Stud or fittings. The pins are walled up during the laying of the wall and are removed through the support beam along the drilled holes. The diameter of the fasteners should be 12–14 millimeters, the protrusion above the surface of the beam should be 10–14 centimeters.
- Steel wire. A bundle of two or four wire strands is installed when laying the wall 2-3 rows before its end. The Mauerlat is tightened using a crowbar. Often used as an additional fastening of the support beam.
- When installing a reinforcing belt, fastening with studs or anchor bolts is also used.
The mounting locations should be approximately halfway between the rafter legs.
Video: installing a Mauerlat on an armored belt
Photo gallery: methods of mounting the Mauerlat on the wall
The studs are embedded in the wall while it is being poured, then the Mauerlat is put on them and secured with bolts
The wire is also installed at the wall laying stage
The Mauerlat can be fastened using wire ties passed through holes in the beam
Wooden plugs are inserted into the gaps between the wall blocks, into which brackets are then secured
Construction of a gable roof step by step
Installation of the Mauerlat of a gable roof
The Mauerlat takes on the entire load from the roof and transfers it to the walls, so a fairly thick and strong beam is chosen as the Mauerlat. The thickness is chosen based on the thickness of the wall on which it rests. As a rule, they tend to choose the thickness of the mauerlat beam equal to or close to the thickness of the wall.
The Mauerlat must be laid flush with the outer part of the wall, firmly connecting them together. To connect the Mauerlat to the wall, anchor bolts or wire are laid (poured into the reinforced belt) even at the stage of wall construction. If wire is used as fastening, then after laying the timber it is tightly tied with this wire around and remains firmly fixed in this form. If anchor bolts were walled into the wall, through holes are pre-drilled in the mauerlat, with which the beam is placed on the bolts and tightened from above with nuts and wide washers.
It is also important not to forget to lay a layer of waterproofing material in the form of a gasket between the wall and the Mauerlat. As a rule, roofing felt or similar materials are used as waterproofing. More information about securing the mauerat is described in this video.
Installation of gable roof rafters
After the base has been prepared, we begin to assemble the rafter system of the gable roof. Installation of rafters can be done in several ways: install the rafters directly on the roof or perform some structural elements on the ground and then lift them to the installation site using special equipment. Correctly placing the rafters on a gable roof with your own hands without the help of a partner is quite problematic, so it is better to get help so as not to make a mistake and not nullify all your efforts.
To make it easier to attach the beams, it is worth marking the attachment points on each wall and connecting the opposite walls with beams (beams), on which racks will be installed to support the rafters. A ridge beam is installed on the racks, which serves as a guide for installing the rafter system. In order to connect the rafters as accurately as possible so that the entire skeleton of the rafters is the same, templates are used. This way you can avoid dips and distortions in the roof.
After installing the ridge beam, they proceed to the most important part - the installation of rafters (already fastened together or separately). It is important to constantly monitor the level and evenness of the installation. The rafters are fastened together, usually with nails or using iron staples. Common schemes for placing rafters on a gable roof and attaching them to each other are shown in the figure below.
After completing the roof frame, it is necessary to install auxiliary fasteners to improve the rigidity of the roof. To do this, install struts and middle skates.
We invite you to watch a video that clearly shows how to install rafters with your own hands for a gable roof.
Types of rafter systems and their installation
The choice of roof truss design is determined by the configuration of the building. If there are no internal capital partitions, a hanging rafter system is constructed.
If there are permanent partitions, it is necessary to use a floor installation scheme.
Manufacturing of rafter pairs
This is the name of a pair of rafter legs connected into an arch with the installation of a spacer element in the form of a tie for a hanging system or a crossbar for a decking system.
Installation of rafter pairs is carried out in three ways:
- Assembly is done at the top after installing the translations. They are covered with plank flooring nailed down.
- The formation of rafter pairs is carried out on the ground in the immediate vicinity of the house. Only blanks that represent a rigid triangular structure are assembled. Lifting of products is carried out when the rafter pairs are ready for the entire system. For this purpose, it is possible to use lifting devices in the form of a manual or drive winch, which represents certain inconveniences and additional costs. On the other hand, assembly on the ground is much easier and more accurate.
- The roof is assembled directly at the installation site in detail.
In any option, the rafter legs are mounted according to the template, which is the first truss. For higher assembly accuracy, it is advisable to fix the parts of the next pair to the previous pair with clamps.
When assembling rafter systems on the ground, all structures are made according to a template, which is the first manufactured truss. This makes the installation more accurate
Procedure for installing the rafter system
Prefabricated roofing elements are installed in the following sequence:
- First of all, you need to install the front rafter pairs and secure them with temporary fasteners. The most important point is verticality, which is checked with a plumb line. This installation procedure is possible when all rafter pairs are at the top.
Front rafter structures are installed first - A construction cord must be pulled between the opposite front structures to control the coincidence of the supporting surfaces of subsequent rafter pairs.
- Next, trusses are installed alternately, one on each side. Each arch is carefully installed in its place, its location in space is verified in all planes, and then standard connections are installed with the previous rafter pair.
Intermediate trusses are mounted one on each side and connected with standard jumpers to previously installed structures - After installing the last arch in the middle of the roof, you need to install all the connections according to the project and attach the ridge beam.
- It is recommended to connect parts using metal plates - flat and in the form of corners. It is better to connect the most loaded units with bolts, the rest with self-tapping screws. Nails are used only for initial fixation during installation.
The rafter legs are attached to each other and to the Mauerlat using metal corners
Fastening rafter system parts
To reliably connect the elements of the roof frame, various auxiliary elements are used, made of galvanized steel up to 1.5 millimeters thick.
The use of additional fasteners ensures a strong assembly of the rafter system
When assembling using additional connectors, labor productivity increases and the strength characteristics of the structure increase.
Special fastening devices are used to connect roofing elements of wooden buildings. Thus, the upper joint of the rafters is often connected using a hinge. This is due to frequent movements of the building, including seasonal ones.
The hinged connection allows you to avoid large stresses at the junction of the rafters during seasonal movements of the log house
For the same purpose, sliding fastenings are used on houses made of this material.
A reliable sliding connection of the rafters with the Mauerlat relieves this unit from stress during deformations of the structure
Video: quick production of rafters
https://youtube.com/watch?v=Sgqey_eGAaA
Roof insulation
Before installing the sheathing, the roof is insulated. For this:
- The internal sheathing is filled from the attic or attic side.
- The vapor barrier film is stretched.
- Insulation is being installed.
- A moisture-proof film or membrane with one-sided permeability is laid.
Thus, in addition to insulation, a ventilation system for the under-roof space is created. It starts working after installing the coating.
It is more convenient to lay the insulation layer on the outside on the internal sheathing with a vapor barrier coating
In certain conditions, roof insulation can be done from the inside; this is not so convenient, but you can safely work in any weather conditions. The formation of the roofing pie is done in the reverse order. Each layer of insulation as it is laid must be strengthened in the openings between the rafters.
Minimum slope for some roofing materials
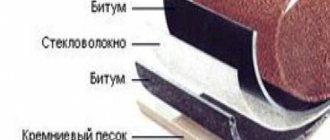
When choosing a roofing material, you should carefully read its performance characteristics and recommendations for use.
For each material, its own optimal slope is recommended:
- Piece materials (slate, tiles). The minimum slope of a slate roof is 22 degrees. In this case, moisture will not be able to accumulate in the joint area, which threatens subsequent seepage inside.
- Roll materials. The number of laying layers is of great importance here. If three layers are used, the slope is selected within 2-5 degrees. Two-layer installation will require an increase in angle to 15 degrees.
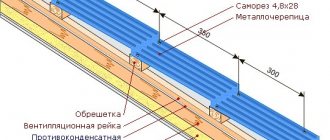
- Profiled sheeting. The slope of a metal roof must be no less than 12 degrees. Small angles require additional sealing of the joining areas.
- Metal tiles. The slope of the slopes is at least 14 degrees.
- Ondulin. From 6 degrees.
- Soft tiles. From 11 degrees, in which case the installation of a continuous sheathing is mandatory.
- Membranes. A universal coating used on a wide variety of roofs. The minimum roof slope is 2 degrees.
When determining what the minimum roof slope should be, the load-bearing capacity of the roof structure should be taken into account. It is important that it can effectively withstand all external loads characteristic of a given region. There are permanent (weight of the roof and its equipment) and temporary (atmospheric influences) loads.
The slope angle has a direct impact on the construction of the sheathing. It is recommended to equip minimally inclined slopes with continuous sheathing, or use a pitch of 350-450 mm. In addition, a flat roof will require additional time to arrange water drainage from its surface. For these purposes, a slope system is used. On large rooftops, an emergency water drainage system is often installed in case water flows exceed the capacity of the main drains.
Since roofing materials are quite expensive, you need to choose them very carefully, taking into account all the advantages and disadvantages. It is important to choose the most optimal coating for your home from the variety of options available for sale. The process of constructing a roof should also be organized as responsibly as possible, since even minimal errors in the process of calculating the angle of inclination can have the most disastrous consequences. It’s good if you can get it done with some minor repairs or alterations. It often happens that an incorrectly designed roof undergoes significant damage and destruction during strong winds or snow. This can lead not only to serious financial losses, but also to injuries to the people living in such a house.
Creating a frame pediment
Before you begin decorating the gable, you need to arrange the sheathing and lay the finishing roof covering.
When forming the sheathing, the type of future roofing is taken into account. It is made from edged boards 25 millimeters thick. Lathing happens:
- Solid - boards are packed at a distance of 2–4 centimeters from one another. Used when using tiles or soft roofing.
- Sparse - the distance between the boards is 15–25 centimeters. This sheathing is installed under metal tiles, corrugated sheets, slate and other similar materials.
- Rare - the distance between the boards is from 0.6 to 1.2 meters. Used when the length of the covering sheets is equal to the length of the slope with an overhang. This coating is made only to order.
The sheathing should be brought out beyond the gable rafters to create an overhang.
A frame is mounted on the front trusses for fastening the front finishing material
Roofing installation
Before laying the sheathing, the roof is insulated and a moisture-proof layer is laid. Further:
- The roof covering is being laid. The installation sequence is from bottom to top in order. The straightness of the first row is controlled by a stretched cord.
- Roofing sheets are fastened with self-tapping screws using shock-absorbing gaskets.
When installing the final roof covering, you cannot skimp on fasteners; the protective layer must be durable and able to withstand wind and snow loads.
Sheets of metal tiles are laid from bottom to top, starting from the corner of the roof
Installation of gables
The sheathing of frame gables is done based on the characteristics of the material intended for the front finishing. The following products can be used for this:
- Lining.
- Block house.
After finishing with a block house, the house becomes like a log house made of rounded logs - Board materials such as waterproof plywood, OSB, flat slate, cement-bonded particle board, etc.
- Vinyl or metal siding, as well as other finishing materials.
After installing the sheathing, it is necessary to lay a moisture barrier made of polyethylene film 200 microns thick. It can be secured with construction staples. This work is done outside. Using the film, you can sheathe the outer surface with the selected finishing material.
The gables must be insulated with roll or tile insulation. The thickness of the protective layer must be at least 10 cm, and for areas with cold climates - at least 15 cm. An internal moisture-proof layer of film is stretched over the insulation.
A lathing for the front finishing is placed on top of it, for which bars measuring 50x50 millimeters are used. The entire building is finished at the same time, after the roof is insulated.
During the process of facing the pediment, windows are installed, if they are provided for in the project, and in some cases, doors.
The pediment of a wooden house with a gable roof is most often finished with clapboard
Decoration of overhangs
Roof overhangs, both gable and eaves, in addition to a purely decorative function, are intended to protect walls and foundations from water or snow. Their sizes are usually 50–60 centimeters. The design of overhangs is made using various materials:
- planed board, installed end-to-end or overlapped;
- tongue and groove lining;
- block house lining;
- sheet plastic;
- sheet profiled or smooth metal;
- finished products made of metal or plastic - soffits.
There are several ways to install overhangs:
- Along the rafters. In this case, the lining of the space under the roof on the overhang is carried out with fastening directly to the projections of the beams.
Hemming along the rafters is done along the lower edge of the rafter leg - Along the rafters inside. Planks are attached to the rafter leg, to which the board is hemmed. The lower part of the rafter remains open, and the opening under the roof is closed.
When hemming the rafters from the inside, the rafter beams remain open - In the box For this method, a plank is installed from the end of the rafter perpendicular to the wall. The second plank is installed on the wall and attached to the rafter. Sometimes a jib is installed between them. The hemming is done to these planks.
To frame the box, it is necessary to make a frame from mutually perpendicular bars
Ventilation holes must be made along the hem. They can be of any size, but large ones must be covered with a fine-mesh mesh made of any material. This allows you to avoid birds and harmful insects from entering the under-roof space. Soffits are sold with ready-made ventilation grilles.
Ventilation is installed only on eaves overhangs; it is not needed for gable overhangs.
When finishing with soffits, there is no need to drill ventilation holes - they are already made at the factory