A strip foundation for a fence is a continuous strip of concrete, which is poured along the entire length or facade of the future fence. It is considered excellent protection of the structure from deformation.
This base can withstand heavy loads well. If the installation technology is followed, the service life of the structure will be significantly extended. Following the recommendations of the masters, you can make it yourself.
Which fence is suitable for “tape” as a foundation?
Such a foundation is placed in cases where it is necessary to make a reliable foundation for a heavy fence. These include:
- brick;
- forged;
- stone;
- gabions;
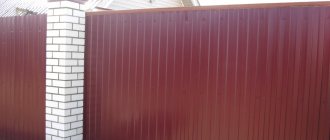
- from corrugated sheet;
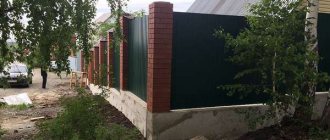
Photo: corrugated sheet fencing on a strip base - concrete;
- made of solid wood;
- combined options.
Suitable for areas where it is not possible to build a deep columnar foundation.
A buried tape will provide a solid foundation on weak soils, while a non-buried tape will provide a solid foundation on hard, stable ground.
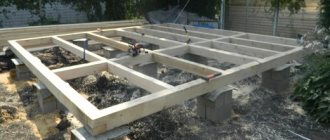
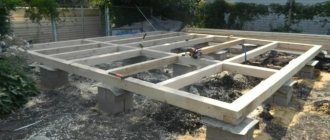
DIY strip foundation for a fence
How to properly make a strip-type foundation yourself? The workflow consists of several stages:
- preparing and marking the site for the fence;
- excavation;
- filling the bottom of the trench with sand and gravel;
- formwork installation;
- laying knitted reinforcement;
- pouring concrete;
- dismantling formwork.
Construction begins with preparing and marking the area for the fence
Preparing the site
Before starting construction work, you must carefully inspect the place where the foundation will be installed. Identified obstacles (stumps, stones, ditches, utilities) must either be removed or bypassed. Then the future trench is marked. Its width should be greater than the width of the fence plus space for the bars necessary for installing the formwork.
Ready trench for the foundation
Excavation
The excavation is done manually. It is not advisable to use specialized equipment for shallow foundations (50-80 centimeters). In addition, after digging with an excavator, the trench will still have to be leveled manually.
Sand should be poured into the bottom of the trench and compacted.
Bedding
River sand is poured onto the bottom of a dug trench ten centimeters high, watered generously and compacted tightly. Crushed stone is poured on top of the sand to the same height and compacted as well.
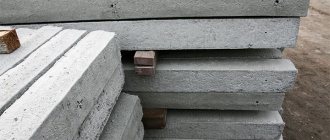
Installation of formwork for the foundation of a fence made of blocks
Formwork is a prefabricated structure made of various materials into which concrete is poured. Most often, wood is used as a material, but it is possible to install formwork from metal sheets, laminated plywood, etc.
It is installed directly into the trench. Usually a removable formwork is used.
Wood formwork
It must satisfy a number of requirements.
The formwork must be strong enough to withstand the pressure of concrete on its walls.
When constructing it, it is necessary to strictly maintain the geometric dimensions.
There should be no gaps in the formwork, since leakage of concrete can significantly reduce the strength of the foundation.
The formwork should be easy to install and dismantle after the concrete has dried.
Advantages and possible disadvantages
The advantages of such a foundation:
- High strength at low installation depth.
- Resistance to mechanical loads and environmental influences.
- A high-quality poured solid concrete strip extends the life of the fence for decades.
- If necessary, the base can be reinforced with pipes and metal corners.
- The tape protruding above the ground level is lined with stone, which makes the structure more beautiful.
Photo: 3D model of tape laying
Among the disadvantages is the large waste of materials, and therefore the high cost of construction. If the construction area is large, you will need to use special equipment and 2-3 assistants.
Types of strip bases
There are:
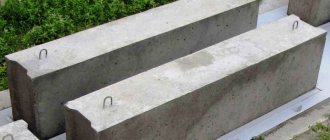
- Prefabricated. For the arrangement, splitter blocks, artificial or natural stones are used. Installation is simple and reduces time significantly. During construction, slight deviations in size are allowed. It is important that the foundation material is strong and resistant to moisture.
- Monolithic. For heavy structures with high load-bearing capacity. Their creation is labor-intensive, requires experience in construction and high consumption of materials.
- a - made of blocks: 1 - blind area, 2 - backfill with soil.
- b - monolithic: 1 - bulk soil, 2 - monolithic concrete.
- c - brick: 1 - brick foundation, 2 - backfill with soil.
- d - on heaving soils: 1 - sand-gravel mixture, 2 - crushed stone or gravel, 3 - sand cushion. I - from blocks
- II - monolithic
- III - made of brick.
Depending on the raw materials used, the tape is distinguished:
- brick;
- reinforced concrete;
- rubble concrete;
- soil-cement;
- stone.
According to the method of deepening into the ground, there are three types:
- Recessed. It is built below the freezing point of the soil at a depth of 1 m. Moreover, the looser the soil, the higher the indicator should be. It is used under massive fences made of brick, stone, concrete, with forged elements.
- Shallow. It is installed at a depth of up to 50 cm on stable soils. Suitable for high fences made of corrugated board, euro-fence, wood, siding. Profile pipes, concrete or screw piles are used as pillars.
- Not buried. The support point of the base coincides with the ground level. Suitable for installation on sandy soil for small fences. An excellent option for areas with high groundwater levels. This foundation is not afraid of the forces of frost heaving.
The width of the future foundation depends on the weight of the fence material for the spans. The heavier it is, the wider the trench should be made. The average is 40 cm.
Thematic material:
- Overview of the main types of strip foundations
- How to make a foundation for a fence
Application for foundations and pillars
A columnar foundation for a fence is a budget-friendly and simple option that can be poured with your own hands. The support pillars need to be buried in the ground and filled with mixture at the base. At the next stage of construction, they will be sheathed with finishing material.
Scheme of creation methods
If a chain-link mesh, wood or corrugated sheeting is used to construct the fabric of the future fence, then the use of such a foundation is recommended. Its depth depends on the weight and height of the future fence. If you do not take soil samples and make accurate calculations before building the foundation, then the entire structure may collapse in the future.
Construction scheme
The use of a strip foundation for a fence is more common. With its help, the weight of the fence is evenly distributed, which increases its stability. Pouring this type of foundation can be done with your own hands. But this procedure requires certain knowledge, skills and abilities.
Filling instructions
The strip foundation for a fence is universal, as it is installed when constructing fences made of stone, brick, corrugated board and other types of fences. This type of foundation is more expensive than pouring under pillars, as it requires the use of more materials.
Device idea diagram
Protecting the foundation from excess moisture, providing drainage
Regardless of the type of tape used, in order for it to serve for a long time, it is recommended not to neglect the arrangement of the waterproofing layer.
It is done in two ways:
- Roofing felt flooring. A budget-friendly, fast, but not so reliable method of protection against moisture, since after 2-3 years it begins to peel off. This material is used to lay out the bottom of the trench and cover the finished frozen base. For fixation, they are covered with resin or hot bitumen on top.
- By adding a product like Penetron to the concrete solution. This is excellent protection for strip foundations of any depth. Its advantage is that the entire base becomes impermeable to moisture. Penetron is added to the solution at the mixing stage. The finished base does not require additional coating with waterproofing material.
If you need to pour a foundation for a fence in areas with a high groundwater level, you should worry about creating drainage in advance.
A plastic or asbestos-cement pipe with a diameter of 8 to 11 cm is laid in a trench on top of the sand cushion, both edges of which are recommended to be filled with sand. This is done so that when pouring the tape with concrete, the solution does not get into the pipe cavity. Below the base of the foundation, in several places, you will need to dig inspection wells into which water will flow from the pipes during flushing.
If the fence is on a slope, then it is more convenient to make open drainage. That is, dig several ditches connected to each other near the structure.
Concrete for a fence
The mixture for fencing must be selected with a certain strength and taking into account all technical characteristics. This guarantees the reliability and durability of the fence foundation.
Reliable frame
Brand
If the quality of the mixture is assessed, then the grade of concrete for the fence plays a decisive role. The base is used if a brick, metal or concrete fence is being built. The technical characteristics depend on the brand of concrete for the foundation for the fence.
This indicator affects the maximum load, level of frost resistance and water resistance.
Cooking proportions
If you use heavier mixtures for arranging the foundation, this will only increase costs.
Frost resistance
This building material has good frost resistance. Depending on the chosen brand of concrete, the finished foundation can withstand from 50 to 80 cycles of freezing and thawing.
Table of additives for use in winter
Waterproof
In accordance with the indicators, concrete for the foundation has a water resistance level of W2, which allows it to fully withstand the negative effects of precipitation.
Plastic
Concrete grades 100, 150, 200 have a low level of plasticity. But this characteristic is acceptable for pouring a foundation.
Additives work
Step-by-step instructions for creating a strip base for a fence
In order to correctly complete all stages of work, it is recommended to draw up a drawing of the future structure in advance, which will indicate in detail the placement, dimensions of all elements, types of materials and other quantities. The diagram allows you to see what difficulties you will encounter. If errors are detected, they can be corrected at the design stage.
Tools and materials you will need:
- bayonet shovel;
- level;
- wooden pegs and rope;
- boards, plywood, nails and hammer (for formwork);
- cement, sand, crushed stone, water (for solution);
- container and construction mixer for manual mixing or concrete mixer;
- reinforcement bars;
- pillars.
In places where wickets and gates are installed, it is permissible to replace the strip foundation with a columnar one.
Determine the dimensions, choose a location
Before starting construction, it is important not to forget about the SNiP requirements regarding the distance of fences from buildings, nearby areas, and streets. If possible, obtain the consent of your neighbors to avoid conflict situations.
If we talk about the dimensions of the strip foundation (width, height, length), then they are selected individually based on:
- soil type;
- depth of groundwater;
- type of sectional material (whether the load will be large);
- number of gates, wickets.
It is worth performing an accurate calculation of the base area in advance. The following formula will help with this:
(k(n)*F)/(k(c)*R),
where k(n) is the reliability coefficient;
F is the expected load on the base;
k(c)—working conditions coefficient;
R - soil resistance.
Such data can be found in special tables. If you doubt the accuracy of the calculations, use simplified versions of construction calculators.
Carrying out markings
This is the initial stage of work. We clear the site of unnecessary objects, garbage, and vegetation.
A laser level will be an excellent helper when marking. If this is not the case, then the verticality of the corners will have to be checked with a regular level.
We carry out from the corner of the fence. We drive wooden pegs in these places. Then we install them at the points where the pillars will be installed every 2-2.5 meters. We pull the rope tightly between the pegs.
It is better to make external and internal markings under the tape, not forgetting about the indentation of 40-50 cm.
Preparing the trench
The trench is dug manually with a shovel. It is important to ensure that the bottom is equally level throughout the entire foundation. To do this, we transfer soil from high areas to lower ones so that it does not have to be removed.
We make the width of the tape 20 cm larger than the width of the future fence. We select the depth based on the soil characteristics of the region.
To better distribute the load throughout the structure, we create a sand cushion in the trench. To do this, pour a 10–15 cm layer of sand onto the bottom, level it, moisten it with water and tamp it.
Choosing the right brand of cement
The reliability and durability of the foundation directly depend on the quality and strength of the prepared mortar. Therefore, you should not save on concrete by buying goods from a dubious manufacturer.
Depending on the type of fence, we recommend taking into account:
- For fencing made of welded mesh, corrugated sheets, picket fences erected on hard soils, grade M 100, 200 is sufficient.
- For heavy fences made of brick, stone, and forged elements, it is worth using cement grade M 250, 300, 400, 500.
On moisture-saturated soils, the required concrete option is M 400 or M 500.
The optimal crushed stone fraction is 20-30. It is better to take quarry sand.
Calculating the amount of concrete
To accurately determine the required volume of solution, it is necessary to multiply the cross-sectional area of the foundation by its length.
To mix a high-quality mixture for 1 cubic meter of concrete you need:
- 340 kg of cement;
- 0.86 cu. m crushed stone;
- 1.05 cu. m of sand.
The amount of reinforcement is calculated from its diameter.
To make the solution harden faster and be resistant to frost, plasticizers are added to the mixture.
We install the formwork
Formwork is a panel structure that provides the strip base with a neat, even and straight shape. For production it is allowed to use pieces of boards and plywood.
The height of the formwork must be greater than the depth of the foundation.
We nail parts of the boards together. We fasten the shields along the perimeter of the trench, securing them with spacers.
Users often search for:
- Paint for metal fence against rust
- Installation of a metal fence
Installing pillars
Even at the fencing design stage, it is recommended to determine what material for supports will be used:
- tree;
- brickwork;
- asbestos-cement, concrete pipes;
- metal profile pipes.
A detailed description of each type and step-by-step installation can be found here:
More often they choose profile pipes with a cross section of 60*60 mm. Before installation, they must be treated with a primer and painted to extend their service life and protect against corrosion.
Under each pillar we dig a hole with a diameter of at least 20 cm and a depth of 1 m. We fill the bottom with a layer of crushed stone and sand. We fix the pipe in the hole. We check the verticality of the installation with a level.
Making trench reinforcement
After fastening the supports, we move on to reinforcement. Rods with a diameter of 8 to 12 mm are suitable for this.
Experienced builders recommend tying the wire together into beams rather than welding them. When fastened by welding, the frame loses flexibility.
Before laying the frame, it is better to line the bottom of the trench with a layer of brick.
The reinforced structure consists of 4 long longitudinal rods that are connected by transversely located jumpers. The average cell size is 33*35 cm. For jumpers, rods of a smaller diameter are always used. The number and diameter of the elements are determined when developing the drawing of the future fence.
The depth of laying the upper and lower levels of reinforcement is 10 cm from the top edge and, accordingly, from the bottom of the trench. There should also be protrusions of 5 cm on each side. They are necessary for ease of installation inside the trench.
Filling the tape
Performed in 2 ways:
- Continuously. When filling a small area.
- With a technological break. Used for laying foundations for long fences. We pour concrete in layers of 20 cm. We tamp each layer. Fill the next one after the previous one has dried.
We remove the formwork after the tape has completely hardened. In the warm season, 7–10 days will be enough for this ; in the cold season, you will have to wait up to a month.
We treat the finished base with hot bitumen. We backfill the soil.
Plinth cladding
Finishing with decorative plaster
The choice of cladding depends on the taste preferences of the owners, but the ease of cladding work depends on the quality of the base. The smoother the foundation was laid, the easier the cladding process will be.
If the fence is combined, then the base lining can be base tiles or decorative plaster, which is laid on a previously prepared flat surface. Before starting facing work, the surface of the base is treated with a primer.
Then the work of laying tiles on the mortar or decorating the base with decorative plaster is carried out. Details of the entire process can be seen in the video. And the choice is always up to the owner, especially since today there is plenty to choose from.
When is it necessary to cover the foundation?
When erecting a stone, brick, or wrought-iron fence, the strip protruding above ground level becomes part of the structure, therefore, in order for the fence to have a complete look, its lower part is finished. The following materials are suitable:
- natural or artificial stone (granite, sandstone, flagstone);
- facing bricks, tiles;
Photo: corrugated fence with brick pillars - pieces of colored glass (to create a mosaic).
In order to save money, you should not use such a technique as painting on a concrete surface. This will cause the solution to crack.
Monolithic tape is a reliable basis for the fence, which will give it neatness and extend its service life by years.