What is the material
Initially, before proceeding with installation, you need to study the properties of the material. Ondulin is similar to slate, however, it has a flexible base. This roof consists of the following layers:
- main board - cellulose-fibre board;
- mineral additives and filler, which are responsible for strength;
- bitumen resin, which guarantees resistance to moisture;
- pigment is responsible for the aesthetics of slate.
The price of 1 m2 of ondulin starts at 200 rubles, so the cost of a sheet with a width of 0.95 m, a length of 2 m, a thickness of 3 mm, a wave width of 9.5 m and a weight of 6.3 kg is 395 rubles. You can buy the material at any hardware store; many also provide home delivery.
Ondulin, or Euroslate: what is it and how is it produced?
In technical terms, ondulin is sheets of compressed paper, which is impregnated with distilled bitumen with minerals. At the same time, the thermosetting resin gives the sheets strength and water-repellent properties.
Specifically, “Ondulin” was first used to designate roofing material from the famous French company of the same name. Although its correct name is embossed bitumen shingles. Like “felt-tip pens” and “copier,” this word comes from the name of the company that first began producing it, and so it stuck with it.
So what is the secret to producing this roofing covering? First, paper pulp is made from ordinary purified waste paper. It is sent to the conveyor, where it is dried and shaped into a wavy shape. After this, the canvas is cut to length, impregnated with bitumen under high pressure and temperature and stacked on pallets.
That is why ondulin is considered a completely environmentally friendly material, because it is made from natural raw materials - bitumen and cellulose! Indeed, unlike slate, ondulin does not release toxic substances into the air, and is not subject to corrosion, like metal tiles.
By the way, Polish residents today replace the slate from their roofs most often with ondulin - there are official studies.
True, from the very beginning, ondulin was produced only for the restoration of old roofing coverings, or rather, it was laid directly on them. But over time, this lightweight and durable material acquired the status of a new one.
Why not? After all, such sheets are light, durable and have an aesthetic similar to ceramic tiles:
By the way, European slate manufacturers provide a 15-year guarantee for their products, with the caveat that with proper care and use, it can last up to half a century.
Advantages of ondulin
Modern onduline material is produced on the basis of bitumen. The advantages include the following:
- lightness - because of this, there is no need to construct a reinforced rafter system before laying the roof;
- budget cost is ensured due to the manufacturing method and available component materials;
- Elementary care - just spray it with a hose or wait for the rain;
- the material is resistant to acidic and alkaline irritants;
- there is no risk of mold on the surface and inside the layers;
- roofing made of ondulin is environmentally friendly due to the characteristics of the components;
- resistant to precipitation in the form of snow and rain;
- the manufacturer determines the service life of 15-20 years;
- installation of ondulin is possible on top of the old roof, which will save on dismantling.
Disadvantages of operation
It is necessary to note the disadvantages of the material in order to ensure the possibility of an objective choice of roofing:
- sun and rain can cause the roof to burn out, which will negatively affect the appearance of the coating;
- resistance to water is ensured only for the service life specified by the manufacturer;
- if you intend to purchase a large volume of slate, then it may turn out that some sheets differ in shade;
- fragility - the surface should not be walked on, as most likely dents or other damage will remain on it; the same criterion should be taken into account during transportation;
- As you can see in the photo, the limited color range currently includes only 4 colors: brown, green, red and black.
The technology for laying ondulin is similar to fastening slate, but before starting work you should do a little preparation.
Advantages and disadvantages of ondulin
Like any other material, ondulin has its positive and negative sides. It is they who tip the scales when choosing each person. Therefore, you should carefully examine both sides before starting construction.
Pros. A recognized advantage of ondulin is its ability to withstand any temperature changes. It doesn’t matter what the indicator on the thermometer is, be it -50 or +50 degrees, this material will reliably protect the house from any precipitation. This circumstance distinguishes it favorably from some other options.
Another definite advantage is the ability to absorb sounds. Heavy rain and even hail will go unnoticed if the roof of the house is covered with ondulin. The cellulose base together with bitumen impregnation perfectly stops noise.
Light weight is also a huge plus of this material. This not only speeds up the work process, but also makes it possible for only one master to perform it. Reducing the total weight of the roof has a positive effect on the condition of the foundation of the house, which will bear less load.
Also among the advantages is the cost of ondulin . The price of this roofing material is one third lower than that of other analogues used for roofing. And this is a direct saving of money, which is never superfluous during construction.
It is worth noting that this material allows you to quickly cover the entire roof space even on the most complex roof projects. The master is not tormented by the question of how to cut ondulin, since for this it is enough to have an ordinary hacksaw. Anyone can handle the process, even if they have never done anything like this.
Minuses. With all the variety of positive aspects, ondulin also has some negative aspects. So this material belongs to the category of flammable. Bitumen impregnation cannot withstand open fire, which imposes its own characteristics when used.
Temperature brings another inconvenience. During the hot summer, residents of the house may notice a not so pleasant smell. It is emitted by the bitumen impregnation of the material, which begins to make itself felt as the temperature increases.
The meager color scheme is also not a positive thing. Especially if the consumer wants to see something unusual and unique on his roof. But the variety is limited to three shades.
Features of working with ondulin
To correctly attach ondulin to the roof, you should learn some of the intricacies of working with this fashionable material. After studying them, you will be able to lay sheets on the roof of any structure yourself.
- If you still need to go through the required material, then it is better to step on the crest of the wave.
- To renew the roof for a long time, it is better to carry out all installation work at an ambient temperature in the range from -5C to +30C. If the temperature is above normal or, conversely, below -5C, reschedule the work to another time.
- Approximately 20 nails are used to fasten one sheet. This is exactly how many nails the sheet can hold in case of gusts of wind.
- Due to the nature of the composition, the coating may stretch. This leads to the appearance of waves over the entire roof area, which will only have to be removed by dismantling. To prevent stretching, the ondulin fastening scheme involves the use of sheets that are perfectly even in shape.
- Check that the overhang is long enough. Too long will look unsightly, and too short will lead to the collection of debris and dust under the roof. The most dangerous thing is that precipitation will constantly fall under the short overhang.
What you need to prepare initially
Note that the competent selection of the necessary tools and materials is much more important than the installation itself.
Make an accurate calculation of the required amount of coverage. The dimensions of a standard onduline sheet are 200 x 95 cm. Be sure to take into account overlap allowances in your calculations. For overlap you will need to leave 9.5 cm in width and 10-15 cm in length. It turns out that the useful area from one sheet will be 1.6 m2. If you know the total roof area, you can simply divide it by 1.6. This way you will get an almost exact number of sheets needed. Please be aware that results may vary depending on the roof angle and roof shape.
Preparation requires the availability of the following tools:
- hand saw for wood;
- hammer;
- nail puller;
- ladder;
- roof ladder.
In addition, you should purchase auxiliary parts, without which the work will not be of high quality:
- tong elements (protective shields) for the edge;
- cornice filler (foamed polyethylene, which prevents debris from getting between the sheets and the sheathing);
- skate (flexible);
- rubber drip aprons;
- specialist. nail fasteners with a rubber cap.
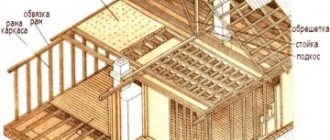
Making lathing and its features
- Laying ondulin on the roof involves arranging a continuous sheathing. It is extremely necessary so that the material does not sag later. For installation, waterproof plywood or OSB boards are used, and the pitch should be 40-45 cm.
- If the roof slope is more than 15 percent, then the sheathing pitch can be increased to 60 cm. And for areas with a lot of snow in winter, the sheathing pitch should be minimal. To build the frame, bars with dimensions of 4 x 5 cm, 5 x 6 cm or 5 x 5 cm are used.
- Install additional sheathing under the gable and ridge. The sheathing under the ridge is installed at a distance of 5-10 cm from its axis. This distance varies depending on the degree of slope of the roof slopes.
- The cornice is formed using a rubber apron, which can bend, enveloping the sheathing of the cornice at any angle. The apron is attached to the sheathing with ordinary self-tapping screws, and the overlap between the elements is 5 cm.
Important! Immediately before the construction of the sheathing, it is necessary to carry out waterproofing work.
- The last thing to install is the wind board, which should protrude 3 cm from the sheathing frame.
- After the frame is erected, be sure to check the entire structure for compliance with the geometry. To do this, measure the diagonal of each roof slope. If the values differ, all errors should be eliminated.
Roof angle for ondulin
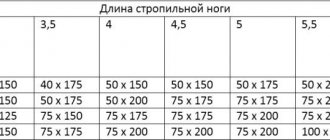
Depending on the angle of inclination of the roof, the laying pattern, the pitch of the sheathing, and the width of the overlap of the sheets along and across the sheet depend.
The slope angle determines the coating technology as follows:
When the angle of inclination is less than 10°, a continuous sheathing is constructed. The optimal material for such sheathing is plywood, OSB, boards. In this case, the ondulin is overlapped by 30 cm with a two-wave overlap along the length of the sheet.
The minimum angle of inclination of an ondulin roof is 6 degrees;
With a roof slope angle of 10-15°, the sheathing pitch should be 45 cm , the overlap width should not exceed 20 cm, and the overlap should be single-wave;
When the angle of inclination is more than 15°, the sheathing pitch should be 60 cm , the overlap width should be no more than 17 cm for a single-wave overlap.
Ondulin installation instructions
To properly cover a roof with ondulin, you must adhere to a certain algorithm.
Important! Initially, you should take care of your own safety.
Here are the instructions for laying ondulin with your own hands:
- Attaching the first sheet should begin on the side farthest from the wind, and always from the bottom of the slope. To align the sheets, pull the cord along the bottom edge, taking into account that the sheet overhang should end at a distance of about 5 cm from the drip apron. The extreme wave of the sheet should go onto the wind board. Place the filler in the space of the waves between the sheet and the sheathing, using a screwdriver to free the ventilation holes in it. If this is not done, birds may fly into the holes under the waves, and even hornets may take up residence.
- Special nails are equipped with special heads, so fastening is carried out like this: with a hammer you punch a nail with an open head at an angle of 90 degrees, and after driving it in, put on a decorative cap.
- Remember that you will have three lines of fasteners on each sheet. To get a nail into the sheathing, either mark the sheet or stretch a rope along the sheathing line. It is important to remember that the indentation of the lines along which the nails are driven in will depend on the pitch of your sheathing, however, there cannot be less than 3 lines of nails on the sheet. Next, carry out the fastening according to the diagram below.
- Lay the second sheet overlapping 1 wave, and you will nail its first wave together with the overlap, that is, immediately into the sheathing through two sheets. During the process, make sure that the second sheet does not protrude beyond the boundaries of the lace that regulates the horizontalness of the bottom of the roof. In any other situation, the sheets will lie askew. If you need to cut off the tip of the sheet, you can use a hacksaw.
- The second row, the next row relative to the first, is laid out in checkerboard order. To do this, take and cut the sheet lengthwise in the middle. Install an overlap between the rows of 10-15 cm. If the roof slope allows, then the overlap can be reduced, thereby achieving savings in material consumption.
- After completing the installation of the last segment, you can proceed to attaching roofing accessories that perform the functions of protection and decoration.
- The gable elements are installed on the wind board, which is pressed closely to the ondulin. The overlap of the pliers is about 15 cm. It is nailed to the end with the same nails.
- The ridge for ondulin is attached to the edge of the roof opposite the predominant wind direction, just like the sheets. The ridge is nailed into each underlying wave, on both sides alternately. The overlap of the ridge elements is also 15 cm.
Important! Pay extreme attention to the quality of nail fastening. Their caps will be very visible on the surface, so initially take care of their correct geometry.
Now that you know the step-by-step instructions for installing ondulin, here is a video instruction for a more detailed introduction to the installation process.
Now you can easily cover your roof using ondulin. Perhaps you already have experience working with this material? Share your impressions with the readers below.
How to care for ondulin roofing
If the process of laying sheets was carried out according to all the rules, special care for them during operation will not be required. All you need to do is promptly remove various dirt from the roof of your ondulin dacha so that it can last as long as possible. After a certain time, ondulin gradually loses its original freshness of color. To restore the former attractiveness of the coating, painting is usually used using a special material.
As can be seen from the description, making the roof of a house from ondulin with your own hands is quite a feasible task. All that is required is to strictly follow the installation technology and some recommendations that will allow you to increase the service life of the roof by an order of magnitude.