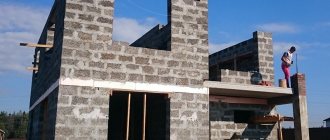
The search for a facing material that is as close as possible to the ideal in its performance characteristics will inevitably lead to facing bricks.
Solidity, strength and resistance to all types of external influences make this material so far ahead of all its competitors that any comparison looks incorrect.
Exterior finishing, which is stronger than the wall material, does not require any additional arguments in its favor.
In some sense, facing brick may be inferior to other types of facing materials in terms of decorative qualities, although in this sense the situation is confidently moving towards leveling the chances.
All the shortcomings of the material are, rather, features and do not cause a desire to refuse to use it.
Types of facing bricks and how to make the right choice
The main types of facing bricks are:
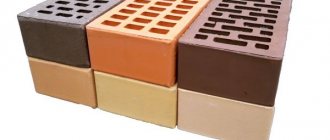
- Ceramic . This type of facing brick is the most common. For its production, clay with special mineral additives is used, from which the molding mixture is made. It is passed through dies, and the output is a fully formed block, which is sent to the kiln for firing at a temperature of 1400-1600°. The resulting products acquire properties approaching those of natural stone - high hardness, low moisture absorption coefficient, strength, etc. Different firing modes provide the opportunity to obtain a wide choice of material colors - from light red to black. The combination of quality and cost of the material is optimal for consumers and makes ceramic brick the most preferred type of cladding.
- Clinker . This material is usually classified as a separate category, although it is, in fact, a type of ceramic brick. The production technology and raw materials are similar, the only difference is a more severe firing regime - up to 1900°. The material becomes almost monolithic, completely resistant to moisture, the service life of clinker bricks is literally calculated in centuries . At the same time, for installation you will need a special composition of the solution, since the usual one does not adhere well to a surface that does not absorb water. In addition, clinker is a poor sound insulator. The high density of the material contributes to good conductivity of sound waves, which should be taken into account when choosing cladding. The cost of clinker bricks is higher than that of ceramic bricks.
- Hyper pressed . This type of facing material is produced without the participation of clay in the composition of the feedstock. A cement-limestone mixture with additives is used for greater strength and to obtain the desired color shades. The main difference is the absence of a firing process. During manufacturing, the molded block is subjected to high pressure, which makes it very dense and hard . A feature of hyperpressed brick is its large weight - it is not made hollow, like other types, so the weight of the block is maximum. The working edges can have the texture of natural stone, which looks very expressive in the masonry. The price of the material is high, the area of application is the facades of expensive mansions.
- Silicate . This type of brick is made from silicate sand mixed with lime and water. It is distinguished by light tones of block coloring. The material has high water absorption rates, which reduces its frost resistance and durability . This circumstance reduces its competitiveness among other types of facing bricks to such an extent that recently sand-lime brick has almost completed its career as a cladding, completely moving into the category of building material.
When it comes to choice, the clear leader in strength and resistance to any load is clinker brick. If decorative properties are considered as a priority, then hyper-pressed brick is ahead. In terms of price-quality ratio, the most preferable type of cladding is ceramic .
IMPORTANT!
The decorative properties of the material are not so different from each other that one or another type can be unambiguously recommended as the undisputed leader. The main selection criterion is the user’s personal taste and preferences.
Specifications
The marking of one-and-a-half products can have values of 76, 100, 125 and higher. This indicator indicates the compression pressure, expressed in kg/cm².
In addition to strength, one-and-a-half elements must meet additional indicators.
Size of one and a half facing bricks for ceramic elements:
- weight - from 2.7 - to 4.3 kg;
- water absorption - 3-14%;
- thermal conductivity - 0.24 - 0.7 W/m°C;
- maximum density - 2000 kg/m³;
- heat resistance - 600 - 1200°C.
For silicate elements:
- weight - from 3.7 - to 5 kg;
- water absorption - 6-8%;
- thermal conductivity - 0.75 W/m°C;
- maximum density - 1650 kg/m³;
- heat resistance - 500 - 800°C.
NOTE!
Compliance with the technical characteristics of products is carefully monitored at large enterprises that can afford high-tech modern equipment.
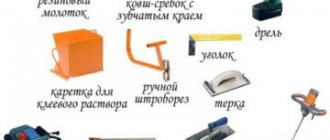
Required Tools
To lay facing bricks with your own hands you will need:
- Trowel (trowel).
- Hammer-pick.
- Grinder for precise cutting of bricks.
- Plumb, level.
- Rule.
- Order.
- Joining.
- Cord.
- Square, etc.
NOTE!
The number of tools used largely depends on the skill of the mason. Experienced craftsmen can get by with a few tools; less trained workers need a wider range of tools.
Types and methods of bricklaying
The laying of facing bricks is characterized by increased requirements for accuracy. The location and geometric proportions of the elements must be as precise as possible, and the placement accuracy must strive to be ideal.
Permissible deviations:
- Up to 4.4 mm - along the spoon (long) edge;
- up to 3.3 mm along the butt (short) edge;
- up to 2.3 mm - along the block height.
Basic masonry techniques:
- Bed. The visible side of the brick in the masonry is the bed - the largest face in area.
- Spoon. The visible side is a spoon, the long side edge.
- Tychkovaya. The visible face is the butt, the smallest side of the block.
Depending on the presence or number of spoon or butt bricks, there are certain masonry options:
- Standard. Rows of spoon bricks are laid at half offset relative to each other.
- Stackable. In this case, the spoon bricks are located exactly above each other. The strength of such masonry is significantly reduced.
- American dressing (American). A row of interlocking bricks alternates with 4-7 rows of spoon bricks, laid at half offset.
- Flemish dressing. Alternation of spoon and bond bricks in each row, and the bond brick is located exactly above the middle of the lower spoon.
- English dressing. Alternating rows of bonded and tongue bricks.
For cladding a half-brick façade (1 layer), most options are not suitable; they are content with either standard masonry, or for laying interlocking blocks, they split the bricks in half.
There is also openwork masonry, when instead of some interlocking bricks, voids are left. Like stacked masonry, this type of masonry is purely decorative and does not provide high-quality wall protection . It is most often used for fencing - fences, parapets, etc.
How to prepare the base
The need for cladding the external walls of the building should be discussed during the process of laying the foundation. The first row of facing bricks is laid on the plinth. The projection of the base is formed at the stage of pouring the foundation. The width of the projection corresponds to the thickness of the chosen bricklaying method and the air gap for ventilation.
The base preparation process includes the procedure for identifying and leveling irregularities in the base protrusion. Using a 1.2–1.5 m long building level, check the base for distortions. You can level the surface horizontally using cement mortar.
What should be the foundation and how to expand it
The width of the foundation must provide sufficient support area for the cladding. Taking into account the insulation, the width of the part of the base protruding from under the main (load-bearing) wall should be at least 16 cm (5 cm of insulation, 3 cm for the ventilation gap and at least 8 cm for the brick support). This condition is not always met. In some cases, it is necessary to expand the area of the foundation protrusion.
The main way to expand the projection area is to install a steel angle on the anchor bolts. The shelf of the corner should be located in the same plane with the protrusion, expanding it . The greater the expansion required for the protrusion, the larger the size of the corner will be needed and the thicker the anchors needed to attach it to the base.
Another method is to drive pieces of reinforcement into holes in the base, install formwork and fill the “steps”. This option allows for a more durable attachment of the additional platform to the base and eliminates the possibility of corrosion for the load-bearing corner.
IMPORTANT!
In any case, before starting work, a careful calculation of the additional site will be required, as well as the ability of the foundation to withstand the additional load from the weight of the cladding.
Preparing the wall surface
The surface of the wall must be carefully prepared so that no problem areas remain on it by the time the facing brick is laid.
To do this you should:
- Inspect the wall, remove foreign objects - lights, drains, equipment elements, trim, etc.
- Remove old paint, remove peeling areas, remove flaking.
- All detected defects are repaired with putty. In difficult cases, you will have to completely plaster the wall.
- To install the insulation, you will need to apply a layer of primer to ensure better adhesion of the wall and the adhesive.
Preparation of the solution
The quality of the mortar is an important point, since facing bricks are resistant to water absorption, which complicates the creation of strong adhesion between the cement mortar and the surface of the block. This problem is especially pronounced in clinker bricks, which require special additives that increase adhesion.
Composition of the solution:
- Cement M500 - 1 hour.
- Sand - 4 hours
- Water.
The consistency of the finished mortar should be such that the laid brick does not “ride” on it, like on a layer of lubricant. It is not recommended to add any additives, with the exception of pigments that give a contrasting color to the seams to create an additional decorative effect.
Some masons add some clay to the mortar to increase plasticity . Opinions differ on this matter - some see this as harmful due to the possibility of washing the clay out of the solution and reducing its strength, others argue that this method, on the contrary, makes the seams stronger and more durable. There is no consensus; everyone is guided by their own point of view.
Seam thickness in brickwork
The optimal seam thickness according to SNiP is 8-12 mm. In practice, they prefer to do 10-12 mm, this makes it easier to hide the reinforcing material in the seams . Maintaining the same thickness of the seam is not an easy task; it is best to use a special device - a dispenser, which allows you to apply a layer of mortar calibrated in thickness and shape.
Laying the bottom row
The prepared base is laid out on a dry row of bricks. This is necessary to find out which bricks will have to be cut to exactly match the length of the wall. The lining is carried out taking into account the type of masonry - the ratio of bonded and tread blocks.
In places where there are window or door openings, the layout is carried out without interrupting the row, since a full row will need to be laid over the opening without interruption. Openings are made as bricks are laid and the block is trimmed.
Laying corners
The beginning of the work is laying out the corners. They rise to a height of 4-6 rows, after which a control cord is pulled between the corner blocks and the wall is laid. When laying corners, you should carefully monitor the presence of a right angle, verticality and other geometric parameters of the masonry.
Wall covering
Wall rows are laid along stretched cords between the corners. As the rows grow, work on the walls is suspended in order to re-build the corner ligaments. After this, the cords are tightened again and work continues in the same order.
Brick laying technique
Before use, the solution is stirred, since heavy particles can sink down and water can rise to the top. The mixed solution is placed in buckets and transported to the masonry site, where it is distributed. Immediately lay a strip of mortar - a bed - for one row. For a bond row the bed width is 200-220 mm, for a spoon row - 80-100 mm. If the seam is filled completely, about 10-15 mm are removed from the edge, the height of the mortar is 20-25 mm, which, when laying, provides a seam of 10-12 mm. Before installing the brick, the mortar is leveled with a trowel.
There are three techniques for bricklaying. On hard, low-plasticity mortar, the “squeeze” technique is used. In this case, the seams are completely filled. If the solution is plastic, use the “butt” technique.
Back-to-back bricklaying technique
As already mentioned, this method of laying bricks is used with plastic mortar. It should be mobile, easy to apply and move. This is achieved by adding additives. You can spread the solution over the entire surface of the wall at once: additives allow you to extend the time before setting begins.
The bed is laid with a thickness of about 20 mm, with a gap of about 15-20 mm left from the edge. This indentation allows you to avoid squeezing out the mortar onto the front surface, but at the same time the edges of the seams often remain unfilled. This significantly reduces the strength of the wall, therefore, in regions with seismic activity, laying milestone courses (external and internal) using this method is prohibited.
When laying a spoon row, take a brick, holding it with a slight slope. Approaching what has already been laid, at a distance of 8-10 cm they begin to rake up the solution with the edge (poke). When joining, it turns out that the seam is already partially filled. The brick is pressed down a little (settled), pressing it to the bed. The excess is removed with a trowel and sent either to a bucket or to the wall.
Technique for laying bricks “back to back”
With this technique, it often turns out that the vertical seams are only partially filled. That’s why this method is also called “wasteland”. They are filled in when laying the bed for the next row. If the technique is not yet well developed, it is better to fill the seams before laying the next row: voids reduce the strength and thermal insulation characteristics.
When laying a bonded row, everything is exactly the same, only the mortar is raked with a spoon edge. The zabutka is laid, like the bonded rows, and then pressed with the palm of your hand. It is necessary to ensure that all the stones are at the same level. This is done using a building level, and the verticality of the wall is checked with a plumb line every 3-4 rows.
"Press" technique
When working with hollow bricks, hard mortars are usually used. In this case, bricks are laid using the “squeeze” technique. In this case, you also have to work with a trowel.
The bed is laid at a distance of 10 mm from the edge, the thickness is still about 20 mm. Since such a composition does not stretch well, it is raked to the edge of the laid brick with the edge of the tool. With your left hand, take the brick and press it against the trowel, while simultaneously pulling it up. At the same time, they continue to press with bricks, achieving the required seam thickness (10-12 mm).
“Butt-to-end” technique
Excess mortar is picked up with a trowel. Having laid several fragments, take a level, checking the horizontality of the row, tapping the trowel handle to straighten the position. The solution that has been squeezed out is picked up. The result is a dense masonry, but the process takes longer: more movements are required.
Butt-together with trimming
The average method in terms of productivity is butt jointing with cutting of seams. With this method, the bed is laid out close to the edge (10 mm), as when laying pressed, and the laying technique is flush: the mortar was raked with brick, placed, pressed down, and the excess was removed. If the wall is not subsequently planned to be finished with anything, after several rows it is necessary to take a jointer - a special tool and give the seams the required shape (convex, concave, flat).
As you can see, this is a kind of symbiosis. To make it more convenient to work, the solution is also made with “intermediate” plasticity. If it is too liquid, it will flow down the wall, leaving streaks, so it needs to be kneaded a little more tightly than when laying end-to-end.
How to fasten the cladding and facade of a building
Facing bricks cannot be laid separately from load-bearing walls. This option will soon lead to the collapse of the outer facing layer.
A combination of internal walls and cladding must be made, which is done using different techniques:
- Bandaging layers with bonded bricks . This option is suitable for the simultaneous construction of load-bearing walls and an outer decorative layer. In parallel with this, insulation is installed and a ventilation gap is created.
- Bundle using reinforcing bars . Sections of thin reinforcement (8 mm in diameter) are hammered into holes drilled in the walls. The free ends of the rods are laid in inter-row seams. The disadvantage of this method is the gradual rocking of the rods due to movements of the outer layer of the cladding due to temperature expansion. Some movement of the rods occurs, violating the strength of their connection with the load-bearing wall.
- Bundle using reinforcing mesh fastened to a load-bearing wall . This option excludes the possibility of using insulation, so it is not used often.
- Using flexible connections . Polymer rods 6 mm thick are installed in the wall using dowels. The free end is equipped with a sand coating, which enhances adhesion to the mortar in the inter-row seam. This option eliminates all the disadvantages of other methods - there is no possibility of pulling out bonds, and cold bridges do not form.
Requirements for building materials
Brick is the most popular material for building houses; there are hundreds of manufacturers producing products with distinctive characteristics. Before purchasing it, the developer will need to familiarize itself with its production parameters so that they comply with GOST requirements.
The most important of them:
- Strength characterizes the ability of a brick to withstand external natural factors without destroying the structure. This characteristic is marked “M”. For wall structures of residential buildings, bricks of M - 150 and M-200 are allowed, which corresponds to a compressive strength of 150 and 200 kg/cm2, respectively. The brand of brick is also characterized by bending strength, which for the above modifications is respectively 22 and 34 kg/cm2.
- Thermal resistance should be from 0.5 to 0.8 W/m*K and characterizes the ability of the wall to retain heat in the house.
- Moisture absorption is set at 6-14%, this is a high figure, but the porous structure of the brick cannot guarantee less, therefore, during the construction of walls, waterproofing will be required, which, as a rule, is performed in the process of thermal insulation of external walls.
- Frost resistance is set at F50 and must provide at least 50 freezing/thawing cycles of the walls.
- The vapor permeability of brick corresponds to 0.14-0.17 Mg/(m*h*Pa).
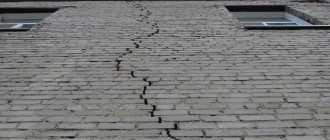
- The shrinkage of bricks is no higher than 0.1 mm/m; for this reason, cracks in brick buildings are quite rare.
- Sound insulation of walls of 1.5 bricks provides protection of 50 dB, which corresponds to SNiP.
- The fire resistance of a brick should provide resistance to direct flame exposure for more than 5 hours; in practice, this figure is higher and reaches 10 hours.
Scheme
Laying walls of 1.5 bricks can be done with single-row or multi-row ligation. The first is considered stronger and more durable and involves swapping the tie and spoon rows from the outer part of the wall being built, while observing the following basic rules:
- the rows at the top and bottom are laid with pokes from the outside;
- longitudinal seams in the following rows are shifted by 1/2 bricks, transverse seams by 1/4;
- the blocks of the upper row overlap the vertical seams of the lower one.
This laying method has a significant drawback, since it will require many incomplete bricks, which leads to increased labor intensity of construction work and increased mortar consumption.
Multi-row dressing is performed according to the following row scheme:
- the first is “spoon-poke”;
- the second is “poke-spoon”;
- from 3 to 6 - laying only with spoons with dressing of seams in 1/2 brick;
- from the 7th row the action is repeated from the first row.
Multi-row ligation is characterized by the highest productivity and the need for the smallest number of incomplete bricks, although the strength is somewhat less than with a single-row scheme.
Corners are considered the basis for the construction of walls of any object , therefore even the slightest mistakes made during their laying will lead to damage to the geometric shapes, and, consequently, to a decrease in the load-bearing capacity of the structure and the duration of its operation.
When using the 1.5 brick technology, the construction of corners is carried out 4 rows ahead. This is required so that it is possible to install the order and expose the cord. In this case, it is possible to maintain horizontality as accurately as possible when laying rows.
The correct layout for laying one and a half bricks is in the video:
How many pieces will you need?
To calculate the volume of building material for a two-story house in a 10x10 m plan:
- The perimeter is determined by the outer walls: 10x 2+ 10 x2 = 40 m.
- At a height of 3.00 meters, the area of the wall structures is: 40 x 3.0 = 120 m2.
- The area of windows and doors is 11 m2.
- When laying 1.5 bricks, the wall thickness is 380 mm.
- According to the table, it is chosen that 1 m2 of walls with 1.5 bricks requires 189 bricks
- Brick consumption: (120-11)* 189 = 20601 pieces.
- Mortar consumption taking into account a 5mm thick mortar joint: 5.263 m3.
Slope finishing
The slopes are decorated with interlocking bricks, which creates an additional decorative effect and strengthens the perimeter of the opening. The material is installed in an even column, creating a dense edge of the masonry fabric and emphasizing the accuracy of the geometric lines.
For a more expressive design, you can use a brick of a different color, combining it with the main tone of the material. This option will decorate the slopes and make the facade more elegant.
Let's start installation
Next, we have created step-by-step instructions for laying facing bricks.
Step 1. Bottom row
Before laying, the bricks are briefly soaked in water so that they do not draw moisture from the mortar. Since the length of the wall is not always a multiple of the number of bricks, traditionally the bottom row is laid without mortar - so that the brick can be trimmed if necessary. However, as we have already said, professionals do not advise violating the integrity of the cladding. You can get around this difficulty by finely adjusting the thickness of the vertical seam: increasing or decreasing it by 1-1.5 millimeters in most cases will allow you to combine the length of the wall with a certain number of whole bricks. Nevertheless, we still advise people unfamiliar with installation to do without mortar in the bottom row.
Step 2: Corners
Laying always starts from the corners. They need to be laid out at a height of 5-6 rows. To do this, place a square rod on the outer edge of the already laid bottom row. Use a trowel to take the solution and carefully apply it to the bottom row. Level the layer and lay the brick on top so that it fits tightly onto the metal rod along its entire length. Apply a level and, if necessary, use the handle of a trowel to tamp down the side of the brick that is warped. After you achieve horizontal evenness, carefully remove the rod and remove excess mortar. Next, repeat the operation on the other side of the corner. Thus, raise the required number of rows.
Please note: you need to carefully monitor the dressing. Violation of the correct alternation (poke - spoon) will immediately catch the eye and spoil the overall appearance of the facade.
Step 3. Laying rows
Next comes the actual wall cladding. You need to stretch a construction cord between the corner bricks of the second row and fix it on top of the bricks. This cord is the level of your second row, all bricks in this row should lie with their top edge flush with it.
Place the second row of bricks nearby. They should be on the end. Place a square rod on the bottom row and apply mortar in the same way as applying mortar to the corners. Applying a little mixture with a trowel to the ends of the bricks standing at hand, they are carefully laid in a row. Each brick is tapped with the handle of a trowel so that it fits exactly “on the cord.” After the bricks are laid along the entire length of the rod, it must be carefully removed.
Do not lay out more than 5-6 rows at a time - heavy loads may cause the masonry of the lower rows to become deformed.
In this way, by inserting and removing the rod, and also using the cord as a level, you will move along each row.
Step 4. Slopes
The slopes of window and door openings are most often laid according to the angular principle or with bonded masonry. But they often use bricks of a different color to add variety to the finish.
option for facing corners and slopes
We also allow for a protrusion of the slope brick relative to the general level of the cladding.
Step 5. Joining the seams
After you have laid 5-6 rows, you need to stop. Firstly, the solution needs to set so that you can continue laying the top rows without fear of deformation. Secondly, while the mixture has not yet completely hardened, you need to do the jointing - their decorative alignment.
First, crumbs of mortar are removed from the façade, the cladding is swept and moistened with water. For jointing, a special solution of cement, lime and sand is required. Cement and lime are mixed in equal proportions, and then ten parts of sand are added. All this is diluted with water to form a paste-like mass. This mass is what needs to be filled in the seams.
In the description of the tools, we mentioned a metal round rod with a diameter of 10 mm. The classic jointing is semi-round, so you can use a rod. However, there are many types of joints. To give the seams the desired shape, use a special tool called a jointer. It usually comes with different attachments.
Joining
Joining is the process of outlining, arranging the seam relative to the outer plane of the wall. To perform the work, a special tool is used - a jointing knife or, simply, a jointing knife.
It is approximately 9mm wide and has a concave or convex blade to create the appropriate seam profile. When laying several rows, jointing is done - ironing the seams to give them a neat and even shape with the same depth relative to the surface of the masonry .
The process is simple, but requires timely completion - the set solution is difficult to joint, which complicates the work and worsens the result.
Video
This video provides tips for brick cladding:
Return to content
Adobe houses have excellent thermal insulation properties, but they quickly settle and lose their aesthetic appearance. In order to extend the life of adobe houses, preserve the structure and prevent complete destruction of the structure, the walls are reinforced with bricks. How exactly the technological stage occurs, we look further.
Before starting construction work, draw up a construction estimate in which you carefully calculate the quantity and type of building material needed. So, in any case, each of the components presented below will be needed when facing walls with brick. Construction materials and tools for working with the cladding of an old house: bricks, cement, sand, insulation, water, plumb line, level, bucket, shovel, concrete mixer (you can mix the masonry mortar by hand, then you will need a spacious trough).
If you are deliberately constructing a house from adobe, after construction, allow the walls to settle (naturally) and settle for several years to further strengthen and protect the foundation. Over such a period of time (3-4 years), the walls will be sufficiently strengthened and will be ready for further action.
If you have such circumstances that you have purchased your own summer cottage in addition to an old adobe rickety house, do not be upset and do not make drastic decisions. In most cases, the situation can be corrected. It is enough to strengthen the corner joints of the building and add foundation. Brief description of how this happens:
- It is necessary to drill holes with a diameter of 12 mm and a depth of 100 mm into concrete (or 200 mm into brick) with a downward slope of 15-20 degrees;
- 12 mm reinforcement is immersed in the holes made. The remaining 150 mm length should extend to the surface of the foundation;
- Pour a new foundation 30 cm deep and leave the anchors in the concrete;
- You perform waterproofing from a two-layer roofing material.
After the issue with the foundation has been resolved, do not forget to raise the base (if you have not done this before) - complete the formwork and fill it with concrete, or, alternatively, lay it out of brick.
When starting to line the walls, make an approximate calculation of the bricks - at the most inopportune moment, the supply of building materials may run out, causing unnecessary trouble. Lay out the “trying on” row without using a binder mixture - on a dry one. On average, brick consumption is 55-58 pcs. per m2. Consider the ventilation system and do not place bricks close to the walls, leave space for air exchange. The inability to ventilate the walls will lead to their rapid destruction, dampness, and the spread of mold and mildew.
Don't forget about the wall connection. Simple 10 cm nails can be used as a cohesive material. It would be a good idea to fill the resulting gaps not with cement mortar, but with a heat-insulating mixture (for example, expanded clay).
Prepare cement mortar for laying walls in a ratio of 4 buckets of sand to 1 bucket of cement. After mixing thoroughly, add water to a medium consistency (“sour cream”). During the laying process, it is necessary to leave 11-13 mm seams between the bricks.
Place metal lintels on door and window openings. Maximum strength and minimal clearance allow them to be used as reinforcement.
Bricks must be laid out in a checkerboard pattern and the walls must be regularly checked for “evenness” using a level.
Building and renovating a home requires a lot of expenses. Drawing up an estimate will allow you to accurately calculate the quantity and cost of the required material. Plan your expenses. When buying bricks, consider a stock of at least 500 pieces. additionally. Anything can happen, but you won’t lose the building material; in extreme cases, use it for another need.