Carved window frames - stencils and patterns for carving with a jigsaw
These decorative fixtures are a great way to decorate your home and give it a style that is different from others. It is not difficult to create such wooden planks with your own hands; for this, on the Internet you can find many ready-made templates that only require transferring to paper and wood.
Advantages:
- the ability to independently decorate the exterior of the building;
- visual increase in the size of the building;
- implementation of bold architectural solutions;
- protection of the window opening and walls adjacent to it from moisture, dust, dirt;
- reducing the level of heat loss in the house;
- increasing noise insulation performance;
- emphasizing the individual style of the house.
These designs have a number of disadvantages:
- the need to process the primary material (wood) to protect it from moisture;
- the importance of regular processing (coloring);
- lack of a harmonious appearance together with structures made of metal-plastic.
Create your own templates
Platbands can easily emphasize the individual style of a building and place the right accents.
Independent development of template samples is usually not difficult, especially if a person has minimal drawing skills. Otherwise, you can use ready-made samples.
There are several types of platbands, they differ in the method of attachment to the frame.
- Telescopic: they are distinguished by characteristic protrusions in the shape of the letter “L”, which coincide with the grooves located on the window frame.
- Overlays: mounted directly to the frame using glue or screws.
Popular materials
Most often, platbands are made from wood species. This material gives finished products an elegant and harmonious appearance. Sometimes plastic options are used; they better withstand frost and heat, sun and precipitation.
Recently, MDF structures created from wood processing waste have been gaining popularity. This material is highly environmentally friendly, which distinguishes it from plastic. In addition, in appearance it resembles a natural structure. Occasionally, polyurethane is used, a very practical composition, often used for stucco molding placed on the facade.
The nuances of choosing the right wood
To create truly durable and beautiful structures, it is important to pay careful attention to the choice of wood and its varieties:
- hard (oak, beech, ash): they are durable, but making cuts on them is not very easy;
- soft (alder, linden, aspen): perfectly amenable to processing, but require pre-treatment with special compounds;
- apple and cherry branches: perfectly convey the smallest patterns, attached by attaching to the base;
- birch, pine: easy to process;
- combinations of different species: require mandatory processing, allow you to create an original window frame.
The nuances of creating templates on your own
To prepare the platband, you need to develop a design and implement it using a stencil. The latter allows you to transfer the picture to wood.
Not every person has drawing skills. You can simply find and print the pattern you like, the main thing is to maintain a consistent style. Patterns of strict geometry and vegetation should not be combined.
Subtleties of creating a template:
- Harmony of the color palette of external walls and decorative elements.
- Selection of the optimal size.
- Choosing the best type of coating.
- Details are written along the direction of the wood grain.
Manufacturing stages
Modern platbands are created by selecting a suitable design from numerous photographs that can be found on the Internet. Patterns for their design are created in two ways:
- An applied thread, characterized by separate patterns attached to a single base.
- Carved carving: the ornament is distinguished by through gaps, it resembles lace.
Stages of creating platbands:
- taking measurements;
- processing of workpieces with a protective coating;
- cutting out a design from wood with a jigsaw in exact accordance with the prepared templates;
- filling the created holes with sandpaper;
- processing of products by impregnation;
- installation of parts by attaching them to a pre-selected base.
Installation specifics
After the part is ready, it needs to be attached. You can use different fastening methods:
- on the inside using blind spikes: holes are made on the frame for them. The tenon is lubricated with glue and then placed directly into the groove. This type of fastening reduces the likelihood of dust penetration and moisture accumulation;
- through tenon: varnish is used to fasten the joints.
Required care
All types of wooden platbands need care, so they will retain their appearance longer and will not soon require replacement.
Types of care activities:
- Application of impregnations that prevent damage due to exposure to pests, cracks, and fire.
- The use of primer, varnish and paint is a prerequisite for processing carved products. Such manipulations should be carried out once every five years.
- The use of products that protect materials from corrosion.
- Periodic renewal of paint coating.
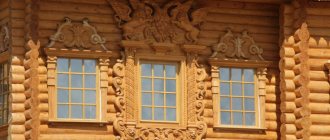
Carved window frames: templates, photos
Old Russian style architecture necessarily includes the use of window frames. This window decoration is rich in its species diversity; it allows you to reflect the most daring ideas on wood.
Just a few decades ago, each village had its own style of carved patterns. Today they are used less frequently, but there is a tendency to slowly return to former motives.
Purpose of framing
The purpose of window casings, first of all, includes framing the facade of the building, creating its unique style, a kind of “face”.
In addition, they protect the space between the frame and the window opening, preventing dust, dirt, precipitation, and sounds from the street from entering the house.
Previously, platbands were considered a kind of protection, a talisman for the home against the penetration of evil spirits. This was evident even from the patterns that depicted plants and mysterious figures, which necessarily carried a special meaning.
Today, such a design, provided that it was chosen correctly, can modify the geometry of the structure: expand or extend.
The meaning of carved elements
When planning to decorate window openings with such structures, it is important to first study their meaning:
- the sun and kokoshnik are symbols of energy and life;
- the snake personifies wisdom, fertility;
- the cross represents the harmony of the spiritual and material worlds;
- vegetation gives a feeling of unity with nature;
- earrings are a sign of the hospitality of the owners of the house;
- the silhouette of a bird is a traditional connecting element.
Characteristics of materials and forms
Wooden window frames can be created from two types of materials, wooden and artificial. It is traditional to carve figures from wood; it is particularly resistant to atmospheric precipitation.
To choose the right material, you should evaluate the properties of different types:
- larch very rarely rots, but is too fragile;
- linden, aspen, and alder are great for creating decor; they are pliable. To increase shelf life, they require treatment with impregnations, because they easily absorb moisture;
- ash, beech, oak are difficult to process, but have excellent weather resistance;
- birch and pine decor allow for accurate cutting of parts, and are distinguished by a high margin of safety;
- apple and cherry branches are ideal for creating minute carved decorations.
In addition to wooden materials, others are used:
- laminated MDF can be matched to the color of any species, but it is recommended for use only indoors;
- plastic looks good with similar window structures; it perfectly resists solar radiation and moisture.
Patterns and types of threads
Carved decor gives a special charm to the house; in order for it to look neat and fit perfectly into the overall style, preliminary preparation of templates is required.
The easiest way is to find ready-made sketches; if the need arises, you can supplement them with your own ideas. The drawing or part of it must be enlarged so that it fully matches the exact dimensions of the window.
It is good to place carved templates on thick cardboard or fiberboard. You should try to create patterns equally on all windows, taking into account that small parts require the most attention and wear out the fastest.
The platbands consist of two parts: the upper one is called a kokoshnik, the lower one is called a towel. Each drawing may contain key elements, among them are a vertical rail, a window sill, lower and upper strips, flowerpots, a tiara and more.
Manufacturing process
The production of window frames begins with the choice of a pattern and continues with the selection of the type of thread and fastening methods. After all the preparatory activities, the time comes for the actual production of the frame.
- Taking dimensions from the window.
- Cutting out blanks after applying them from the template to the material.
- Forming holes with a jigsaw and smoothing them out with sanding paper.
- Fastening the cut elements with glue and nails (if it is an overhead thread), or with tenons (blind, through).
- Treatment with special compounds.
Stencils for window trim. How to make carved platbands?
Framing the windows with carved decor creates the basis for the entire style of the facade. These elements give individuality to the entire structure, can change its geometry, and carry a secret meaning. It’s easy to make this beauty with your own hands.
The function of window trim and a little history
Timber windows first appeared as window frames in the 15th century. Today, these elements have practically no meaning; they are used to protect the frame from the penetration of debris and moisture. Previously, such decor had a special grandeur; each type of design was used with deep meaning, meaning one thing or another.
People believed in the mystical protection of these wooden structures and were of the opinion that they were able to keep evil out of the house.
Types and types of platbands for windows
Elements of carved decor can be flat or convex. The second type is produced using special machines, which increases their cost.
Depending on the type of installation work, these structures can be telescopic (equipped with special protrusions) and overhead.
The types of these elements may vary depending on the material from which they are made:
- woody;
- plastic;
- MDF.
Requirements for platband material
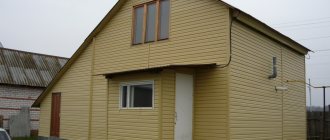
Beautiful window frames in a wooden house are needed not only to achieve aesthetic goals, but also to solve purely practical issues.
In order for a structure to stand for a long time and fully perform its assigned functions, it must meet certain requirements.
- The material must be well resistant to moisture, frost, sun, wind and precipitation (oak and beech are best suited for this).
- The structure must be durable and not subject to cracking (for this reason, external platbands are not made from MDF, preferring to place them indoors).
Having found out the requirements for the material from which such decor is prepared, it should be noted that wood would be the best. Plaster, for example, quickly absorbs moisture, darkens, and loses its aesthetic appearance. This leads to the fact that the architectural design quickly becomes unusable.
Polymer concrete and glass fiber reinforced concrete resist moisture and high and low air temperatures well. However, they have sufficient weight, which does not always allow their use on some buildings.
Polyurethane is practically no different from other materials; in addition, it provides additional thermal insulation for the house and is characterized by simple installation work.
How to make stencils for window trim?
Making stencils doesn't require too much skill. You just need to find the decor you like, for example, on the Internet, then transfer it to thick cardboard (necessarily with real window dimensions).
It is much more important to properly prepare for creating these frames:
- choose suitable wood (having a dense, strong, solid structure);
- select the necessary tools (chisels, knives, jigsaw).
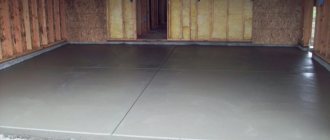
Manufacturing window trims
Beautiful window frames in a wooden house must be prepared taking into account all proportions. For example, if the sash opens outward, then the platband should not be closer to the sash than 3 cm. Otherwise, it will create obstacles to opening the frame.
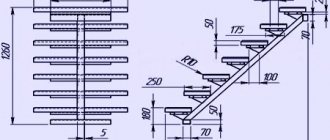
The manufacture of the structure should begin with careful planing of the workpiece. Its dimensions can range from 3 to 15 cm. The width of the decorative element should not be more than 5 cm wider than the window frame. In order for the structure to better adhere to the wall, you need to make gaps or grooves at a distance of no more than 15 m from the edge.
It is very important to use a power tool carefully when working on wood. If you apply excessive force, there is a high probability of damaging its integrity and cracking. If making patterns is difficult, you should sharpen the blade.
Minimum required tools
The manufacture of platbands, in contrast to artistic wood carving, involves repeated execution of the same type of operations, resulting in a rather primitive repeating pattern. Therefore, most of the work is done with an electric tool: this not only increases the processing speed, but also achieves uniform quality in different areas.
1 - jigsaw; 2 - drill; 3 - belt sander; 4 - vibration grinder; 5 - manual router
The main work is done with a jigsaw and drill. The tool must be reliable and of high quality, capable of being in continuous use for a long time. To clean and polish products, it is better to use an electric grinder, at least a simple belt grinder. Quick finishing of the relief is possible using vibration-type machines.
If you intend to add additional small details to the edges of your product, you cannot do without a router. Slopes, chamfers and figured borders can also be done manually, but only if you have a variety of chisels, cutters and specific skills in working with wood.
Set of wood cutters
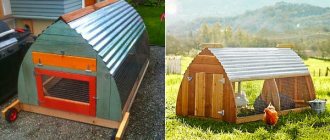
Do-it-yourself wooden carved window frames
The log house seems to be asking for its windows to be framed with carved elements. You can make them yourself; this will not only be an excellent financial savings. Such work will allow you to turn your own ideas into reality, decorating your own home on your own.
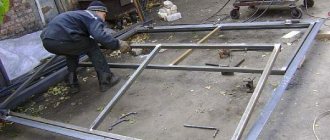
Minimum required tools
Cutting and installing platbands in a wooden house involves repeating the same actions to create patterns and slots.
Most of the work involves the use of electric tools:
- electric jigsaw;
- manual frezer;
- drill;
- grinding machine (belt, vibration types).
Additional small elements, such as slopes, figured borders, chamfers, are made using sharp chisels and a variety of knives.
How to choose wood
It is best to create carved elements from hardwood. These include alder, maple, oak, beech, ash, and birch.
The advantages of these varieties are obvious:
- minimal susceptibility to rotting;
- long service life;
- good endurance against drying out.
The use of soft hardwood is allowed to create reliefs with fine details. For this purpose, walnut, poplar, and linden boards are purchased.
Important! The material must be selected, its humidity should not be higher than 12%. Chamber drying is preferable.
The material must not have signs of warping, pronounced defects, or large branches. It is better to prefer pre-calibrated boards with a width of 15 cm and a thickness of 4 cm.
To determine the required length of material, measurements should be taken. According to average indicators, the board should cover the window opening and have overlaps along the horizon and vertical.
To practice your carving skills, you should additionally buy some cheap material on which you can practice.
Making templates and stencils
Beautiful window frames in a wooden house are created by preliminary preparation of a stencil. The selected pattern is transferred to the prepared workpiece. It is very important to act accurately, striving for the ideal and exact repetition of the pattern.
Important! The first experience of wood carving should not be carried out with the embodiment of a complex design. It is better to try and master primitive patterns that will be of high quality.
You can apply markings to workpieces in different ways:
- Make a pattern on a plastic base; it can consist of one pattern, which will be consistently applied to the entire surface.
- Create a solid template that will be placed on the board and outlined with a pencil.
Important! The placement of the pattern should be taken into account. It should form a single contour, uninterrupted, looking complete.
Sampling through holes
The first thing the work begins with is leveling the edges by trimming them. Then holes are sampled in the central part. You need to go along the edges with a jigsaw, moving one to one and a half millimeters away from the markings.
To cut out shapes in the center of the pattern, the part is drilled at the edge of the cutout line, then the inner contour is drawn using a jigsaw. To make large diameter holes, use core drills. However, when using such accessories, markings are required in the form of the centers of the circles where the crown will be placed.
Blind carving: applying relief
After giving shape to the decorative elements, flat patterns are painted with ornaments and plants.
The simplest methods are:
- the groove is created with a thin chisel or a cutter with a square or triangle-shaped blade. Here the carving runs only along the line, after which grinding is carried out;
- the leaf is a group of grooves that look like veins; they are cut with a disc knife;
- small notches are made from the center between each vein (with a semicircular chisel), they will represent the body of the leaf;
- the outer contour is drawn with a thin incisor.
Wood processing and installation of platbands
Installation of platbands on windows in a wooden house is carried out only after preliminary processing of all materials. This is necessary to slow down their aging processes and prevent damage by pests.
The carved decor is soaked in an antiseptic solution for 8 hours. Then they are dried stacked on top of each other, with linings placed every 40 cm.
After the material has dried, you need to:
- carry out sanding;
- coat with alkyd enamel, polyurethane varnish.
To properly place the platbands, you need to trim the perimeter of the frame with a strip 1.5 cm thick and wide. It is important to place it so that the outer edge of the rail is not visible afterward through the carved pattern. Such a plank is needed to hide unevenness on the wall and create a solid foundation for all elements. To make the pattern especially expressive, the strip is painted in a contrasting color to the trim.
Rules for the manufacture of platbands
If the source material is wood, then the width of the board should be 30-40 mm. In addition, sheets of metal, plastic and others can be used.
The width of the material should be sufficient to hide the edges of the walls, as well as protect them from the negative effects of air humidity.
By placing the carved elements along the wood fibers, cracking will be prevented. This is especially true when using coniferous wood. You should also remember that the openwork tips and bends have a much smaller thickness than the structure as a whole, which is why they are the most fragile.
After installing the entire structure, there should be no interference with the comfortable opening and closing of windows. To do this, the internal size of the platband should be a couple of centimeters larger than the size of the frame. The lower part must be attached at a slight angle, which ensures normal water flow. The bottom bar is made 1 cm wider than the top.
Before starting the installation phase, it is recommended to nail the slats around the entire perimeter, carefully fitting all joints. Thanks to this, all irregularities on the walls will be hidden.
Templates for carved frames on windows and doors - from drawing to stencil
Carved casings give the house a special spirit and give an aesthetically complete appearance. When the owner knows how to use carpentry tools, creating such a creation with his own hands will not be difficult for him.
You can download the templates on the pages of online publications, then apply them to the blanks and secure them to the frames.
How to make templates for carved frames (stencil)
Installing platbands on windows in a wooden house requires preliminary preparation of templates. They can be done in different ways:
- draw it yourself on paper;
- use a graphic editor;
- photocopy;
- scan and print;
- find suitable samples on the Internet.
From drawing to template
The platbands for the windows of a wooden house are prepared on cardboard; it is important that they have the actual dimensions of the structure that will be fixed to the windows. Each type of pattern, element, decoration requires the creation of its own template.
It can be made on plastic or thick cardboard. Then, applying sequentially on the wood, using a soft pencil, transfer it to the workpiece.
Afterwards you need to cut out the pattern with a jigsaw, using different knives and chisels if necessary.
Templates of carved window frames - photo gallery
There are many templates for creating and decorating platbands. After studying the proposals, you can choose the best option for a particular home. Stop at what best reflects his style and mood, what the owner wants to convey to others.
Transferring the outline of the design to the workpiece
After the sketch has been created, you need to make a stencil directly onto which all the elements of the design for the carved frames are transferred. You can transfer the contour to the workpiece in the following ways:
Cutting the platband according to the template
- The most common method is when the design is cut out of thick paper or cardboard. The resulting templates are applied to the board and traced along the outline with a pen, felt-tip pen or pencil.
- The stencil can not be cut out, but transferred to future trim using carbon paper.
- You can press the outline of the sketch through the paper onto the wood with a pen (an inconspicuous mark remains). You can make the outline clearer without carbon paper by applying a layer of graphite on the back of the sheet with a soft pencil.
The stencils should be placed on the workpiece along the grain of the wood: in the future, the thread of such a casing will not crack. For convenience, the places where the cuts will be made can be colored.