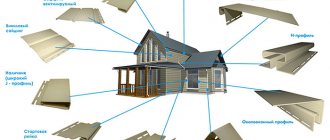
Types and features of frame lathing for siding
So, the better the quality of the lathing is made, the neater the facade will look and the longer it will last. An impeccable frame is capable of masking a wide variety of wall defects, since it is installed directly on their surface, and siding panels are attached to it on top.
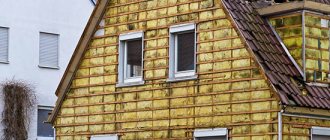
In addition, the lathing serves as the basis for laying heat insulation: mineral wool boards, expanded polystyrene, polystyrene foam and others. Another important function of the lathing is to ensure ventilation of the facade due to the formation of a distance between the surface of the walls and the siding through which ventilation occurs.
If the outer walls of the house are as smooth as possible, the question arises: is lathing necessary in this case or can you save money on it? Yes, it really is possible if the vertical battens of the sheathing are fixed directly on the building itself.
To secure the slats in the correct position on uneven walls, you need to use special hangers. On a flat surface such hangers will not be needed, which again leads to saving money and reduces installation time.
Types of lathing
- Metal battens. They are made from a metal profile designed to work with drywall. For vertical slats, any profile used for racks or ceilings will do. However, they usually prefer ceiling PP 60x27 for the reason that there are suitable PN 28x27 guides for it, which are also needed for the construction of high-quality sheathing.
- Wooden sheathing. Its production will require less money than a metal one, but it has a number of disadvantages. The main one is that wooden blocks are subject to deformation during operation. For lathing, you need to choose only thoroughly dried wood. But there is still no guarantee that the sheathing will not deform over time, because it will be constantly exposed to atmospheric factors, such as high humidity. In this regard, metal undoubtedly wins - it is not subject to deformation, biological effects and lasts much longer.
Types of lathing
Only two types of lathing are used, this is due to the use of different materials: wood and metal.
Wooden
The use of wooden beams makes construction more economical. But there is a significant drawback, the deformation of the material from natural phenomena (snow, rain). If the timber used has a moisture content of 12-15%, this is considered normal. But when this indicator is higher than normal, you can expect negative consequences. Firstly, the material will become distorted. Secondly, the integrity of the sheathing and its appearance are compromised.
Low humidity levels can be corrected before installation. The material should be kept in its natural state for one month, it will dry and only then begin its installation.
The appearance of the wooden profile is a beam, which has a cross-section of 0.5x0.5 cm. In order to prevent damage to the wood, a special antiseptic impregnation is applied to the beams. And even with such protection, the timber cannot be used for sheathing in rainy weather.
Metal
Here, profiles are used, the material of which is galvanized iron with a cross-section of 0.6 x 0.27 cm. Analogs of such profiles can be used for attaching plasterboard panels to various surfaces.
There are profiles of other sections. For example, 0.5x 0.5 and 0.4x 0.4 cm, but they are not suitable for fastening siding. The reason lies in the insufficient rigidity of the material. There is no flanging of the edge of the canvas.
To fasten metal profiles, hangers in the form of thin galvanized sheets are used. They are U-shaped and fastened to the wall surface with self-tapping screws. From the opposite ends of the surface, the fastening of two canvases begins, which act as guides.
To check the accuracy of the fasteners, you should use a construction or laser angle. After the measurements have been made, you need to stretch the fishing line between the guide blades. Additional strips will be installed along it.
Metal frame installation technology
To equip a metal frame, special galvanized hangers are used. They are plates with perforations and are called pawns in installer slang.
Attention! If you need to make a 2-tier sheathing with an extension at the top of the wall, you need to stock up on another type of connecting parts called crabs. They are needed for joining vertical and horizontal profile strips.
The step-by-step process of manufacturing a frame for siding occurs as follows:
- First, markings are made, determining the optimal distance between adjacent sheathing profiles. In this case, they focus on the width of the heat insulator that will be laid, but do not forget about one technological requirement: the interval between vertical profiles should be within 0.40 - 0.60 m.
- Using a marker or chalk, marks are placed on the surface of the walls for attaching hangers. To fix the profile, you can use several fasteners, but according to the rules, their number should be at least 3. The upper and lower suspensions are placed at a distance of 0.15 - 0.20 m from the edges of the wall.
- The profiles are connected to the hangers using self-tapping screws SMM 35x51.
- Guide profiles PN 28x27 are installed at the bottom and top of the wall. They are laid strictly horizontally, regardless of the slope of the area on which the building is located. Galvanized hangers are also used for their fastening. The finished metal frame must be mounted exactly vertically. To achieve this, when installing profiles, their direction is determined by a plumb line.
- A double PP 60x27 profile is installed in the corners of the building, while a gap is left between the wall and the profile, the size of which is equal to the thickness of the thermal insulation with an increase of half a centimeter. Two profiles are connected to each other at right angles and fixed using SMM.
- To arrange vertical racks, the following technique is used: measure the interval between the guides, which are located above and below, subtract half a centimeter from the result for free movement and cut the profile to the resulting size. Next, the profile is inserted into both guides.
- The antennae of the suspensions should wrap around the posts on both sides.
- The correct installation of profiles is determined by a level and they are fixed in the required position, secured with self-tapping screws on hangers.
- To prevent the PP 60x27 metal profile from squeaking when moving, use plastic inserts, mounting them under both ends.
- The window and door openings are finished around the entire perimeter, and this is where the work on making the sheathing for the siding ends - the frame is ready for use.
Sheathing for basement siding
The choice, for example, of panels fell on vinyl imitating wood, brick or stone with a size of 50 x 120 cm. We chose a metal frame, since the surface of the base is close to the ground and is exposed to groundwater and melt water, which is not desirable for wooden profiles.
In a region with warm winters, you can mount the first guide directly above the ground. In regions where freezing of the ground is possible, it should be located 15 cm above the soil level.
If we are cladding the entire façade, the guides should be placed vertically at a distance of 90 cm; in the case of cladding only from below, the optimal solution would be a horizontal frame at a distance of 45 cm.
As always, we will start the installation with two guides, which we place on opposite walls. Next, a fishing line is stretched between them, along which the intermediate beams will be located.
Using a hammer drill, we drill holes for hangers or brackets; this is where we will attach the frame bars. If we choose a metal frame, we use brackets because of their stability.
Having decided to make additional thermal insulation, before installing the profiles, we will lay the insulating material directly on the brackets. We lay the windproof membrane on top and continue to attach the main slats.
Now we measure the plane of the fixed corners with a building level and proceed to the installation of the panels.
Wood frame installation technology
Wood lathing is made according to the same principle as metal profiles. However, during installation a different set of tools and consumables is used. For example, you will need wood screws, a primer with antiseptic properties, and a hacksaw. The strength of both lathing is almost the same, but the service life is much longer for the metal one.
Nuances when making a wooden frame:
- wood must be treated with a special agent to protect it from moisture
- It is better to pre-plane the bars with a planer or process them on a surface planer so that they become even
- guides are not used when constructing a wooden frame
- the top and bottom of the racks are fastened with the same bars
Frame on plinth
Siding is often used for covering plinths, and not just walls - it perfectly decorates the structure and masks flaws. The process of manufacturing the frame for the plinth is exactly the same as for the facade. The technology and materials are the same, but there are a number of features.
Important! Each element of the sheathing for the plinth is fixed on four vertical posts.
The interval between them is determined based on the length of the facing material and the thickness of the heat-insulating layer, if provided. The plinth sheathing is more susceptible to moisture, so it is recommended to make it from metal profiles.
Having carefully studied the recommendations for making a frame from both materials, you can easily cope with the work on your own and thus save money.
General structure of the lathing
To create sheathing, in general, it is necessary to mount a frame around the perimeter of each sheathed surface. It is brought to the required level. After this, the intermediate elements are placed at a distance necessary to secure the sheathing elements. This is a very important point in which mistakes are not allowed.
To secure plasterboard sheets, the distance of the sheathing elements should be half the width of the sheet. In this case, the distance itself is calculated from the middle of one crossbar to the middle of the other. Only in this case will it be possible to properly fasten the sheets end to end.
For sheathing with PVC, aluminum or wood panels, you can limit yourself to a distance equal to the length of the elements or place one or two more supporting elements of the sheathing in the middle between them. For the ceiling, it is better to take a smaller distance between the beams or profiles (450-600 mm) so that the cladding elements do not sag.
If insulation is used, the distance between the sheathing beams is sufficient to accommodate it. So, for example, when using strips or slabs of mineral wool, the distance should be 1-2 cm less than the dimensions of the insulator. This will allow you to pack it tightly without gaps.
Taking into account these construction features, you can already decide on the required amount of base material and determine how much the sheathing costs.
If necessary, at the stage of forming the sheathing, hidden wiring, various communications and elements of additional equipment, such as heated floors, insulation, etc., are distributed. In the case of forming a sheathing with a counter-lattice, the frame around the perimeter should be made at a certain height for both layers of timber.
How to make lathing for siding with your own hands
If you are building your own home, you have probably thought about facade cladding. The facing material in demand today is siding. It is practical and durable, and also inexpensive. Its high technical characteristics are due to the use of modern materials, but not only. Siding cladding is reliable and durable also due to the fact that it rests on a durable sheathing. Below we will tell you how to make lathing for siding with your own hands.
Installation of siding on sheathing
Once the sheathing is ready, you can begin installing the siding.
Attaching siding
You can master this technology by watching a video demonstrating the fastening of siding to the sheathing, and below are only brief installation instructions:
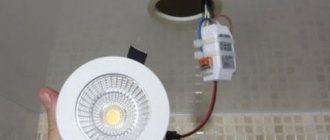
- We attach PVC siding to the sheathing using special self-tapping screws with a wide head.
- To ensure unhindered movement of the siding during thermal expansion, do not tighten the screws all the way, but leave a gap of about 1 mm. For the same reason, we try to attach siding only to special holes for fastening, which have an oval shape.
- A drainage system must be attached to the bottom of the wall - a specially shaped siding strip designed to remove moisture from the foundation.
- On top of the drainage we install a starting strip into which we insert the first siding panel.
- We edge windows, doors and other protruding elements with special corners. We use the same corners to decorate the external and internal corners of the building.
We hope that this instruction describes in sufficient detail how to properly make sheathing for siding. And yet, the main conditions for success will be not only careful study of the recommendations from this article, but also diligence and practice. However, this recipe is valid for any business!
Why is a frame needed for finishing siding?
First of all, we’ll tell you why siding needs sheathing. If you think that siding panels are simply nailed to the facade, then you are mistaken. Although this is still possible, it is extremely rare - if the surface of the facade is completely flawless. And this practically never happens. Therefore, for most buildings, installing sheathing is an integral procedure for several reasons:
- Elimination of wall defects. Almost all façade walls have curvatures and defects that prevent the panels from being laid evenly. The cladding will turn out to be of poor quality, and it will not look its best. Leveling walls with plaster is a long and expensive process, but lathing is done quickly and costs much less for materials.
- Avoiding shrinkage. Wall shrinkage is typical for almost all new buildings. If you install siding panels on the walls just after construction, then over time they will warp due to shrinkage of the walls. The lathing will allow you to avoid such problems, because the panels will be fixed on it, and not on the walls themselves.
- Possibility to insulate the facade. The lathing serves as a basis for laying thermal insulation mats, for example, mineral wool or polystyrene foam boards. As a result, the building will not only be beautiful from the outside, but also warm from the inside. The walls will not become damp and covered with mold.
- The ability to create free air circulation under the cladding. The gap between the sheathing and the thermal insulation allows air to freely penetrate into the sheathing and resist the accumulation of moisture.
- The load on load-bearing walls is distributed evenly. This is very important in order to avoid gradual distortion of the walls and foundation.
Choosing the direction of the sheathing
There are several types of lathing:
- vertical
- horizontal
- with counter-lattice
You can choose the appropriate option from the first two only by deciding on the location of the elements of the finishing material. The counter-lattice is formed, firstly, to ensure normal ventilation of the space under the cladding, and secondly, to position the thermal insulation layer. It is applicable only when wooden sheathing is installed.
For plasterboard sheets, the lathing should be placed vertically, with the same direction for the plasterboard sheets themselves. The rule here is that the sheet must be fastened evenly along its entire length. Otherwise, when using transverse lathing, you will have to fill it too thickly, which will significantly affect the cost of the entire structure.
To mount various types of materials consisting of individual panels or strips, such as PVC panels, lining or wooden slats, aluminum panels, etc., transverse lathing . This means that when the material elements are arranged horizontally, the sheathing is performed vertically and vice versa.
If it is necessary to form a counter-lattice , the outer layer of the lathing is mounted according to the rules already described, and the lower layer, which is directly attached to the base, is positioned perpendicularly.
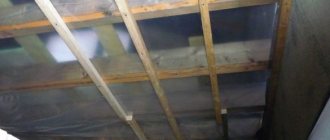
Horizontal (transverse) lathing and counter lathing using the example of a roof. When working indoors, a counter-lattice is rarely required.
Lathing for siding made of timber or metal profiles - pros and cons
The sheathing for siding is a simple frame made of wooden slats or metal profiles located parallel to each other at certain intervals. The sheathing can be made both vertically and horizontally, depending on the method of installation of the siding itself. The siding panels and sheathing battens should be perpendicular to each other. The gaps between adjacent slats are determined in accordance with the weight of the siding panels - the heavier they are, the smaller the gaps.
Typically, thermal insulation mats made of mineral wool or expanded polystyrene boards are laid between the lathing slats.
Important: when making the sheathing, be sure to ensure that the slats located at the corners of the building are vertical/horizontal. This determines how correctly the corner profile will be mounted, and therefore the entire cladding as a whole.
As we have already said, the sheathing is made of wooden slats or metal profiles. Each of these materials has pros and cons. Wood lathing is cheaper and easier to make than metal lathing. Almost anyone can saw a piece of wood and nail it to a wall. However, wood has a number of significant disadvantages.
- Wood quickly becomes damp, especially in the basement of the house.
- To extend the service life of wooden sheathing, the slats should be impregnated with an antiseptic composition, which costs additional money, effort and time.
- Wood requires certain storage conditions: protection from bad weather, moisture, sun, and so on.
- The wood must be thoroughly dried, otherwise it will shrink.
- When choosing slats, you need to check each of them separately so that they do not have defects in the form of knots or cracks.
Metal profiles do not have all these disadvantages. In addition, it has its advantages:
- Resistance to rotting, cracking, shrinkage, and biological effects.
- No curvature.
- Minimum number of defective products.
- Convenient for storage and transportation.
- Easy installation.
However, it should be noted that metal profiles are much more expensive than wooden slats. Nevertheless, the difference in price is also justified by the difference in quality - the metal sheathing will last much longer, all costs will be justified.
Important: in any case, when choosing material for sheathing, you must calculate its quantity in advance. To the number you get when calculating, you should add 10-15% for the reserve.
Principles of sheathing for siding
Both metal and wood sheathing will be a good base for installing siding. But still, experts recommend choosing a metal profile in order to extend the service life of the skin. As we have already noted, wood sheathing has one significant disadvantage - it is not resistant to moisture and, under its influence, gradually begins to rot. It is especially undesirable to use wooden lathing when cladding the base, since it is most susceptible to moisture.
The thickness of the metal profile is desirable in the range of 0.40 - 0.55 mm, and it is also desirable to have additional stiffeners to enhance strength. For wooden blocks, the following two rules must be observed: pre-impregnate them with an antiseptic composition and dry them to a moisture level of no more than 15%.
Installation of sheathing
Preparing the walls of the house for installation of sheathing
Before making sheathing for siding (no matter - wood or metal), you need to prepare the walls of the house itself. Preparation is carried out according to the following algorithm:
- We remove the trim from windows and doors, as well as all elements protruding beyond the plane of the wall.
- We clean the walls of the house from contamination, if possible, remove the remnants of the previous finishing, especially those that are peeling and falling off.
- If the outside of the house is lined with wooden clapboards, check how securely the boards are fastened. If there are loose cladding elements, we fix them with self-tapping screws.
- We treat the walls of the house with an antiseptic. This is done in order to prevent the development of mold fungi under the siding in case of possible moisture penetration under the sheathing.
Option for placing profiles After preparing the walls, you need to mark them. The pitch of the sheathing under the siding depends on what kind of material we plan to use: the denser and heavier the siding panels, the smaller the pitch between the beams or sheathing profiles should be. As a rule, when installing vinyl siding, sheathing is used with a pitch of 40-60 mm.
Note!
If your area has a very high wind load, then the pitch of the sheathing for installing siding should be reduced.
Also at this stage we determine the direction of the sheathing: if the siding is attached horizontally, then the sheathing will be installed vertically under the siding, and vice versa.
Vertical lathing Lathing for basement siding can also be either vertical (maximum step - 90 cm) or horizontal (step up to 45 cm). An exception is Dolomite basement siding - its panels can be mounted exclusively on vertical sheathing.
Installation of metal sheathing
The metal sheathing for fastening with siding is made from a U-shaped profile. The most commonly used profile is a section of 27x60 mm and a length of 3 m.
Note!
Profiles with a section of 50x50 or 40x40 are not suitable for lathing - they do not have a curved edge and therefore do not have the necessary rigidity.
The profile is fixed to the base using hangers - perforated plates made of galvanized steel (pictured). Sometimes, instead of suspensions, special brackets are used - they are much more durable.
Suspension for the profile
The lathing from the profile under the siding is mounted according to the following scheme:
- We begin installing the profiles from both edges of the wall - they will serve as guides for leveling the plane.
- Using a hammer drill, we drill holes according to the markings on the wall. We insert plastic dowels into these holes, after which we fix the brackets for the profile, or metal hangers.
Installation diagram
Advice!
Experts recommend placing a paronite gasket or a fragment of a similar material between the base of the bracket and the wall. Such a gasket will create a “thermal break” and prevent the formation of a cold bridge.
- If you plan to insulate the facade, then before installing the main profiles it is necessary to install slabs of heat-insulating material. To do this, we cut holes in the slabs opposite the brackets and put the slabs on the fixed brackets.
- Using the same technology, a windproof membrane is placed under the sheathing.
- We attach profiles for the sheathing to the outer brackets. We stretch a cord between them - we will use it to align the remaining profiles.
- We continue to install the frame elements. To add rigidity, we connect the main profiles of the sheathing with perpendicular jumpers from scraps of the same profile.
- To attach the vertical sheathing, you may need a 28x27 mm profile. We will use it as a starting profile into which we will insert the ends of the main profile.
Metal sheathing The installation of sheathing for siding must be completed by checking the resulting plane. For control, you can use a water or laser level.
Installation of timber sheathing
As we noted above, wooden sheathing for siding is somewhat cheaper: almost anyone can do it with their own hands, so you will also save on labor costs for craftsmen. The wood for sheathing must be thoroughly dried and treated with an antiseptic. In addition, it is better to choose even beams, since even a slight curvature of the tree complicates the work and makes it difficult to align the sheathing .
Assembling the wooden sheathing
We install the sheathing under the siding as follows:
- We cut the beams for the sheathing in advance, so that the length of the beam matches the dimensions of the wall. If the length of one beam is not enough, you will have to join it, which is undesirable.
- We begin fastening the beams in the same way as when installing metal sheathing - by installing brackets. We apply the sheathing beams to the brackets, align them on a plane and fix them with self-tapping screws.
- If insulation of the space under the siding is not planned, then it is possible to attach the sheathing directly to the wall. When fastening in this way, the bars are drilled through with a hammer drill, and then attached directly to the wall through these holes. To level the sheathing, we use wooden or plastic mounting wedges.
Material selection
The first step is to decide on the material for the sheathing. If you choose a wooden beam, it should have a cross-section of 4x4 cm or 5x5 cm. You can use a thinner beam, but then it will not be as strong and reliable as necessary, and may not withstand the weight of the siding panels. To choose good quality wood, pay attention to the following factors:
- Humidity indicators. The beams under the sheathing must be thoroughly dried, otherwise during operation it will begin to shrink, and this will negatively affect the entire structure.
- Parameter matching. For the sheathing, you need to use timber of the length and cross-section indicated in the documentation.
- No defects. For the manufacture of lathing, only smooth bars are suitable, without knots, cracks, traces of biological influence and other defects.
Important: for lathing it is better to use wood that absorbs less moisture and, accordingly, lasts longer. For example, larch wood.
Required Tools
Here we list a set of tools that you will need when making wood sheathing.
- Construction plumb line and twine rope. They are necessary in order to insert an indentation from the facade in a strictly vertical position during the preparation of the walls - without slanting to the side.
- Nylon rope. It is necessary to set marks for aligning the sheathing parts strictly vertically and horizontally.
- Level. It will be needed in order to control the even position of the sheathing in the horizontal and vertical directions.
- Pencil/marker. With their help, you will apply marks on facade walls, sheathing bars and thermal insulation material.
- Yardstick. Necessary for determining intervals and parameters.
- Carpenter's table. Necessary for working with wooden elements.
- Jigsaw. With its help, solid bars are sawn into separate parts of the required size.
- Hammer. Will be needed for drilling holes in the load-bearing walls of a building.
- Hammer. Use it to drive nails and dowels.
- Screwdriver. Used to drive self-tapping screws to connect wooden slats to brackets.
- Gloves. Necessary to protect hands from damage.
Important: when working with wooden slats, a jigsaw can be replaced with a circular saw by choosing a disk with suitable teeth.
The choice of professionals - metal profile lathing
Despite the fact that professionals sometimes use a wooden frame, metal sheathing for siding is more in demand, as it has higher strength and performance characteristics. Its installation is in many ways similar to the installation of a wooden frame, but there are also significant differences.
What tool will you need?
To carry out work on arranging a metal frame, you will need almost the same tools as when working with wood: a pencil or marker, a level and a rope, a tape measure, a drill, a screwdriver, a hammer.
But in order to cut out the necessary parts from the profile, you will need a jigsaw or a hacksaw for metal.
Which profile is used?
When constructing a frame from a metal profile, two main types of profile will be required:
- UD profile, which will be attached around the perimeter of the structure, and will also frame window and door openings.
- CD profile on which the siding will be directly attached. These elements are inserted directly into the UD profile and provide rigidity to the structure.
The sheathing for metal profile siding is attached to the surface using ES brackets. This is quite convenient and allows you to compensate for unevenness.
Calculation of materials and components
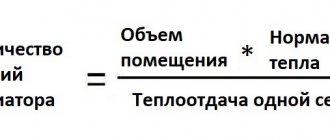
To determine how much material and components are required for metal profile lathing, you will need to make preliminary calculations.
First of all, you need to calculate the working area. Subtract the area of window and door openings from the total amount.
Next, depending on the size of the metal profile and the step of its fastening, it will be possible to determine the required amount of material.
Scheme
It is also important to determine the number of fasteners required. Here, brackets or special canopies can be used as the main elements. You will also need dowel nails and screws. It is better to purchase them with a reserve.
Marking the wall, installing hangers
Surface marking is carried out using a level and plumb line. If insulation is installed, the distance from the wall should be greater.
After marking, you will need to install fasteners - hangers. This must be done at a distance of 10 cm from the corner of the structure. The optimal lathing pitch is considered to be 40 cm.
This must be taken into account when installing support elements. If the building is made of timber, then the hangers are fixed with self-tapping screws. If the base of the structure is concrete or brick, then you should use dowel-nails.
Installation of the guide profile
After fixing the suspensions, it is necessary to install guides that can be used to guide during further work.
Installation of guides
To ensure that the sheathing of a house made of metal profiles for siding is of high quality and level, after attaching each element, it is necessary to check its position with a level. Installation of the guide profile should begin around the perimeter. Based on these planks, all subsequent ones are attached. Next you will need to frame all openings with a profile.
How to properly install a frame at the corners of a house
To properly distribute the load, you should pay special attention to the corner elements. Leaving a gap of 10 cm from the corner will ensure a tight fit to the vertical profile.
Corner elements
Corner parts should be installed with a distance of 6 mm from the cornice, as well as from the starting strip.
Installation of the stand profile and its alignment
The stand-up CD profile is fixed into the UD profile. How much is needed depends on the height of the building. It is intended to be used for every 60 cm of surface. It is on this that the starting bar is then fixed.
How to make sheathing for siding around windows and doors
Installing additional horizontal elements around the openings is not necessary, but experts recommend doing this, as this process will help improve the degree of rigidity of the structure.
The profile should be fastened along the entire perimeter of the opening, ensuring neat and strong fixation at the corner joints.
Installation of timber sheathing
After you have completely prepared the materials and tools, you can proceed directly to the installation of the sheathing. It is done as follows:
- All elements that will interfere with the installation of slats are removed from the facade: sills, shutters, parts of the drain, air conditioning unit, and so on.
- Old finishing material is removed from the walls: plaster, paint and other types of finishing that may interfere with the normal installation of the sheathing. To get the job done faster, use a screwdriver and a hammer to pry up layers of old coating and knock it down.
- Using a plumb line, a level and a nylon thread, mark the distance from the facade where the sheathing will be located. Using the marks you have made, place small bars or brackets to secure the sheathing.
Important: all wooden elements must be impregnated with antiseptics and fire retardants.
- Place marks on the facade and drill holes in these places to secure the slats.
- Drive plastic dowels into the holes using a hammer.
- Attach a block with screws already placed in it to the mark on the wall and screw them in using a screwdriver. After this, take a level and see if the beam is level.
- At a distance of 0.50 m from the installed block, place the next one in the same way.
- In the same way, install support bars along the entire façade wall.
- Apply a deep penetration primer to the façade.
- Prepare thermal insulation material for installation on the facade. Cut holes in the material in those places where they will coincide with the support bars. Polystyrene foam boards or mineral wool are usually used as a heat insulator. The second option is preferable for high humidity walls.
- Lubricate the inside of the heat insulator with glue and lean it against the facade. The support bars must fit clearly into the pre-drilled holes. As for applying glue to polystyrene foam boards, it is applied around the perimeter and several additional dots are placed in the center.
- Check with a level whether the insulator is installed correctly.
- Insulate the entire facade of the building in the same way.
- Fill the joints that form between individual insulation boards with polyurethane foam and, after it hardens, cut off the excess.
- To improve the strength of the structure, secure the thermal insulation boards with disc dowels.
Important: if you choose mineral wool as insulation, after fixing it on the facade, cover it on top with a windproof membrane.
- Take a measuring tape and a plumb line to determine the distance between the sheathing and the insulation boards. Based on these data, install the slats vertically on the left and right along the edges of one wall. Stretch nylon threads horizontally between them - you will use them as a guide when installing other parts of the sheathing.
- Attach the next strip to the façade in a vertical position. Place scraps of rectangular or square wood between the support block and the sheathing piece. This is necessary so that a gap for ventilation is formed between the thermal insulation layer and the siding.
- Using the method described above, secure all vertical slats to the façade.
- Measure the areas at the top and bottom of the window and door openings where the flashings will be installed, and install the horizontal battens there.
At this point, the installation of the sheathing is considered complete. Now you can proceed directly to installing the siding.
Frame for siding
The frame can be assembled either from wooden blocks or from a metal profile, which is used to install plasterboard sheets. Today, some siding manufacturers offer ready-made frame elements that are sold complete with cladding.
The question of which frame is better: wooden or metal is asked by many novice home craftsmen.
- Lumber is cheaper, but for lathing facade finishing, bars of at least 1st grade are required. That is, dry, without a large number of defects: delamination, cracks, bluish spots, wormholes and eyes. They must be treated with an antiseptic and fire retardant. But keep in mind that under the influence of high humidity and then drying, the bars may warp, which will affect the quality of the finishing of the wall of the house.
- In this regard, metal elements are better. They do not change their size under the influence of changes in temperature and humidity. They do not need to be treated with anything, but they are more expensive.
Installation of sheathing
Before installing the sheathing to the wall, you need to prepare it.
- Facade elements are dismantled: drainage system, window and door frames, drains, etc.
- If there are defects on the wall, then they must be repaired with a repair mortar, for example, cement-sand with a ratio of 1:2. You can use ready-made facade putty or plaster.
- Since siding is primarily installed horizontally, this means that the sheathing elements must be installed vertically. Therefore, first markings are made on the wall, where vertical lines are drawn every half meter. In the corners, regardless of the specified pitch, lines are drawn without fail.
- Along the marked lines, straight hangers are installed every 50-60 cm, which are attached to the wall with self-tapping screws on plastic dowels. That is, they drill holes in the wall, drive dowels in with a hammer, attach a hanger, which is tightened with a self-tapping screw. There are at least two fasteners for each suspension.
- Direct hangers must be installed along the perimeter of window and door openings. Here the installation step is from 30 to 50 cm.
- If the facade of the house is planned to be insulated, then this must be done right now.
Wall insulation
For a facade that is covered with siding, it is best to use slab thermal insulation material. This is mineral wool or polystyrene foam. The main thing is to accurately select the insulation thickness. For central Russia, a thermal insulation layer thickness of 50-60 mm is suitable. Mineral wool and polystyrene foam boards are sold at this thickness.
If a house is insulated and covered with siding in the northern region, then the thermal insulation layer must be at least 100 mm. And here there is a difficulty, because the antennae of direct suspensions have a mounting length of 80 mm. That is, the insulation is thicker. In this case, proceed as follows:
- wooden blocks with a cross section of 50x50 mm are installed vertically on the walls along the marked lines, which are not aligned vertically;
- and then direct hangers are installed on them and attached to them with wood screws.
There is a simpler and better option - a short block of the same cross-section is installed under each suspension, which is pre-attached to the wall. And already there is a suspension for it. This is how the distance from the cladding to the wall surface increases, where an insulating layer with a thickness of even 130 mm will fit.
As for the installation of insulation, through cuts are made in each slab with a knife so that the antennae of the hangers can squeeze through them
Therefore, it is very important to accurately determine the locations of the cuts.
The slabs themselves must be laid tightly to each other so that gaps do not form between them. If any cracks still remain, they must be filled with foam sealant. This is foam in a can, but not mounting foam. It does not expand in volume in air.
Continuation of frame assembly
A profile is mounted in one corner of the facade. It is leveled vertically using a level and attached to the suspension antennae with special self-tapping screws, which craftsmen call bugs or seeds. Now four or five strong threads are tied to the profile, which are pulled to the opposite corner of the house. Here, each thread is aligned horizontally, having previously been attached to a self-tapping screw screwed into the wall. That is, the threads should form a plane that is even both vertically and horizontally.
First, a corner profile is installed along them, attaching it to the hangers, then the rest are intermediate. Be sure to install profiles around the perimeter of window and door openings.