Materials and tools for installation work
To cover a roof with metal tiles you must have:
- hammer;
- screwdriver;
- roulette;
- hacksaws for metal with small teeth;
- marker;
- hand scissors for metal;
- long slats;
- electric jigsaw;
- circular saw with carbide teeth;
- electric nibblers.
Note! You should absolutely not use a grinder to cut metal tiles. Under the influence of its abrasive wheels heated to a high temperature, the zinc is burned out and the polymer coating is damaged, which within 2 years will become covered with rust in the cut areas. When cutting material, it is prohibited to use not only a grinder, but also any other tools that can heat nearby areas of the metal.
Sawdust remaining on the surface of the metal tile can also cause damage, so they should be removed upon completion of the work.
When installing sheets, you must use only galvanized self-tapping screws that have a rubber gasket. They are screwed in using a screwdriver or electric drill with a speed controller and reverse.
Scratches on the surface of metal tiles should be treated with paint of a similar color.
What you should know about working with metal tiles
When talking about how to cover a roof with metal tiles, first of all it’s worth talking about the necessary tools. You will need:
- Hammer;
- Screwdriver;
- Marker;
- Roulette;
- Rake-rule;
- Metal scissors.
When planning roof construction, do not forget:
- The roof slope angle must be at least 14 degrees;
- You should not cut metal tiles with a grinder, because... high temperatures contribute to the destruction of the protective layer. You also need to know how to cut metal tiles correctly so as not to damage it;
- If you plan to cover a roof with a complex shape, purchase material in large quantities, because... when cutting, there will be a lot of unnecessary trimmings;
- Purchase reliable paint, which must be used to carefully paint the cut areas of the metal tiles in order to protect them from corrosion;
- A roof with metal tiles needs additional sound insulation;
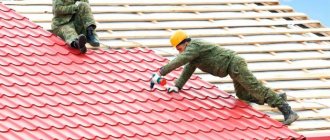
- When laying metal tiles, walk on them in soft shoes, trying to step on the concave part of the wave.
Preparatory work
To avoid inconsistencies, after installing the rafters, it is necessary to measure the roof slopes. Having checked the diagonals, you can begin to check the squareness and plane of the roof. Existing minor defects can be eliminated through additional elements at the ends.
Note! The roof slope when laying metal tiles must be greater than 14°.
The length of the sheets is calculated depending on the length of the slopes - the gap between the cornice and the ridge. To the resulting size you need to add 4 cm for overhanging sheets from the eaves. If the length of the slope is more than 7 m, the metal tiles must be divided into several parts.
The sheets should be laid overlapping one another by 15 cm. When performing installation work, laying long pieces will help reduce the number of joints, but it must be taken into account that this will significantly complicate the work process.
According to GOST, metal tiles must be stored in rooms without heating, in which the material is reliably protected from the negative effects of precipitation and direct rays of the sun. Factory-wrapped profiles should be placed on straight platforms using 20 cm thick beams every 50 cm as supports.
Attention! If the storage period for metal tiles is more than a month, then it is better to unpack them and put them in stacks up to 70 cm high, into which the sheets are placed with slats laid between them.
The optimal angle of inclination of a hip roof made of metal tiles
For a standard four-slope scheme, all four slopes are located either at the same angle of inclination, or the hip triangular slopes are inclined more than the two main planes. From the point of view of the strength of the rafter frame, an angle of 35° ensures minimal load on the hipped system and at the same time guarantees good drainage of water from the roof surface.
Important! The situation is different with Danish hip roofs. The two trapezoidal hips are always at an angle of 1/3 of the rise of the main slopes.
In this case, the small hips must be raised to an angle of 15°, otherwise water will flow in at the joints. Accordingly, the main pitched surfaces have to be positioned at an angle of 40-45o.
Vapor barrier, thermal insulation and ventilation
Some shortcomings when covering the roof with sheets of metal tiles can lead to more serious consequences, so in order to avoid them it is necessary to take into account several characteristic features of the material:
- due to daily temperature changes, condensation may form on the inside of the sheets;
- An increase in the level of moisture inside a building covered with metal tiles manifests itself in the presence of vapors rising from the bottom of the structure.
These reasons lead to the thermal insulation material getting wet and reducing its technical parameters. The roof becomes predisposed to freezing, ice can freeze on the surface of the covering, the rafter system and wood sheathing begins to rot and mold appears, which causes the possibility of damage to the interior decoration of the house.
To avoid the above negative consequences, you must:
- lay a large layer of insulation;
- protect thermal insulation material from condensation using a membrane or waterproofing film;
- use a vapor barrier that can protect the insulation from moisture that rises from the room below;
- device for natural ventilation of the under-roof space.
Rolled waterproofing must be laid along the rafters on the heat insulator between the cornice and the ridge on a horizontal plane with an overlap of 15 cm. When performing this process, you need to pay attention to the indicator color strip, which should be turned outward.
The film should be laid with a sag of 2 cm to ensure a 2 cm gap to the thermal insulation material. If these conditions are not met, it may lose its protective qualities.
The vapor barrier layer consists of overlapping insulation. To ensure tightness, parts of the material are joined together using adhesive tape.
Natural ventilation is achieved thanks to a special gap 4 cm high, which can separate the metal tiles from the waterproofing layer. It is performed using lathing under the roofing material, allowing air to penetrate between the ridge and the eaves.
When making hems for metal tile overhangs, gaps of no more than 5 cm are calculated. Special holes are designed to be removed in the sealing material for the ridges.
Construction of a pitched roof
Organize the required slope of the pitched roof due to the difference in heights of the opposite walls. One wall of the building turns out to be significantly higher than the other. This leads to increased consumption of materials for the walls, but the rafter system is very simple, especially for buildings of small width.
Shed roof
If the load-bearing capacity of the walls is sufficient, the truss system of a pitched roof rests on a mauerlat attached to the wall. To make the load distribution more uniform, the top row of the wall masonry is reinforced with longitudinal reinforcement (for brick walls, concrete blocks) or an armored belt is poured over the last row (for walls made of lightweight concrete, limestone, shell rock). In the case of a wooden or frame structure, the role of the Mauerlat is usually performed by the last crown or top trim.
If the building material of the walls is insufficiently strong, most of the load can be transferred to the ceiling. To do this, install racks (steps of about 1 meter), on which purlins are laid - long bars running along the building. The rafter legs then rest on them.
How to transfer the load from the walls to the floor
When pouring an armored belt or laying the last row, studs are installed into it in increments of 80-100 cm, with the help of which the mauerlat is then attached to the walls of the building. In wooden houses, if you do not make an armored belt, it is impossible to install studs. In this case, installation on pins with a hexagonal head is allowed. Under the pin, through the Mauerlat, a hole is drilled, a couple of millimeters smaller than the diameter of the pin. A metal rod is driven into it, which attracts the wooden beam to the wall. The connection is tightened using a hex wrench of the required size.
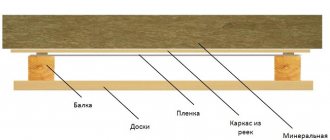
Frame and other roofing elements
The roof sheathing for metal tiles is made using bars with a cut of 5x5 cm and boards with a size of 3.2x10 cm. First of all, falling bars of 50x50 mm are fixed to the rafter system from the ridge to the eaves using a waterproofing film.
The boards are attached while maintaining the exact distance:
- from the beginning of the first to the center of the second - 30 cm;
- between the middle sections of the boards that are located next to each other - 35 cm.
Important! If the distance between the rafters exceeds 1 m, then it is necessary to use boards with a greater thickness.
When performing lathing, you need to pay attention to the pitch of the metal tiles. In some areas the frame must be continuous. This applies to the space that is located near window frames in the attic, chimneys and valleys. To construct a continuous sheathing, 2 additional boards are nailed to the sides of the ridge trim.
The end strips also need to be made higher than the ordinary frame to a height that corresponds to the size of the metal tile profile. The lower valleys are fixed at the internal joints on a continuous frame using self-tapping screws. At the junction of the platbands, the process is carried out with an overlap of 10 to 15 cm, depending on the slope of the roof.
Next, the coating of pre-cut metal tile sheets is carried out. The top strip of the valley is laid at the top.
The junction points must be done especially carefully, since they are among the most vulnerable areas on the roof. When performing installation work, it is necessary to monitor the tightness of the junction of the sheets to the walls and areas where the outlet of the chimney pipes is located. To accomplish this task, an internal apron is provided on the roof slope, made from the lower abutment strips:
- The strip is attached to the pipe walls.
- The top edge is marked on the wall.
- Using a grinder, a groove is punched along the drawn line.
- The groove is cleaned of dust and washed.
- The lower junction strip is cut in place.
- When using self-tapping screws, it is fixed.
The apron is attached to other walls in the same sequence. When performing this work, it is necessary to overlap one edge over the other by 15 cm to avoid possible leaks.
It is necessary to seal the side of the strip installed in the groove. To direct water to the required place where the cornice is located or into the valley, you should install a tie under the lower edge of the inner apron, which has the shape of a flat sheet with curved sides. You can straighten the edge using a hammer and pliers.
At the next stage, the metal tiles are laid along the internal apron and tie. Having reached the location of the chimney during installation work, it is necessary to make from adjacent top pickets and fix the outer apron. Its installation is carried out by analogy with the internal one, but there is one difference, which is that the upper edge is attached to the wall, and is not inserted into the groove.
When installing gutters for drainpipes, their holders should be fixed on the last board at the bottom of the frame so that the side of the gutter is 25-30 mm below the end of the roofing sheet. By installing it this way, it will be possible to reduce the load on them when snow comes off the roof in layers.
At the next stage, each gutter is installed and fixed in the holders, and a strip for the roof eaves is attached to the frame, taking into account that its lower border should overlap the edge of the drain.
The edge of the waterproofing membrane is retracted from above the cornice film layer, allowing condensation to drain from the membrane into the drainage system.
Thorough preparation is the key to the success of any enterprise
It is no secret that the price of such a roof is far from childish; on average, the cost of 1 m² of coverage starts from 1000 rubles, of which almost half goes to pay for the work of the craftsmen. Here you can’t help but think, is the instruction so complicated that you pay so much?
The installation technologies for slate and metal tiles are somewhat similar. But installing newfangled tiles has a lot of small nuances, each of which needs to be given attention.
Schemes of insulated and cold roofing.
Before covering the roof with metal tiles with your own hands, you must first select these same tiles. Then calculate how much material you need to buy. And be sure to prepare the tool, because you won’t be able to get by with just a hacksaw and a hammer.
Briefly about the choice of material
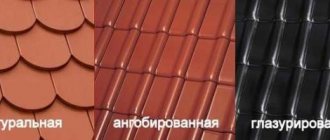
If the “grandfather” slate is the same almost everywhere, then the tiles differ in configuration and, more importantly, in the quality of the polymer coating. The durability of your roof and, of course, its cost depend on it.
The vast majority of manufacturers of this product use galvanized cold-rolled steel sheet with a thickness of 0.45 - 0.50 mm as a basis. In fact, this is the same corrugated sheet, only bent differently and with a wider range of finishing protective coatings.
Roofing accessories.
| The most common types of polymer coatings for metal tiles | |
| Type of coverage | General characteristics of the coating |
| Polyester with glossy surface | In some sources, this glossy coating is also called polyester. Polyester has the most reasonable price, holds ultraviolet light well, but its thickness is only 25 - 30 microns. Therefore, the mechanical strength of the coating leaves much to be desired. Even a thick layer of snow can damage polyester, not to mention a fallen branch. |
| Polyester with matte finish | Here the layer thickness already starts from 35 microns, and accordingly the strength of matte polyester is an order of magnitude higher. The only drawback is that the color range of the material is quite poor. |
| Pural | Durable and quite beautiful material with a thickness of 50 microns. The main component of the coating is polyurethane with the addition of polyamide, which provides unique resistance to sudden temperature changes. |
| Plastisol | Plastisol is deservedly considered a classic of the genre. The coating thickness reaches 200 microns. The basis of plastisol is polyvinyl chloride; on the one hand, PVC provides high mechanical strength, and on the other hand, plastisol can change color, in other words, fade, from sunlight. Plus, due to the presence of polyvinyl chloride in the composition, some countries banned plastisol, although these bans did not affect us. |
| Polydifluorite | The latest in fashion, a modern coating with a wide range of colors and unique characteristics of resistance to anything that may threaten your roof. The coating consists of 80% polyvinyl fluoride and 20% acrylic resins. Everything about this product is good, but the price is astronomical. |
There are now many configuration options and each manufacturer praises its own version. As far as I have compared, the strength of the sheet depends on the depth of the wave; it often ranges from 22 to 78 mm.
Types of metal tiles.
It is believed that the deeper the wave, the more stable the roof will be. But on the other hand, if the wave is too high, the depressions experience greater load and the protective layer there wears out more quickly. As a result, I came to the conclusion that the optimal wave depth should be approximately 40 - 50 mm.
The width of the sheet is limited by the capabilities of the equipment, that is, the size of the drums with impressions on the conveyor; it usually fluctuates around 1 m and often these parameters cannot be influenced.
But the length can reach 8m. If previously these were mostly strictly fixed sizes, now more advanced manufacturers are introducing the service of making sheets to order according to your length, and in some cases they can even make a pattern of material according to the shape of your roof.
Color range of sheets.
If you decide to cover the roof with metal tiles with your own hands, then it is better not to take on complex multi-level structures, especially those that have semicircular arches and various kinds of broken transitions. The maximum that an amateur without experience can do is a standard gable roof with an attic window, although nothing is impossible for a creative person with hands and a head.
Material calculation
Of course, everyone has individual roof dimensions, so as an example, I will take the average version of calculating a simple gable roof with the size of each slope being 8 m wide (distance along the edge of the slope) and 4.5 m long (distance from the edge of the slope to the ridge):
- We measure the length along the rafters, that is, from the ridge to the edge of the rafter leg, after which we add 50 - 70 mm to this value (different models of tiles come with different overhangs, so read the accompanying documentation);
- To find out the number of rows, you need to divide the width of the slope by the useful width of the sheet; the width of the slope is measured along the ridge. There is a useful sheet width and a total sheet width, these data are also indicated in the documents. If the length of the ridge is 8 m, and the useful width of the sheet, for example, is 1.1 m, then in the end we get 7.27 rows (8: 1.1 = 7.27). Logically, you need to round up, so you will have to lay 8 rows;
- Of course, it is better to order a single sheet along the length of the slope, because the fewer joints, the stronger the roof, and it is easier to attach it. But transporting long sheets is much more expensive, so 2.95 m is considered the most popular size. According to the conditions of our problem, the length of the rafter leg is 4.5 m, to it we add the sheet overhang of 0.07 m, plus the overlap at the junction of the sheets of 0.15 m and we get 4.72 m (4.5 + 0.07 + 0.15 = 4.72 ). It turns out that one sheet on the slope will be solid (2.95 m), and the second will have to be trimmed;
- Based on these calculations, we have 16 sheets per slope (8x2=16). And since our roof is gable, we need a total of 32 sheets of metal tiles with a useful width of 1.1 m and a length of 2.95 m.
Plan of a complex roof.
If the roof has asymmetrical slopes or there are more than 2 slopes, then calculations must be performed separately for each slope and then added up.
Tool
Below I will provide a recommended list of tools that are used for professional installation of metal roofing:
Roofing installation tool.
- Electric cutting shears;
- Drill attachment for cutting metal;
- Manual metal cutting shears;
- Standard lever shears for metal, can be right, left or straight;
- To install the fittings, you will need corrugated pliers;
- Construction gun for sealant;
- Device for even bending of metal strips “Strip bender”;
- If installation with rivets is planned, then rivet pliers are needed;
- Construction stapler;
- Assembly knife;
- Adjustable template for mounting load-bearing sheathing;
- Roulette;
- Cord for beating the level;
- Screwdriver with attachments for different types of screws;
- If insulation is planned, you will also need a knife for cutting thermal insulation.
The use of a grinder for cutting sheets is strictly prohibited. It not only produces a jagged cut, but also “sears” the edges of the polymer coating. As a result, the metal in the cut areas very soon begins to rust.
Tool for cutting sheets.
Covering the roof with metal tiles
During laying, the first sheet is aligned with the end of the roof. Next, it is fixed near the ridge using self-tapping screws. The offset reaches 4 cm relative to the cornice.
The installation of the second sheet when laying from left to right is placed under the previous one, and when covering from the right side to the left it is overlapped. The metal tiles are fixed with self-tapping screws, which are located on top of the overlap, since they should not be screwed to the roof frame. In this case, the sheets are able to rotate relative to the axis of the screw that was screwed in earlier on the first sheet at the roof ridge. The third sheet is attached in a similar way. Next, the three of them, being connected to each other, are aligned parallel to the cornice.
If the joining of sheets is carried out along the length, then the sequence of installation work is subject to changes: sheets 1 to 4 are combined, after which they are aligned along the end of the roof.
At the bottom, the metal tile is fixed into the base of the wave with self-tapping screws, taking into account the fact that the 1st wave is passed through. It should also be remembered that when performing installation, it is necessary to take into account the length of the wave pitch of the sheet of roofing material.
The next step is screwing in the screws. They rotate in a checkerboard pattern after 1 wave. To fasten the side overlap, you need to screw the screws into the crest of the wave.
Note! For 1 sq. m, 6-8 pieces of fastening elements are consumed.
Practical tips: how to lay metal tiles on the roof
The sheets are lifted onto the roof one at a time; special screws with rubber gaskets are used for fixation.
The first sheet is aligned with the end of the roof
The color of the screw heads must match the color of the metal tiles; hardware is purchased at the same time as the roofing. Length approximately ≈30 mm, Ø 4.8 mm. Self-tapping screws are screwed in in a checkerboard pattern in an amount of at least 8 pcs/m2.
The sheets are secured with self-tapping screws at the top of the overlap
The edges of the sheets are aligned with the cornice strip
Self-tapping screws are screwed through one wave in a checkerboard pattern
The overhang over the eaves is approximately 50 mm; the installation order is determined by the placement of the drainage grooves. Places of cutting and mechanical damage to the surface of the sheets are painted over with paint to match the front surface.
Sheet trimming
Installation of the ridge element
The ridge element performs several functions:
- decorative _ Improves the appearance of the roof, giving it a finished look;
- technical. Prevents moisture and snow from entering the attic, protects the wooden structures of the roofing system from getting wet and rotting. Another technical function is to ensure optimal natural ventilation.
The ridge element can be semicircular or flat. The first is more complex, but has improved technical characteristics. The ridge elements are fixed to the crests of the waves of metal tiles, with an overlap of approximately 10 cm. To protect the under-roof space from birds and insects, the cracks are closed with seals; they do not interfere with the movement of air flows.
Seals are used to prevent leaks
Prices for different types of roofing ridges
Roofing ridge
Installation of curtain rod
This is not only a decorative, but also a functional element of the roof. Protects the sheathing and rafters from getting wet, provides ventilation of the under-roof space, and improves the appearance of the roof. Lay with an overlap of 10 cm, fixed with self-tapping screws in increments of 25–30 cm.
The bottom edge of the eaves strip should overlap the edge of the gutter
Installation of the valley
A complex roof element, the sheathing in these places must be continuous. According to existing technology, two valleys are installed on the roof: internal and external. The internal one is laid under metal tiles on a continuous sheathing. Receives wastewater from roof slopes and directs it to the drainage system. The external valley is used only for decorative purposes and is fixed to the roofing sheets.
Scheme of fastening the lower valley in the abutment area
Sheets of metal tiles are laid on the lower valley strip and the upper valley strip is attached
Attaching the end strip
The end strip prevents sheets from being torn off by strong winds, covers uneven metal cuts and protects wind boards from getting wet. The direction of fastening is from bottom to top, the pitch between screws is 50–60 cm. The horizontal plane of the wind strip is screwed to the waves of the metal tile.
The end strips are attached at intervals of 500-600 mm
Self-tapping screws for fastening the cornice strip
Overlap between planks
Installation of snow guards
There are several types of them, the installation technology for each is different. The most durable structures are those whose thrust elements are attached to the sheathing. If self-tapping screws are screwed only into the waves of metal tiles, then such snow retainers are more decorative than functional. Professional roofers strongly do not recommend installing them; there is almost no practical benefit, but there are risks of very unpleasant damage to the roof. Snow retainers in the form of slats can hold small volumes of snow; its fall will not damage the drainage system. A large amount of snow will tear the snow guards out of their mounting points. The result is severe damage to metal roofing sheets.
Attaching the snow guard support
Distance from snow guard to cornice
Snow retention system on the roof of a private house
Prices for snow guards
Snow guard
Installation of other metal roofing elements
The ends of the roof are sheathed using end strips. They are arranged with an overlap of 5 cm, and if necessary they are trimmed. They are fixed with self-tapping screws. When fastening, fasteners with a length of 2.8 cm are used on the sides, and 8 cm long on the top. Self-tapping screws must be tightened at a distance of 500-600 mm.
Having freed the ventilation hole, the shaped seal is placed on the ridge. On it, through the wave of metal tiles, a round or flat ridge strip is installed with a 10 cm overlap, which is fixed with self-tapping screws 80 mm long.
For further movement along the laid roofing material, a vertical type fencing grille is installed on the roof at the eaves level. To secure its support, galvanized screws M8x60 are used, which are screwed through the covering sheet and the lining in the areas where the waves sag into the supporting beam.
Next, the support is adjusted depending on the slope of the metal sheets, it is fixed and the roof railing is hung on it.
The sections should be fastened to the support with M8x55 and M10x35 bolts, having previously made 11 mm holes in the top crossbar.
Important! Upon completion of installation work, areas adjacent to the roof must be well sealed.
For easy access to antennas or pipes on the roof, transition bridges are installed.
They are attached in a similar way to what is used when fixing the roof railing.
Roof installation in 10 steps
In general, there are 2 types of roofing, insulated and cold. They differ only in the presence or absence of insulation . And since it is a little more difficult to install an insulated roof, we will consider this option.
Step No. 1: installation of waterproofing
- Waterproofing begins to be installed from the so-called valleys, if any (“valleys” are the internal connection of two adjacent roof slopes). The waterproofing roll is rolled out from top to bottom over the entire length of the valley, naturally overlapping both adjacent roof slopes;
- After this, the waterproofing membrane tape is rolled out horizontally across the entire roof. You need to move from the edge of the roof to the ridge, again with an overlap;
We roll out the waterproofing membrane on the roof.
- Between the rafters, the waterproofing should sag slightly, 10 - 20 mm, no more. And the overlaps between the tapes of the waterproofing membrane are glued with a special adhesive tape;
- The canvas is fixed from above to the rafters with a wooden block 50x50 mm. I do not recommend using thinner planks, because you are covering the roof for more than one day and the thicker the sheathing strips, the more reliable your structure will be. But keep in mind that 50 mm is the maximum, the planks should not be wider than the rafters themselves;
Fixing the waterproofing membrane on the rafters with a 50x50 mm block.
Step No. 2: installation of the sheathing
Do not forget that all wooden structural elements must be treated with a complex protective composition. There is no point in making such compositions yourself now, because the price of factory-made impregnations is quite reasonable, and their quality, compared to homemade products, is disproportionately higher.
- Installation of sheathing under the roof begins with nailing two identical 50x100 mm bars horizontally along the edge of the rafters. The bars overlap each other. Please note that the edge of the roof is formed from exactly 2 bars; if you take 1 bar 100x100 mm, then there is a chance that it will suffer from changes in humidity and temperature;
Scheme of installation of sheathing under the roof.
- Next, the waterproofing will need to be placed on top of the boards; in other words, the knocked down bars will need to be wrapped in waterproofing cloth, as shown in the diagram. There is no need to fasten the canvas yet, we will fix it later;
- On top of the 50x50 mm block we filled, a lathing from a 32x100 mm board is laid horizontally, the lathing pitch is selected according to the wavelength of the metal tile model you have chosen;
Installation of horizontal lathing.
- Here it is very important to accurately maintain the pitch of the sheathing, so each plank is filled according to a template. Professionals use an adjustable template; amateurs, in order not to spend money on a tool, simply take a bar and drive 2 nails into it at the required distance;
Control of sheathing pitch.
- On the ridge, 2 sheathing strips are placed end-to-end on each slope, so the ridge is covered on both sides with 200 mm strips.
Roofing pie diagram.
Step No. 3: arrangement of the valley
- If your roof has a valley, but the arrangement of the roof begins precisely from this sector. There is a lower and an upper valley. The lower slats are considered working; water flows down this gutter;
- The installation of the valley planks is carried out from the bottom up with an overlap of about 100 mm. The metal is attached to the sheathing along the edge with self-tapping screws, and the overlaps between adjacent sheets are coated with sealant;
Fastening the bottom valley strip.
- The metal strips of the upper valley are mounted after the roof has been installed and are fastened with self-tapping screws into the upper wave of the roofing sheet;
Attaching the top valley strip.
Personally, I chose not to install the upper valley at all. The fact is that this element is purely decorative, plus in the fall foliage gets clogged under the upper valley and it is very difficult to clear it out.
Step No. 4: how to go around the chimney
- The connection strips are the first to be attached to the chimney. You should start with the bottom bar, then the side ones go and the top one is installed last;
- The lower junction bar is equipped with a so-called tie. The tie is an ordinary smooth sheet with a flange; along it, water, which will flow down the pipe and inevitably fall under the roofing, flows into the drainage gutter or the nearest valley, so the tie can be quite large, at least half the size of the slope;
Pipes covered with corrugated sheets.
- In order for the abutment strips to fit tightly with the trunk of the chimney, small sides are bent on the top of the sheets; subsequently, these sides must fit into the grooves that we will cut along the perimeter of the chimney;
- In order to cut even grooves, first each flanging strip is applied to the installation site and a line is drawn along the upper edge with a marker;
Marking the chimney trunk for flanging grooves.
- In order to cut an even groove, it is best to use a grinder with a large diameter disk. The groove is cut along the entire perimeter of the chimney in accordance with the markings, the depth is made according to the dimensions of the curved side;
- You will get a lot of dust from the grinder, so after you cut out the groove, you need to clean it with a soft brush, rinse it well with water and wait until it all dries, otherwise the sealant will not adhere well to a wet and dirty surface;
We cut a groove on the chimney.
- Now the flange sectors are inserted one by one. Each sector is sealed with heat-resistant sealant in a groove we cut. And after that it is fixed with self-tapping screws on a wooden crate;
Fixing the edge of the flange with a self-tapping screw to the sheathing.
- After fixing all sectors of the flanging to the sheathing, you will need to once again go through all the problem areas and coat them with sealant. The area where the roof meets the chimney is the most vulnerable place for leaks;
Finished flange with tie.
- Sheets of the main covering are already installed on top of the flanging, and after installation is completed, another upper flange is installed. If the pipe is not sheathed with metal, then the technology for installing the upper flange is similar to that which I have already described above, only the lower flange here comes without a tie. The flange is attached to a pipe sheathed with corrugated sheets without sealant, simply with self-tapping screws or rivets.
Upper connection strips
Step No. 5: installing fasteners under the drain and installing the eaves strip
- On such a roof, awnings under the drain are installed even before the installation of the main covering. The drain itself should have a slope of about 3 mm per 1 linear meter. In order not to measure each plank separately, they are marked all at once, numbered and then bent;
Marking of gutter holders.
- It is best to bend the gutter holders using a bender; this tool allows you to immediately set the desired angle. Of course, at home you can use a vice and a hammer, but this will take 5 times more time;
- The strips of holders are attached to the outer paired planks of the sheathing with self-tapping screws, in increments of half a meter. Here, be careful with the numbering of the slats, the slightest mistake can throw off the angle of inclination and then water will constantly stagnate in the gutter, and what’s worse, garbage will collect;
Installation of gutter holders.
- Now you will need to decide where you will have the outlet funnel, and cut a V-shaped hole in the drain with a metal hacksaw for the outlet funnel;
Hole for outlet funnel.
- The holders have special hooks for fixing the gutter; when you insert the drain into the holders, these hooks bend and hold the gutter firmly. Plugs are installed at the ends of the gutters. The drain funnel has several hooks; it is put on the gutter from below, after which the hooks are bent at the edges of the gutter;
Installation of the outlet funnel.
- The gutters are inserted into each other and interconnected with an overlap. To ensure that the joint is held firmly and does not leak, a semicircular bracket with a rubber seal is placed on it from below; such brackets have locks that snap into place and are secured with a tongue;
- A cornice strip is mounted on top of the gutter, which should cover the edge of the drain; for reliability, such a connection is made with a hook. The upper part of the plank is fixed with self-tapping screws on the sheathing, after which the edge of the waterproofing sheet is applied and glued to it. As a result, even if water leaks under the roof, it will simply flow down the waterproofing sheet into the gutter.
Fixing the cornice strip with a hook on the edge of the gutter.
- If the roof is of impressive size, then it makes sense to install dividers and water pressure dampers in the most problematic areas of the drain, so that during a rainstorm the water does not overflow over the edge of the drain;
Divider for water under the valley.
Step No. 6: installation of metal tile sheets
- On complex roofs, before lifting the sheets up, they need to be cut on the ground. To do this, the sheet is placed on a solid base, marked and cut. Naturally, with a metal thickness of half a millimeter, the edges of the cuts should in no case be left unprotected, corrosion “eats” them very quickly;
- To protect the edges, you can use special paint in aerosol cans, which is offered by manufacturers, but I believe that this is an unnecessary “pumping” of money out of the buyer, so when I have to cut metal tiles, I put a jar of alkyd-urethane varnish next to it for exterior use, and then I immediately cover the edge of the sheet with a brush. If the varnish is used only for these purposes, then one small jar is enough to treat joints on a large roof;
Cutting metal tiles.
- Sheets of metal tiles are quite fragile; with such metal thickness and dimensions, they are very easy to damage or bend, so the material must be lifted onto the roof very carefully. The easiest way is to place 2 or 3 long logs from the ground to the roof and move the sheets upward along them.
Although this article is about how to cover a roof with metal tiles with your own hands, you don’t need to take everything so literally. To be honest, I have never seen anyone cope with such a task alone. Ideally, you will need three more assistants; their professionalism does not play a special role, the main thing is that there is someone to support and guide.
Lifting sheets along joists.
- As I already said, it is much easier to work when the length of the sheets is equal to the length of the roof slope; in this case, the first sheet is aligned along the ridge and along the edge of the roof, after which it is fixed with self-tapping screws;
Option for fastening sheets.
- All self-tapping screws used for installing metal tiles must have press washers; often the color of the screw heads is matched to the color of the roof. When fixing the sheets, the screws are driven through the wave, in a checkerboard pattern, into the lower part of the wave;
Fastening the sheets to the sheathing with self-tapping screws.
- In different models of metal tiles, the joining system of sheets may differ, but generally speaking, the sheets are joined with an overlap;
- Short sheets are mounted slightly differently than long ones; they are laid according to the batch principle. That is, 3 sheets from the edge of the roof are installed first. Then the next row is attached above them, this will count as one package. Now you move to the side and also begin to lay the second package of sheets and so on until you have sewn up the entire roof;
Schemes for laying sheets of metal tiles on the roof.
No matter how hard you try, in any case you will have to step on and walk on the already mounted sheets. Remember that the metal is thin and this should be done very carefully. Shoes should be soft, feet should be placed only at the bottom edge of the wave and it is advisable to get on the sheathing strips; their location can be easily determined by the screws.
Movement on the roof.
- Beginners often find it difficult to work with a screwdriver, or rather not even with the tool itself, but with the level of tightening of the screws. In this case, it is important to find a middle ground; you cannot overpress or undertighten the screws. There are no special recommendations here, you just need to get better at it.
Screw tightening level.
Step No. 7: installing the ridge and end strips
- Ridge strips are semicircular and triangular. From the point of view of operation, there is not much difference in them, but it is believed that semicircular strips look better, and accordingly they cost more;
- The semicircular ridge strips are closed at the ends with plugs. Plugs, in turn, also come in straight and semicircular types; in this case, semicircular plugs are used on hip-type roofs, and straight ones on standard ones;
Two types of ridge strips
- Whatever plugs you choose, they are attached with self-tapping screws. That is, bend the fastening tabs on the plug at 90º, insert it into the end of the bar and secure it with a self-tapping screw or rivet;
- First, you simply attach the strip to the ridge and place the ridge seal under it; it is adjusted to the configuration of the sheet. The ridge strip itself is screwed to the sheets of metal tiles with self-tapping screws; it must be fastened through one wave;
Fixing the ridge strip.
- Special end strips are mounted on the ends of the roof slopes. From above they are inserted under the ridge strip and immediately fixed with a self-tapping screw. Then they are fastened along the entire length with roofing screws at the same pitch as metal tile sheets.
Ridge and end strips in a complex.
Step #8:. installation of ventilation and antenna outlets on the roof
Not a single modern roof can do without installing sewer, ventilation and antenna outlets on it. The technology for installing such structures is generally similar.
The installation of a sewer drain pipe is considered the most difficult (a drain pipe is called a sewer ventilation pipe).
- All such outputs are mounted on the upper crest of the wave. The set of any such overlay contains a paper template, which serves to mark the base into which this overlay will cut. You just need to take this template, place it on the top crest of the wave and outline it with a marker;
- After this, take metal scissors and cut a straight hole in the roof, do not forget to varnish the edges of the hole;
Marking using a paper template.
- Further, the instructions instruct you to remove the metal tile sheet and mark along the inner edge of the lower seal and cut a similar hole in the waterproofing sheet with a knife;
- Now you need to generously lubricate the edges of the seal with sealant, place it under the waterproofing, bend the fastening strips and screw these strips to the roof sheathing with self-tapping screws. After which the metal tile sheet is put in place;
- Although when I was faced with the need to install a fan outlet, I did not completely remove the sheet. After the window was cut out in the metal sheet, I marked and cut out the window in the waterproofing, and then I cut off most of the fastening strips on the seal and secured the seal not on top of the sheathing, but at the end of the supporting strips. Of course, we had to tinker, but we didn’t have to completely remove the sheet of metal tile;
Attaching the lower seal to the sheathing.
- On roof slopes with large areas it is necessary to install under-roof ventilation. It is a little easier to install than a fan one. Here you only need to cut out a window in a metal sheet using a template, coat the edges of the trim with sealants and screw this trim to the roof with self-tapping screws. Since the ventilation is under the roof, there is no need to touch the waterproofing sheet;
- The antenna output is installed in approximately the same way. Here, of course, you will have to make holes in the waterproofing, but a fan pipe with a diameter of about 100 mm is one thing, and a thin tube for installing an antenna output is quite another.
Antenna output on the roof.
Step No. 9: install the snow guard and transition bridges on the roof
In most parts of our great country, heavy snowfalls in winter are not uncommon, and on roofs with serious square footage there is a need to install snow retainers.
They consist of two parallel metal tubes mounted on several vertical plates.
- The supporting strips of the snow guards are installed on the lower part of the wave and secured with several bolt-screws. To do this, you need to pre-drill several holes for bolt screws in the roofing sheets;
- The supporting strips are installed on rubber gaskets, through which bolt-screws are screwed into the roof;
- At the last stage of installation, profile tubes are inserted and fixed into special holes in the supporting strips. The snow retainer itself can be extended as long as desired;
Snow guards for roofing.
- Since the roof is usually quite steep and smooth, for safe movement on it, special transition bridges with an adjustable angle of inclination are installed. The installation of such bridges is similar to the installation of snow guards.
- The only difference is that the guide strips are attached both to the roof and to the bridge itself, after which the desired angle of inclination is set and the structure is finally fixed.
Transition bridge on the roof.
Step No. 10: arrangement of insulation
- To insulate the roof, cotton wool insulation boards are used; in this case, basalt wool is best suited. Do not confuse cotton slabs and cotton mats. The slabs have a dense structure and clear shapes, and the mats are soft insulation. Surely most of you have seen glass wool, so this is an example of a cotton mat;
- The slabs need to be cut 2 - 3 cm wider than the distance between the rafters. This is done so that the insulation fits tightly between the rafter legs;
Laying thermal insulation slabs.
- Next, a vapor barrier membrane is stretched over the insulation and stapled to the rafters; it is needed to prevent the cotton slabs from absorbing moisture;
- Keep in mind that such membranes only allow steam to pass in one direction, as indicated on the membrane itself. In this case, the direction of steam movement should be from the stove to the room. Otherwise, since we have waterproofing installed on top of the insulation, moisture will accumulate in the cotton slabs and they will eventually become unusable;
Fastening the vapor barrier membrane with a stapler.
- The interior attic space can be covered with any suitable material. Most often, owners choose between clapboard, plywood and drywall.
Roofing diagram with insulation.
Brief summary: how to cover a roof with metal tiles with your own hands
- By adhering to all installation rules, you will be able to achieve a long period of operation.
- You need to purchase all the necessary materials and tools in advance.
- To avoid inconsistencies, calculations should be made correctly.
- It will be possible to ensure the protection of a metal tile roof by installing vapor barrier and heat insulation layers, as well as ventilation.
- Before covering the roof with sheets, you need to build a frame.
- When constructing sheathing, boards and beams of specific sizes are used, taking into account the pitch of the sheets.
- An internal apron is installed in the part of the roof where the chimney outlet is located.
- The sheets are laid in a certain sequence, and fixed using self-tapping screws.
- After covering the roof with metal tiles, you can begin installing additional elements.
Having learned how to cover a roof with metal tiles with your own hands correctly, there should not be any difficulties when performing installation work. By adhering to the steps and recommendations described above, the sheets will be laid with high quality, and the roof itself will last for many years without the need for repair or replacement.
Video:
We install the roof covering
Having completed the preparation of the base, you can begin installing the roof covering. In addition to metal tile sheets, it is necessary to install special shaped elements for the roof - extensions. Those parts that are installed before laying the sheets are called internal, and those mounted on top of the metal tile covering are called external.
Installation of internal accessories
Internal extras include:
- Cornice strips. These are metal parts with a polymer coating that are installed on the eaves end of the roof. The planks are installed so that an overlap of 10 cm wide is formed between adjacent elements. The planks are secured using roofing screws, which are placed in 30 cm increments.
- Internal shaped elements of the valley. These elements are laid starting from the eaves strip upwards. They are laid with an overlap of 20-30 cm and secured to the solid flooring with self-tapping screws. A special porous sealant is placed under the side parts of the planks.
- Internal flashings and flashing strips are installed around pipes and other vertical fittings. When installing internal abutment strips, grooves are made in the vertical walls.
Advice! The grooves must be made in the brickwork; making recesses in the joints of the masonry is strictly prohibited.
Laying sheets
- The unpacked sheets of metal tiles are laid out in stacks for each slope separately.
- Leaf trimming can be done both on the ground and locally. For this work, it is convenient to use electric nibblers, but the use of an angle grinder is strictly prohibited.
Advice! If you don't have electric nibblers, you can use hand shears for cutting metal or an electric jigsaw.
- When lifting sheets onto the roof, you should use a gangway - two parallel boards installed.
- The direction of laying sheets is chosen for reasons of convenience. Only the method of forming the overlap depends on this. It is important to lay the sheets so that when an overlap occurs, the capillary groove is always at the top.
- The layout scheme is selected depending on the shape of the slopes and their sizes. So, on rectangular slopes up to 5 meters long, sheets can be laid in one row. On longer slopes, the sheets are laid in two horizontal rows. If the slopes have the shape of a triangle or trapezoid, then installation begins from the ridge.
- It is not recommended to attach each sheet separately. It is necessary to secure one sheet with one self-tapping screw, and then lay another 2-3 sheets, fastening them together to form overlaps. The finished block of 3-4 sheets is leveled and secured to the base, screwed with self-tapping screws.
- The self-tapping screws are screwed strictly perpendicularly into the deflection of the wave. It is recommended to use 6-8 screws per square meter of coating.
Installation of external extensions
The installation of external extensions completes the assembly of the metal tile covering. You need to install:
- Ridge elements. These are parts that are attached to the ridge board at the joints of the slopes at the highest point of the roof.
- Gable elements or wind strips. The elements are installed to cover the gable ends and protect the covering from being torn off by the wind.
- External valley elements and external aprons that perform a decorative function; they cover the places where metal tile sheets are cut.
So, if you wish, you can cover the roof with metal tiles yourself. But to do this, you need to carefully study the instructions and remember the rules for working with the material.