OSB (OSB) or OSB (oriented strand board) is a modern construction material that has become a serious alternative to plywood, chipboard and has found wide application in the construction of frame houses and the finishing of buildings and structures. OSB boards are used to cover interior and exterior walls, floors and roofs.
Wall cladding with OSB boards takes place in frame construction, when the board acts as a structural material and serves to strengthen the walls of a building, or when it acts as a facade material for concrete, brick or wooden houses, which is caused by the low price and high strength and durability of the material. In this article we will look at the question: how to attach OSB boards to the wall from the outside.
For cladding external walls, it is necessary to use OSB-3 boards, specially made for environments with high humidity. You can find out how different types of OSB sheets differ on the page: OSB sheets, their types, characteristics, sizes.
When installing OSB boards to external walls, sheathing is used for the following purposes:
- leveling the wall plane;
- creating a ventilation gap for insulation under the OSB board;
- preventing slab deformation caused by base movements, especially important for OSB slabs with a thickness of 9 mm or less.
Fastening OSB boards to the wall over insulation using lathing
The slab is fastened to the wall using lathing, which is made from a wooden block or metal profile. The technologies for installing OSB boards on a wall with wooden sheathing and sheathing made of metal profiles are not fundamentally different. When choosing a block, it is advisable to choose a dry, planed block of 40-50 mm, then it will not twist or move after drying, which will have a positive effect on the evenness of the entire wall.
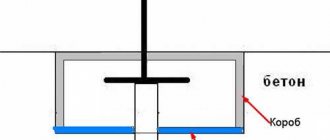
To attach the bar and profile to the wall, special metal plates (hangers) are used. Before attaching the hangers, it is necessary to draw vertical stripes on the wall, the distance between which should be half the width of the sheet, which will subsequently ensure the joint of the slabs right in the middle of the bar or profile and will make it possible to fix the OSB slab in the center along its entire length. After the lines are drawn, hangers are attached along them in increments of 30-40 cm.
A metal hanger is used to secure the sheathing.
Suspensions are attached along the marked lines.
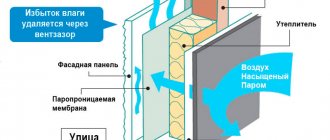
Hangers allow you to secure the sheathing over the insulation. After this, the insulation is laid and covered with a membrane that protects the insulation from moisture, after which the sheathing is installed.
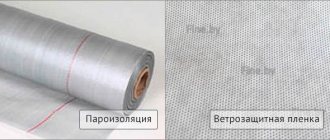
It should be noted that a vapor barrier is not needed on the outside of the building, since it prevents moist air from entering the insulation from inside the room, and from the outside of the building, excess moisture should freely escape outside.
Wall with sheathing. Insulation is laid between the sheathing and the wall.
After securing the sheathing, you can begin installing the OSB boards. For wall cladding, a slab with a thickness of 9 to 12 mm is most often used. If a facade is not mounted on top of the slab, then the slab must be moisture resistant. OSB slabs are attached to the wooden beam sheathing with nails at least 2.5 times longer than the thickness of the OSB sheet. For metal profile sheathing - use metal screws 10-15 mm longer than the thickness of the OSB sheet.
With this installation, the sheathing weighs above the insulation and does not create cold bridges in the insulation between the wall and the OSB boards. Thanks to this solution, maximum efficiency of the insulation is achieved. In addition, between the sheathing beams there is an air gap through which moisture is removed from the insulation, which also improves its performance.
Area of application of the material
Recently, OSB products have been widely used in various fields.
Recently, OSB products have been widely used in various areas, for example:
- in the production of furniture and packaging;
- for interior decoration of cars and trucks;
In construction, you cannot do without this product. Thanks to its unique manufacturing technology, the slab does not deform, does not shrink, and also allows you to hide all internal defects. If we consider the use of slabs in the context of work, it is used for:
- Sheathing the walls of the house, which provides greater protection to the structure from the penetration of moisture, dampness, and also additionally insulates the walls. After covering, the product does not require finishing work. The construction of frame-panel structures, OSB increases the moisture resistance of the structure. The slab can be used in the construction of reusable formwork.
- External wall cladding. It is used as a base, and for interior work it serves as a finishing material.
- Manufacturing of sheathing, rafters and roofing. The slab can withstand any load and the weight of the roof itself.
- Leveling the floor covering or laying it from scratch. This material is an ideal option for obtaining a durable and even floor.
For information! If the OSB product is located outside the building and needs to be painted, difficulties may arise, because... the coating used must reliably protect the product from external factors (wind, precipitation, sun rays).
Fastening OSB boards to a wooden frame
When building frame houses, recommendations for choosing sheets are the same as for covering previously constructed walls. The only difference is when the sheets act as a rigidity element. In this case, their thickness must be at least 12 mm. The recommended thickness is usually 15-18 mm.
When installing walls with a wooden frame, two main approaches are used: attaching OSB sheets to the frame through the sheathing and attaching OSB sheets directly to the frame without sheathing. Let's look at both.
How to attach slabs to a frame using sheathing
When strong slabs are attached to the frame on the inside of the wall, ensuring good rigidity of the wall structure, then a sheathing can be made on the outside between the frame and the OSB board. The sheathing forms air cavities for ventilation of the insulation and reduces the deformation loads from the frame to the OSB board.
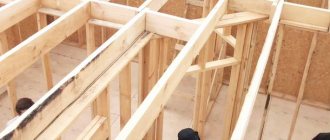
Insulation is laid between the frame posts. A wind and waterproofing membrane is attached over the studs and insulation, which easily allows moisture to pass through. Next, the sheathing and OSB boards are attached to it.
Installation of OSB boards on a wooden frame with sheathing.
With this design, the slabs can be left unfinished; you can paint them, plaster them, or attach almost any façade material to them.
When fastening OSB boards without using sheathing, maximum rigidity of the wall structure is achieved. In this case, it is recommended to attach the wind and waterproof membrane behind the OSB board, then install the sheathing to create a ventilation gap and install facade material on it, such as siding, boards or decorative panels. OSB boards are attached to a wooden frame with nails at least 2.5 times longer than the thickness of the OSB sheet.
The advantage of using nails over self-tapping screws when fastening OSB on the outside of a house is justified by the fact that nails better tolerate deformation of OSB sheets under atmospheric influences.
Installation of OSB on the walls of a frame house without sheathing
Among the methods of providing rigidity to the frame, three methods are considered optimal, which can be combined with each other:
- Fastening sheet materials to frame posts inside the house;
- Jib joints between frame posts;
- Fastening sheet materials to frame posts outside the house.
When OSB sheets are mounted to the frame posts outside the house, the sheathing between the sheets and the frame posts leads to a reduction in rigidity by almost half. Therefore, to ensure maximum structural strength, this sheathing is excluded from it. Without the sheathing, the ventilation gap disappears, so it is recommended to attach such sheathing on top of OSB sheets. A waterproof, vapor-permeable film is attached to the OSB, then a sheathing, and on top of any suitable facade material: siding, corrugated board, wood, facade panels, and so on.
Technology for attaching OSB sheets to a wooden frame without using sheathing.
So, for example, when building a frame house using the Finnish “Platform” technology, there is no sheathing between the frame and the OSB frames. You can find out more about this technology in the article: construction of a frame house using the “Platform” technology.
The option described above is preferable. But there are other ways. When it is necessary for OSB sheets attached to the racks to act as a facade, and nothing is mounted on top of them, then a ventilation gap can be created between the frame racks. For this purpose, the space between the frame posts is not completely filled with insulation. Leave 2-3 cm for a ventilation gap between the insulation and the OSB sheets. The waterproof, vapor-permeable film is attached to the frame using slats. So that these slats remain between the racks - on two sides to each rack.
Ventilation gap when attaching OSB sheets directly to frame posts
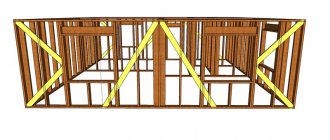
A compromise option is to use oblique sheathing. It is laid at an angle of 45 degrees. This helps to increase rigidity compared to straight sheathing. To increase rigidity, boards 25 mm thick are better suited for such sheathing. The board is attached to each frame post with two nails. Due to the increased consumption of materials and the complexity of the work, this method is used extremely rarely, so there is no statistical information on the performance characteristics of built houses.
Oblique sheathing.
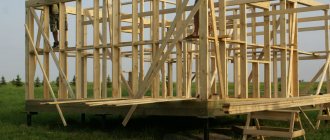
Temporary elements
Temporary jibs support the walls after they are erected until they are permanently secured to the floor joists and the sheathing is installed.
Expert opinion
Mikhail Fromov
Construction of houses, extensions, terraces and verandas.
Temporary miters are not installed flush; they are attached from the outside so that they can be easily removed without compromising the appearance or strength of the structure.
There is a widespread opinion among people that installing jibs is a waste of time and money - a harmful myth. Their absence shortens the life of the house, making it vulnerable to climatic conditions and wind loads. This is a necessary element of a reliable building frame, responsible for its rigidity; savings are inappropriate. In most cases, it cannot be replaced with sheathing. In order for the jib to cope with its task, it is necessary to strictly follow all the rules when installing it.
Projects of frame houses for self-assembly: One-story houses from 145 to 780 thousand rubles.
Frame house KD-3
7.5x12 (75)90m2 one-story
437t.r. Frame house KD-4 10x13 126m2 one-story 680t.r. Frame house KD-14 5x6 30m2 one-story 221t.r. Frame house KD-16 4x5 20m2 one-story 151t.r. Frame house KD-31 6x6 36m2 one-story 238t.r. Frame house KD-32 6x7 42m2 one-story 287t.r. Frame house KD-33 7.5x10 75m2 one-story 417t.r. Frame house KD-34 7.5x10.5 78(88) m2 one-story 510 t.r. Frame house KD-35 8(9.5)x10.6 91(98)m2 one-story 543t.r. Frame house KD-37 6(8.5)x10.6 68(90)m2 one-story 428t.r. Frame house KD-38 6(7.5)x10 66m2 one-story 440t.r. Frame house KD-42 8x9.2 73m2 one-story 435t.r. Frame house KD-43 10x16.5 162m2 one-story 888t.r. Frame house KD-44 9x12 108m2 one-story ???t.r. Frame house KD-45 9x12 108m2 one-story 645t.r. Frame house KD-47 8x12 96m2 one-story 592t.r. Frame house KD-63 6x6 24m2 one-story 208t.r. Frame house KD-65 6.5x10 65(85)m2 1st floor. pitched roof 454t.r. Frame house KD-68 8x9.3(12.3) 74(98)m2 1st floor. double house 432t.r. Frame house KD-421 8x9.2 73(92) m2 one-story 475 t.r. Frame house KD-432 10x16.7 162 m2 one-story duplex 909 t.r. Frame house KD-451 9x12 108(130) m2 one-story 665 t.r. The price includes: insulation 150-200-250mm min. cotton wool and before. fine finishing. Monolithic strip foundation (MZLF) h50cm x w40cm + 50-80 t.r.
Two-story houses and houses with an attic from 320 to 1021 thousand rubles.
Frame house KD-1
6x10 105m2 with a warm attic
444t.r. Frame house KD-2 6x10.5 121m2 with a warm attic 547t.r. Frame house KD-6 13.2x16.2 308 m2 Chalet + Spa area 1715 rub. Frame house KD-8 8.5x9.7 148 m2 with a warm attic 702 t.r. Frame house KD-9 10.5x13 192 m2 two-story 1026 t.r. Frame house KD-11 6x10 102 m2 with a warm attic 425 t.r. Frame house KD-12 6x7 84m2 with a warm attic 361t.r. Frame house KD-15 6x7.4 89 m2 with a warm attic 414 t.r. Frame house KD-17 6x6 72m2 with a warm attic 347t.r. Frame house KD-18 8x7.4 89(118) m2 with a warm attic 513t.r. Frame house KD-21 6x10 120m2 with a warm attic 543t.r. Frame house KD-22 8.4x10.5 172 m2 with a warm attic 722 t.r. Frame house KD-23 8.4x10 168 m2 with a warm attic 734 t.r. Frame house KD-24 8.4x10 167m2 with a warm attic 829t.r. Frame house KD-25 8.8x11.7 198 m2 with a warm attic 927 t.r. Frame house KD-26 6x10 137 (156) m2 with a warm attic 678 t.r. Frame house KD-27 8.4x11 195 m2 with a warm attic 955 t.r. Frame house KD-28 8x9 147 m2 with a warm attic 744 t.r. Frame house KD-29 8x8 128 m2 with a warm attic 631 t.r. Frame house KD-81 9.5x9.5 180m2 with a warm attic 854t.r. Frame house KD-92 9x9 168m2 with a warm attic 853t.r. Frame house KD-93 9.5x9.5 180m2 with a warm attic 817t.r. Frame house KD-96 10.5x13 242 m2 two-story 1114 t.r. Frame house KD-97 9x10 176m2 with a warm attic ???t.r. Frame house KD-151 6x10 104m2 with a warm attic 519t.r. Frame house KD-171 6x8 84m2 with a warm attic 403t.r. Frame house KD-172 6x10 96m2 with a warm attic 428t.r. Frame house KD-211 6x10 120(138) m2 with a warm attic 603t.r. Frame house KD-212 6x10 120(135) m2 chalet with a warm attic 612t.r. Frame house KD-219 6x9 108m2 with a warm attic 516t.r. Frame house KD-231 8.4x10 168 (186) m2 with garage and warm attic 795 t.r. Frame house KD-237 7x10 140m2 with a warm attic 655t.r. Frame house KD-252 8.8x11.7 198 m2 duplex with attic 920 t.r. Frame house KD-271 8.4x11 195 (233) m2 with garage 1081 t.r. Frame house KD-292 8x8 128 m2 with a warm attic 580 t.r. Frame house KD-901 10.5x13 192 (223) m2 two-story with garage 1181 t.r. The price includes: insulation 150-200-250mm min. cotton wool and before. fine finishing. Monolithic strip foundation (MZLF) h50cm x w40cm + 50-80 t.r.
Small architectural forms - baths, garages, etc. from 8 to 327 thousand rubles.
Frame bathhouse KD-7
4x5 20m2 including fireplace stove
210t.r. Frame toilet KD-51 1.2x1.3 1.3m2 beautiful and comfortable 10.2t.r. Frame utility block/house KD-52 2(3)x4 8(12)m2 with terrace 25t.r. Frame utility block/change house KD-53 3x4(12)m2 5(15)m2 lean-to 37t.r. Frame garage KD-55 7x7 49m2 garage 187t.r. Play complex KD-58 1.7x1.7 2.9 m2 with swings 18.6 t.r. Frame house/bath KD-63 6x6 24m2 one-story 217t.r. Frame house with bathhouse KD-65 6.5x10 65(85)m2 1st floor. pitched roof 474t.r. Frame bathhouse KD-71 6x6 36(44) m2 with terrace 266 t.r. Frame bathhouse KD-73 6x6 72m2 with a warm attic 358t.r. Frame bathhouse KD-75 6(9)x8.7 52(78)m2 with terrace 380t.r. The price of the bath includes: insulation 100-200mm min. cotton wool and before. fine finishing. Monolithic strip foundation (MZLF) h50cm x w40cm + 10-50 t.r.
Catalog of all projects with detailed descriptions and prices
Home Library Jib beams in a frame house: necessity or myth?
necessity or myth?
There is an opinion that jibs are not needed in a frame house, and that they can be completely replaced by exterior decoration. Unfortunately, this is not entirely true, and if for small buildings, such as a utility block, they can not be used, provided they are finished with slab material, then for a residential building they are required.
It is the jibs that are needed, and not the spacers between the racks, which illiterate builders are trying to replace them with, without taking into account the physics of processes and loads. Such spacers only eliminate the “spring” effect of the board. They are used when the height of the rack is more than 3 m with a section of 50*150, or when using boards of small thickness 40x150 mm, for a house of more than one floor. Spacers do not add spatial rigidity to the frame, only vertical rigidity.
For spatial rigidity, it is necessary to use jibs, preferably solid or wooden ones, although standards allow for small buildings the use of flexible diagonal ties made of metal strips, plates and studs.
The ideal installation angle for the jib is 45 degrees, but it is not always possible to install them at this angle. Adjacent walls, windows and doorways reduce the installation angle to 60 degrees or more. This can be compensated for by a large number of installed jibs on one wall.
In our projects, on walls over 6 m long, we place 4 jibs at an angle of 50-60 degrees; on walls of greater length, there can be more jibs and at an angle closer to 45 degrees.
General rules for installing OSB boards to the wall
Regardless of the chosen method of fastening OSB sheets, there are general rules, compliance with which will ensure maximum strength, reliability and durability of the sheathing structure.
- Self-tapping screws should be screwed in at a distance of 10-15 cm from each other and at least 1 cm from the edge of the slab.
- A 10 mm gap is required between the bottom slab and the foundation to prevent water accumulation.
- The slabs cannot be joined closely to each other; a gap of 2-3 mm is required between them so that the slab can expand freely due to changes in humidity.
- All door and window openings are cut out with a jigsaw or a circular saw, but if you need perfectly even joints and cuts, then you can take ready-made sizes and OSB sheets to a furniture shop, where for a small fee they will cut your sheets on a format-cutting machine evenly and precisely to size .
Jib beams in a frame house are a necessity!
If you still doubt the installation of jibs when building a house and hope that they can be replaced with sheet sheathing or slabs (chipboard, OSB), then on the Internet you can find a lot of photographs of houses without jibs that refutes your hopes.
Let's look at the benefits of using jib beams when building a house:
- Without the use of these parts, the frame and the entire house will not have sufficient reliability and durability.
- Prevent deformation and damage to the external and internal decoration of the house.
- Eliminates the “walking” of inter-wall insulation.
- Stabilizes the house and prevents it from folding.
- Wind load, “snow” load lying on the roof, and static load from the roof itself are distributed evenly over the entire frame structure of the house.
Which side to mount OSB sheets
All sides of OSB sheets do not differ in composition. But there are differences in the surfaces. Often one side is smooth and the other is rough. In this case, when installing slabs on walls on the outside of a building, it is better to mount the sheets with the smooth side out. With this orientation, rainwater will not accumulate in such quantities in the uneven areas of the slab. Water helps accelerate the destruction of the slab. Protecting sheets from water penetration helps increase their durability.
When installing slabs on the roof under the roof, in turn, it is recommended to place OSB sheets with the rough side up so that they are not slippery to walk on during roof installation work.
When installing OSB boards in places protected from moisture, the choice of their orientation does not have a significant impact on subsequent operation.
Protecting the wall from mice, birds and insects
In most cases of installation of OSB sheets outside the house, a ventilation gap is provided. Air moves along it, which enters from the bottom of the wall from the surrounding space and exits from above back into the atmosphere. Blind sealing of ventilation gaps on any side is not acceptable. Otherwise, instead of a ventilation gap, you get a closed air cavity.
Wasps, mice, and small birds can enter the ventilation gap and build nests there, thereby violating the characteristics of the wall. Therefore, it is recommended to provide protection at the stage of its construction or repair.
There are several options for protecting the wall from rodents, birds and insects, let's look at them.
- Protection using metal mesh and sheet metal with small holes. It is better to use stainless metal that will not corrode. Mesh or strips of metal are attached to the bottom and top of the wall behind the OSB sheets so that they do not affect the appearance of the house.
- Painting mesh. Differs from the previous version in low price and less strength.
- Perforated facade material at the bottom and top of the wall. For example, in the case of siding, these are perforated soffits.
Grilles or meshes are mounted at the inlet and outlet of ventilation gaps.
After installing the OSB sheets, you can begin sealing the seams and further finishing. You can learn about how to properly seal gaps, what sealing material and in what cases to choose in a separate article: correct sealing of OSB joints.